Table of Contents

Related Manuals for Gardeo GTHE510SP


Summary of Contents for Gardeo GTHE510SP
- Page 1 GTHE510SP FR TAILLE-HAIES ELECTRIQUE TRADUCTION DES INSTRUCTIONS D’ORIGINE NL HEGGENSCHAAR VERTALING VAN DE ORIGINELE INSTRUCTIES GB HEDGE TRIMMER ORIGINAL INSTRUCTIONS S18 M05 Y2016...
- Page 3 FR TAILLE-HAIES ELECTRIQUE INFORMATIONS DE SÉCURITÉ......................Sécurité au travail ............................ Sécurité électrique ........................... Sécurité personnelle ..........................Fonctionnement ............................Consignes spéciales de sécurité ......................Préparatifs ..............................Fonctionnement ............................Maintenance et stockage .......................... Consignes de sécurité supplémentaires ....................Risques résiduels ............................. Réparations .............................. Utilisation prévue .............................
-
Page 4: Informations De Sécurité
INFORMATIONS DE SÉCURITÉ l’intérieur d’un outil augmentera le risque de choc Utilisation électrique. L’outil de jardinage est conçu pour découper et tailler des haies et des buissons dans des jardins Ne pas maltraiter le cordon. Ne jamais utiliser domestiques et de plaisance. Cet outil est destiné à le cordon pour porter, tirer ou débrancher l’outil. - Page 5 S’habiller de manière adaptée. Ne pas porter Maintenance et entretien de vêtements amples ou de bijoux. Garder les cheveux, les vêtements et les gants à distance Faire entretenir l’outil par un réparateur des parties en mouvement. qualifié utilisant uniquement des pièces de Des vêtements amples, des bijoux ou les cheveux rechange identiques.
- Page 6 Avant de déposer l’outil électroportatif, attendez que celui-ci soit complètement à l’arrêt. Ne jamais tenir le taille-haies sur le dispositif de protection. Durant le service, aucune autre personne ni animal ne doit se trouver dans un rayon de 3m Lors du travail avec le taille-haies, veiller à autour de l’appareil.
- Page 7 ATTENTION : Pour votre propre sécurité, il est nécessaire que la fiche montée sur l’outil de jardin soit raccordée à la rallonge. Le dispositif de couplage de la rallonge doit être protégé des projections d’eau, être en caoutchouc ou être recouvert de caoutchouc. La rallonge doit être utilisée avec un serre-câble.
- Page 8 Avertissements supplémentaires FONCTIONNEMENT • Ne surchargez pas l'équipement. Veillez à utiliser l'outil électrique approprié pour le travail à exécuter. Si vous utilisez l'outil électrique approprié, il vous sera plus facile de travailler dans la plage de puissance spécifiée. - et cela augmentera également la sécurité. •...
- Page 9 PRÉPARATIFS • Ne laissez jamais des enfants utiliser l'équipement. • Faites attention aux câbles électriques en hauteur. • Évitez de travailler lorsque d'autres personnes, en particulier des enfants, sont à proximité. • Pensez à porter des vêtements appropriés ! Ne portez pas de vêtements amples ni de bijoux, ceux-ci étant susceptibles d'être entraînés par des pièces de machine en mouvement.
-
Page 10: Maintenance Et Stockage
MAINTENANCE ET STOCKAGE • Mettez l'équipement hors service et attendez qu'il soit arrêté et qu'il ait refroidi avant de le nettoyer, de le ranger ou de le transporter pour y effectuer des contrôles ou d'y travailler. • Montez toujours le protège-lame lorsque transportez ou rangez l'équipement. CONSIGNES DE SÉCURITÉ... -
Page 11: Risques Résiduels
AVERTISSEMENT ! N'utilisez pas l'équipement si vous êtes fatigué ou malade ou si vous êtes sous l'influence de l'alcool ou de médicaments. • Maintenez toujours l'équipement par les deux poignées lorsque vous l'utilisez. Ayez une prise solide sur chaque poignée. •... -
Page 12: Utilisation Prévue
RÉPARATIONS • Utilisez uniquement des accessoires et pièces de rechange recommandés par le fabricant. • Si l'équipement ne fonctionne pas malgré nos contrôles de qualité et une maintenance soigneuse de votre part, vous devriez le laisser réparer par un électricien qualité. •... - Page 13 SYMBOLES Lisez attentivement le mode d'emploi avant d'utiliser l'équipement pour la première fois ! L'outil électrique est à double isolation. Tirez immédiatement la fiche de la prise de courant si le câble est endommagé ou a été coupé ! N'exposez pas l'équipement ou à l'humidité et ne l'utilisez pas dans de telles conditions ! Avertissement ! Utilisez l'équipement de protection personnelle ! Utilisez toujours des lunettes de sécurité...
-
Page 14: Caracteristiques Techniques
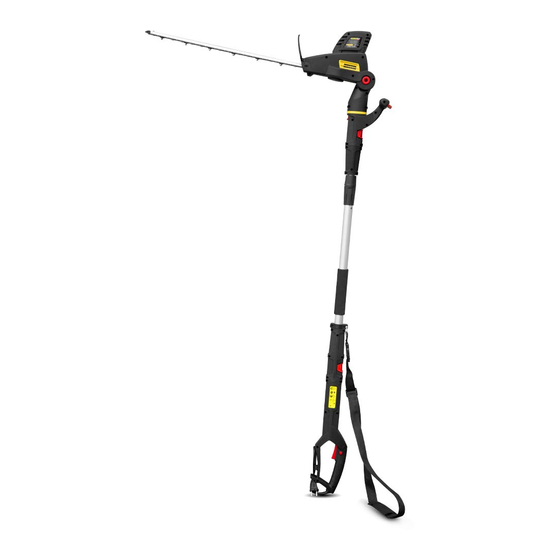
Dents/lames acérées ! Faites attention à vos doigts et orteils ! Avertissement ! Risque de choc électrique ! Gardez une distance de 10 mètres avec les câbles aériens. CE Conformément aux normes Européennes d’application en matière de sécurité CARACTERISTIQUES TECHNIQUES Tension nominale 230-240 V ~ 50 Hz Puissance... - Page 15 toutes les parties constituantes du cycle de fonctionnement, telles que les temps d'arrêt de l'outil et de fonctionnement au repos, en plus du temps de déclenchement). DESCRIPTION PAGE 2 Lames Verrouillage de démarrage Protection Manche télescopique Accouplement télescopique à libération Poignée avant rapide Bouton de réglage d'angle...
- Page 17 Montage de la sangle d'épaule Fermez la boucle. Ajustez la longueur de la sangle d'épaule à l'aide de la boucle coulissante. Réglez la sangle d'épaule à la longueur requise pour une attitude de travail confortable. Placez la sangle d'épaule sur l'épaule droite. Portez l'équipement du côté droit. Pour retirer la sangle d'épaule, appuyez des deux côtés de la boucle et retirez la sangle d'épaule.
-
Page 18: Mise En Service Et Hors Service
FONCTIONNEMENT MISE EN SERVICE ET HORS SERVICE Taille-haie télescopique Connectez un prolongateur à la fiche du taille-haie. Faites passer le prolongateur à travers le support de câble et fixez-le au crochet. Lorsque vous désirez démarrer le taille-haie, appuyez d'abord sur le verrouillage de démarrage et ensuite sur l'interrupteur. - Page 19 Réglage du manche télescopique Coupez l'alimentation du taille-haie. Tournez la bague de blocage dans le sens contraire des aiguilles d'une montre pour libérer le verrouillage de démarrage. Ajustez le manche télescopique à la longueur désirée. Tournez la bague de blocage dans le sens des aiguilles d'une montre pour verrouiller le manche télescopique.
-
Page 20: Conseils De Coupe
CONSEILS DE COUPE AVERTISSEMENT ! Maintenez toujours le taille-haie à deux mains lorsqu'il est en fonctionnement. Ne tenez jamais de branches d'une main en manœuvrant le taille-haie de l'autre main. Si vous le faites, vous pourriez vous retrouver avec de graves blessures. •... - Page 21 N.B. : Mettez le taille-haie hors service et débranchez la fiche de la prise de courant avant de nettoyer, contrôler, effectuer de la maintenance ou travailler sur le taille-haie. Vous devez connecter le taille-haie uniquement sur des prises 230 V (courant AC monophasé). Contrôlez que la tension d'alimentation du réseau correspond à la tension nominale de l'outil.
-
Page 22: Maintenance
Périodes recommandées pour tailler une haie • Haies de feuillus : juin et octobre. • Haies de sapin : avril et août. • Haies de conifères et autres haies çà croissance rapide : à partir de mai, environ toutes les six semaines. •... -
Page 23: Garantie
STOCKAGE • Retirez tous les objets étrangers de l'équipement. • Rangez l'équipement en intérieur, dans un endroit sec avec une bonne ventilation. • Maintenez l'équipement hors de portée des enfants. •Ne rangez pas de produits corrosifs tels que des produits chimiques de jardin et du sel de déneigement près de l'équipement. -
Page 24: Service Après-Vente
Vous trouverez des vues éclatées ainsi que des informations concernant les pièces de rechange également sous : www.eco-repa.com Les conseillers techniques et assistants GARDEO sont à votre disposition pour répondre à vos questions concernant nos produits et leurs accessoires : sav@eco-repa.com ENTREPOSAGE _ Nettoyez soigneusement toute la machine et ses accessoires. - Page 25 NL HEGGENSCHAAR VEILIGHEIDSINFORMATIE ........................Veiligheid op het werk ..........................Elektrische veiligheid ..........................Persoonlijke veiligheid ..........................Bediening ..............................Speciale veiligheidsinstructies ........................Voorbereiding ............................Bediening ..............................Onderhoud en Opslag ..........................Bijkomende veiligheidsinformatie ......................Overblijvende risico’s ..........................Herstellingen ............................. Voorzien gebruiksdoel ..........................SYMBOLEN .............................. TECHNISCHE GEGEVENS........................
- Page 26 VEILIGHEIDSINFORMATIE Voorkom aanraking van het lichaam met Beoogd gebruik geaarde oppervlakken, bijvoorbeeld van buizen, verwarmingen, fornuizen en koelkasten. Er Het tuingereedschap is bestemd voor het knippen bestaat een verhoogd risico door een elektrische en snoeien van heggen en struiken in de tuin voor schok wanneer uw lichaam geaard is.
- Page 27 Voorkom per ongeluk inschakelen. Controleer Verzorg het elektrische gereedschap dat het elektrische gereedschap uitgeschakeld zorgvuldig. Controleer of bewegende delen van is voordat u de stekker in het stopcontact steekt het gereedschap correct functioneren en niet of de accu aansluit en voordat u het vastklemmen en of onderdelen zodanig gereedschap oppakt of draagt.
- Page 28 Extra waarschuwingen Controleer dat alle meegeleverde grepen en veiligheidsvoorzieningen bij het gebruik van de Dit gereedschap is er niet voor bestemd om te heggenschaar gemonteerd zijn. Probeer het worden gebruikt door personen (inclusief kinderen) gereedschap nooit in gebruik te nemen met beperkte fysieke, zintuigelijke of geestelijke als het onvolledig gemonteerd is en evenmin met vermogens of gebrekkige ervaring en/of gebrekkige...
- Page 29 LET OP: Voor uw veiligheid is het noodzakelijk dat de aan het tuingereedschap aangebrachte stekker met de verlengkabel wordt verbonden. De stekker van de verlengkabel moet tegen spatwater bestemd zijn en uit rubber bestaan of met rubber bekleed zijn. De verlengkabel moet met een trekontlasting worden gebruikt.
-
Page 30: Speciale Veiligheidsinstructies
Extra waarschuwingen BEDIENING • Zorg dat u het werktuig niet overbelast. Zorg dat u het juiste werktuig voor de uit te voeren werkzaamheden gebruikt. Als u het gepaste werktuig gebruikt, zal het gemakkelijker voor u zijn om binnen het gespecificeerde vermogensbereik te werken - en ook de veiligheid zal worden verhoogd. - Page 31 VOORBEREIDINGEN • Laat kinderen nooit het werktuig gebruiken. • Let op voor overhangende elektriciteitsdraden. • Vermijd te werken als andere mensen, in het bijzonder kinderen, in de buurt zijn. • Denk eraan van gepaste werkkledij te dragen! Draag geen loszittende kleding of juwelen, aangezien deze verstrikt kunnen raken in de bewegende delen van het werktuig.
-
Page 32: Onderhoud En Opslag
ONDERHOUD EN OPSLAG • Schakel het werktuig uit en wacht tot het is gestopt en afgekoeld vooraleer u het reinigt, opbergt of eventuele inspecties of werkzaamheden aan uitvoert. • Plaats de beschermkap steeds op het trimblad als u het werktuig moet vervoeren of opbergen. BIJKOMENDE VEILIGHEIDSINFORMATIE •... - Page 33 WAARSCHUWING! • Gebruik het werktuig niet als u vermoeid of ziek bent, of als u onder de invloed van alcohol of van geneesmiddelen bent. • Houd het werktuig steeds met beide handen vast bij elk gebruik. Zorg dat u een stevige greep krijgt op elke hendel.
- Page 34 HERSTELLINGEN • Gebruik alleen accessoires of wisselstukken die worden aangeraden door de fabrikant. • Als het werktuig niet werkt ondanks onze kwaliteitscontroles en ondanks zorgvuldig onderhoud van uw kant, moet u het laten herstellen door een bekwame elektricien. • Als de stroomkabel van het werktuig beschadigd is, moet deze worden vervangen door de fabricant, of door iemand met vergelijkbare kwalificaties.
- Page 35 SYMBOLEN Lees de gebruiksinstructies aandachtig door vooraleer u het werktuig voor het eerst gebruikt! Dit elektrisch werktuig is dubbel geïsoleerd. Trek de stekker onmiddellijk uit als de kabel beschadigd is of werd afgesneden! Stel het werktuig niet bloot aan regen of vochtigheid en gebruik het niet in vochtige omstandigheden! Waarschuwing! Gebruik persoonlijke beschermingsuitrusting! Gebruik steeds een veiligheidsbril...
-
Page 36: Technische Gegevens
Scherpe tanden/trimbladen! Let goed op dat u geen vingers of tenen verliest. Waarschuwing! Hoog risico van elektrische schok! Blijf op een afstand van 10 meter van ondergrondse bedrading. CE Conform de Europese toepasselijke standaarden op het gebied van veiligheid. TECHNISCHE GEGEVENS Nominale spanning 230-240 V~50 Hz Vermogen... - Page 37 BESCHRIJVING PAGINA 2 Trimbladen Startvergrendeling Beschermkap Telescopische stang Voorste handgreep Snelontgrendeling telescopische koppeling Hoekverstelknop Schouderriem Snelontgrendeling telescopische koppeling Kabel Kabelklem Trimbladbeschermkap Schakelaar op de achterste hendel Schakelaar op de voorste hendel Borgring voor afstelling telescopische stang Achterste hendel ASSEMBLAGE De telescopische stang aanbrengen Open de snelontgrendelingskoppeling op de telescopische stang.
- Page 38 Aanbrengen van de schouderriem Klik de gesp vast. Pas de lengte van de schouderriem aan met behulp van de schuifgesp. Maak de schouderriem zo lang als nodig voor een comfortabele werkhouding. Leg de schouderriem over de rechter schouder. Draag het werktuig aan uw rechterzijde. Om de schouderriem af te nemen moet u beide zijden van de gesp naar onder duwen en de schouderriem wegtrekken.
- Page 39 BEDIENING STARTEN EN UITSCHAKELEN Telescopische haagtrimmer Sluit een verlengkabel aan op de stekker van de haagtrimmer. Trek de verlengkabel doorheen de kabelklem en maak deze vast aan de haak. Als u de haagtrimmer wilt starten, druk dan eerst op de startvergrendeling en druk dan op de schakelaar. Als u de haagtrimmer wilt uitschakelen, laat de schakelaar dan opnieuw los.
- Page 40 De telescopische stang afstellen Trek de stekker van de haagtrimmer uit. Verdraai de vergrendelring linksom om de startvergrendeling te ontgrendelen. Stel de telescopische stang in op de gewenste positie. Verdraai de vergrendeling rechtsom om de telescopische stang te vergrendelen. De hoek aanpassen Trek de stekker van de haagtrimmer uit.
- Page 41 HAAGTRIMTIPS WAARSCHUWING! Houd de haagtrimmer steeds met beide hendels vast als de motor draait. Houd nooit struiken met één hand vast terwijl u de haagtrimmer met de andere hand beweegt. Doet u dit toch, dan kunt u ernstige kwetsuren oplopen. •...
- Page 42 N.B.: Schakel de haagtrimmer uit en trek de stekker uit vooraleer u reinigingswerken, inspecties, onderhoud of werken aan het werktuig uitvoert. U mag de haagtrimmer alleen aansluiten op 230V stopcontacten (1-fase stekkers met netvoeding). Controleer of de netspanning wel overeenkomt met de nominale spanning van het werktuig.
- Page 43 Aanbevolen periodes voor haagtrimwerkzaamheden • Bebladerde hagen: Juni en oktober. • Sparrenhagen: April en augustus. • Naaldboomhagen en andere snelgroeiende hagen: vanaf mei, ongeveer om de zes weken. • Jonge hagen moeten vaker worden getrimd om ze dichter begroeid te maken. Hoe vaak de hagen daarna moeten worden getrimd zal afhangen van hoe sterk ze groeien.
- Page 44 Onze klantenservice beantwoordt uw vragen over reparatie en onderhoud van uw product en over vervangingsonderdelen. Explosietekeningen en informatie over vervangingsonderdelen vindt u ook op :www.eco- repa.com Het GARDEO-team voor gebruiksadviezen helpt u graag bij vragen over onze producten en toebehoren : sav@eco-repa.com...
- Page 45 OPSLAG Reinig zorgvuldig de gehele machine en het toebehoren. Berg de machine op buiten het bereik van kinderen, in een stabiele en veilige positie en op een droge plaats met een gematigde temperatuur. Vermijd te hoge en te lage temperaturen. Bescherm de machine tegen direct invallend licht.
- Page 46 HEDGE TRIMMER SAFETY INFORMATION ........................Safety at work ............................Electrical safety ............................Personal safety ............................Operation ..............................Special safety instruction .......................... Preparations ............................. Operation ..............................Maintenance and storage ......................... Additional safety information ........................Residual risks ............................Repairs ..............................Intended use ............................SYMBOLS ..............................
-
Page 47: Safety Information
SAFETY INFORMATION cord suitable for outdoor use reduces the risk of Intended use electric shock. The machine is intended for cutting and trimming hedges and bushes in domestic use. If operating a power tool in a damp location is unavoidable, use a residual current device General Power Tool Safety Warnings (RCD) protected supply. - Page 48 Hold the power tool by insulated gripping Power tool use and care surfaces only, because the cutter blade may contact hidden wiring or its own cord. Cutter Do not force the power tool. Use the correct blades contacting a “live” wire may make exposed power tool for your application.
- Page 49 Know how to stop the hedgecutter quickly in an The coupling of the extension cord must be emergency. protected against splash water, be made of rubber or coated with rubber. The extension cord must be Cut a hedge only in daylight or in good artificial used with a cable strain relief.
- Page 50 away from moving parts. Loose clothes, jewellery Electrical safety or long hair can be caught in moving parts. Power tool plugs must match the outlet. Never If devices are provided for the connection of modify the plug in any way. Do not use any dust extraction and collection facilities, ensure adapter plugs with earthed (grounded) power these are connected and properly used.
- Page 51 not operate with a damaged or excessively worn Carry the hedge trimmer by the handle with cutting device. the cutter blade stopped. When transporting or storing the hedge trimmer always fit the cutting Check cable for damage before starting work and device cover.
- Page 52 It is recommended for increased electrical safety to use a Residual Current Device (RCD) with a tripping current of not more than 30 mA. Always check your RCD every time you use it. WARNING: For your safety, it is required that the plug attached to the machine is connected with the extension cord.
-
Page 53: Operation
Additional safety warnings OPERATION • Do not overload the equipment Ensure that you use the right power tool for the job If you use the appropriate power tool it will be easier for you to work within the specified power range. - and it will also increase safety •... - Page 54 PREPARATIONS • Never let children use the equipment • Be alert to electricity wires overhead • Avoid working when other people, particularly children, are in the vicinity • Think about wearing appropriate clothing! Do not wear loose-fitting clothes or jewellery, as these can become caught in the equipment’s moving parts.
-
Page 55: Maintenance And Storage
MAINTENANCE AND STORAGE • Switch off the equipment and wait until it has stopped and cooled down before you clean it, put it away or carry out any checks or work on it. • Always fit the guard onto the blade when you transport or put the equipment away. ADDITIONAL SAFETY INFORMATION •... -
Page 56: Residual Risks
WARNING! • Do not use the equipment if you are tired or ill, or if you are under the influence of alcohol or drugs. • Always hold the equipment by both handles when using it. Get a solid grip on each handle. •... -
Page 57: Intended Use
REPAIRS • Only use accessories or replacement parts recommended by the manufacturer. • If the equipment does not work despite our quality checks and despite careful maintenance on your part, you should let a qualified electrician repair the equipment. • If the equipment’s power cable is damaged, it must be replaced by the manufacturer, or by someone with similar qualifications. - Page 58 SYMBOLS Read through the operating instructions carefully before you use the equipment for the first time! The power tool is doubly insulated. Immediately pull the plug out if the cable is damaged or has been cut off! Do not expose the equipment to rain or damp, and do not use it in damp conditions! Warning! Use personal protective equipment! Always use protective glasses and ear pro-...
-
Page 59: Technical Data
Sharp teeth/blades! Take care so you don’t lose any toes or fingers. Warning! High risk of electric shocks! Keep at a distance of 10 metres from overground wires. In accordance with essential applicable safety standards of European directives TECHNICAL DATA Rated voltage 230-240 V ~ 50 Hz Power... - Page 60 use (taking account of all parts of the operating cycle such as the times when the tool is switched off and when it is running idle in addition to the trigger time). DESCRIPTION PAGE 2 Blades Starting lock Guard Telescopic pole Front handle Quick release telescope coupling Angle adjustment button...
- Page 61 Fitting the of shoulder strap Snap the buckle shut Adjust the length of the shoulder strap using the sliding buckle. Make the shoulder strap as long as you need for a comfortable working posture. Lay the shoulder strap over the right shoulder. Carry the equipment on your right side. To take the shoulder strap off, press down on both sides of the buckle and pull the shoulder strap away.
- Page 62 OPERATION STARTING AND SWITCHING OFF Telescopic hedge cutter Connect an extension lead to the hedge cutter’s plug. Pull the extension lead through the cable restraint and fasten it to the hook. When you want to start the hedge cutter, first press the starting lock and then press the Switch. When you want to turn off the cutting unit, release the switch again.
- Page 63 Adjusting the telescopic pole Cut the power to the hedge cutter Turn the locking ring anticlockwise to release the starting lock Adjust the telescopic pole to the desired position Turn the locking ring clockwise to lock the telescopic pole Adjusting the angle Cut the power to the garden equipment.
-
Page 64: Cutting Tips
CUTTING TIPS WARNING! Always hold the hedge cutter by both handles when it is running. Never hold bushes with one hand and manoeuvre the hedge cutter with the other. If you do, you could end up with serious injuries. • Check the blades are cutting as they should. The blades on both sides should work in opposite directions and cut effectively without becoming stuck. - Page 65 N.B.: Switch off the hedge cutter and pull out the plug before you clean, check, carry out maintenance or work on the hedge cutter. You should only connect the hedge cutter to 230 V power sockets (single-phase plugs with AC). Check that the mains supply’s voltage matches the tool’s rated voltage.
- Page 66 Recommended periods for hedge trimming • Leaved hedges: June and October. • Fir hedges: April and August. • Conifer hedges and other fast-growing hedges: from May, approximately every six weeks. • Young hedges should be cut more often to make them denser. How much the hedges need cutting after this will depend on how much they grow.
-
Page 67: Troubleshooting
Our after-sales service responds to your questions concerning maintenance and repair of your product as well as spare parts. Exploded views and information on spare parts can also be found under:www.eco-repa.com GARDEO application service team will gladly answer questions concerning our products and their accessories : sav@eco-repa.com... - Page 68 STORAGE _ Thoroughly clean the whole machine and its accessories. _ Store it out of the reach of children, in a stable and secure position, in a cool and dry place, avoid too high and too low temperatures. _ Protect it from exposure to direct sunlight. Keep it in the dark, if possible. _ Don’t keep it in plastic bags to avoid humidity build-up.
- Page 69 Ne jamais laisser un enfant ou une autre personne n’ayant pas pris connaissance des instructions d’utilisation se servir de la machine. Il est possible que les réglementations locales fixent une limite d’âge minimum de l’utilisateur. Gardez la machine non utilisée hors de la portée des enfants. Cet appareil n’est pas prévu pour être utilisé...
- Page 70 Déclaration de conformité Nous « GARDEO» certifions par la présente que la machine spécifiée ci-après répond de par sa conception et son type de construction ainsi que de par la version que nous avons mise sur le marché aux prescriptions fondamentales stipulées en matière...
- Page 71 Productiejaar : 2016 EG-verklaring van overeenstemming Hierbij « GARDEO » verklaren wij dat de hierna vermelde machine door haar ontwerp en bouwwijze en in de door ons in de handel gebrachte uitvoering voldoet aan de betreffende fundamentele veiligheids-en gezondheidseisen, zoals vermeld in de desbetreffende EG-richtlijnen. Deze verklaring verliest haar geldigheid wanneer zonder overleg met ons veranderingen aan de machine worden aangebracht.
- Page 72 Arrival date: 18/07/2016 Production year : 2016 Declaration of Conformity We “GARDEO” hereby declare that the machine described below complies with the relevant basic safety and health requirements of the EU Directives, both in its basic design and construction as well as in the version put into circulation by us.
- Page 73 Ankunftsdatum: 18/07/2016 Fertigungsjahr: 2016 EG-Konformitätserklärung Hiermit erklären wir « GARDEO », dass die nachfolgend bezeichnete Maschine aufgrund ihrer Konzipierung und Bauart sowie in der von uns in Verkehr gebrachten Ausführung den einschlägigen grundlegenden Sicherheits- und Gesundheitsanforderungen der EG-Richtlinien entspricht. Bei einer nicht mit uns abgestimmten Änderung der Maschine verliert diese Erklärung ihre Gültigkeit.
- Page 75 81, rue de Gozée 6110 Montigny-le-Tilleul Belgique Tél : 0032 71 29 70 70 Fax : 0032 71 29 70 86 Made in China S.A.V sav@eco-repa.com Service Parts separated 32 / 71 / 29 . 70 . 83 32 / 71 / 29 . 70 . 86 Fabriqué...
Need help?
Do you have a question about the GTHE510SP and is the answer not in the manual?
Questions and answers