Thetford 23709 Repair Instruction
C250 s/cs electric valve; sc250 overlay; sc250 control panel; sc250 cwe pump; sc250 reed switch; c250 reed switch housing; c250cwe drain; sc250/400 pour out spout; sc250/c260 waste-holding tank plate; sc250/400 seal mechanism; sc250 waste-holding tank flo
Hide thumbs
Also See for 23709:
- Manual (37 pages) ,
- Repair instructions (4 pages) ,
- Repair instruction (51 pages)
Advertisement
Quick Links
Repair instruction
Description: C250 S/CS Electric Valve
Part number: 23709
Look for Service Centres, Point of Sale addresses and other
information on:
Version:
Date:
Tools required:
Remove
A
Waste holding tank
B
42799
www.thetford.eu
V2
Mai 2011
Remove bowl retainer
bracket closest to the door
Take the bowl inner off
1/4
05/11
Advertisement

Related Manuals for Thetford 23709


Summary of Contents for Thetford 23709
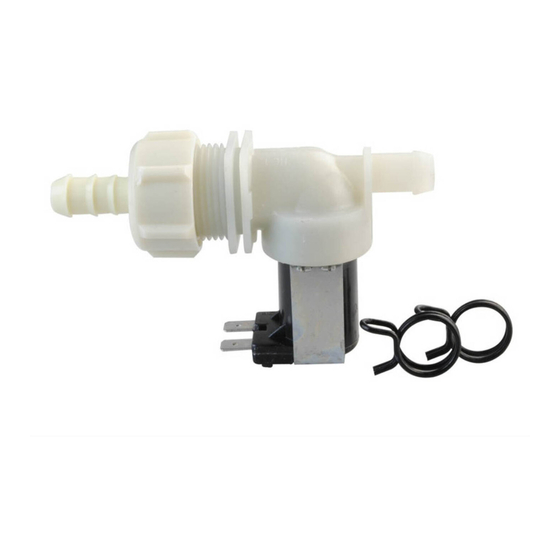
- Page 1 Repair instruction Description: C250 S/CS Electric Valve Part number: 23709 Look for Service Centres, Point of Sale addresses and other information on: www.thetford.eu Version: Date: Mai 2011 Tools required: Remove Waste holding tank Remove bowl retainer bracket closest to the door...
- Page 2 Remove Remove valve retaining clip Slide hose clamp Push new valve in tube, arrow over tube should be in direction of water flow Push tube onto valve Assemble hose clamps 42799 05/11...
- Page 3 Warning! Lip to be at inside Route tubing around bowl Bring tube back in Push the Bowl inner position assembly back in position Assemble the retainer Rotate the Rotate the retainer back in retainer back in position in position position 42799 05/11...
- Page 4 Place waste holding tank back into toilet 42799 05/11...
-
Page 5: Repair Instruction
Repair instruction Description: SC250 Overlay Part number: 50708 Look for Service Centres, Point of Sale addresses and other information on: www.thetford-europe.com Version: Date: June 2010 Tools required: Stanley knife Using a sharp object such as a stanley knife carefully peel back the overlay taking... - Page 6 Repair instruction Description: SC250 Control panel Part number: 50709/50710/50711 Look for Service Centres, Point of Sale addresses and other information on: www.thetford-europe.com Version: Date: June 2010 Tools required: Stanley knife, flat head screwdriver Locate the overlay on the top of the toilet...
- Page 7 Simply unclip the control panel from its housing. **Note Take note of the positioning of the wire connecting as this is important when re-attaching Remove control panel and replace with new Clip the control panel back into its housing and clip the two parts back in the toilet Replace the overlay ** In case the PCB is glued with hotmelt to the housing, steps D until G can be left out.
- Page 8 Repair instruction Description: SC250 CWE Pump Part Number: 50712 Look for Service Centres, Point of Sale addresses and other information on: www.thetford.eu Version: Date: June 2010 Tools required: Electrical crimps Drain the flush water tank, remove the waste tank and...
- Page 9 Cut the faulty cable leaving enough wire to allow for ease of reconnection. Strip back the wires to show the bare cable Crimp the cable of the new pump to the existing wiring using the connections supplied Reconnect the flush tube to the top of the pump 42690 06/10...
- Page 10 Reconnect the flush tube to the base of the water tank making sure the clip is in place and push the opposite end onto the pump Replace the pump into its housing Replace the fuse and holding tank, add a couple of litres of water to the flush tank and test.
- Page 11 Repair instruction Description: SC250 Reed Switch Part Number: 50713/50714/50715 Look for Service Centres, Point of Sale addresses and other information on: www.thetford.eu Version: Date: June 2010 Tools required: Remove the waste tank and locate the reed switch which can be found on a stem towards the...
- Page 12 Repair instruction Description: C250 Reed switch housing Part number: 50716 Look for Service Centres, Point of Sale addresses and other information on: www.thetford.eu Version: Date: June 2010 Tools required: Stanley knife, flat screwdriver Remove waste- holding tank out Cassette toilet.
- Page 13 Repair instruction Description: C250CWE Drain Part number: 50717 Look for Service Centres, Point of Sale addresses and other information on: www.thetford.eu Version: Date: June 2010 Tools required: Flat screwdriver Turn drain to the outside. Place flat screwdriver between drain and tank and push drain loose.
- Page 14 Repair instruction Description: SC250/400 Pour out spout Part number: 5071992/3230606 Look for Service Centres, Point of Sale addresses and other information on: www.thetford-europe.com Version: Date: April 2010 Tools required: Turn pour out spout anti clockwise and take it out. Place new pour out...
- Page 15 Repair instruction Description: SC250/C260 Waste-holding tank plate Part number: 50723-06 Look for Service Centres, Point of Sale addresses and other information on: www.thetford-europe.com Version: Date: August 2011 Tools required: Philips head screwdriver In case you are operating on a C250 and changing your Holding Tank, The Holding...
- Page 16 Take 1 screw out of bushing and remove blade driver. Take bushing out and remove blade. Press two ribs from blade opener in which allows to pull out the blade opener from the other side. Take 6 screws out of seal retainer and take lip seal out.
- Page 17 Repair instruction Description: SC250/400 Seal mechanism Part number: 50724 Look for Service Centres, Point of Sale addresses and other information on: www.thetford-europe.com Version: Date: April 2010 Tools required: Using the sliding cover as a lever rotate the complete mechanism anti...
- Page 18 Repair instruction Description: SC250 Waste-holding tank float Part Number: 50725 Look for Service Centres, Point of Sale addresses and other information on: www.thetford.eu Version: Date: June 2010 Tools required: While looking down on the top of the tank you will notice the sliding cover.
- Page 19 The complete disc and mechanism can now be removed. The float should be easily visible however if it has been washed away the float housing can be found between the wheels towards the top of the tank The float simply unclips and clips back into place, when replacing the float ensure the fin is positioned towards the base of...
- Page 20 Repair instruction Description: SC250 Waste-holding tank wheels Part number: 50726 Look for Service Centres, Point of Sale addresses and other information on: www.thetford-europe.com Version: Date: June 2010 Tools required: Turn waste-holdingtank upside down. Place your hand on the side of the wheel and pull it out.
- Page 21 Repair instruction Description: SC250/C260 Waste-holding tank mechanism Part Number: 50727-06 Look for Service Centres, Point of Sale addresses and other information on: www.thetford.eu Version: Date: August 2011 Tools required: In case you are operating on a C250 and changing your Holding Tank, The Holding tank...
- Page 22 Repair instruction Description: SC250 Pull handle Part number: 50728 Look for Service Centres, Point of Sale addresses and other information on: www.thetford-europe.com Version: Date: June 2010 Tools required: Flat head screwdriver Turn waste holding-tank upside down. Place flat head screwdriver underneath rib and take one complete rib out, if not broken yet.
- Page 23 Repair instruction Description: C250 Seal nozzle Part number: 50729 Look for Service Centres, Point of Sale addresses and other information on: www.thetford.eu Version: Date: June 2010 Tools required: Flat screwdriver, Philips crosshead screwdriver Remove waste-holding tank and seat & cover.
- Page 24 Remove nozzle retainer followed by tube from nozzle. Fit new nozzle and nozzle retainer. Bring tube back into position, place bowl inner and push it back on bowl outer. Assemble both brackets back (see B and C in reverse), and place seat &...
- Page 25 Repair instruction Description: SC250/400 Blade Part number: 50731 Look for Service Centres, Point of Sale addresses and other information on: www.thetford-europe.com Version: Date: April 2010 Tools required: Crosshead screwdriver Using the sliding cover as a lever rotate the complete mechanism anti...
- Page 26 Press two ribs from retainer in and take it off. Remove blade arm. Take 1 screw out of bushing and remove blade driver. Take bushing out and remove blade. For assembling new blade follow steps in reverse. 51304 2/2 04/10...
- Page 27 Repair instruction Description: SC250 Float stem Part number: 50732 Look for Service Centres, Point of Sale addresses and other information on: www.thetford-europe.com Version: Date: June 2010 Tools required: Flat head screwdriver Remove waste holding-tank out of toilet. Using the sliding cover as a...
- Page 28 Float stem which was inside waste-holding tank. By pulling the vent lifter a bit up, the spring can be replaced. Follow steps in reverse to assemble new float stem. 42692 06/10...
- Page 29 Repair instruction Description: C250/C260 Bowl retainer bracket Part number: 50733 Look for Service Centres, Point of Sale addresses and other information on: www.thetford.eu Version: Date: 15/08/2011 Tools required: Flat screwdriver In case you are operating on a C250 and changing your Holding Tank, The Holding tank...
- Page 30 Repair instruction Description: C250 Vent plate Part number: 5073462 Look for Service Centres, Point of Sale addresses and other information on: www.thetford.eu Version: Date: June 2010 Tools required: Remove waste-holding tank out Cassette toilet. Pull vent plate loose, is fixated in base on 5 points.
-
Page 31: Gear Wheel
Repair instruction Description: C250 Saddle Part number: 50735 Look for Service Centres, Point of Sale addresses and other information on: www.thetford.eu Version: Date: June 2010 Tools required: Philips crosshead screwdriver Remove waste-holding tank out Cassette toilet. Gear wheel Remove one screw out of saddle and screw new saddle in. - Page 32 Repair instruction Description: SC250 Handle grip cover Part number: 50737-92 Look for Service Centres, Point of Sale addresses and other information on: www.thetford-europe.com Version: Date: June 2010 Tools required: Flat head screwdriver Remove waste holding-tank out of toilet. Place flat head screwdriver between handle grip cover and lift it up.
- Page 33 Repair instruction Description: C250 Kit one switch/single level/multi level Part number: 5075062/5075162/5075262 Look for Service Centres, Point of Sale addresses and other information on: www.thetford.eu Version: Date: June 2010 Tools required: Remove waste- holding tank out Cassette toilet. Locate the reed switch housing...
- Page 34 Using the sliding cover as a lever rotate the complete mechanism anti clockwise until the arrow points to the second dot The float should be easily visible however if it has been washed away the float housing can be found between the wheels towards the top of the tank The float simply unclips and clips...
- Page 35 Repair instruction Description: C250 Ventilator for powered vent Part Number: 50755 Look for Service Centres, Point of Sale addresses and other information on: www.thetford.eu Version: Date: January 2010 Tools required: Philips screwdriver, wire cutters Remove the waste tank and locate the vent plate which is situated in the base of the toilet.
- Page 36 Remove two screws on cable cover. Remove cable cover. Take electrical fan out and disconnect the Cable ties complete wire by cutting the cable ties. S version: Disconnect connector block and press new connector block in. CS/CWE version: Remove control panel out of console and disconnect connector block.
- Page 37 Repair instruction Description: C250 CWE Additional Drain Tube Part number: 93073 & 24073 Look for Service Centres, Point of Sale, addresses and other information on: www.thetford.eu Version: Date: 28/09/11 Tools required: Before you can fit the additional drain tube you must ensure the fresh water tank is drained.
- Page 38 Once the fresh water tank is drained refit the waste holding tank and flush the toilet until no more water comes through the nozzle into the bowl. Empty the bowl into the waste holding tank. Remove the waste holding tank. Have a small receptacle at hand (or ideally the waste holding tank dump cap) and using long nose pliers squeeze together the tabs on the...
- Page 39 Place the end of the drain tube along side the original drain tube behind the retaining bracket. You have now completed the fitting of the additional drain tube. Please note that there still may be some water in the tank and therefore we advise if this is not the final destination of the vehicle before it goes into storage that both the drain tubes are opened and emptied again to remove any water which may have moved during transit.
- Page 40 Repair instruction Description: SC250/400 Vent button Part number: 0752492/3230716 Look for Service Centres, Point of Sale addresses and other information on: www.thetford-europe.com Version: Date: April 2010 Tools required: Using the sliding cover as a lever rotate the complete mechanism anti clockwise until the arrow points to the second dot.
- Page 41 Take new seal retainer and place it through the hole where the button needs to be pressed in. Press button with spring back into position. Place mechanism and use sliding cover in reverse to position back into the tank. 51305 2/2 04/10...
Need help?
Do you have a question about the 23709 and is the answer not in the manual?
Questions and answers