Table of Contents
Advertisement
Quick Links
Overview
Follow the instructions below to attach the Sani-Con Turbo to the RV coach.
Warning!
Read and understand the
!
warnings listed in this document before you
install, operate, or service this system. If you
do not obey these warnings there is a risk of
property loss, injury, or electrocution. Do not
make any changes to this unit as this could
result in property damage, injury, or electrocu-
tion.
Thetford Corporation accepts no responsibility or
liability for damage to equipment, injury, or death
that may result from the system's improper instal-
lation, service, or operation.
Thetford Corporation recommends that plumbing
and electrical work be performed by a licensed
tradesperson. Local permit and code compliance
is required.
Contents
■
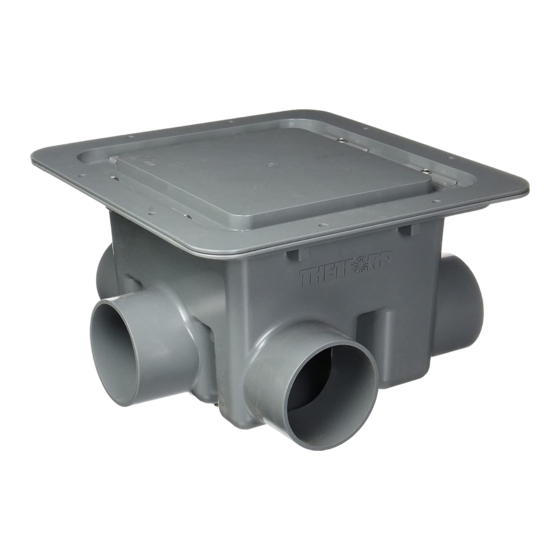
(1x) Sani-Con Turbo Tank Assembly - with OT
(over-temperature) protected pump
■
(1x) Hose and Nozzle Assembly with nozzle
caps
■
(1x) Owners Manual
■
(2x) Labels with serial #
Required Materials (Not Provided)
■
Plumbing and End Caps (if necessary)
■
Switch
■
Relay (Example: American Terminal ER-1200)
■
Fuse and Fuse Holder or Breaker
■
Wiring
■
Mounting Hardware
■
2" Hose Clamp (actual dimension is 1.9")
■
Schedule 30, 40, 80, or DWV rated hard pipe
fi ttings for pressure side of pump.
www.thetford.com
Questions?
If you have any questions or need assistance, please
contact Technical Support at 1-800-444-7210, avail-
able Monday through Friday 8 a.m. to 6 p.m., Eastern
Standard Time.
General Guidelines & Considerations
■
Gray water bypass can be achieved by
plumbing the discharge line in a manner that
gravity can allow liquid to fl ow to the hose
with no upward plumbing.
■
All systems rely on gravity to move the liquid
waste to the pump; therefore, make sure that
the pump inlet is mounted below the RV hold-
ing tank. See line on side of Sani-Con Turbo
system - refer to
Fig. 1-A1
■
Plan the installation so that the pump does
not extend beyond the side of the coach
■
Consider using 1/4-20 threaded rod (4x) and/
or 13" x 13" mounting plate to install unit.
■
Each tank assembly comes with two labels.
One label should be placed in the hose com-
partment; the other should be placed in the
Owner's Manual.
Note:
Labels (2x) are specifi c to each tank
based on serial #.
■
If black and gray tanks are heated, treat Sani-
Con Turbo Tank in same manner.
■
Duty Cycle: Intermittent, fi ve minutes continu-
ous operation; 20 minutes off.
■
Gray water plumbing should be 2" - 3" pipe
to provide fastest pumping. 1 1/2" pipe drains
slower than the pump and causes pump to
cavitate during use.
■
It is important to plumb hose avoiding sharp
angles during use or storage.
■
Placement of the hose connection MUST be
serviceable by the customer.
1
Sani-Con
Installation Manual
Warnings and Cautions
Read and understand the warnings and cautions listed
in this document before you install or operate this unit.
CAUTION!
!
■
Do not make any changes to this unit, as
this could result in property damage or
injury.
■
Do not let the pump run dry, as this will
damage the macerator.
CAUTION!
!
MUST BE COMPLETELY FREE FROM
DEBRIS before installing and operating the
pump. Failure to comply with this warning
could result in a voided product warranty and
equipment failure.
CAUTION!
!
.
compartment MUST be hard-plumbed with
Schedule 40, Schedule 80, or DWV rated
hard pipe.
CAUTION!
!
MUST be able to support a minimum of 30
pounds.
CAUTION!
!
under the RV once the Sani-Con system is
installed. Lowest point of unit MUST be above
axles of coach.
Winterizing the Sani-Con Unit
1. Ensure all tanks are empty.
2. Pour RV antifreeze into empty black water
tank.
Note:
capturing system fl uid!
3. Turn on pump.
4. Run pump until antifreeze begins to discharge
from universal nozzle.
5. Turn off pump; chase out hose.
Turbo
®
Gray and black water tanks
Plumbing from pump to storage
The installation site of the pump
Plan for suffi cient clearance
Be sure to have container available for
Part No. 97516 Rev. D (17/12/2015)
Advertisement
Table of Contents

Related Manuals for Thetford Sani-Con Turbo


Summary of Contents for Thetford Sani-Con Turbo
- Page 1 Turbo ® Installation Manual Overview Warnings and Cautions Follow the instructions below to attach the Sani-Con Turbo to the RV coach. Read and understand the warnings and cautions listed Warning! Read and understand the Questions? in this document before you install or operate this unit.
- Page 2 2” OR 3” pipe is RECOMMENDED G. Universal Nozzle with Caps F. Discharge Hose for gray water plumbing from tank to For easy cleaning, recommend removable stor- SaniCon age tray for hose and nozzle. www.thetford.com...
- Page 3 Pump requires a 12-VDC/35 AMP dedicated circuit with 35 AMP breaker or fuse between The positive and negative wires NOTE: main bus or battery. should be braided to prevent radio interfer- ence during operation. ■ Wire size is dependent on distance between www.thetford.com...
- Page 4 AT OR NEAR BOTTOM of the compart- ment with the hose barb pointing AWAY from ment with the hose barb pointing AWAY from ment with the hose barb pointing AWAY from the RV coach. the RV coach. the RV coach. www.thetford.com...
Need help?
Do you have a question about the Sani-Con Turbo and is the answer not in the manual?
Questions and answers