Advertisement
Quick Links
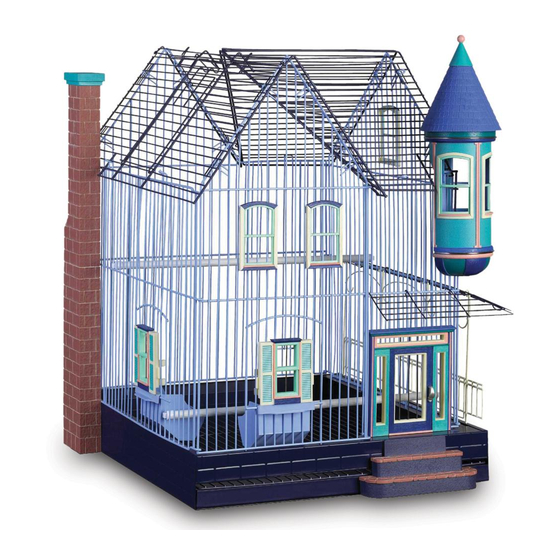
STEP #1: Attach Wire Body Mesh to Base
Attach cage body mesh to base unit, by raising the horizontal wire lock on the side of the cage. This will allow the
positioning wires to be inserted into the elongated holes in the base. Once the positioning wires are in place on one
side, secure by lowering the wire lock to rest comfortably. Repeat this for the other side of the cage. When com-
plete, the Wire Body should be secure with the base, fitting into the 8 guide holes, with the locks on the Right/Left
in the locked (down) position. See illustration #1 & #2.
STEP #2: Attach Chimney to Cage
Attach Chimney to Cage by locating the 2 screw holes in the side of the steel base unit, and temporarily lining
them up with the holes in the bottom of the chimney. Attach the plastic chimney hook to the cage wire by rotating
the chimney (do not force hook to "pop" between the wires). After chimney is in the correct position, secure
with 2 screws provided. See Illustration #3.
STEP #3: Attach Wire Roof to Cage Body
Lay the folded roof assembly into position on the left (Flat side of body with window opening) of the cage, and
engage the wire hairpins, connecting this portion to the body of the cage (the chimney will rest in small cut out
area). Then, open the right side of the roof, and place into position. See Illustration #4. Be sure that the roof is
in the correct and comfortable position before engaging the rest of the wire hairpins. For maximum security, use a
pliers to "crimp" all the hairpins permanently closed. When doing this, use a cloth to protect the painted finish on
the wire. The use of pliers alone may damage finish.
STEP #4: Attach Wire Porch & Porch Roof
Identify 3 Side Porch pieces, as in Illustration #5. Assemble Porch Railing to Porch Roof as shown in Illustra-
tion #6, and crimp wire ends with pliers (protecting printed finish with a cloth). Next attach porch assembly to
the Right side of the Victorian Home as shown in Illustration #7, and again crimp wire ends with pliers
(protecting printed finish with a cloth). Now secure Porch Railing into base by inserting the "L" shaped wires
into long holes, and then sliding to the Right until the 2 straight wires can be pushed downward into their holes.
Illustration #5
Illustration #6
Prevue Pet Products, Inc. Chicago, IL. USA
Assembly Instructions for
The VICTORIAN
Front Door Overhang
Side Porch Roof
Side Porch Railing
Illustration #7
www.PrevuePet.com
Sheet #6089-5
Model # 294
Illustration #1
Illustration #2
Illustration #3
Illustration #4
(Crimp All Latches)
Illustration #8
Advertisement

Related Manuals for Prevue Hendryx FeatherStone Heights Victorian


Summary of Contents for Prevue Hendryx FeatherStone Heights Victorian
- Page 1 Sheet #6089-5 Assembly Instructions for The VICTORIAN Model # 294 STEP #1: Attach Wire Body Mesh to Base Attach cage body mesh to base unit, by raising the horizontal wire lock on the side of the cage. This will allow the positioning wires to be inserted into the elongated holes in the base.
- Page 2 Page #2 STEP #5: Attach Wire Front Door Overhang Attach Front Door Overhang, as shown in Illustration #9, again using a cloth and pliers to secure into position. With the proper placement, the Front Door Overhang will rest on the Porch Roof naturally. STEP #6: Assemble Corner Turret Hold the 2 halves of the Turret Assembly in your hand, so that the shingles of the roof join in the proper position.
Need help?
Do you have a question about the FeatherStone Heights Victorian and is the answer not in the manual?
Questions and answers