Advertisement
Quick Links
1
READ!
2
3
4
5...
6... 7... 8...
9... 10...
3155S — 08/19— USL.1
For successful assembly of your Silverado Cage
MODEL #
3 55
Follow this flight path
READ!
READ THESE INSTRUCTIONS!
Follow these steps for a successful assembly. If you still have questions,
we're here to help. Please contact our Prevue Customer Service team via
READ!
email at : customerservice@prevuepet.com
HELPFUL TOOLS
INCLUDED
The entire cage can be assembled with the allen wrench included in this kit.
Optional tools which may be helpful at a couple points include a flathead
screwdriver and rubber mallet (see Step 2), and a small adjustable crescent
wrench (see Step 6).
FIND A FRIEND
A second person's assistance is a necessity during several stages of this
FRIEND ME !
cage assembly. Look for this symbol:
EASY AS 1-2-3 !
REVIEW ALL PARTS & HARDWARE
After unpacking all components, review all parts and count the contents
of the screw packets and compare the quantities against the Hardware
Included list on the other side.
Please contact Prevue if any problems or issues arise.
Made in China for Prevue Pet Products, Inc., 224 N Maplewood Ave, Chicago IL 60612 USA • www.prevuepet.com • 1 [312 ] 243-3624 • customerservice @ prevuepet.com
OPTIONAL
Advertisement

Related Manuals for Prevue Hendryx Silverado Cage


Summary of Contents for Prevue Hendryx Silverado Cage
- Page 1 For successful assembly of your Silverado Cage MODEL # 3 55 Follow this flight path READ! READ THESE INSTRUCTIONS! READ! Follow these steps for a successful assembly. If you still have questions, we’re here to help. Please contact our Prevue Customer Service team via READ! email at : customerservice@prevuepet.com...
- Page 2 For successful assembly of your Silverado Cage MODEL # 3 55 Follow this flight path C RE FOR BIRDS CAGE PLACEMENT TRAVEL CARRIERS Place the cage away from drafts and drafty areas and away Always keep an appropriate size travel carrier from harsh or direct sun. Keep the cage away from strong on hand for emergencies, travel or temporary fumes and odors.
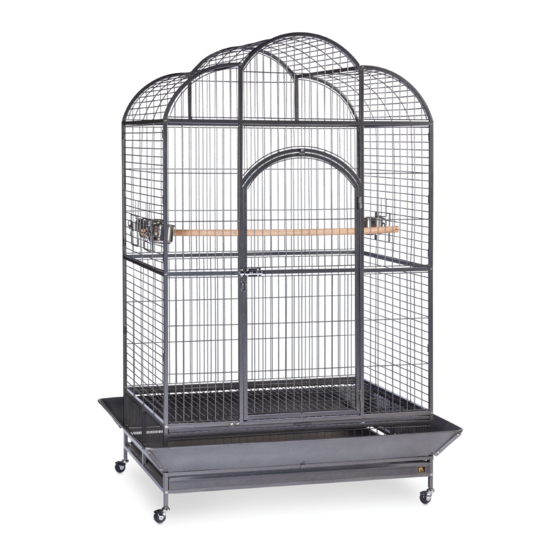
- Page 3 CUSTOMER SUPPORT Silverado Cage MODEL # Please contact Prevue Pet Products: 3 55 PARTS LIST PHONE 1 (312) 243 -3624 ONLINE www.prevuepet.com EMAIL customerservice @prevuepet.com Instructions online at www.prevuepet.com KEY: C = Center (Roof) Panels F = Front Panels B = Back Panels L = Left Side Panels...
-
Page 4: Hardware Included
CUSTOMER SUPPORT Silverado Cage MODEL # Please contact Prevue Pet Products: 3 55 PARTS LIST PHONE 1 (312) 243 -3624 ONLINE www.prevuepet.com EMAIL customerservice@prevuepet.com Instructions online at www.prevuepet.com HARDWARE INCLUDED: Long Screws 20 pcs Screw + Nut 8 pair ( Step 6 ) - Page 5 CUSTOMER SUPPORT Silverado Cage MODEL # Please contact Prevue Pet Products: 3 55 ASSEMBLY PHONE 1 (312) 243-3624 ONLINE www.prevuepet.com EMAIL customerservice @prevuepet.com Instructions online at www.prevuepet.com For best results, follow the Assembly Steps in the order presented. ⁕ KEY: F = Front Panels...
- Page 6 PIECES Carefully lay the cage on its side. Insert the casters by hand. If casters do not insert fully, position a flathead screwdriver at the caster base and gently tap the caster in place with a rubber mallet. After caster installation, carefully upright the cage and continue with assembly.
- Page 7 Slide the upper side panels down through the continued vertical frame rail channels. Align and insert the extended vertical wires into the holes in the horizontal frame rails. PIECES [ 8 ] LONG Guide the top roof panel into the channels on the horizontal frame rails.
- Page 8 PIECES DOOR Install the front door by aligning and inserting the sleeves on the door into the posts on the frame rails. The door may be padlocked for security (padlock not included). PERCH Install the perch on corresponding-height horizontal wires. CUPS Open the cup doors.
- Page 9 PIECES Pre-assemble the right side seed guard to the front seed guard. [ 8 ] PAIR Pre-assemble the left side seed guard to the back seed guard. OPTIONAL Insert the assembled seed guard sections onto the cage. Finish by attaching the open ends with the remaining screw/nut pairs.
Need help?
Do you have a question about the Silverado Cage and is the answer not in the manual?
Questions and answers