SOMFY SGS 501 Operating And Installation Manual
Hide thumbs
Also See for SGS 501:
- Operating and installation manual (72 pages) ,
- Manual (44 pages) ,
- Replacing (52 pages)
Advertisement
Available languages
Available languages
Quick Links
Advertisement

Related Manuals for SOMFY SGS 501


Summary of Contents for SOMFY SGS 501
- Page 1 SGS 501 Operating and installation guide Montage- und Gebrauchsanleitung...
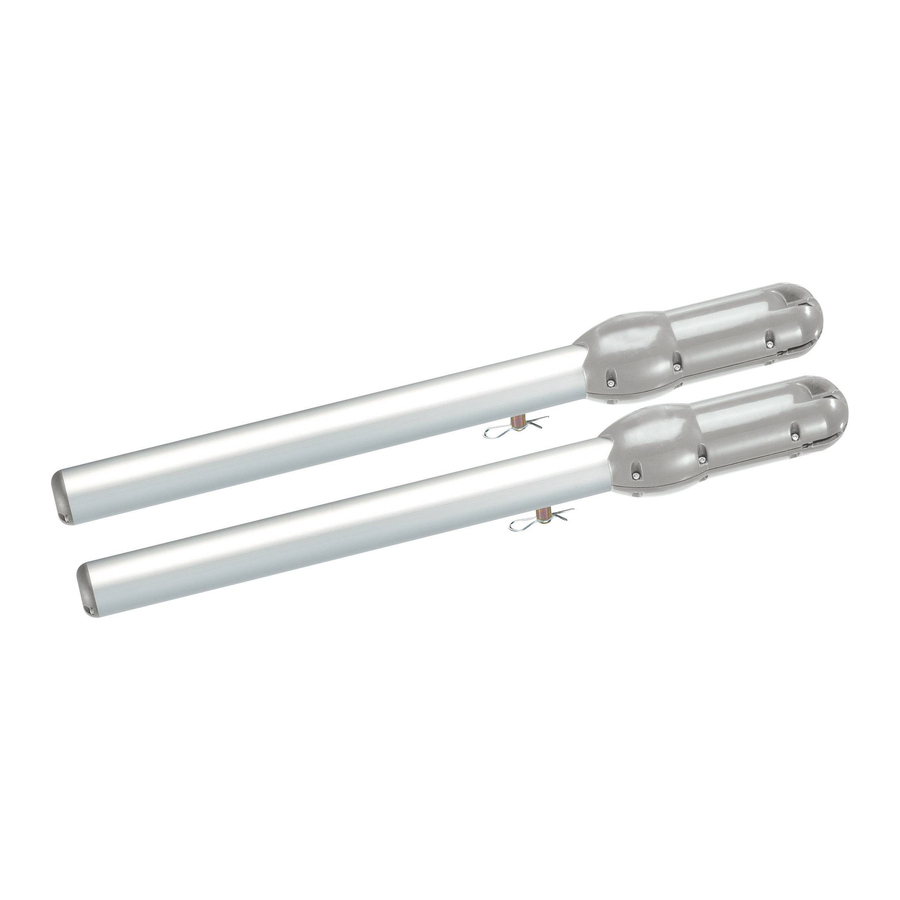
- Page 2 Screw for securing the unit to the bracket Cable clamp Unlocking mechanism Cable clamp bolt Unlocking mechanism screw 2-button remote control Pin for securing the cylinder to the wall/pillar bracket M8x22 flat washer START Copyright © 2013 Somfy SAS. All rights reserved.
- Page 3 Flashing function is selected the drive functions correctly - the control electronics are reactivated Indicator light the drive functions correctly - the control electronics are in stand-by Flashing see diagnostic page 29 Copyright © 2013 Somfy SAS. All rights reserved.
- Page 4 Checking the position of the antenna ..................................20 Closing the control unit ....................................... 20 Standy-by/Reactivating the control electronics ................................21 Fully opening and closing the gate ..................................... 21 Detecting obstacles........................................21 User training ..........................................21 Copyright © 2013 Somfy SAS. All rights reserved.
- Page 5 Diagnostics ..........................................29 Assistance ............................................ 29 Replacing the remote control battery ..................................29 Clear the settings ......................................... 30 Clear the memorised settings and remote controls ..............................30 Unlock/Lock the motors ......................................30 Copyright © 2013 Somfy SAS. All rights reserved.
- Page 6 Somfy is prohibited, on safety grounds. fixed appliances must be connected to the power supply Somfy cannot be held liable for any damage resulting from terminals and there must a separation between the failure to follow the instructions in this manual.
-
Page 7: Cable Feed
For operation in automatic mode, or if the gate faces a public road, installation of an orange light may be required in accordance with the regulations in the country in which the motorisation is installed. Copyright © 2013 Somfy SAS. All rights reserved. - Page 8 Ensure that the batteries are not short-circuited, thrown in the fire or recharged. There is a risk of explosion. Zone 2 Zone 2 Zone 1 Zone 3 Zone 3 Zone 4 Zone 4 Zone 5 Copyright © 2013 Somfy SAS. All rights reserved.
- Page 9 12 cm or a maximum of 5 12 cm 5 mm 12 cm min. max. min. Copyright © 2013 Somfy SAS. All rights reserved.
- Page 10 ≤ 40 Km/h Sand is flying Max weight. 250 kg 76 mm 85 mm 105,05 mm 149,59 mm 786 mm 104,70 mm 164,49 mm 208 mm 30,00 mm 177,11 mm 187 mm 72 mm Copyright © 2013 Somfy SAS. All rights reserved.
- Page 11 - Accessories supply output 24 Vdc / 15 W max. - Backup battery input - Input for photoelectric cells - Dry contact control input Yes (does not function if no battery or solar power supply) *optional accessories Copyright © 2013 Somfy SAS. All rights reserved.
- Page 12 The motors must be secured to the horizontal reinforcements for the gate leaves. Patte de These reinforcements must ideally be placed 1/3 of the way up the gate. fixation If there are no reinforcements, use metal reinforcement plates approximately 4 mm thick. Renfort Copyright © 2013 Somfy SAS. All rights reserved.
- Page 13 • Underground cables must be equipped with a protective sheath with a sufficient diameter to contain all the cables. Property side Côté Propriété • Fit a 230 V electrical input as close as possible to the control unit. Copyright © 2013 Somfy SAS. All rights reserved.
- Page 14 < 0 cm = 0 cm the pillar. We recommend that you add a shim so that the cylinder mounting bracket is aligned with the gate leaf hinge and A is 0 cm. Copyright © 2013 Somfy SAS. All rights reserved.
- Page 15 Check that the bracket is horizontal, then mark the mounting holes for the bracket. Drill 3 holes in each pillar at the marked locations (see page 8 for the drilling diameter corresponding to suitable hardware). Copyright © 2013 Somfy SAS. All rights reserved.
- Page 16 Secure the mounting bracket to the pillar with hardware adapted to the mounting support. Check that the bracket is at the right level. Retighten if necessary. Fit the cylinder onto its mounting bracket. Immobilise it with the pin (10). Copyright © 2013 Somfy SAS. All rights reserved.
- Page 17 Push the gate leaf mounting bracket against the gate leaf reinforcement. Check that the cylinder is level. Make the markings on the sides of the gate leaf mounting bracket. Unclip that unlocking mechanism, then remove the cylinder from the leaf mounting bracket. Copyright © 2013 Somfy SAS. All rights reserved.
- Page 18 Secure the gate leaf mounting bracket to the two points on the gate leaves using screws suited to the reinforcement material and the washers (11) supplied. Fit the cylinder. Clip the unlocking mechanism on the catch to secure it. Copyright © 2013 Somfy SAS. All rights reserved.
- Page 19 The drilling diameter is to be defined based on the type of screws used for mounting (see page 8). Secure the bracket to the pillar/wall. Position the base of the unit to mark the 2 mounting points at the bottom of the unit. Copyright © 2013 Somfy SAS. All rights reserved.
- Page 20 With the gate closed, identify the gate leaf that opens first. Motor M1 activates this gate leaf. M1 est à droite M1 est à gauche Connect the motors as indicated in the table below: blue brown blue brown Copyright © 2013 Somfy SAS. All rights reserved.
- Page 21 Immobilise the 230 V power cable with the cable-clamp provided (18). Fit a terminal block on the earth wire (yellow/green) and store Neutral Live it in the control unit. 230V power supply cable Copyright © 2013 Somfy SAS. All rights reserved.
- Page 22 Press button 1 on the remote control again to stop the gate leaf in the desired opening position. STOP Position the opening stops in contact with the cylinder knob, then tighten the stops with a 3 mm Allen key (2 screws per stop). Copyright © 2013 Somfy SAS. All rights reserved.
- Page 23 3 mm Allen key (2 screws per stop). Press button 1 on the remote control to close the gate completely. The leaves close one after the other. Copyright © 2013 Somfy SAS. All rights reserved.
- Page 24 For optimum performance, it is essential that the aerial is correctly positioned. Affix summary label (7) to the back of the control unit cover. Close the control unit and screw in the cover. Copyright © 2013 Somfy SAS. All rights reserved.
- Page 25 When opening the gate, if an obstacle is detected (abnormal force on the motorisation), the gate stops. All users must be trained on how to safely use this motorised gate (standard use and unlocking principle) and on the mandatory periodic checks. Copyright © 2013 Somfy SAS. All rights reserved.
- Page 26 If the cells are blocked when closing the gate, the gate will stop and reopen. After disconnecting the photoelectric cells, switch the motor on again then perform the procedure “Deactivating automatic closing - returning to standard operation” on page 26. Copyright © 2013 Somfy SAS. All rights reserved.
- Page 27 • Service life: 3 years. To ensure an optimum battery life, switch the gate's electric power supply off at least 3 times a year to run a number of cycles using the battery. Copyright © 2013 Somfy SAS. All rights reserved.
- Page 28 • only the remote controls and radio control points can be used to control the gate (wired controls are deactivated), • - the wired safety accessories (photoelectric cells, orange light) remain active. Copyright © 2013 Somfy SAS. All rights reserved.
- Page 29 Repeat the “Activate pedestrian opening” procedure using the button for which the pedestrian opening must be deactivated. The indicator light comes on then goes out. The pedestrian opening is deactivated on this button. Copyright © 2013 Somfy SAS. All rights reserved.
- Page 30 The indicator light remains lit. Automatic closing is activated. To deactivate automatic closing mode and return to standard operation, the indicator light flashes. Press button 1 on the remote control 3 times. Copyright © 2013 Somfy SAS. All rights reserved.
- Page 31 Depending on the choice of settings, Somfy RTS remote controls can control: • full opening of the gate • pedestrian opening of the gate • another Somfy RTS device (example: garage door motor, roller shutter, etc.) Complete opening Pedestrian opening or other Somfy RTS automatism...
- Page 32 Briefly press a button on the remote control to be programmed. The RADIO indicator light will come on then go out when you release the button on the remote control. See “Clear the memorised settings and remote ” page 30. Copyright © 2013 Somfy SAS. All rights reserved.
- Page 33 The service life of the battery is generally 2 years. Remove the clip from the Open the remote Remove the battery using a Replace the battery (3 V remote control. control. screwdriver. CR 2430). Copyright © 2013 Somfy SAS. All rights reserved.
- Page 34 When unlocking the motors, the gate may be manoeuvred manually if there is an electrical fault. Fit the cylinder. Clip the unlocking mechanism on the Unclip that unlocking mechanism, then remove the catch to secure it. cylinder from the leaf mounting bracket. Copyright © 2013 Somfy SAS. All rights reserved.
- Page 35 Copyright © 2013 Somfy SAS. All rights reserved.
- Page 36 Befestigungswinkel zur Wandbefestigung Schraube zur Befestigung des Steuerkastens am Erinnerungsschild Befestigungswinkel Kabelzugentlastungsklemme Verriegelungsteil Kabelklemmschrauben Schraube Verriegelungsteil Funksender mit 2 Tasten Achse zur Befestigung der Spindel am Winkel für Pfeiler/Mauer Unterlegscheibe M8x22 START Copyright © 2013 Somfy SAS. All rights reserved.
- Page 37 Die Funktion zum Löschen der Einstellungen und der Blinkt Funksender ist ausgewählt. Der Antrieb funktioniert ordnungsgemäß – die Steuerelektronik ist im Betriebsmodus. Der Antrieb funktioniert ordnungsgemäß – die Steuerelektronik ist im Standbymodus. Blinkt Siehe Diagnose Seite 29. Copyright © 2013 Somfy SAS. All rights reserved.
- Page 38 Überprüfung der Position der Antenne ..................................20 Schließen des Steuerkastens ...................................... 20 Wechsel der Steuerelektronik in den Standby-/Betriebsmodus ..........................21 Vollöffnung und Schließung des Tors ..................................21 Erfassung eines Hindernisses ..................................... 21 Schulung der Benutzer ........................................ 21 Copyright © 2013 Somfy SAS. All rights reserved.
- Page 39 Löschen der Funksender ......................................28 Diagnose ............................................29 Support ............................................29 Austausch der Batterie des Funksenders .................................. 29 Einstellungen löschen ......................................... 30 Einstellungen und programmierte Funksender löschen ............................30 Entriegeln/Verriegeln der Antriebe ..................................... 30 Copyright © 2013 Somfy SAS. All rights reserved.
- Page 40 Die Verwendung von Zubehör oder Komponenten, die Die Trennung vom Stromnetz muss alle Pole erfassen. nicht von Somfy genehmigt sind, ist untersagt, da in Die Trennschalter, die die Trennung aller Pole der einem solchen Fall nicht für die Sicherheit der Personen Spannungsversorgung der fest installierten Geräte...
- Page 41 Tors stößt. WARNUNG Bei Automatikbetrieb oder bei einer Betätigung ohne Sichtkontakt muss eine Lichtschranke installiert werden. Der Antrieb im Automatikbetrieb funktioniert mindestens in einer Richtung ohne absichtliche Betätigung seitens des Benutzers. Copyright © 2013 Somfy SAS. All rights reserved.
- Page 42 Achten Sie darauf, Batterien nicht kurzzuschließen, in ein Feuer zu werfen oder neu aufzuladen. Hierbei besteht Explosionsgefahr. Zone 2 Zone 2 Zone 1 Zone 3 Zone 3 Zone 4 Zone 4 Zone 5 Copyright © 2013 Somfy SAS. All rights reserved.
- Page 43 Boden ein Gefahrenbereich für die Füße besteht, muss der Abstand zwischen der Unterkante der Torflügel und dem Boden mindestens 12 cm oder höchstens 5 mm betragen. 12 cm 5 mm 12 cm min. max. min. Copyright © 2013 Somfy SAS. All rights reserved.
- Page 44 ≤ 40 km/h Sand wird aufgewirbelt. Max. Gewicht 250 kg 76 mm 85 mm 105,05 mm 149,59 mm 786 mm 104,70 mm 164,49 mm 208 mm 30,00 mm 177,11 mm 187 mm 72 mm Copyright © 2013 Somfy SAS. All rights reserved.
- Page 45 - Ausgang zur Stromversorgung von Zubehör 24 V DC / max. 15 W - Eingang für Notstrombatterie - Eingang für Fotozellen - Eingang für Steuerung von sekundärem Ja (funktioniert nicht bei Batterie- Kontakt oder Solarstromversorgung) *Optionales Zubehör Copyright © 2013 Somfy SAS. All rights reserved.
- Page 46 Diese Verstärkungsschienen sollten sich im Idealfall auf einem Drittel der Höhe des Tors befinden. Wenn keine Verstärkungsschienen vorhanden sind, sind Gegenplatten aus Metall mit einer Renfort Stärke von ca. 4 mm vorzusehen. Copyright © 2013 Somfy SAS. All rights reserved.
- Page 47 • In der Erde verlegte Kabel müssen in einem Schutzrohr Grundstückseite Côté Propriété verlegt werden, dessen Durchmesser groß genug ist, um alle Kabel aufnehmen zu können. • Eine 230-V-Leitung so nahe wie möglich zum Montageort des Steuerkastens verlegen. Copyright © 2013 Somfy SAS. All rights reserved.
- Page 48 = 0 cm dem Pfeiler. Wir empfehlen die Nutzung eines Einsatzes, der dafür sorgt, dass der Befestigungswinkel der Spindel sich auf der Achse des Torscharniers befindet und Maß A gleich 0 cm ist. Copyright © 2013 Somfy SAS. All rights reserved.
- Page 49 Darauf achten, dass der Winkel horizontal ist, und dann die Befestigungslöcher des Winkels markieren. An den markierten Stellen 3 Löcher in jeden Pfeiler bohren (siehe Seite 8 für Informationen zum Bohrdurchmesser für die entsprechenden Schrauben). Copyright © 2013 Somfy SAS. All rights reserved.
- Page 50 Den Befestigungswinkel mit geeigneten Schrauben für die Befestigung am Pfeiler anbringen. Die Höhe des Winkels überprüfen. Bei Bedarf nachziehen. Die Spindel am Befestigungswinkel anbringen. Mit der Achse (10) blockieren. Copyright © 2013 Somfy SAS. All rights reserved.
- Page 51 Den Befestigungswinkel für den Flügel an der Verstärkungsschiene der Flügel positionieren. Prüfen, ob die Spindel genau horizontal sitzt. Die Seiten des Befestigungswinkels für die Flügel entsprechend markieren. Verriegelungsteil ausrasten Spindel Spindelbefestigungswinkel abnehmen. Copyright © 2013 Somfy SAS. All rights reserved.
- Page 52 Den Spindelbefestigungswinkel an den beiden Punkten an den Flügeln befestigen. Hierfür Schrauben verwenden, die für das Material der Verstärkungsschienen geeignet sind, und die mitgelieferten Unterlegscheiben (11). Die Spindel anbringen. Das Verriegelungsteil am Mitnehmerdorn einrasten, um ihn zu fixieren. Copyright © 2013 Somfy SAS. All rights reserved.
- Page 53 Der Bohrdurchmesser ist von dem für die Befestigung verwendeten Schraubentyp abhängig (siehe Seite 8). Den Befestigungswinkel an Pfeiler/Mauer anbringen. Das Unterteil des Steuerkastens anbringen, um die 2 Befestigungspunkte unten am Steuerkasten zu markieren. Copyright © 2013 Somfy SAS. All rights reserved.
- Page 54 Torflügel sich zuerst öffnen soll. Dieser Torflügel wird von Antrieb M1 bewegt. M1 est à droite M1 est à gauche Die Antriebe entsprechend den Angaben in nebenstehender Tabelle anschließen. Blau Braun Blau Braun Copyright © 2013 Somfy SAS. All rights reserved.
- Page 55 Phase und Neutralleiter an den Klemmen 16 und 17 anschließen (rotes Schild „230 V“). Das Versorgungskabel 230 V mit der mitgelieferten Kabelzugentlastungsklemme (18) fixieren. Eine Lüsterklemme am Erdungskabel (grün/gelb) befestigen Phase Neutralleiter und diese im Steuerkasten arrangieren. Versorgungskabel 230 V Copyright © 2013 Somfy SAS. All rights reserved.
- Page 56 Erneut die Taste 1 des Funksenders betätigen, um den Torflügel in der gewünschten Öffnungsposition anzuhalten. STOP Die Öffnungsanschläge in Kontakt mit der Kettennuss der Spindel bringen. Dann die Anschläge mit einem Sechskant-Inbusschlüssel mit Durchmesser 3 anziehen (2 Schrauben je Anschlag). Copyright © 2013 Somfy SAS. All rights reserved.
- Page 57 Die Öffnungsanschläge in Kontakt mit der Kettennuss der Spindel bringen. Dann die Anschläge mit einem Sechskant-Inbusschlüssel mit Durchmesser 3 anziehen (2 Schrauben je Anschlag). Taste 1 des Funksenders drücken, um das Tor vollständig zu schließen. Die Flügel schließen sich nacheinander. Copyright © 2013 Somfy SAS. All rights reserved.
- Page 58 Sie Hilfe in der Störungsbeseitigung auf Seite 29. Damit die Antenne optimal funktioniert, muss sie korrekt ausgerichtet sein. Das Erinnerungsschild (7) unten am Steuerkasten anbringen. Den Steuerkasten schließen und die Abdeckung verschrauben. Copyright © 2013 Somfy SAS. All rights reserved.
- Page 59 Wird beim Öffnen des Tors ein Hindernis erkannt (größerer Widerstand gegen Antrieb), hält das Tor an. Alle Benutzer müssen in die sichere Verwendung dieses elektrisch angetriebenen Tores eingewiesen werden (Standardbenutzung und Entriegelungsprozeduren). Zudem müssen sie über die regelmäßigen Pflichtprüfungen informiert werden. Copyright © 2013 Somfy SAS. All rights reserved.
- Page 60 Wenn die Fotozellen beim Schließen des Tors verdeckt werden, bleibt das Tor stehen und öffnet erneut. Nach Entfernung der Fotozellen die Stromversorgung zum Antrieb wiederherstellen und dann das Verfahren „Deaktivierung des automatischen Zulaufs – Rückkehr in den Standardbetrieb“ von Seite 26 durchführen. Copyright © 2013 Somfy SAS. All rights reserved.
- Page 61 • Lebensdauer: 3 Jahre. Sie können die Lebensdauer Ihrer Batterie verlängern, indem Sie Ihr Tor 3 Mal pro Jahr vom Strom trennen und es mit Hilfe der Batterie einige Male öffnen und schließen. Copyright © 2013 Somfy SAS. All rights reserved.
- Page 62 Wenn der Antrieb mit Solarstrom funktioniert: • das Tor kann nur mit Funksendern und fest Funkbedieneinheiten gesteuert werden (per Kabel angeschlossenen Steuerungen sind deaktiviert), • die per Kabel verbundenen Sicherheitseinrichtungen (Lichtschranke, gelbe Warnleuchte) bleiben aktiviert. Copyright © 2013 Somfy SAS. All rights reserved.
- Page 63 Wiederholen Sie das Verfahren „Aktivierung der Fußgängeröffnung“ mit der Taste, für die die Fußgängeröffnung deaktiviert werden soll. Die LED leuchtet auf und verlöscht wieder. Die Fußgängeröffnung ist an dieser Taste deaktiviert. Copyright © 2013 Somfy SAS. All rights reserved.
- Page 64 Der automatische Zulauf ist aktiviert. Zur Deaktivierung des automatischen Zulaufs und Rückkehr in den Standardbetrieb des Funksenders betätigen: Die LED blinkt. Drücken Sie 3 Mal auf die Taste 1 des Funksenders. Copyright © 2013 Somfy SAS. All rights reserved.
- Page 65 Die RTS-Funksender von Somfy können je nach Programmierung folgende Funktionen auslösen: • Vollöffnung des Tors • Fußgängeröffnung des Tors • Ansteuerung anderer RTS-Produkte von Somfy (Beispiele: Antrieb für Garagentor, Rollladen etc.) Vollöffnung Fußgängeröffnung oder andere RTS-Automatikvorrichtung von Somfy Anderes RTS-Produkt von Somfy Vollöffnung...
- Page 66 Zielmarkierung der Steuerelektronik an. <0,5s >2s Drücken Sie kurz eine Taste des einzulernenden Funksenders. „RADIO“ leuchtet verlöscht wieder, sobald Taste Funksenders losgelassen wird. Siehe „Einstellungen und programmierte Funksender löschen“ auf Seite 30. Copyright © 2013 Somfy SAS. All rights reserved.
- Page 67 In der Regel halten Batterien 2 Jahre. Entfernen Sie den Clip des Den Funksender öffnen. Nehmen Sie die Batterie mit Ersetzen Sie die Batterie (3 Funksenders. Hilfe eines Schraubenziehers V CR 2430). heraus. Copyright © 2013 Somfy SAS. All rights reserved.
- Page 68 Wenn die Antriebe entriegelt sind, kann das Tor bei einem Stromausfall manuell bewegt werden. Die Spindel anbringen. Das Verriegelungsteil am Das Verriegelungsteil ausrasten und die Spindel vom Mitnehmerdorn einrasten, um ihn zu fixieren. Spindelbefestigungswinkel abnehmen. Copyright © 2013 Somfy SAS. All rights reserved.
- Page 72 Somfy 50 Avenue du Nouveau Monde BP 250 - 74307 Cluses Cedex France www.somfy.com 0 820 055 055 (0,15€ la minute) 810377199 forum.somfy.fr www.somfy.pl Forum d’entraide : 07472 / 930 - 495 900 20 68 68 www.somfy.de www.somfy.es 8 (800) 555-60-70 808100153 www.somfy.ru/diy...
Need help?
Do you have a question about the SGS 501 and is the answer not in the manual?
Questions and answers