
Related Manuals for KaVo SCAN EXAM


Summary of Contents for KaVo SCAN EXAM
- Page 1 SCAN EXAM™ Digital imaging plate scanner User Manual ENGLISH 215948 rev.1 0.805.5059...
- Page 3 Copyright Copyright © 2016 by PaloDEx Group Oy. All rights reserved. KaVo and Scan eXam are either registered trademarks or trademarks of Kaltenbach & Voigt GmbH in the United States and/or other countries. Comfort Occlusal is either registered trademark or trademark of Soredex in the United States and/or other countries.
- Page 4 User manual 215948...
-
Page 5: Table Of Contents
Contents 1. The Scan eXam™ ............1 1.1 Introduction ............... 1 1.2 System installation ............. 2 Positioning the unit ............2 Positioning the PC ............. 3 Other devices ..............3 2. Intraoral imaging plate unit ......... 4 2.1 Main parts and controls ............4 2.2 Accessories ................ - Page 6 5. Unit care and maintenance ......... 32 5.1 Cleaning the unit ...............32 5.2 Disinfecting the unit ............32 5.3 Maintenance ..............33 5.4 Repair ................33 5.5 Disposal ................33 6. Symbols that may appear on the unit and accessories ... 34 7. Warnings and precautions .......... 36 Appendix A.
- Page 7 User manual 215948...
- Page 8 VIII User manual 215948...
-
Page 9: The Scan Exam
(the unit) which is part of the digital intraoral imaging plate system (the system). The complete system comprises the following: the Scan eXam digital imaging plate unit (the unit). Dental Imaging Plates (IPs), protective covers, hygiene bags and other related imaging plate accessories. -
Page 10: System Installation
1. The Scan eXam™ With the Express Share confi guration up to eight PCs can be used, one at a time, with the unit. NOTICE: Only personnel trained and authorized by the manufacturer of the unit are allowed to install and confi... -
Page 11: Positioning The Pc
1. The Scan eXam™ Positioning the PC The PC connected to the unit should not be used in the patient environment. The minimum horizontal distance between the patient and the PC is 1.5 m (4.5 ft). The minimum vertical distance between the patient and the PC is 2.5 m (6.5 ft). -
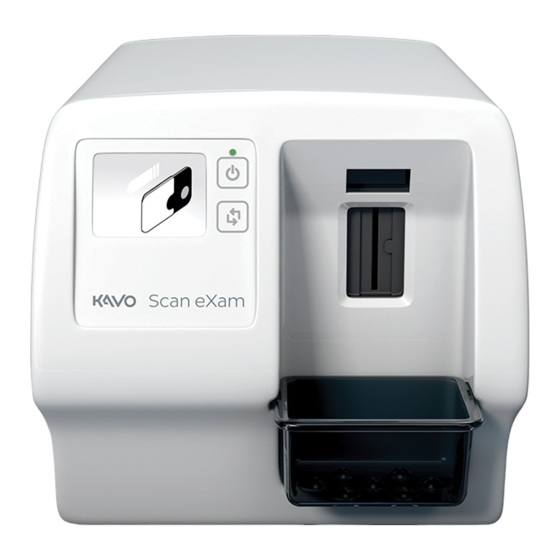
Page 12: Intraoral Imaging Plate Unit
2. Intraoral imaging plate unit 2. Intraoral imaging plate unit 2.1 Main parts and controls SCAN EXAM... -
Page 13: Accessories
Standard (STD) version. The standard ver- sion has no identifi cation mark on the active side of the plate. Protective covers. For IPs 0, 1, 2 and 3. Hygiene bags. For IPs 0, 1, 2 , 3 and Com- fort Occlusal™ 4C. SCAN EXAM... - Page 14 IP storage box For storing IPs safely and conveniently. Microfi ber cloth For cleaning IPs. IP holders For bitewing, periapical and endodontic expo- sures (optional, not included) See section 3.4 Imaging plate holders for more information. SCAN EXAM...
-
Page 15: Display Symbols And What They Mean
PC (e.g. PC number 2). UV disinfection in progress The system is carrying out automatic UV dis- infection cycle. Remaining cycle time will be displayed. Comfort Occlusal™ 4C mode System in occlusal projection imaging mode. SCAN EXAM... - Page 16 Comfort Occlusal™ 4C mode System in occlusal projection imaging mode, insert second size 3 IP. Unit door Protective cover and imaging plate Yellow: remove protective cover Imaging plate Yellow: wrong way round, rotate Protective cover Remove / disconnect Insert / connect SCAN EXAM...
- Page 17 Unit in UV disinfection mode, the remaining/ elapsed disinfection time is shown. Unit in erasing mode Check Something wrong or take alternative action. Dental imaging software Software not open, not ready or waiting for user action. Unit connection Not connected or connection not working. SCAN EXAM...
- Page 18 2. Intraoral imaging plate unit Rotate Error state and error number Check documentation supplied with the unit Unit in service mode (Service technicians only) SCAN EXAM...
-
Page 19: Using The System
1. PC: Switch on the PC connected to the unit. 2. PC: Open the dental imaging software and a new or existing patient card where you wish to store the intraoral images. 3. Press the on/off key to switch the unit SCAN EXAM... - Page 20 When the status light turns green and ready animation, indicating IP insertion, appears on the unit display, the unit is ready to use (in the ready state). NOTICE: If the ready animation does not appear, check the system setup described in the installation instructions. SCAN EXAM...
-
Page 21: Preparing An Ip For Exposure
IP must appear in the semicircular cut out. 3. Turn the protective cover and IP over so that the black side of the protective cover is uppermost. This makes it easier to slide the protective cover and IP into the hy- giene bag. SCAN EXAM... - Page 22 7. Turn the sealed hygiene bag over and check that the IP and protective cover are in the correct position. You must be able to see the light side of the protective cover and the metal disk on the IP. SCAN EXAM...
-
Page 23: Imaging Plate Holders
Problems caused by manually positioning the IP include: incorrect vertical alignment distortion cone cut off poor projection standardization inferior image quality For more information on imaging plate hold- ers and systems contact you dealer. SCAN EXAM... -
Page 24: Taking An Exposure
X-ray unit being used and may vary by ±1 step from the values in the following table. If the exposure time is too short images will be noisy. Such images may still usable for some diagnostic purposes. SCAN EXAM... - Page 25 3. Protect yourself from radiation and take the exposure. 4. After the exposure remove the sealed hy- giene bag from the patient’s mouth. CAUTION: If there is a risk of cross contamination, wash, disinfect and dry the hygiene bag before opening it. SCAN EXAM...
-
Page 26: Reading An Imaging Plate
2. Keep the IP in the protective cover so that you do not touch the IP or allow it to be exposed to ambient light, and then slide the protective cover and IP out of the hy- giene bag. SCAN EXAM... - Page 27 If after repositioning the IP it still does not slide into the unit press the Start key to manually switch the unit from the standby to the ready state and the IP will then slide into the unit when the protective cover is removed. SCAN EXAM...
- Page 28 For information on how to do this see sec- tion 3.9 Retrieve last image. 5. After the IP has been read it will be au- tomatically erased and then ejected from the unit into the plate collector. SCAN EXAM...
- Page 29 Refer to Appendix B.3.4 Workfl ow page. After the IP has been ejected or removed the ready animation will reappear on the display. The unit is now ready to read the next IP. SCAN EXAM...
-
Page 30: Express Share Confi Guration
Wait until the device is released or ready. GRAY - The device cannot be found, is switched off, disconnected or is still con- necting. Check that the device is on and connected to the PC and wait for the con- nection. SCAN EXAM... -
Page 31: Removing Ips From The Plate Collector
The unit will automatically exit the standby mode as soon as a new imaging plate is in- serted into the unit or when the Start key is pressed. After four hours the unit will exit the standby mode and automatically shut down. SCAN EXAM... -
Page 32: Retrieve Last Image
NOTICE: You can select different parameters (for example resolution) for the image to be retrieved. 4. PC: Click Save to close the Setup window. The last processed image is transferred to the PC. SCAN EXAM... -
Page 33: Shutting Down The Unit
(4 sec- onds) the start key. NOTICE: If there is an untransferred image in the unit’s memory the unit cannot be shut down. The image must be transferred fi rst. Refer to section 3.9 Retrieve last image. SCAN EXAM... -
Page 34: Ip Erasing Mode (Initial Erasing Of The Ips)
The IP can now be used to take an exposure. 4. To exit the erasing mode, either wait 15 seconds for the unit to automatically exit the mode, or press and hold down the Start key until the erase animation disap- pears. SCAN EXAM... -
Page 35: Taking An Occlusal Projection Image
5. Remove the sealed Comfort Occlusal 4C IP from the patient’s mouth. 6. Open the sealed Comfort Occlusal 4C IP. Remove the two size 3 IPs and scan them. SCAN EXAM... -
Page 36: Errors And Warnings
IP is read it indicates that the image may not be within the factory set quality limits. If the image looks okay no action is nec- essary. If the message appears frequently, contact your authorized distributor for as- sistance. SCAN EXAM... -
Page 37: Handling And Care Of Imaging Plates
4. Handling and care of imaging plates 4. Handling and care of imaging plates The correct use, handling, cleaning and storage of imaging plates guarantees the best image quality and maximum service life of the imaging plates. 4.1 General • X-ray exposures DO NOT cause IPs to age. -
Page 38: Cleaning
4. Handling and care of imaging plates 4.3 Cleaning If IPs are handled and stored correctly clean- ing should not be necessary or can be kept to an absolute minimum. Clean the IP if there you see any visible marks or stains (which are not obvious scratches) on the image or if there is a rea- son to believe that the IP is contaminated. -
Page 39: Replacement
4. Handling and care of imaging plates 4.5 Replacement Replace an IP if: • the image shows marks, spots or dots, which still appear on images even after the IP has been properly cleaned. • the IP is mechanically damaged (scratched) or badly bent. -
Page 40: Unit Care And Maintenance
96%. Never use abrasive, corrosive or sol- vent disinfectants. All surfaces must be dried before the unit is used. WARNING Do not use any disinfecting sprays as the va- por could ignite and cause injury. SCAN EXAM... -
Page 41: Maintenance
The unit includes some or all of the following parts that are made of or include materials that are non- environmentally friendly or hazardous: - electronic circuit boards - electronic components - UV lamp (Hg) SCAN EXAM... -
Page 42: Symbols That May Appear On The Unit And Accessories
Catalogue number Serial number Batch code DANGEROUS VOLTAGE LASER RADIATION ULTRAVIOLET RADIATION Operating instructions Refer to operating instructions for more information. The operating instructions can be supplied electronically or in paper format. Direct current Eternet connector RJ45 straight cable SCAN EXAM... - Page 43 This symbol indicates that the waste of electrical and electronic equipment must not be disposed as unsorted municipal waste and must be collected separately. Please contact an authorized representative of the manufacturer for information concerning the decommissioning of your equipment. SCAN EXAM...
-
Page 44: Warnings And Precautions
• This unit can interfere with other devices due to its EMC characteristics. • Other devices can interfere with this unit due to their EMC characteristics. SCAN EXAM... - Page 45 If this device will be used with 3rd party imaging application software not supplied by the manufacturer, the 3rd party imaging application software must comply with all local laws on patient information software. This includes, for example, the Medical Device Directive 93/42/EEC and/or FDA if applicable. SCAN EXAM...
- Page 46 Do not disconnect the unit’s PSU adapter before the network is operational and image has been transferred to imaging application software. • Due to Occlusal 4C projection imaging geometry and imaging plate positioning, accurate distance and angle measurements cannot be taken from occlusal projection images. SCAN EXAM...
-
Page 47: Appendix A. Technical Specifi Cations
Intended use The Scan eXam system is intended to be used only by dentist and other qualified dental professionals to process x-ray images exposed to the imaging plates from the intraoral complex of the skull. -
Page 48: Imaging Plates And Hygiene Bags
Disposal Observe relevant national requirements. PATIENT CONTACTING PARTS Part type: Type of contact: Contact duration: Imaging plate Mucosal membrane <5 min Disposable cover for Mucosal membrane <5 min imaging plate SCAN EXAM... -
Page 49: Main Dimensions
A. Technical Specifi cations A.3 Main dimensions SCAN EXAM... - Page 50 A. Technical Specifi cations Guidance and manufacturer’s declaration – electromagnetic emissions Emissions test Compliance Electromagnetic environment - guidance SCAN EXAM...
- Page 51 A. Technical Specifi cations Guidance and manufacturer’s declaration – electromagnetic immunity SCAN EXAM...
- Page 52 A. Technical Specifi cations Guidance and manufacturer’s declaration – electromagnetic immunity SCAN EXAM...
- Page 53 A. Technical Specifi cations SCAN EXAM...
- Page 54 A. Technical Specifi cations SCAN EXAM...
-
Page 55: Appendix B. Installation And Setup
The PC(s) connected to the unit should not be used in the patient environment. The minimum horizontal distance between the patient and the PC(s) is 1.5 m (4.5 ft). The minimum vertical distance between the patient and the PC(s) is 2.5 m (6.5 ft). SCAN EXAM... -
Page 56: Connecting The Unit To A Pc / Lan
The detection starts automatically at the software application install. 1. If the software is already installed or fails to start the Add Device Wizard automatically, launch it from the Image Capturing Window. 2. From the Image capture window press Settings. SCAN EXAM... - Page 57 B. Installation and setup 3. This will open a Settings dialog. Click Add to launch the Add Device Wizard. 4. Select the desired device from the list and press Finish to complete the connection confi guration. SCAN EXAM...
- Page 58 3. The Add Device manually window will appear. The window displays a pictorial list of all the devices that can be connected to the 4. Click the picture of SCAN EXAM to select Then click Next, or double click the picture of the device. SCAN EXAM...
- Page 59 The connection to the unit will be checked. After the connection has been checked and the device connected, click Finish. NOTICE: If you wish to change the IP-address of the device click the Change device IP address... button and follow the onscreen instructions that appear. SCAN EXAM...
- Page 60 See the instructions in chapter B3 to enable the Express Share. The procedure must be repeated at all workstations operating the unit. If your system does not allow the direct connection SCAN EXAM...
- Page 61 B. Installation and setup B.2.4 Activate the Scan eXam unit From the image capturing window of the imaging application software, activate the unit by clicking the appropriate device button. Before activating the device, observe the current status of the device. Before processing the imaging plates, make sure that the unit is READY.
-
Page 62: Setup Options
B. Installation and setup B.3 Setup options The Scan eXam setup options allow you to confi gure the unit to the user’s clinical preferences. From the imaging application software you are using select unit Device settings/Device page (for more instruction on how to access setup page, review application software manual). - Page 63 PC cannot use the device until the fi rst PC releases the device. The timeout feature ensures that no device can be permanently reserved and unavailable to other users. The device can be reserved in advance from another PC. SCAN EXAM...
- Page 64 PC. 2. From the Image page click the Retrieve now button to retrieve the last read image. NOTICE: If required you can select different parameters (e.g. resolution, show image preview etc.) for the image to be retrieved. B-10 SCAN EXAM...
- Page 65 Image adjustments can be done with the appropriate sliders and check box(s). Auto Brightness On / Off Brightness -100 ... 100 Contrast -100 ... 100 Gamma -100 ... 100 Sharpening 0 ... 100 Noise reduction Off, Classic, Progressive SCAN EXAM B-11...
- Page 66 Cover removal: after the imaging plate in protective cover have been inserted into the plate carrier, the unit will automatically start when the protective cover is removed. B-12 SCAN EXAM...
- Page 67 The Leave in plate carrier option is recommended for users who want to handle the IPs with more care and reduce wear and tear on them. This option extends IP service life and allows greater hygiene standards to be observed. SCAN EXAM B-13...
- Page 68 B.3.5 Power Options page Standby after (seconds): Allows you to select the length of time the scanner will remain unused before it enters the standby mode (Display switches off and power LED turns yellow). B-14 SCAN EXAM...
- Page 69 Disinfection frequency: There are three options: During idle and shutdown: UV disinfection is automatically performed when the unit is in the idle mode and before shutdown. There is no user indication of this taking place. SCAN EXAM B-15...
- Page 70 UV disinfection will automatically stop after 15 minutes. If you wish to stop manual UV disinfection before the complete cycle is fi nished, press the Manual UV disinfection control / Cancel key or press and hold down (4 seconds) the start key. B-16 SCAN EXAM...
- Page 71 This will cancel the Occlusal 4C mode for this operation and produce a single size 3 image. Size 3 image from each size 3 plate This option allows size 3 IPs to read as individual IPs. SCAN EXAM B-17...
- Page 72 B.3.6 Default Exposure Values page If required, the exposure values used to take an exposure can be entered into these fi elds. The values will be added to the image metadata. Voltage (kV) Current (mA) Time (s) B-18 SCAN EXAM...
-
Page 73: Troubleshooting
Replace if faulty. PROBLEM Animation displaying either Unit connection or Dental imaging software (fl ashing yellow) appear on the unit display and the unit will not work. CAUSE / SOLUTION • Defective RJ45 cable. Replace. SCAN EXAM B-19... - Page 74 If the Insert animation appears on the unit display while inserting the IP but the unit does not insert the IP into the unit nor start scanning, the refl ective sensor in the unit door is faulty (refer to the service manual). B-20 SCAN EXAM...
- Page 75 Ethernet link. If the link is active it does not necessarily mean that the unit is physically connected to PC. It only means that the unit is physically connected to something that is Ethernet compatible (hub, switch, another PC etc.) SCAN EXAM B-21...
- Page 76 The unit display is not active but the power on / off status light is on, green or yellow. CAUSE / SOLUTION • Green LED - defective display or its cabling. Replace • Yellow LED - unit is in standby (energy save) mode. B-22 SCAN EXAM...
Need help?
Do you have a question about the SCAN EXAM and is the answer not in the manual?
Questions and answers