
Related Manuals for Kramer VA-4X


Summary of Contents for Kramer VA-4X
- Page 1 USER MANUAL MODEL: VA-4X HDMI Extender / Toolbox P/N: 2900-301291 Rev 1 www.kramerAV.com...
-
Page 2: Table Of Contents
Kramer Electronics Ltd. Contents Introduction Getting Started Overview Typical Applications Defining VA-4X HDMI Extender / Toolbox Mounting VA-4X Connecting VA-4X Operating and Controlling VA-4X Configuring Settings – OSD Menu Configuring EDID via EDID Manager Upgrading Firmware Technical Specifications Default EDID... -
Page 3: Introduction
Kramer Electronics Ltd. Introduction Welcome to Kramer Electronics! Since 1981, Kramer Electronics has been providing a world of unique, creative, and affordable solutions to the vast range of problems that confront the video, audio, presentation, and broadcasting professional on a daily basis. In recent years, we... -
Page 4: Overview
European Advanced Recycling Network (EARN) and will cover any costs of treatment, recycling and recovery of waste Kramer Electronics branded equipment on arrival at the EARN facility. For details of Kramer’s recycling arrangements in your particular country go to our recycling pages at www.kramerav.com/support/recycling. -
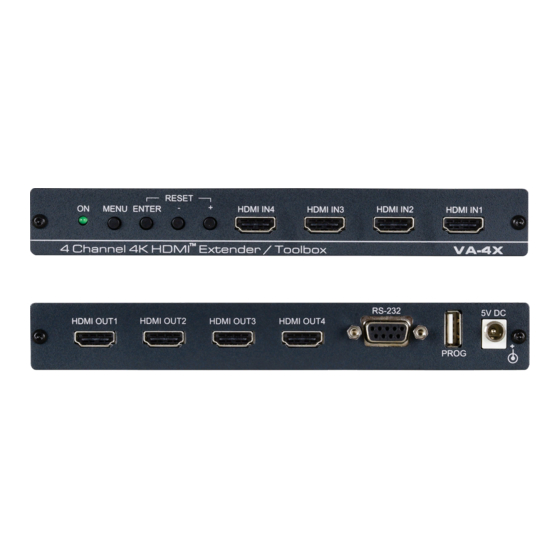
Page 5: Defining Va-4X Hdmi Extender / Toolbox
Connect to a PC to control VA-4X via the EDID Manager software. Connector PROG USB Port Connect to a USB memory stick for firmware upgrade. 5V DC Connect to included power adapter. VA-4X – Defining VA-4X HDMI Extender / Toolbox... -
Page 6: Mounting Va-4X
Kramer Electronics Ltd. Mounting VA-4X This section provides instructions for mounting VA-4X. Before installing, verify that the environment is within the recommended range: • Operation temperature – 0 to 40C (32 to 104F). • Storage temperature – -40 to +70C (-40 to +158F). -
Page 7: Connecting Va-4X
Kramer Electronics Ltd. Connecting VA-4X Always switch off the power to each device before connecting it to your VA-4X. After connecting your VA-4X, connect its power and then switch on the power to each device. Front Panel Back Panel HDMI... -
Page 8: Operating And Controlling Va-4X
10). Configuring Settings – OSD Menu The OSD enables you to configure VA-4X. When using the menu, it appears as an overlay on top of any image that appears on the display. The menu is operated using the front panel buttons. - Page 9 Display Select is activated and editable. Figure 6: Main OSD Menu with Editable Display Select 5. Use the + or – button to select the desired option. 6. Press the ENTER button. The selected option is set. VA-4X – Operating and Controlling VA-4X...
- Page 10 1. In the OSD, go to Channel X (X = 1, 2, 3, or 4) > Input EDID. 2. Select one of the following EDID sources: ▪ Sink – Display. ▪ User – User defined (see Upload EDID and Store on VA-4X on page 12). ▪ Internal – Default EDID (see Default EDID on page 20).
- Page 11 2. Select the output on which you want the OSD to appear or select All Channels to display the OSD menu on all four outputs. 3. Go to Display Timeout and select the amount of time for the OSD to remain on the screen after the last button press. VA-4X – Operating and Controlling VA-4X...
-
Page 12: Configuring Edid Via Edid Manager
To use EDID Manager software: 1. Download the EDID Manager software to your computer at www.kramerav.com/product/VA-4X#Tab_Resources. 2. Power on VA-4X and connect it to your computer via the RS-232 9-pin D-sub Connector 3. Open EDID Manager software. VA-4X – Operating and Controlling VA-4X... - Page 13 Kramer Electronics Ltd. The EDID Manager window appears: Figure 8: EDID Manager – EDID Controller Tab 4. Click Search. VA-4X – Operating and Controlling VA-4X...
- Page 14 ▪ Create or Modify EDID, see page 16. Upload EDID and Store on VA-4X To upload an EDID from your computer and store it on VA-4X: 1. Select EDID Controller. The EDID Controller tab appears (Figure 2. In the Upload area, click Open.
- Page 15 Figure 10: EDID Manager – File Browser 3. Select an EDID file and click Open. The selected file name appears in the Upload area. Figure 11: EDID Manager – EDID File Selected 4. Click Upload. VA-4X – Operating and Controlling VA-4X...
- Page 16 Kramer Electronics Ltd. The selected EDID file is uploaded to User. Figure 12: EDID Manager – Uploading EDID Download EDID from VA-4X To download an EDID from VA-4X to your computer: 1. Select EDID Controller. The EDID Controller tab appears (Figure 2.
- Page 17 3. Navigate to the folder in which you want to save the EDID file and click Save. The selected EDID is downloaded and saved to your computer. Viewing EDID Details To view EDID details: 1. Select EDID Analyzer. VA-4X – Operating and Controlling VA-4X...
- Page 18 Kramer Electronics Ltd. The EDID Analyzer tab appears. Figure 14: EDID Manager – EDID Analyzer Tab 2. View EDID details. Create or Modify EDID To create or modify EDID: 1. Select EDID Creator. VA-4X – Operating and Controlling VA-4X...
- Page 19 Audio1, Audio2 –EDID supported audio formats, audio frequencies, channels, and speaker locations. ▪ Color Space – EDID supported color formats and bit depths. ▪ Other data – CEC Address. 4. Click Save. 5. Click Upload to upload the Bin file to USER. VA-4X – Operating and Controlling VA-4X...
-
Page 20: Upgrading Firmware
Caution: Do not power cycle or operate the device during firmware upgrade. 3. After the upgrade is complete, remove the USB memory stick and power cycle VA-4X. The firmware is upgraded. VA-4X – Operating and Controlling VA-4X... -
Page 21: Technical Specifications
1.0kg (2.2lbs) approx. Accessories Included Power adapter, bracket set Optional For optimum range and performance use the recommended HDMI, USB, and serial Kramer cables available at www.kramerav.com/product/VA-4X Specifications are subject to change without notice at www.kramerav.com VA-4X – Technical Specifications... -
Page 22: Default Edid
1024 x 768p at 85Hz - VESA STD 1280 x 1024p at 85Hz - VESA STD Report information Date generated... 23/07/2020 Software revision..2.91.0.1043 Data source....Registry Operating system..10.0.18362.2 Raw data 00,FF,FF,FF,FF,FF,FF,00,2D,B2,1D,03,31,00,00,00,13,1A,01,03,80,24,1D,8C,EA,9C,20,9C,54,4F,8F,26, 21,52,56,2F,CF,00,A9,40,81,80,90,40,D1,C0,31,59,45,59,61,59,81,99,02,3A,80,18,71,38,2D,40,58,2C, 45,00,10,09,00,00,00,1E,9E,20,00,90,51,20,1F,30,48,80,36,00,10,0A,00,00,00,1C,00,00,00,FC,00,46, 43,2D,31,37,34,0A,20,20,20,20,20,20,00,00,00,FD,00,17,55,1B,5B,11,00,0A,20,20,20,20,20,20,01,B1 VA-4X – Default EDID... - Page 23 Electronics products, this product must be insured during shipment, with the insurance and shipping charges prepaid by you. If this product is returned uninsured, you assume all risks of loss or damage during shipment. Kramer Electronics will not be responsible for any costs related to the removal or re- installation of this product from or into any installation.
- Page 24 SAFETY WARNING Disconnect the unit from the power supply before opening and servicing For the latest information on our products and a list of Kramer distributors, visit our website where updates to this user manual may be found. We welcome your questions, comments, and feedback.
Need help?
Do you have a question about the VA-4X and is the answer not in the manual?
Questions and answers