
Related Manuals for Kramer VM-3HDT


Summary of Contents for Kramer VM-3HDT
- Page 1 USER MANUAL MODELS: VM‑4HDT 1:4 HDMI to HDBT DA VM‑3HDT 1:3 HDBT DA/Extender VM‑2HDT 1:2 HDBT DA/Extender P/N: 2900-300486 Rev 4 www.kramerAV.com...
-
Page 2: Table Of Contents
Operating the VM‑4HDT, VM‑3HDT and VM‑2HDT IR and RS-232 Signal Routing EDID Configuration Firmware Upgrade Technical Specifications Default Communication Parameters Default EDID Protocol 3000 Understanding Protocol 3000 Kramer Protocol 3000 Syntax Kramer Protocol 3000 Commands VM‑4HDT, VM‑3HDT, VM‑2HDT – Contents... -
Page 3: Introduction
Kramer Electronics Ltd. Introduction Welcome to Kramer Electronics! Since 1981, Kramer Electronics has been providing a world of unique, creative, and affordable solutions to the vast range of problems that confront the video, audio, presentation, and broadcasting professional on a daily basis. In recent years, we... -
Page 4: Safety Instructions
European Advanced Recycling Network (EARN) and will cover any costs of treatment, recycling and recovery of waste Kramer Electronics branded equipment on arrival at the EARN facility. For details of Kramer’s recycling arrangements in your particular country go to our recycling pages at http://www.kramerelectronics.com/support/recycling/. -
Page 5: Typical Applications
I-EDIDPro™ Kramer Intelligent EDID Processing™ – An intelligent EDID handling, processing and pass-through algorithm that ensures Plug and Play operation for HDMI source and display systems. • Kramer Equalization & re-Klocking™ Technology – Rebuilds the digital signal integrity to travel longer distances. Advanced and User-friendly Operation •... -
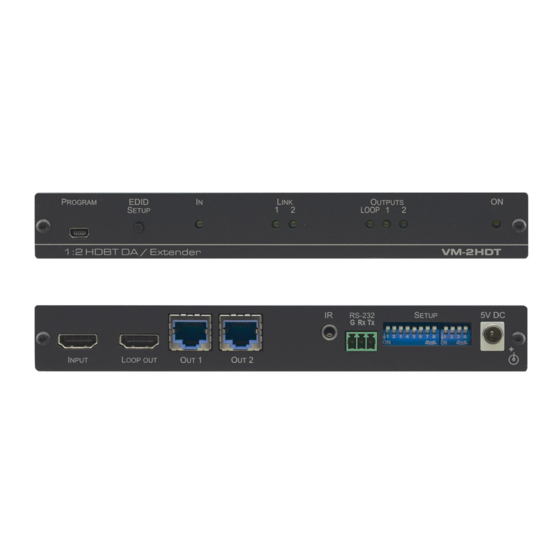
Page 6: Defining The Hdmi To Hdbt Da
Kramer Electronics Ltd. Defining the HDMI to HDBT DA Figure 1 defines the VM‑4HDT. Figure 1: VM‑4HDT 1:4 HDMI to HDBT DA Figure 2 defines the VM‑3HDT. Figure 2: VM‑3HDT 1:3 HDBT DA/Extender Figure 3 defines the VM‑2HDT. Figure 3: VM‑2HDT 1:2 HDBT DA/Extender... - Page 7 EDID Designer. K-Upload and EDID Designer can be downloaded from our Web site at: www.kramerav.com/manual/VM-4HDT. To use the mini USB port, you need to download and the Kramer USB driver from our Web site at: www.kramerav.com/support/product_downloads.asp and install it.
-
Page 8: Connecting The Vm-4Hdt, Vm-3Hdt And Vm-2Hdt
Kramer Electronics Ltd. Connecting the VM‑4HDT, VM‑3HDT and VM‑2HDT Always switch off the power to each device before connecting it to your VM‑4HDT. After connecting your VM‑4HDT, connect its power and then switch on the power to each device. To connect the VM‑4HDT as illustrated in the example in... - Page 9 Kramer Electronics Ltd. Figure 4: Connecting the VM‑4HDT Figure 5: Connecting the VM‑3HDT / VM‑2HDT VM‑4HDT, VM‑3HDT, VM‑2HDT – Connecting the VM‑4HDT, VM‑3HDT and VM‑2HDT...
-
Page 10: Hdbt Rj-45 Pinout
Use a straight pin-to-pin cable with RJ-45 connectors. We recommend that for HDBT cables, the ground shielding be connected/soldered to the connector shield. For optimum range and performance use the recommended Kramer cables available at www.kramerav.com/product/VM-4HDT. PIN EIA /TIA 568B... -
Page 11: Operating The Vm-4Hdt, Vm-3Hdt And Vm-2Hdt
Kramer Electronics Ltd. Operating the VM‑4HDT, VM‑3HDT and VM‑2HDT This section describes the following functions • IR and RS-232 Signal Routing on page 9. • Acquiring an EDID on page 12. IR and RS-232 Signal Routing The VM‑4HDT can send or receive IR and RS-232 commands via the four HDBT output ports. - Page 12 Projector IR signal Routing To route the IR signal you have to use the Kramer external IR sensor on one end and the Kramer IR emitter cable on the other end. In this example, an IR emitter is connected to the streamer and IR sensors are connected to each TP-580R device.
-
Page 13: Edid Configuration
Kramer Electronics Ltd. In the same way, if RS-232 is also connected to the displays on TP-580R (1) and TP-580R (2) (not shown in Figure 9) they can also receive specific control commands each, which will be ignored by devices of a different model. - Page 14 2. Connect the device to your PC via the mini USB port. 3. Follow EDID designer instructions. To use the mini USB port, you need to download and the Kramer USB driver from our Web site at: www.kramerav.com/support/product_downloads.asp and install it.
-
Page 15: Firmware Upgrade
The latest firmware version and the latest version of K-UPLOAD and installation instructions can be downloaded from our Web site at www.kramerav.com/downloads/VM-4HDT. To use the mini USB port, you need to download and the Kramer USB driver from our Web site at: www.kramerav.com/support/product_downloads.asp and install it. -
Page 16: Technical Specifications
Kramer Electronics Ltd. Technical Specifications VM‑4HDT Input HDMI On a female HDMI connector Outputs 4 HDBT On RJ-45 female connectors VM‑3HDT Input HDMI On a female HDMI connector Outputs 1 LOOP HDMI On a female HDMI connector 3 HDBT On RJ-45 female connectors VM‑2HDT... -
Page 17: Default Communication Parameters
Kramer Electronics Ltd. Default Communication Parameters RS-232 Baud Rate: 115,200 Data Bits: Stop Bits: Parity: None Factory Reset Protocol 3000 FACTORY command to reset to factory default configuration RS-232 Command Format: ASCII protocol 3000 Example (Get the HDCP state of output 2): #HDCP-STAT? 1,2<cr>... - Page 18 Kramer Electronics Ltd. 720 x 480i at 60Hz - Doublescan (16:9, 32:27) 720 x 576i at 50Hz - Doublescan (16:9, 64:45) 640 x 480p at 60Hz - Default (4:3, 1:1) NB: NTSC refresh rate = (Hz*1000)/1001 CE audio data (formats supported)
-
Page 19: Protocol 3000
PC to the serial or Ethernet port on the VM‑4HDT. To enter CR press the Enter key (LF is also sent but is ignored by the command parser). Commands sent from various non-Kramer controllers (e.g., Crestron) may require special coding for some characters (such as, /X##). For more information, refer to your controller’s documentation. -
Page 20: Understanding Protocol 3000
Kramer Electronics Ltd. For more information about Protocol 3000 commands, see: • Understanding Protocol 3000 on page 18. • Kramer Protocol 3000 Syntax on page 19. • Kramer Protocol 3000 Commands on page 19. Understanding Protocol 3000 Protocol 3000 commands are structured according to the following: •... -
Page 21: Kramer Protocol 3000 Syntax
Kramer Electronics Ltd. Kramer Protocol 3000 Syntax The Kramer Protocol 3000 syntax uses the following delimiters: • CR = Carriage return (ASCII 13 = 0x0D) • LF = Line feed (ASCII 10 = 0x0A) • SP = Space (ASCII 32 = 0x20) Some commands have short name syntax in addition to long name syntax to enable faster typing. - Page 22 Kramer Electronics Ltd. Command Description RESET Reset device (system mandatory) Get device serial number (system mandatory) DISPLAY? Get output HPD status SIGNAL? Get input signal lock status (system) Functions Permission Transparency Set: End User Public Get: Description Syntax Set: Protocol handshaking...
- Page 23 Kramer Electronics Ltd. HELP Function Permission Transparency Set: HELP Get: End User Public Description Syntax Set: #HELPCR Get: Get command list or help for specific command Response Multi-line: ~nn@Device available protocol 3000 commands:CR LFcommand,SPcommand…CR LF Parameters COMMAND_NAME – name of a specific command...
- Page 24 Kramer Electronics Ltd. NAME Function Permission Transparency NAME Set: Administrator Public NAME? Get: End User Public Description Syntax #NAMESPmachine_nameCR Set: Set machine (DNS) name #NAME?CR Get: Get machine (DNS) name Response Set: ~nn@NAMESPmachine_nameCR LF Get: ~nn@NAME?SPmachine_nameCR LF Parameters machine_name – String of up to 15 alpha-numeric chars (can include hyphen, not at the beginning or...
- Page 25 Kramer Electronics Ltd. RESET Functions Permission Transparency Set: RESET Administrator Public Get: Description Syntax #RESETCR Set: Reset device Get: Response ~nn@RESETSPOKCR LF Notes To avoid locking the port due to a USB bug in Windows, disconnect USB connections immediately after running this command.
- Page 26 Kramer Electronics Ltd. DISPLAY? Function Permission Transparency Set: DISPLAY? End User Public Description Syntax Set: #DISPLAY?SPout_idCR Get: Get output HPD status Response ~nn@DISPLAYSPout_id,statusCR LF Parameters out_id – Output number for : 1 (Output 1), 2 (Output 2), 3 (Output 3), 4 (Output 4); for VM‑4HDT...
- Page 27 Kramer Electronics Ltd. EDID Handling Commands Additional EDID data functions can be performed via a compatible EDID management application, such as Kramer EDID Designer (see www.kramerav.com/product/EDID%20Designer). Command Description CPEDID Copy EDID data from the output to the input EEPROM CPEDID...
- Page 28 Electronics products, this product must be insured during shipment, with the insurance and shipping charges prepaid by you. If this product is returned uninsured, you assume all risks of loss or damage during shipment. Kramer Electronics will not be responsible for any costs related to the removal or re- installation of this product from or into any installation.
- Page 29 SAFETY WARNING Disconnect the unit from the power supply before opening and servicing For the latest information on our products and a list of Kramer distributors, visit our Web site where updates to this user manual may be found. We welcome your questions, comments, and feedback.
Need help?
Do you have a question about the VM-3HDT and is the answer not in the manual?
Questions and answers