
Subscribe to Our Youtube Channel
Related Manuals for Canvas ASHCROFT


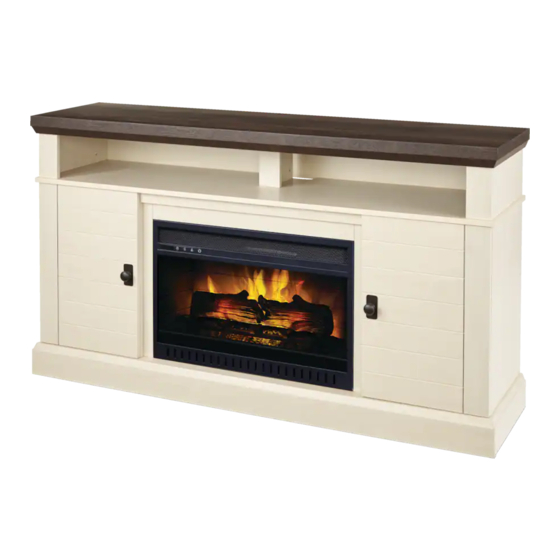
Summary of Contents for Canvas ASHCROFT
- Page 1 60” ASHCROFT MEDIA FIREPLACE MODEL NO. 064-4017-6 ASSEMBLY INSTRUCTIONS HAVING TROUBLE? TOLL-FREE: 1-888-670-6684...
- Page 2 From on-trend furniture pieces to holiday décor and all your outdoor living essentials, CANVAS®️ makes it easy to refresh your space to reflect your unique style and the way you live every day. We would love to hear from you and welcome your thoughtful feedback.
-
Page 3: Table Of Contents
This fireplace should not be used as a drying rack for clothing. Christmas stockings or decorations should not be hung on it or near it. ASHCROFT MEDIA FIREPLACE... -
Page 4: Safety Information
Arrange the power cord away from 8. There is a thermostat limiter inside the traffic areas and where it will not be tripped over. heater. When the inner temperature ASHCROFT MEDIA FIREPLACE... - Page 5 The use of grounded adapters are banned in certain jurisdictions in Canada due to safety concerns. Use of grounded adapters on two-slot receptacles is unsafe and should only be installed by a certified electrician. Check with local laws to ensure compliance with legal requirements. ASHCROFT MEDIA FIREPLACE...
-
Page 6: Parts List
Middle Stile Upper Side Panel Upper Side Panel Moulding Upper Partition Panel Upper Partition Panel Moulding Adjustable Shelf Firebox Support Upper Back Panel Lower Side Back Panel Door Panel WH100-26C2D-R Fireplace Insert 00RC006 Remote Control with Battery ASHCROFT MEDIA FIREPLACE... - Page 7 00RC006 WH100-26C2D-R ASHCROFT MEDIA FIREPLACE...
- Page 8 24 + (3) Hinge L-shaped Metal Bracket Knob Knob Bolt Cam Lock Cover 26 + (3) Rubber Bumper 4 + (1) Acrylic Stopper Glue Touch-up Pen Tipping Restraint Hardware Hardware indicated in brackets ( ) are extra if needed. ASHCROFT MEDIA FIREPLACE...
- Page 9 ASHCROFT MEDIA FIREPLACE...
-
Page 10: Step-By-Step Guide
REQUIRES A, B, C, CC Securely screw the CAM BOLTS (CC) into the designated small holes on the TOP PANEL (A) and LOWER SIDE PANELS (B and C) using a cross-head screwdriver. X 12 Not actual size ASHCROFT MEDIA FIREPLACE... - Page 11 Securely screw the CAM BOLTS (CC) into the designated small holes on the MIDDLE SHELF (D), BOTTOM PANEL (E), UPPER SIDE PANEL MOULDINGS (M) and UPPER PARTITION PANEL MOULDING (O) using a cross-head screwdriver. X 25 Not actual size ASHCROFT MEDIA FIREPLACE...
- Page 12 STEP-BY-STEP GUIDE STEP 3 REQUIRES E, B, C, AA, VV Glue the WOOD DOWELS (AA) into the inner holes on the BOTTOM PANEL (E) and LOWER SIDE PANELS (B and C) as shown. Not actual size ASHCROFT MEDIA FIREPLACE...
- Page 13 STEP 4 REQUIRES F, G, J, AA, VV Glue the WOOD DOWELS (AA) into the inner holes on the BOTTOM FRONT STRETCHER (F), BOTTOM REAR STRETCHER (G) and MIDDLE CROSSBAR (J) as shown. Not actual size ASHCROFT MEDIA FIREPLACE...
- Page 14 STEP-BY-STEP GUIDE STEP 5 REQUIRES D, J, BB Attach the MIDDLE CROSSBAR (J) to the MIDDLE SHELF (D) by engaging three CAM LOCKS (BB). Not actual size ASHCROFT MEDIA FIREPLACE...
- Page 15 STEP 6 REQUIRES E, G, BB Attach the BOTTOM REAR STRETCHER (G) to the BOTTOM PANEL (E) by engaging four CAM LOCKS (BB). Not actual size ASHCROFT MEDIA FIREPLACE...
- Page 16 STEP-BY-STEP GUIDE STEP 7 REQUIRES E, F, BB Attach the BOTTOM FRONT STRETCHER (F) to the BOTTOM PANEL (E) by engaging four CAM LOCKS (BB). Not actual size ASHCROFT MEDIA FIREPLACE...
- Page 17 Align the large holes on both LOWER SIDE PANELS (B and C) with inserted WOOD DOWELS (AA) and press them together. Attach the LOWER SIDE PANELS (B and C) in place by engaging six CAM LOCKS (BB). Not actual size ASHCROFT MEDIA FIREPLACE...
- Page 18 STEP-BY-STEP GUIDE STEP 9 REQUIRES H, I, K, AA, VV Glue the WOOD DOWELS (AA) into the inner holes on the LOWER PARTITION PANELS (H and I) and MIDDLE STILES (K) as shown. X 12 Not actual size ASHCROFT MEDIA FIREPLACE...
- Page 19 STEP 10 REQUIRES H, I, K, EE Fasten the MIDDLE STILES (K) to the LOWER PARTITION PANELS (H and I) with two MEDIUM FLAT-HEAD SCREWS (EE) in each. Not actual size The pilot holes face inward ASHCROFT MEDIA FIREPLACE...
- Page 20 STEP-BY-STEP GUIDE STEP 11 REQUIRES E, H, I, FF Attach the LOWER PARTITION PANELS (H and I) to the BOTTOM PANEL (E) with four LONG FLAT-HEAD SCREWS (FF). Not actual size ASHCROFT MEDIA FIREPLACE...
- Page 21 REQUIRES D, BB Ask for assistance to position the MIDDLE SHELF (D) onto the inserted WOOD DOWELS (AA) on the vertical panels properly, and fasten it in place by engaging eight CAM LOCKS (BB). Not actual size ASHCROFT MEDIA FIREPLACE...
- Page 22 Using the pilot holes as a guide, fasten two TRIANGLE METAL PLATES (JJ) at the bottom joints between the BOTTOM FRONT STRETCHER (F) and LOWER SIDE PANELS (B and C) using four LONG PAN-HEAD SCREWS (LL) per plate. Not actual size ASHCROFT MEDIA FIREPLACE...
- Page 23 STEP 14 REQUIRES KK Screw the FLOOR LEVELLERS (KK) into the threaded sockets on the TRIANGLE METAL PLATES (JJ) and set to the correct height. Not actual size ASHCROFT MEDIA FIREPLACE...
- Page 24 STEP-BY-STEP GUIDE STEP 15 REQUIRES D, CC Stand the assembled unit upright. Securely screw the CAM BOLTS (CC) into the designated small holes on the top face of MIDDLE SHELF (D) using a cross-head screwdriver. Not actual size ASHCROFT MEDIA FIREPLACE...
- Page 25 REQUIRES L, M, N, AA, VV Glue the WOOD DOWELS (AA) into the inner holes on the UPPER SIDE PANEL (L), UPPER SIDE PANEL MOULDINGS (M) and UPPER PARTITION PANEL (N) as shown. X 17 Not actual size ASHCROFT MEDIA FIREPLACE...
- Page 26 Attach the UPPER SIDE PANEL MOULDINGS (M) to UPPER SIDE PANELS (L) by engaging two CAM LOCKS (BB) in each. Repeat the same step to attach the UPPER PARTITION PANEL MOULDING (O) to the UPPER PARTITION PANEL (N). Not actual size ASHCROFT MEDIA FIREPLACE...
- Page 27 STEP 18 REQUIRES L, N, BB Attach the UPPER SIDE PANELS (L) and UPPER PARTITION PANEL (N) to the MIDDLE SHELF (D) by engaging six CAM LOCKS (BB). Not actual size ASHCROFT MEDIA FIREPLACE...
- Page 28 STEP-BY-STEP GUIDE STEP 19 REQUIRES A, BB Place the TOP PANEL (A) onto the inserted WOOD DOWELS (AA) on the vertical panels properly, and fasten it in place with six CAM LOCKS (BB). Not actual size ASHCROFT MEDIA FIREPLACE...
- Page 29 Ask for assistance to lay down the unit on its front edge as shown. Attach two METAL BRACKETS (II) at the joints where the MIDDLE CROSSBAR (J) meets the MIDDLE STILES (K) with four SHORT FLAT-HEAD SCREWS (DD). Not actual size ASHCROFT MEDIA FIREPLACE...
- Page 30 TOP PANEL (A). Attach it in place using the provided WASHER-HEAD SCREWS (HH). Repeat to attach the LOWER SIDE BACK PANELS (S) to the mantel with the provided WASHER-HEAD SCREWS (HH). X 38 Not actual size ASHCROFT MEDIA FIREPLACE...
- Page 31 PANEL (T). Secure the door hinges in place with two ZINC SCREWS (NN) in each. Attach one KNOB (QQ) to the front side of the door with one KNOB BOLT (RR). Repeat to attach the other KNOB (QQ) and HINGES (OO) to the other DOOR PANEL (T). Not actual size ASHCROFT MEDIA FIREPLACE...
- Page 32 Stand the unit upright and position it near the final location. Pick up the DOOR PANELS (T) and fasten the HINGE BASES onto the LOWER SIDE PANELS (B and C) with four ZINC SCREWS (NN) in each. X 16 Not actual size ASHCROFT MEDIA FIREPLACE...
- Page 33 Make sure you place the four shelf supports at the same level so the shelf is not tilted. Tilt and rest the ADJUSTABLE SHELVES (P) onto the shelf supports. Not actual size ASHCROFT MEDIA FIREPLACE...
- Page 34 STEP 25 REQUIRES SS, TT Plug the CAM LOCK COVERS (SS) onto the visible cam locks to conceal the cams. Stick the RUBBER BUMPERS (TT) on the outer corners of doors as shown. X 26 Not actual size ASHCROFT MEDIA FIREPLACE...
- Page 35 DO NOT drag the insert across the BOTTOM PANEL (E) as it may scratch the unit. Using the pilot holes as a guide, fasten the FIREBOX SUPPORT (Q) between the LOWER PARTITION PANELS (H and I) with four SHORT PAN-HEAD SCREWS (GG). Not actual size ASHCROFT MEDIA FIREPLACE...
- Page 36 PANEL (A). Press down on the acrylic stopper to help adhesion. At the back of TOP PANEL (A), grip the heads of plastic tacks with pliers, and with a twisting motion, pull tacks loose to remove the acrylic stopper template. ASHCROFT MEDIA FIREPLACE...
- Page 37 Follow the instructions printed on the plastic bag containing the tipping restraint hardware to attach the TIPPING RESTRAINT HARDWARE (XX) to the unit and the wall. Plug the fireplace into a dedicated, properly-grounded outlet. Wooden Stud Wall Short Screw Wall Metal Long Bracket Screw Nylon Strap ASHCROFT MEDIA FIREPLACE...
- Page 38 Place TV behind the stopper Maximum load 50 lb (22.7 kg) WARNING! For use with televisions weighing 80 lb (36.3 kg) or less. Use with heavier televisions may cause instability and/or tip over resulting in death or serious injury. ASHCROFT MEDIA FIREPLACE...
-
Page 39: Operating Instructions
- The green LED indicates that the Celsius temperature heating function is running. - The blue LED indicates that the timer function is engaged. To the right of the three LEDs is the infrared receiver module which communicates with the remote control to control the heater. ASHCROFT MEDIA FIREPLACE... - Page 40 Green indicates Celsius mode, and red indicates Fahrenheit mode. In this converting mode, the display (1) flashes (interval is 0.5 second). Repeat the same process to convert Celsius temperature into Fahrenheit temperature. ASHCROFT MEDIA FIREPLACE...
- Page 41 5th press All Off None Flames Off, Logs Off Regardless of the previous flame setting, when powered off by the main power button, the flames will come on in L4 mode (High) when you turn the heater on. ASHCROFT MEDIA FIREPLACE...
- Page 42 The log lights flash several times and then both flame lights and log lights turn on. USING THE MAIN POWER BUTTON Press the power button (6) to turn the fireplace/heater unit on and off. Press the power button (6) once to turn the unit on. Press again to turn the unit off. ASHCROFT MEDIA FIREPLACE...
- Page 43 5. Press the power button on the upper left, and see if the flames on the fireplace/heater turn on or off. 6. If nothing appears to happen, check to make sure the batteries are installed correctly, and try again. ASHCROFT MEDIA FIREPLACE...
- Page 44 Note: The batteries should be removed if the product is to be left unused for a long time. CAUTION: Non-rechargeable batteries must not be recharged. Exhausted batteries are to be removed from the product. ASHCROFT MEDIA FIREPLACE...
- Page 45 Review the Operating Flame Control Instructions section for more information on the Timer Control functionality of these buttons. NOTE: The remote control cannot lock/unlock the flame and heating function, and it cannot switch between Fahrenheit and Celsius. ASHCROFT MEDIA FIREPLACE...
-
Page 46: Troubleshooting
Only the flame control button functions normally. • Check that the unit is fully plugged into a standard The unit does not turn on. 120 V outlet. • Press the power button on the control panel. ASHCROFT MEDIA FIREPLACE... - Page 47 • Press the remote control buttons with an even motion and gentle pressure. • Stand closer to your fireplace. • Remove objects that may block your remote control’s ability to communicate with your fireplace. ASHCROFT MEDIA FIREPLACE...
-
Page 48: Warranty Information
WARRANTY INFORMATION This CANVAS product carries a one (1) year warranty against defects in workmanship and materials. Trileaf Distribution agrees to replace the defective product free of charge within the stated warranty period, when returned by the original purchaser with proof of purchase. This product is not guaranteed against wear or breakage due to misuse and/or abuse. - Page 50 Exclusively at Canadian Tire...
- Page 51 FOYER MULTIMÉDIA ASHCROFT DE 60 PO DE MODÈLE : 064-4017-6 INSTRUCTIONS D’ASSEMBLAGE VOUS RENCONTREZ DES PROBLÈMES? NUMÉRO SANS FRAIS : 1 888 670-6684...
- Page 52 Canadiens et de leur style de vie. Qu’il s’agisse de meubles tendance, de décorations pour les fêtes ou pour le plein air, CANVAS vous permet de rafraîchir facilement votre espace pour qu’il reflète votre style unique et votre mode de vie.
- Page 53 Ce foyer ne doit pas être utilisé comme séchoir pour vêtements. Les bas de Noël ou les décorations ne doivent pas être accrochés dessus ou à proximité du foyer. FOYER MULTIMÉDIA ASHCROFT...
-
Page 54: Consignes De Sécurité
8. Un limiteur de température se trouve cordon d’alimentation de telle sorte qu’il n’entrave pas la circulation et que à l’intérieur du foyer. Lorsque la personne ne risque de trébucher ou de température intérieure surchauffe ou marcher dessus. qu’un échauffement anormal se produit, FOYER MULTIMÉDIA ASHCROFT... - Page 55 à la terre avec des prises à deux orifices n’est pas sécuritaire; des prises adéquates devraient uniquement être installées par un électricien qualifié. Vérifiez les règlements locaux pour vous assurer de la conformité avec les exigences prévues par la loi. FOYER MULTIMÉDIA ASHCROFT...
-
Page 56: Liste Des Pièces
Moulure de panneau latéral supérieur Panneau de séparation supérieur Moulure de panneau de séparation supérieur Tablette réglable Support du foyer Panneau arrière supérieur Panneau arrière latéral inférieur Panneau de porte WH100-26C2D-R Foyer encastrable 00RC006 Télécommande avec pile FOYER MULTIMÉDIA ASHCROFT... - Page 57 00RC006 WH100-26C2D-R FOYER MULTIMÉDIA ASHCROFT...
- Page 58 Bouton Boulon de poignée Cache de came 26 + (3) Pare-choc en caoutchouc 4 + (1) Butée en acrylique Colle Stylo de retouche Matériel de retenue antibasculement Le matériel indiqué entre parenthèses () est supplémentaire si nécessaire. FOYER MULTIMÉDIA ASHCROFT...
- Page 59 FOYER MULTIMÉDIA ASHCROFT...
-
Page 60: Guide Étape Par Étape
Vissez fermement les BOULONS DE CAME (CC) dans les petits trous désignés du PANNEAU SUPÉRIEUR (A) et des PANNEAUX LATÉRAUX INFÉRIEURS (B et C) à l’aide d’un tournevis à tête cruciforme. X 12 Non illustré à taille réelle FOYER MULTIMÉDIA ASHCROFT... - Page 61 Vissez fermement les BOULONS DE CAME (CC) dans les petits trous désignés de la TABLETTE INTERMÉDIAIRE (D), LE PANNEAU INFÉRIEUR (E), LES MOULURES DU PANNEAU LATÉRAL SUPÉRIEUR (M) et MOULURE DE PANNEAU DE SÉPARATION SUPÉRIEUR (O) à l’aide d’un tournevis à tête cruciformer. X 25 Non illustré à taille réelle FOYER MULTIMÉDIA ASHCROFT...
- Page 62 PIÈCES REQUISES : E, B, C, AA, VV Collez les GOUJONS DE BOIS (AA) dans les trous intérieurs du PANNEAU INFÉRIEUR (E) et des PANNEAUX LATÉRAUX INFÉRIEURS (B et C) comme indiqué. Non illustré à taille réelle FOYER MULTIMÉDIA ASHCROFT...
- Page 63 PIÈCES REQUISES : F, G, J, AA, VV Collez les GOUJONS DE BOIS (AA) dans les trous intérieurs de l’ENTRETOISE AVANT INFÉRIEURE (F), de l’ENTRETOISE ARRIÈRE INFÉRIEURE (G), de la BARRE TRANSVERSALE INTERMÉDIAIRE (J), comme illustré. Non illustré à taille réelle FOYER MULTIMÉDIA ASHCROFT...
- Page 64 GUIDE ÉTAPE PAR ÉTAPE ÉTAPE 5 PIÈCES REQUISES : D, J, BB Fixez la BARRE TRANSVERSALE INTERMÉDIAIRE (J) à la TABLETTE INTERMÉDIAIRE (D) en engageant trois CAMES DE VERROUILLAGE (BB). Non illustré à taille réelle FOYER MULTIMÉDIA ASHCROFT...
- Page 65 ÉTAPE 6 PIÈCES REQUISES : E, G, BB Fixez L’ENTRETOISE ARRIÈRE INFÉRIEURE (G) au PANNEAU INFÉRIEUR (E) en engageant quatre CAMES DE VERROUILLAGE (BB). Non illustré à taille réelle FOYER MULTIMÉDIA ASHCROFT...
- Page 66 GUIDE ÉTAPE PAR ÉTAPE ÉTAPE 7 PIÈCES REQUISES : E, F, BB Fixez l’ENTRETOISE AVANT INFÉRIEURE (F) au PANNEAU INFÉRIEUR (E) en engageant quatre CAMES DE VERROUILLAGE (BB). Non illustré à taille réelle FOYER MULTIMÉDIA ASHCROFT...
- Page 67 Alignez les gros trous des deux PANNEAUX LATÉRAUX INFÉRIEURS (B et C) avec les GOUJONS DE BOIS (AA) insérés et appuyez-les ensemble. Fixez les PANNEAUX LATÉRAUX INFÉRIEURS (B et C) en place en engageant six CAMES DE VERROUILLAGE (BB). Non illustré à taille réelle FOYER MULTIMÉDIA ASHCROFT...
- Page 68 PIÈCES REQUISES : H, I, K, AA, VV Collez les GOUJONS DE BOIS (AA) dans les trous intérieurs des PANNEAUX DE SÉPARATION INFÉRIEURS (H et I) et des MONTANTS INTERMÉDIAIRES (K) comme indiqué. X 12 Non illustré à taille réelle FOYER MULTIMÉDIA ASHCROFT...
- Page 69 Fixez les MONTANTS INTERMÉDIAIRES (K) aux PANNEAUX DE SÉPARATION INFÉRIEURS (H et I) au moyen de deux VIS MOYENNES À TÊTE PLATE (EE) dans chacun. Non illustré à taille réelle LES AVANT-TROUS SONT SE TROUVENT À L’INTÉRIEUR FOYER MULTIMÉDIA ASHCROFT...
- Page 70 ÉTAPE 11 PIÈCES REQUISES : E, H, I, FF Fixez les PANNEAUX DE SÉPARATION INFÉRIEURS (H et I) au PANNEAU INFÉRIEUR (E) au moyen de quatre LONGUES VIS À TÊTE PLATE (FF). Non illustré à taille réelle FOYER MULTIMÉDIA ASHCROFT...
- Page 71 Demandez de l’aide pour positionner correctement le PANNEAU INTERMÉDIAIRE (D) sur les GOUJONS DE BOIS (AA) insérés sur les panneaux verticaux, et fixez-le en place en engageant huit CAMES DE SERRURE (BB). Non illustré à taille réelle FOYER MULTIMÉDIA ASHCROFT...
- Page 72 TRIANGULAIRES (JJ) au niveau des joints inférieurs entre l’ENTRETOISE AVANT INFÉRIEURE (F) et les PANNEAUX LATÉRAUX INFÉRIEURS (B et C) au moyen de quatre VIS À TÊTE CYLINDRIQUE BOMBÉE (LL) par plaque. Non illustré à taille réelle FOYER MULTIMÉDIA ASHCROFT...
- Page 73 ÉTAPE 14 PIÈCE REQUISE : KK Vissez les PIEDS DE NIVELLEMENT (KK) dans les douilles filetées des PLAQUES EN MÉTAL TRIANGULAIRES (JJ) et réglez à la bonne hauteur. Non illustré à taille réelle FOYER MULTIMÉDIA ASHCROFT...
- Page 74 PIÈCES REQUISES : D, CC Redressez l’appareil. Vissez fermement les BOULONS DE CAME (CC) dans les petits trous désignés de la face supérieure de la TABLETTE INTERMÉDIAIRE (D) à l’aide d’un tournevis à tête cruciforme. Non illustré à taille réelle FOYER MULTIMÉDIA ASHCROFT...
- Page 75 Collez les GOUJONS DE BOIS (AA) dans les trous intérieurs du PANNEAU LATÉRAL SUPÉRIEUR (L), des MOULURES DU PANNEAU LATÉRAL SUPÉRIEUR (M) et du PANNEAU DE SÉPARATION SUPÉRIEUR (N) comme illustré. X 17 Non illustré à taille réelle FOYER MULTIMÉDIA ASHCROFT...
- Page 76 Fixez les MOULURES DU PANNEAU LATÉRAL SUPÉRIEUR (M) aux PANNEAUX LATÉRAUX SUPÉRIEURS (L) en engageant chacun deux CAMES DE VERROUILLAGE (BB). Répétez la même étape pour fixer la MOULURE DU PANNEAU DE SÉPARATION SUPÉRIEUR (O) au PANNEAU DE SÉPARATION SUPÉRIEUR (N). Non illustré à taille réelle FOYER MULTIMÉDIA ASHCROFT...
- Page 77 ÉTAPE 18 PIÈCES REQUISES : L, N, BB Fixez les PANNEAUX LATÉRAUX SUPÉRIEURS (L) et le PANNEAU SUPÉRIEUR DE SÉPARATION (N) à la TABLETTE INTERMÉDIAIRE (D) en engageant six CAMES DE VERROUILLAGE (BB). Non illustré à taille réelle FOYER MULTIMÉDIA ASHCROFT...
- Page 78 PIÈCES REQUISES : A, BB PLACEZ CORRECTEMENT LE PANNEAU SUPÉRIEUR (A) SUR LES GOUJONS DE BOIS (AA) INSÉRÉS SUR LES PANNEAUX VERTICAUX ET FIXEZ-LE EN PLACE AU MOYEN DE SIX CAMES DE VERROUILLAGE (BB). Non illustré à taille réelle FOYER MULTIMÉDIA ASHCROFT...
- Page 79 Demandez de l’aide pour déposer l’appareil sur son bord avant, comme illustré. Fixez deux SUPPORTS EN MÉTAL (II) aux joints où la BARRE TRANSVERSALE INTERMÉDIAIRE (J) rencontre les MONTANTS INTERMÉDIAIRES (K) au moyen de quatre VIS COURTES À TÊTE PLATE (DD). Non illustré à taille réelle FOYER MULTIMÉDIA ASHCROFT...
- Page 80 SUPÉRIEUR (A). Fixez-le en place au moyen des VIS À RONDELLE (HH) fournies. Répétez l’étape pour fixer les PANNEAUX ARRIÈRE LATÉRAUX INFÉRIEURS (S) au manteau au moyen des VIS À RONDELLE (HH) fournies. X 38 Non illustré à taille réelle FOYER MULTIMÉDIA ASHCROFT...
- Page 81 Fixez un BOUTON (QQ) à l’avant de la porte au moyen d’un BOULON DE POIGNÉE (RR). Répétez l’étape pour fixer l’autre BOUTON (QQ) et les CHARNIÈRES (OO) à l’autre PANNEAU DE PORTE (T). Non illustré à taille réelle FOYER MULTIMÉDIA ASHCROFT...
- Page 82 Prenez les PANNEAUX DE PORTE (T) et fixez les BASES DE CHARNIÈRE sur les PANNEAUX LATÉRAUX INFÉRIEURS (B et C) au moyen de quatre VIS EN ZINC (NN) dans chacun. X 16 Non illustré à taille réelle FOYER MULTIMÉDIA ASHCROFT...
- Page 83 à l’intérieur de chaque compartiment latéral. Assurez-vous de placer les quatre taquets au même niveau afin que la tablette ne soit pas inclinée. Inclinez et posez les TABLETTES RÉGLABLES (P) sur les taquets. Non illustré à taille réelle FOYER MULTIMÉDIA ASHCROFT...
- Page 84 Posez les CACHES DE CAME DE VERROUILLAGE (SS) sur les cames de verrouillage visibles pour masquer les came. Collez les PARE-CHOCS EN CAOUTCHOUC (TT) sur les coins extérieurs des portes comme illustré. X 26 Non illustré à taille réelle FOYER MULTIMÉDIA ASHCROFT...
- Page 85 INFÉRIEUR (E) car cela pourrait rayer l’appareil. En utilisant les avant-trous comme guide, fixez le SUPPORT DU FOYER (Q) entre les PANNEAUX DE SÉPARATION INFÉRIEURS (H et I) au moyen de quatre VIS COURTES À TÊTE CYLINDRIQUE (GG). Non illustré à taille réelle FOYER MULTIMÉDIA ASHCROFT...
- Page 86 PANNEAU SUPÉRIEUR (A). Appuyez sur la butée acrylique pour obtenir une meilleure adhérence. À l’arrière du PANNEAU SUPÉRIEUR (A), saisissez les têtes des punaises en plastique avec une pince et, en tournant, détachez les punaises pour retirer le gabarit de butée en acrylique. FOYER MULTIMÉDIA ASHCROFT...
- Page 87 MATÉRIEL DE RETENUE ANTIBASCULEMENT (XX) à l’appareil et au mur. Branchez le foyer à une prise dédiée et correctement mise à la terre. Montant en bois Vis courte Support en métal Vis longue Sangle en nylon FOYER MULTIMÉDIA ASHCROFT...
- Page 88 Charge maximale 50 lb (22,7 kg) AVERTISSEMENT! Pour une utilisation avec des téléviseurs pesant 80 lb (36,3 kg) ou moins. Des téléviseurs plus lourds peuvent provoquer une instabilité ou un renversement, pouvant entraîner la mort ou des blessures graves. FOYER MULTIMÉDIA ASHCROFT...
- Page 89 - Le voyant DEL vert indique que la fonction de chauffage de la température en Celsius fonctionne. - Le voyant DEL bleu indique que la fonction de minuterie est engagée. À droite des trois voyants DEL se trouve le module récepteur infrarouge qui communique avec la télécommande pour commander le foyer. FOYER MULTIMÉDIA ASHCROFT...
- Page 90 Le voyant vert indique le mode Celsius et le voyant rouge indique le mode Fahrenheit. En ce mode de conversion, l’afficheur (1) clignote (l’intervalle est de 0,5 seconde). Répétez le même processus pour convertir la température Celsius en température Fahrenheit. FOYER MULTIMÉDIA ASHCROFT...
- Page 91 Flammes éteintes, bûches de luminosité élevée 5e appui Éteint Aucune Flammes éteintes, bûches éteintes Quel que soit le réglage de flamme précédent, une fois éteinte par le bouton interrupteur d’alimentation, les flammes s’allument en mode L4 (Élevé) lorsque vous allumez le foyer. FOYER MULTIMÉDIA ASHCROFT...
- Page 92 UTILISATION DU BOUTON INTERRUPTEUR Appuyez sur le bouton interrupteur (6) pour allumer et éteindre le foyer/l’appareil de chauffage. Appuyez une fois sur le bouton interrupteur (6) pour allumer l’appareil. Appuyez à nouveau pour éteindre l’appareil. FOYER MULTIMÉDIA ASHCROFT...
- Page 93 4. Retournez la télécommande et pointez-la vers le foyer/appareil de chauffage. 5. Appuyez sur le bouton d’alimentation en haut côté gauche et voyez si les flammes du foyer s’allument ou s’éteignent. 6. Si rien ne semble se produire, vérifiez que les piles sont correctement installées et réessayez. FOYER MULTIMÉDIA ASHCROFT...
- Page 94 Remarque : La pile doit être retirée si le produit doit rester inutilisé pendant une longue période. ATTENTION : Les piles non rechargeables ne doivent pas être rechargées. Une pile épuisée doit être retirée de la télécommande. FOYER MULTIMÉDIA ASHCROFT...
- Page 95 Commande de la minuterie REMARQUE : La télécommande ne peut pas verrouiller/déverrouiller la fonction de flamme et de chauffage, et elle ne peut pas changer entre Fahrenheit et Celsius. FOYER MULTIMÉDIA ASHCROFT...
-
Page 96: Nettoyage Et Entretien
• Vérifiez que la fiche de l’appareil est entièrement L’appareil ne s’allume pas. branchée à une prise standard de 120 V. • Appuyez sur le bouton interrupteur d’alimentation du panneau de commande. FOYER MULTIMÉDIA ASHCROFT... - Page 97 • Appuyez légèrement sur les boutons de la télécommande avec un mouvement régulier. • Tenez-vous plus près de votre foyer. • Retirez les objets qui pourraient bloquer la capacité de votre télécommande à communiquer avec votre foyer. FOYER MULTIMÉDIA ASHCROFT...
- Page 98 GARANTIE GARANTIE LIMITÉE DE 1 ANS* Cet article CANVAS comprend une garantie de un (1) an contre les défauts de fabrication et de matériau (x). Distribution Trifeuil consent à remplacer l’article défectueux lorsqu’il est retourné par l’acheteur original, accompagné de la preuve d’achat, au cours de la période de garantie convenue.
- Page 100 En exclusivité chez Canadian Tire...
Need help?
Do you have a question about the ASHCROFT and is the answer not in the manual?
Questions and answers