Table of Contents
Advertisement
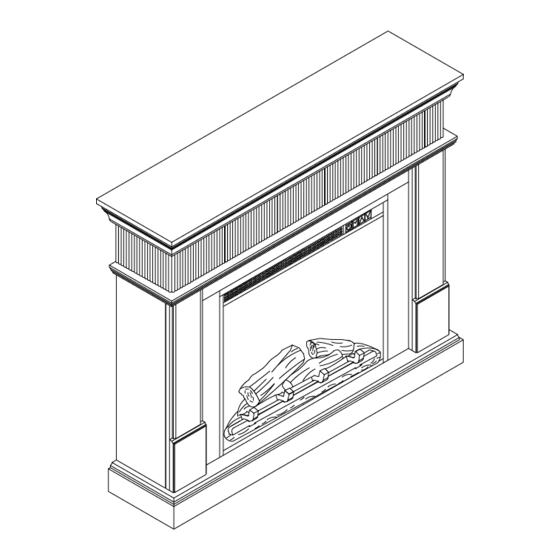
HARLOW
ELECTRIC FIREPLACE
MODEL NO. 064-3504-2
Assembly INSTRUCTIONS
Toll-free: 1-888-670-6684
IMPORTANT: Please read this manual carefully before beginning assembly of this product.
Keep this manual for future reference.
Advertisement
Table of Contents

Related Manuals for Canvas HARLOW064-3504-2


Summary of Contents for Canvas HARLOW064-3504-2
- Page 1 HARLOW ELECTRIC FIREPLACE MODEL NO. 064-3504-2 ASSEMBLY INSTRUCTIONS Toll-free: 1-888-670-6684 IMPORTANT: Please read this manual carefully before beginning assembly of this product. Keep this manual for future reference.
- Page 2 MADE IN CHINA IMPORTED BY TRILEAF DISTRIBUTION TRIFEUIL TORONTO, CANADA M4S 2B8...
- Page 3 Important Safety Information Parts List Assembly Operating Instructions Cleaning and Maintenance Troubleshooting Guide Warranty Warning! To reduce the risk of serious injury, read the following safety instructions before assembling and operating this fireplace. This equipment has been tested and found to comply with the limits for Class B digital devices, pursuant to part 15 of the FCC rules.
- Page 4 MODEL NO. 064-3504-2 When using electrical appliances, basic precautions should always be followed to reduce the rise of fire, electric shock and injury to persons, including the following: Read all instructions before installing or using the fireplace. DANGER: If the information in this manual is not followed exactly, an electric shock or fire may result causing property damage, personal injury or loss of life.
-
Page 5: Electrical Specifications
There is a thermostat device provide inside of the unit. If the inner temperature overheats or abnormal heating occurs, the thermostat device will cut off power supply to prevent damage or risk of fire. DO NOT slide insert on top of wood to avoid scratching wood surface. DO NOT place any objects on top of insert and top air intake vents as this will cause unit to overheat and can cause a fire. - Page 6 MODEL NO. 064-3504-2 The hardware in ( ) is separated for backup. Machine Screw - 32 + (4) Mantel Top Assembly - 1 Plastic Joints, 3 holes - 8 Side Panel, Left - 1 Plastic Joints, 2 holes - 4 Side Panel, Right - 1 Wooden Dowel - 8 Wood Screw - 10 + (1)
- Page 7 Let us help you! DO NOT RETURN YOUR PRODUCT TO THE STORE. CALL US FIRST! 1-888-670-6684 If you have questions regarding your product, require warranty assistance, or have damaged or missing parts, please call our customer service toll-free helpline. Contact us for assistance; we’re here to help. IMPORTANT: Please read and understand this manual before any assembly.
- Page 8 MODEL NO. 064-3504-2 Step 1 Requires 2, 3, A, B Install plastic joints B on left side panel 2 and right side panel 3 using sixteen machine screws A. Step 2 Requires 4, 5, A, C Install plastic joints C on left front panel 4 and right front panel 5 using four machine screws A.
- Page 9 Step 3 Requires 3, 5, A Join right side panel 3 to right front panel 5 using two machine screws A. Step 4 Requires 2, 4, A Join left side panel 2 to left front panel 4 using two machine screws A.
- Page 10 MODEL NO. 064-3504-2 Step 5 Requires A Insert the assemblies from step 3 and step 4 into mantel base assembly 9 with four machine screws A. Left side (not shown) mirrors right side. Step 6 Requires 1, A Install the mantel top assembly 1 on the assembly from step 5 using four machine screws A.
- Page 11 Step 7 Requires 6, 7, 8, D Join left front trim 7, right front trim 8 and top front trim 6 using four wooden dowels D. Left side (not shown) mirrors right side. Step 8 Requires H, I Install the two metal connectors H on left front trim 7, right front trim 8 and top front trim 6 with four wood screws I.
- Page 12 MODEL NO. 064-3504-2 Step 9 Requires D Install the assembly from step 8 using four wooden dowels D. Step 10 Requires E Secure the front trim assembly to the mantel using ten screws E. Left side (not shown) mirrors right side.
- Page 13 Step 11 Requires 10 Install the fireplace insert 10 into the fireplace mantel from rear. NOTE: Do not slide insert on top of wood to avoid scratching wood surface. Step 12 Requires 10, F, O Secure the fireplace insert 10 using insert mounting brackets O by aligning mounting bracket lip with fireplace insert lip and fastening four wood screws F into pre-drilled holes.
- Page 14 MODEL NO. 064-3504-2 MODEL NO. 064-3504-2 Step 13 Requires J, K, L, F, M Drill two holes in the wall and insert the wall anchors N into the holes. Install the mounting bracket L using screws J. Install the white plastic cable tie M using screws K.
-
Page 15: Mode Button
Power Button Pressing the power button will turn turn the unit ON or OFF. When the unit is in ON mode, the power icon indicator light will glow green. When the unit is in OFF mode, the power icon indicator light will glow red. If the heater is working when the unit is powered OFF, the fan will continue to run for another 20 seconds to ensure heat will not be trapped inside the unit. -
Page 16: Care And Maintenance
MODEL NO. 064-3504-2 Timer Setting The timer mode shoud be used to set the countdown for the unit’s main power. Press the up arrow button or down arrow button to adjust the timer setting from 0 hour (OFF) to 9 hours with 0.5 hour intervals. -
Page 17: Replacing The Remote Control Battery
17 17 WARNING: Make sure the power is turned off before proceeding. Any electrical repairs or rewiring of this unit should be carried out by a licensed electrician in accordance with national and local codes. If repairing or replacing and electrical component or wiring, the original wire routing, colour coding and securing locations must be followed. - Page 18 MODEL NO. 064-3504-2 PROBLEM POSSIBLE CAUSE SOLUTION No power. Check that unit is plugged into a The unit does not Logs do not standard 120 V outlet. Then make sure have power. glow. power is set at “ON” position. E1 displayed Unplug unit, wait 5-10 minutes, then The overheat on control...
- Page 19 This CANVAS product carries a one (1) year warranty against defects in workmanship and materials. Trileaf Distribution agrees to replace the defective product free of charge within the stated warranty period, when returned by the original purchaser with proof of purchase. This product is not guaranteed...
Need help?
Do you have a question about the HARLOW064-3504-2 and is the answer not in the manual?
Questions and answers