
Related Manuals for Froggit WH6000 PRO


Summary of Contents for Froggit WH6000 PRO
- Page 1 WH6000 PRO WiFi Internet Wireless Weather Station Manual (EN) Support/Updates/Manuals/Spare parts/compatible products: www.froggit.de...
-
Page 2: Table Of Contents
Table of contents Overview Display Console LCD display Thermo-hygrometer indoor radio sensor 7-In-1 wireless outdoor sensor Intelligent fan Installation and set-up Install 7-In-1 Wireless Sensor Inserting batteries Alignment of mounting post and direction Install wireless indoor sensor Placement of the wireless indoor sensor Setting up the console Synchronization of wireless 7-In-1 sensor &... - Page 3 Trend indicator Wind Dew point Heat Index Wind Chill Weather Forecast Barometric pressure Rain Light intensity, UV index & sunburn time MAX/MIN data record Historical data for the last 24 hours Weather alarm setting Backlighting Maintenance Troubleshooting Specifications General safety instructions...
-
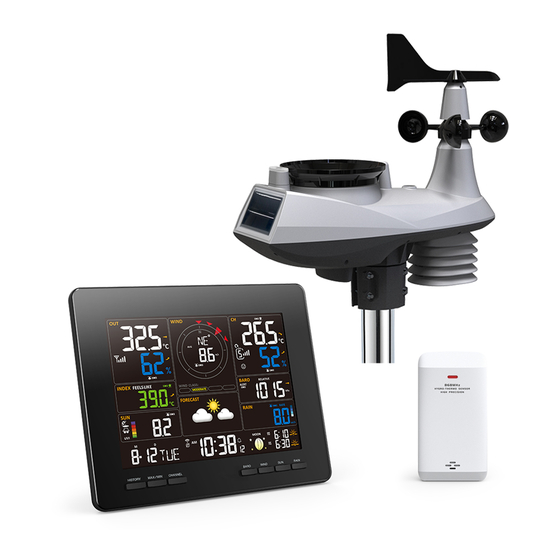
Page 4: Overview
OVERVIEW DISPLAY CONSOLE 1 Alarm/Snooze key 9 Rain key 2 LCD display 10 Clock set key 16 Index key 3 History key 11 Wall mounting holder 17 ˄ key 4 MAX/MIN key 12 Refresh key 18 °C/°F key 5 Channel key 13 Sensor/WiFi key 19 Reset key 6 Baro key... -
Page 5: Lcd Display
LCD DISPLAY Display section: 1 Outdoor temperature & humidity 7 Barometer 2 Wind direction & speed 8 Rainfall & Rain rate 3 Indoor (CH) temperture & humidity 9 Calendar 4 Weather index 10 Time / alarm 5 UV index & light intensity (Sun) 11 Moon phase &... -
Page 6: 7-In-1 Wireless Outdoor Sensor
7-IN-1 OUTDOOR SENS 1Wind vane 8 Reset key 2 Wind cups 9 Transmission LED 3 Antenna 10 Bubble level 4 Radiation shield 11Rain collector 5 Thermo-Hygro sensor and Ventilating fan 12 UV/light sensor 6 Mounting parts 13 Solar panel 7 Battery door... -
Page 7: Intelligent Fan
SMART VENTILATING FAN A fan is installed inside the radiation shields to reduce the effects of solar heat. The fan is driven by a solar panel and rotates automatically under 2 conditions: 1. when the sun shines on the solar panel, and 2. the average wind speed is less than 5 m/s for 1 minute. -
Page 8: Inserting Batteries
INSERTING BATTERIES Unscrew the battery cover on the bottom of the unit and insert the batteries according to the +/- polarity indicated. Screw the battery cover on tightly. NOTE: The red LED will start flashing every 12 seconds. ALIGNMENT OF MOUNTING POST AND DIRECTION Install the 7-IN-1 wireless sensor in an open Position without obstacles above and around the sensor for accurate rain and wind measurements. -
Page 9: Placement Of The Wireless Indoor Sensor
Set the channel number for the sensor with the channel slide switch. (e.g. channel 1) Insert 2 x AA size batteries into the battery compartment and close the battery cover according to the polarity indicated on the battery compartment. 4. the sensor is in synchronisation mode and will be automatically detected by the display console within the next few minutes The transmission status LED will start flashing every 1 minute. -
Page 10: Setting Up The Console
SETTING UP THE CONSOLE INSTALLING THE FUSE BATTERY NOTE: The emergency battery can be used as a backup: Time & date, Max/Min & weather records of the last 24 hours, Alarm Setting values, offset value of weather data and sensor(s) channel progression. -
Page 11: Indoor Sensor(S)
SYNCHRONISATION OF WIRELESS 7-IN-1 SENSOR AND INDOOR SENSOR(S) Immediately after switching on, in synchronisation mode, the 7-in-1 sensor and the interior sensor are automatically coupled to the console. Once your sensors are paired, the The signal strength indicator of the sensors and the weather forecast will appear on your console display. -
Page 12: Create Weather Server Account & Set Up Wifi Connection
Press the [ RESET ] key on the indoor or 7-in-1 outdoor wireless sensor. SYNCHRONIZING ADDITIONAL WIRELESS SENSOR(S) (OPTIONAL) The console can support up to 7 additional wireless sensors. Press the [ SENSOR / WI-FI ] key on the console once to enter the synchronization mode. -
Page 13: Setting Up A Wifi Connection
The Weather Underground and Weathercloud websites are subject to change without notice. SETTING UP A WI-FI CONNECTION 1. When you turn on the console for the first time, the console LCD flashes "AP" to indicate that it has entered AP (Access Point) mode and is in Wlan search mode. -
Page 14: Setting Up The Weather Server Connection
STATUS OF THE WI-FI CONNECTION Below is the status of the WI-FI icon on the console LCD: SETTING UP THE WEATHER SERVER CONNECTION Enter the following information in the "SETUP" page of the Web Interface below to connect the console to the weather server. If you do not want to use Wunderground.com or Weathercloud.net, leave the Station ID &... - Page 15 - When the WI-FI setup is complete, your PC / Mac or mobile phone will resume your default WI-FI. - During AP mode, you can press and hold the [ SENSOR / WI-FI ] key for 6 seconds to restore your previous setting. TIME ZONE To automatically set the time display to your time zone, change the time zone on the SETUP page from '0:00' (default) to your time zone...
- Page 16 CALIBRATION 1. the user can enter the offset and/or gain values for various parameters, while the current offset and the gain values are displayed next to the corresponding blank value. 2 After completing the operation, press Apply at the bottom of the SETUP page to apply the entered data.
-
Page 17: Create A Wunderground Account
- The calibration values for room temperature and humidity are not applicable to this console. Create Wunderground Account Register your personal Wi-fi weather station (PWS). At https://www.wunderground.com click on the "Join" button in the upper right corner to open the registration page. Follow the instructions to create your account Note: You must check your email address before you can register your... -
Page 18: Live Weather Data
Live weather data Wunderground 1 . To view the live data from the wireless outdoor sensor in a web browser (PC or mobile version), please visit www.wunderground.com and then enter your "Station ID" in the search field in the menu bar. The weather information is displayed on the next page WeatherCloud 1. -
Page 19: Other Console Settings And Functions
IMPORTANT NOTE: - Please do not disconnect the power during the firmware update process. - Please make sure that the WI-FI connection of your PC/Mac is stable. - When the update process starts, do not operate the PC / Mac or console until the update is complete. -
Page 20: Moon Phase
Press the [ CLOCK SET ] key to save and exit the setting mode, or the machine will automatically exit the setting mode 60 seconds later without pressing any key. NOTE: - In normal mode, press the [ CLOCK SET ] key to switch between the year and date display. -
Page 21: Setting The Alarm Time
and longitude value does not match the time zone, the sunrise and sunset time cannot be displayed. SETTING THE ALARM TIME: In normal time mode, press and hold the [ ALARM ] key for 2 seconds until the alarm hour digit flashes to enter the alarm time setting mode. -
Page 22: Function Temperature / Humidity
- Automatic stop after 2 minutes of alarm if no operation is made, and the alarm is reactivated the next day. - Pressing the [ALARM / SNOOZE] key to enter the snooze function will cause the alarm to sound again after 5 minutes - Pressing and holding the [ALARM / SNOOZE] key for 2 seconds to stop the alarm is triggered again the next day. -
Page 23: Trend Indicator
2. If the signal is interrupted and does not repeat within 15 minutes, the signal symbol disappear. The temperature and humidity are displayed for the corresponding channel "Er". 3. If the signal is not repeated within 48 hours, the display "Er" becomes permanent. -
Page 24: Dew Point
OVERVIEW OF THE SECTION ON WIND SPEED AND DIRECTION TO SET THE WIND SPEED UNIT AND THE DISPLAY FORMAT FOR THE WIND DIRECTION In normal mode, press and hold the [ WIND ] key for 2 seconds to enter the wind speed unit. Press the arrow keys to enter the unit of wind speed in this order: m/s km/h knots mph Press the [ WIND ] key again to enter the wind direction setting... -
Page 25: Weather Forecast
WEATHER FORECAST The built-in barometer continuously monitors the atmospheric pressure. Based on the collected data, the weather conditions for the next 12-24 hours can be calculated within a 30 to 50 km radius. NOTE: - The accuracy of a general pressure-based weather forecast is approximately 70% to 75%. -
Page 26: Light Intensity, Uv Index & Sunburn Time
Press the [ RAIN ] key to confirm and exit the setting TO SELECT THE DISPLAY MODE OF THE RAINFALL Press the [ RAIN ] key to switch between these two functions: 1st HOUR - the total rainfall of the last hour 2. -
Page 27: Max/Min Data Record
In general, the darker the skin is, the longer (or more radiation) it takes for the effect to be felt on the skin. - The light intensity function is used to detect sunlight. MAX / MIN DATA RECORD The console can record the accumulated MAX / MIN weather data with the corresponding time TO VIEW THE ACCUMULATED MAX / MIN In normal mode, press the [ MAX / MIN ] key to check the MAX/MIN... -
Page 28: Weather Alarm Setting
2. press the [ HISTORY ] key repeatedly to display older measurement values of the last 24 hours, such as 6:00 a.m. (8 March), 5:00 in the morning (8 March), ..., 10:00 in the morning (7 March), 9:00 in the morning (7 March), 8:00 in the morning (7 March) NOTE: WEATHER ALARM SETTING... -
Page 29: Backlighting
BACKLIGHTING The backlight of the main unit can be adjusted with the slide switch [ OFF / HI / LO ] to adjust to set the appropriate brightness: - Move the slider to the [ HI ] position for brighter backlighting. - Move the slider to the [ LO ] position to dim the backlight. - Page 30 the 2.4G band, but not to the 5G band of your WiFi router. No data transmission to the 1. make sure that your Station weather server ID and Station Key are correct 2. make sure that the date and time on the tray are correct If are incorrect, you may report old data and not real-time data.
-
Page 31: Specifications
SPECIFICATIONS Display console Dimensions (WxHxD): approx. 215 x 176.5 x 27 mm Weight: approx. 503g (with batteries) Power supply: AC 5V, 1A Adapter Backup power supply: CR2023 3V Temperature range: -5°C to 50°C WiFi specifications: WiFi standard 802.11 b/g/n WiFi frequency: 2.4GHz Router Requirements: WPA/WPA2, OPEN, WEP... - Page 32 Storage mode: Historical data of the last 24 hours, daily Max / Min Alarm: Alarm for pressure change Indoor/outdoor temperature display & functional specification Note: The following details are listed as they are displayed or operated on the console. Temperature Unit: °C or °F Display mode: Current...
- Page 33 Storage mode: Historical data of the last 24 hours, Max Rain Display Mode: Hourly / Daily / Weekly / Monthly / Total Alarm: Hi Daily Rain UV INDEX DISPLAY AND FUNCTIONAL SPECIFICATION Note: The following details are listed as they are displayed or operated on the console.
- Page 34 7-In-1 Outdoor sensor Dimensions (W x H x D): approx. 370.5 x 334 x 144.5mm Weight: approx. 1096g (incl. batteries) Power supply: 3 x AA 1.5V batteries (We recommend the use of lithium batteries) Weather data: Temperature, humidity, wind speed, wind direction, precipitation, UV &...
-
Page 35: General Safety Instructions
GENERAL SAFETY INSTRUCTIONS Danger of asphyxiation: Keep all packaging materials (plastic bags, rubber bands, etc.) away from children. There is a danger of suffocation! Danger of burns: Caution! Leaking / leaking battery acid can lead to burns! Avoid contact of battery acid with eyes, mucous membranes and skin. In case of contact, rinse the affected areas immediately with clear water and consult a doctor. - Page 36 This manual may contain errors and misprints. However, the information in this manual is regularly reviewed and corrections made in the next issue. We accept no liability for technical errors or printing errors, and their consequences. All trademarks and copyrights are acknowledged. www.froggit.de...
- Page 37 HS Group GmbH & Co. KG Escherstr.31 50733 Koeln Germany Telefon 0221 / 367 48 05 E-Mail info@hs-group.de Registergericht Amtsgericht Koeln HRA 26493 Komplementaer: HS Group Verwaltungsgesellschaft mbH Sitz Koeln Registergericht Amtsgericht Koeln HRB 64734 Geschaeftsfuehrer: Peter Haefele, Carl Schulte UStId DE237971721 WEEE Reg.
- Page 38 Hereby we declare, HS-Group GmbH & Co.KG, Escherstr. 31, 50733 D-Cologne, that this product is in compliance with the essential requirements and other relevant provisions of Directive 2014/53/EU. The declaration of conformity for this product can be found at: www.froggit.de or on request.
Need help?
Do you have a question about the WH6000 PRO and is the answer not in the manual?
Questions and answers