Froggit WH3000SE PRO Manual
Wifi internet wireless weather station
Hide thumbs
Also See for WH3000SE PRO:
- Operation manuals (41 pages) ,
- Operation manual (82 pages) ,
- Manual (89 pages)

Related Manuals for Froggit WH3000SE PRO


Summary of Contents for Froggit WH3000SE PRO
- Page 1 WH3000SE PRO WiFi Internet Wireless Weather Station Manual EN Support/updates/manuals/spare parts: www.froggit.de...
-
Page 2: Table Of Contents
Table of Contents 1. Introduction.................4 2. Warnings and Cautions............4 3. Quick Start Guide..............4 4. Pre-Installation Checkout and Site Survey......5 4.1 Pre Installation Checkout............. 5 4.2 Site Survey................5 5. Setting Started................6 5.1 Contents..................6 5.2 Sensor Set Up................6 5.2.1 Install U-bolts and mounting pole.........7 5.2.2 Install wind vane............. - Page 3 6.5.1 Display of Alarm value..........26 6.5.2 Alarm mode setting:............. 26 6.5.3 Alarm Setting Order:............ 27 6.6 Max/min mode..............27 6.6.1 Press and release MAX/MIN key to display MAX data ....................27 6.7 Calibration mode..............28 6.8 Other Features..............29 6.8.1 Factory Reset/Clear Memory........29 6.8.2 Register New Transmitter..........29 6.8.3 Backlight Operation............29 6.8.4 Tendency indicators.............
-
Page 4: Introduction
1. Introduction Thank you for your purchase of the Solar Powered Wireless WiFi Weather Station. The following user guide provides step by step instructions for installation, operation and troubleshooting. 2. Warnings and Cautions Warning: Any metal object may attract a lightning strike, including your weather station mounting pole. -
Page 5: Pre-Installation Checkout And Site Survey
4. Pre-Installation Checkout and Site Survey 4.1 Pre Installation Checkout Before installing your weather station in the permanent location, we recommend operating the weather station for one week in a temporary location with easy access. This will allow you to check out all of the functions, insure proper operation, and familiarize you with the weather station and calibration procedures. -
Page 6: Setting Started
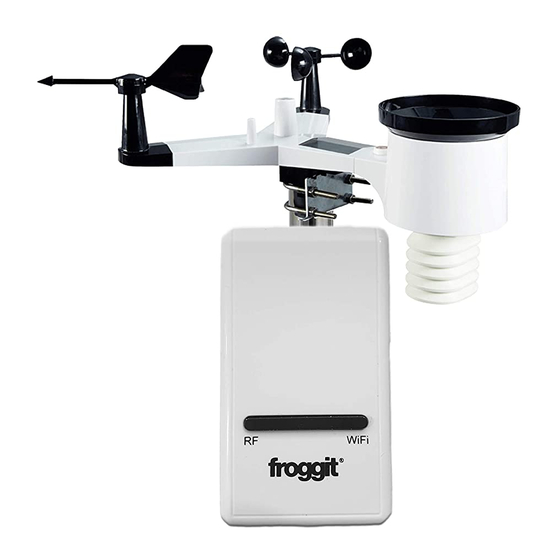
5. Setting Started 5.1 Contents Item Display Console Y shape outdoor sensor(Thermo-hygrometer / Rain Gauge / Wind Speed Sensor /Transmitter) Wind Vane 5V DC Adapter U-bolt with mounting clamps User manual Zip bag for 1pc 10mm single-head wrench 5.2 Sensor Set Up 1. -
Page 7: Install U-Bolts And Mounting Pole
5.2.1 Install U-bolts and mounting pole Installation of the U-bolts, which are in turn used to mount the sensor package on a pole, requires installation of an included metal plate to Fehler! receive the U-bolt ends. The metal plate, visible in Verweisquelle konnte nicht gefunden werden. -
Page 8: Install Wind Vane
The plate and U-Bolts are not yet needed at this stage but doing this now may help avoid damaging wind vane and wind speed cups later on. 5.2.2 Install wind vane Push the wind vane onto the shaft on the top of the sensor, until it stop moving further, as shown in figure 3. -
Page 9: Install Rain Gauge
5.2.4 Install Rain Gauge Keep the Indication mark in straight line. As show below photo. 5.2.5 Install Batteries Insert 2XAA batteries in the battery compartment. The LED indicator on the back of the transmitter will turn on for four seconds and normally flash once every 16 seconds (the sensor transmission update period). -
Page 10: Mount Assembled Outdoor Sensor Package
5.2.6 Mount assembled outdoor sensor package 5.2.6.1 Before you mount Before proceeding with the outdoor mounting detailed in this section, you may want to skip to setup instructions in section 6.2 and onwards first, while you keep the assembled outdoor sensor package nearby (although preferably not closer than 5 ft. -
Page 11: Reset Button And Transmitter Led
Figure 11 Multi-channel temperature and humidity sensor (Optional) The WH3000SE PRO supports up to 8 additional thermo-hygrometer sensors (DP50), and the console receives and sends this data directly to ecowitt.net. The data is not displayed on the console (pass through only) and cannot be calibrated. -
Page 12: Install Batteries
and -10 °C. 5.2.8.1 Install batteries Remove the battery door on the back of the transmitter(s) by sliding down the battery door, as shown in Figure 2 . Figure 12: Battery installation for Multi-channel sensor BEFORE inserting the batteries, locate the dip switches on the inside cover of the lid of the transmitter. - Page 13 Figure 13: Dip Switch diagram Insert two AA batteries. Verify the correct channel number (CH) and temperature units of measure (°F vs. °C) are on the display, as shown in Figure . (1) Temperature (2) Temperature units (°F vs. °C) (3) Channel number (4) Relative humidity Figure 14: sensor LCD display...
-
Page 14: Best Practices For Wireless Communication
This will insure optimum reception. PM2.5 Air Quality Sensor (optional) The WH3000SE PRO supports one indoor and one outdoor PM2.5 Air Quality sensor, and the console receives and sends this data directly to ecowitt.net. The data is not displayed on the console (pass through only) and cannot be calibrated. -
Page 15: Display Console
devices for troubleshooting purposes. You may need to relocate the transmitters or receivers to avoid intermittent communication. 1. Line of Sight Rating. This device is rated at 300 feet line of sight (no interference, barriers or walls) but typically you will get 100 feet maximum under most real-world installations, which include passing through barriers or walls. - Page 16 Figure 16 Note: The batteries are intended for back-up power only. The backlight will remain on for 5 seconds when on back up battery power only. Only when you use power adapter it will the back-light be continuously on. 3. Keep both sensor and the display console together for 15 minutes to lock in the sensor signals.
- Page 17 Figure 17 Note: Your display console should have readings in all sections. Wind and Rain will show 0’s (connected) until wind or rain occur or are simulated. Note: If you only use battery to power up display console, you must press LIGHT/SNOOZE key to light up the LCD before press any other key.
-
Page 18: Vertical Desk Stand
5.4.1 Vertical Desk Stand The console is best viewed above from a 20 to 30 degree angle. In addition to the fold out desk stand on the back of the display, console, the console also includes a vertical desk stand to improve the viewing able on a desk, as shown in Figure 14. -
Page 19: Display Console Operation
6. Display Console Operation 6.1 Screen Display 1.Time 10. Rain fall 2. Moon phase 11. Outdoor temperature 3. Barometric Pressure 12. Outdoor humidity 4. Weather forecast 13. RF icon 5. UV index 14. Indoor humidity 6. Light 15. Indoor temperature 7. -
Page 20: Initial Display Console Set Up
6.2 Initial Display Console Set Up Connect the power adapter to power up the display console. The unit will show software version number 2 seconds after power reset. The unit will turn on all segments of the LCD for 3 seconds after power reset, the unit will start to register the outdoor channel for 3 minutes. -
Page 21: Setting Mode
Press the RAIN key 2s to reset current display rain WIND + Press this key to view wind/gust and wind direction PRESSURE Press this key to view Absolute Pressure average of 12hr, 24hr, 48hr and 72hr Press and hold 2s this key to view the absolute and relative pressure ALARM Press this key to view the alarm value of Temperature /... -
Page 22: Max/Min Daily
6.4.2 MAX/MIN Daily: - Press the SET key twice to select the MAX/MIN Daily section, ON/OFF section digits will start flashing, press the WIND/+ or PRESSURE/- key to select ON or OFF . (Default is ON,ON: clear at 0:00 every day). 6.4.3 Time / Date - Press the SET key third time to select the 12/24 hour format section (default: 24hr). - Page 23 PRESSURE/- key to select the unit (hPa, inhg, mmhg) -Press the SET key eleventh to adjust the REL pressure value, REL pressure value and hPa digits will start flashing, press the WIND/+ key or PRESSURE/- key to increase or decrease the REL pressure value.
-
Page 24: Light
Thus, your absolute pressure may read 28.62 inHg (969 mb) at an altitude of 1000 feet (305 m), but the relative pressure is 30.00 inHg (1016 mb). The standard sea-level pressure is 29.92 inHg (1013 mb). This is the average sea-level pressure around the world. Relative pressure measurements greater than 29.92 inHg (1013 mb) are considered high pressure and relative pressure measurements less than 29.92 inHg are considered low pressure. -
Page 25: Wind Speed
6.4.7 Wind speed - Press the SET key 14th to select wind speed unit ( km/h, mph, knots, m/s, bft;default: km/h ). - In normal mode,press and release the WIND/+ key to view the wind, gust and wind direction. 6.4.8 Rain - Press the SET key 15th to select rainfall unit ( inch or mm) the default mode is mm). -
Page 26: Moon Phase
6.4.9 Moon phase - Press the SET key 16th to select Northern or Southern Hemisphere. 6.5 Alarm mode 6.5.1 Display of Alarm value Press and release ALARM key to display high alarm Press ALARM key again to display low alarm Note: - Press RAIN key to select display rate or day rain alarm data. -
Page 27: Alarm Setting Order
flashing, indicating alert is triggered. Note: press ALARM key third time back to normal mode or press LIGHT /SNOOZE key back to normal mode. 6.5.3 Alarm Setting Order: Time alarm setting Indoor high temperature setting Indoor low temperature setting Indoor high humidity setting Indoor low humidity setting Outdoor high temperature setting Outdoor low temperature setting... -
Page 28: Calibration Mode
- Press TEMP. key to view wind chill and dew point min. - Press PRESSURE/-to hold 2 seconds to view pressure absolute and relative min. Note: press and hold 2s MAX/MIN button to reset all max or min. press MAX/MIN key third time back to normal mode or press LIGHT /SNOOZE key back to normal mode. -
Page 29: Other Features
6.8 Other Features 6.8.1 Factory Reset/Clear Memory To restore the console to factory default, perform the following steps: Remove the power from the console by removing the batteries and disconnecting the AC adapter. Apply power by connecting the AC adapter. Wait for all of the segments to appear on the screen,. -
Page 30: Wireless Signal Strength Indicator
Tendency Humidity Temperature Pressure indicators Rising > Rising >= Rising Rising > 1hpa 1C/2F Change Change < Steady Change <= 1hpa <= 3% 1C/2F Falling > Falling >= Falling Falling > 1hpa 1C/2F 6.8.5 Wireless Signal Strength Indicator The wireless signal strength displays reception quality. If no signal is lost, the signal strength indicator will display 5 bars. - Page 31 Rainy Snowy Storm rainy(Blink for 30 minutes at most) Storm Snowy(Blink for 30 minutes at most) Note: Snowy icon will appear in place of rainy icon when the outdoor temperature is below 0˚C (32 F). Weather Forecasting Description and Limitations In general, if the rate of change of pressure increases, the weather is generally improving (sunny to partly cloudy).
-
Page 32: Snooze
forecasts. In some locations, this prediction may be less or more accurate. However, it is still an interesting educational tool for learning why the weather changes. The National Weather Service (and other weather services such as Accuweather and The Weather Channel) have many tools at their disposal to predict weather conditions, including weather radar, weather models, and detailed mapping of ground conditions. -
Page 33: Specification
7. Specification: Outdoor data Transmission distance in open field : 100m (300 feet) Frequency : 433MHz/868MHz (option) Temperature range : -40˚C--60˚C (-40˚F to +140˚F) Accuracy : + / - 1 °C Resolution : 0.1˚C Measuring range rel. humidity : 10%~99% Accuracy : +/- 5% Rain volume display... -
Page 34: Live Internet Publishing
Alarm duration : 120 sec Measuring interval indoor data : 60s Power consumption Base station : 5V DC adaptor (included), Power Consumption : 0.5 Watts (1.25 Watts during WiFi configuration mode) Base station : 3 x AAA batteries (not included) ... -
Page 35: Connecting The Weather Station Console To Wifi
formed by observers from around the world. Weather http://wow.metoffice.gov. WOW is a UK based Observation weather observation Website website. WOW allows (WOW) anyone to submit their own weather data, anywhere in the world. Customized Supports uploading to your Website customized website, if the website has the same protocol with Wunderground or Ecowitt... -
Page 36: Connect The Console To Wi-Fi
8.1.2 Connect the console to Wi-Fi 8.1.2.1 Android user/ iOs user Now activate the application you have downloaded on your mobile device. The following instructions will generally show screen shots for the Android application side by side. Configure Device 1) Select the device 3) Operate as per 2) Choose The you have from the... - Page 37 4) Press Scan and select 5) Start to connect your you SSID from the list, then phone to the enter your WiFi password weatherstation and press Next. “EasyWeather-WIFI” to If you own a dual band your router. Configure router (2.4 GHz and 5.0 successfully 100%, Press GHz),make sure you connect to the 2.4 GHz...
-
Page 38: Adding Weather Services
8.2 Adding weather services You may have configured weather services during the initial configuration, or you may do so later. To do so, open the mobile application and select your device from the device list. This will bring you to the “Upload” screen for the device. Navigate to the weather service you wish to configure by pressing“Next”... -
Page 39: Ecowitt Weather
8.2.1 Ecowitt Weather It’s recommended to use the Ecowitt Weather server to monitor and record your sensors’ data. Configure as follows: On the ecowitt.net uploading page, enable the ON button(displayed blue) and set the uploading interval time. Press Save on the page. ... -
Page 40: Viewing Data On Ecowitt.net
It will jump to the ecowitt.net dashboard and display the sensor data within several minutes. To delete device from Ecowitt by press Device (upper right) to select the ID you want to delete. Note: If you could not receive the captcha from your email box, please check the spam. - Page 41 It will show a page such as this, where you can look at today’s data and historical data as well. Dashboard Graph display...
- Page 42 List display Weather Map...
-
Page 43: Weather Underground
Email Alerts 8.3 Weather Underground If you are planning to use wunderground.com you must have an account and register a (new) personal weather station. You may do so on the Wunderground uploading page in the WS View Plus application: Press Register at Wunderground.com and finish the registration on ... - Page 44 2. ClickMy Profileand select My Devices to register your station 3. Select Add New Device.
- Page 45 4. Find Personal Weather Station. Select ‘other’ and click ‘Next’. 5. Select ‘Address’ or ‘Manual’ option, and find your local position. Press ‘Next’.
- Page 46 6. This time you will be asked details about your weather station. Go ahead and fill out the form. 7. After completing the weather station, you will see station ID and key/password. Take note of the PWS identifier (ID) and the password that will be ...
-
Page 47: Viewing Data On Wunderground.com
Press Save. Back to the Menu page and select WU Dashboard. You’ll see the current WU data, including graphs on the screen within hour s. ○ To add WU station ID by press the icon (upper right) To delete WU station ID by press Station ID (upper right) to select the ID you want to delete Note:WU Dashboard shows the data obtained from WU server. - Page 48 There are also some very useful mobile apps. The URLs provided here go to the Web version of the application pages. You can also find them directly from the iOS or Google Play stores: WunderStaton: iPad application for viewing your station’s data and graphs: https://itunes.apple.com/us/app/wunderstation-weather-from-your-nei ghborhood/id906099986...
- Page 49 Weather Underground: Forecast: iOS and Android application for forecasts https://itunes.apple.com/us/app/weather-underground-forecast/id486 154808 https://play.google.com/store/apps/details?id=com.wunderground.an droid.weather&hl=en PWS Weather Station Monitor: View weather conditions in your neighborhood, or even right in your own backyard. Connects to wunderground.com: https://itunes.apple.com/us/app/pws-weather-station-monitor/id7137 05929...
-
Page 50: My Device
8.5 My Device Press the “My Device” (bottom left) on the home screen and select Device list to view all of your device. You can move the device to Favorites column by press the star button on the back of the device Note: This function requires that your phone and the console is using the same network. -
Page 51: Maintenance
9. Maintenance 1. Clean the rain gauge once every 3 months. Rotate the funnel counter-clockwise and lift to expose the rain gauge mechanism, and clean with a damp cloth. Remove any dirt, debris and insects. If bug infestation is an issue, spray the array lightly with insecticide. Clean the solar radiation sensor and solar panel every 3 months with damp cloth. -
Page 52: Troubleshooting Guide
10. Troubleshooting Guide Problem Solution Outdoor sensor The sensor array may have initiated properly and array does not the data is registered by the console as invalid, communicate to and the console must be reset. Press the reset the display button as described in Section 5.2. - Page 53 Problem Solution Temperature Make certain that the sensor array is not too close sensor reads too to heat generating sources or strictures, such as high in the day buildings, pavement, walls or air conditioning time. units. Use the calibration feature to offset installation issues related to radiant heat sources.
- Page 54 Problem Solution 4. Make sure your time zone is set properly. If incorrect, you may be reporting old data, not real time data. 5. Check your router firewall settings. The console sends data via Port 80. No WiFi 1. Check for WiFi symbol on the display. If connection wireless connectivity is successful the WiFi icon...
- Page 55 contact, rinse the affected areas immediately with clear water and consult a doctor. Risk of electric shock: Children must not be unattended with the device, because the device contains electronic parts which are operated by means of a power source. The device may only be used as described in the instructions. If not, there is a risk of electric shock.
- Page 56 Hereby we declare, HS-Group GmbH & Co.KG, Escherstr. 31, 50733 D-Cologne, that this product is in compliance with the essential requirements and other relevant provisions of Directive 2014/53/EU. The declaration of conformity for this product can be found www.froggit.de or on request.
- Page 57 WH3000SE PRO WiFi Internet Funk Wetterstation Manual DE Support/updates/manuals/spare parts: www.froggit.de...
- Page 58 Bedienungsanleitung (DE) Inhaltsverzeichnis 1. Einleitung..................60 2. Sicherheitshinweise..............60 3. Kurzübersicht................60 4. Erstinbetriebnahme und Standortwahl........ 61 4.1 Erstinbetriebnahme.............61 4.2 Standortwahl................ 61 5. Inbetriebnahme............... 62 5.1 Lieferumfang................ 62 5.2 Sensorik................62 5.2.1 Montage Windfahne.............63 5.2.2 Montage Windgeschwindigkeit........64 5.2.3 Einlegen der Batterien..........65 5.2.4 Montage Außenmast............65 5.2.5 Reset Taste und Funksender LED......66 5.4 Displayeinheit...............70 6.
- Page 59 6.8.3 Hintergrundbeleuchtung..........80 6.8.4 Funksignalstärke............81 6.8.5 Wettervorhersage............81 6.8.6 Snooze (Schlummermodus)........82 7. Spezifikationen:............... 83 8. Internet..................84 8.1 WiFi Verbindung..............85 9. Wartung.................. 101...
-
Page 60: Einleitung
1. Einleitung Vielen Dank für Ihren Kauf der Froggit Profi Funkwetterstation WH3000SE PRO. Das folgende Benutzerhandbuch hilft Ihnen Schritt für Schritt bei der Einrichtung, Installation und bei auftretenden Störungen. 2. Sicherheitshinweise Warnung: Metallgegenstände können einen Blitzeinschlag hervorrufen. Montieren Sie daher den Wettermast niemals bei Gewitter... -
Page 61: Erstinbetriebnahme Und Standortwahl
4. Erstinbetriebnahme und Standortwahl 4.1 Erstinbetriebnahme Bevor Sie die Wetterstation auf die von Ihnen vorgesehene Position fest platzieren, empfehlen wir die Wetterstation für eine Woche an einem für Sie leicht zu erreichen Ort zu platzieren. Dadurch haben Sie die Möglichkeit alle Funktionen ausgiebig zu testen, die Wetterstation zu kalibrieren und die Funkreichweite zu testen. -
Page 62: Inbetriebnahme
5. Inbetriebnahme 5.1 Lieferumfang Anzahl Produkt Displayeinheit Y shape Außensensorik (Thermo-Hygrometer / Niederschlagssensor / Windgeschwindigkeitssensor /Transmitter) Windfahne 5V DC Adapter Bügelschraube mit Befestigungsklammern Benutzerhandbuch Deutsch/Englisch 5.2 Sensorik 1. Windfahne 2. Windgeschwindigkeitssensor 3. UV Sensor/ LUX 4. Thermo-Hygro Sensor 5. Niederschlagssensor 6. -
Page 63: Montage Windfahne
Montage der Bügelschrauben Die Montage der Bügelschrauben, die wiederum zur Befestigung des Sensorpaketes an einem Mast dienen, erfordert die Montage einer mitgelieferten Metallplatte zur Aufnahme der Bügelschrauben. Die in Abbildung a sichtbare Metallplatte hat vier Löcher, durch die die Enden der beiden Bügel passen. -
Page 64: Montage Windgeschwindigkeit
Abbildung 1 Abbildung 2 An der Windrichtungseinheit sind vier Buchstaben "N", "E", "S" und "W", die, die Windrichtung Nord (N), Ost (E), Süden (S) und West (W) angeben. Der Windrichtungssensor muss richtig adjustiert werden. Überprüfen Sie mithilfe eines Kompasses die Richtung. 5.2.2 Montage Windgeschwindigkeit Drücken Sie den Windgeschwindigkeitssensor in den Schaft (siehe Abbildung 4). -
Page 65: Einlegen Der Batterien
5.2.3 Einlegen der Batterien Legen Sie 2 x AA Batterien in das Batteriefach. Die LED auf der Rückseite leuchtet für 4 Sekunden und blinkt im Nomalbetrieb alle 16 Sekunden auf. Abbildung 6 Abbildung 7 Hinweis: Wenn die LED nicht leuchtet oder permanent blinkt, vergewissern Sie sich das die Batterien korrekt eingelegt sind oder führen Sie einen Reset durch. -
Page 66: Reset Taste Und Funksender Led
Einheiten. Multi-Kanal Temperatur/Luftfeuchte Sensor (Optional – nicht im Lieferumfang enthalten) Die WH3000SE PRO unterstützt bis zu 8 zusätzliche Thermo-Hygrometer-Sensoren (DP50), und die Konsole empfängt und sendet diese Daten direkt an ecowitt.net. Die Daten werden nicht auf der Konsole angezeigt (nur im Durchlauf) und können nicht kalibriert werden. - Page 67 Suchen Sie VOR dem Einlegen der Batterien die Dip-Schalter auf der Innenseite der Abdeckung des Senders. Kanalnummer: Das Gerät unterstützt bis zu acht Sensoren. Zum Einstellen jeder Kanalnummer ändern Sie die Dip-Schalter 1, 2 und 3 (siehe unten) Temperatur-Maßeinheiten: Um die Maßeinheiten der Senderanzeige (°F gegen °C) zu ändern, ändern Sie den DIP-Schalter 4 (siehe unten).
- Page 68 (1) Temperatur (2) Temperatureinheit (°F / °C) (3) Kanalnummer (4) Relative Luftfeuchtigkeit Schließen Sie das Batteriefach. Wiederholen Sie diesen Vorgang für die zusätzlichen DP50 Sensoren und vergewissern Sie sich, dass jeder DP50 Sensor auf einem anderen Kanal liegt. Platzierung der Sensoren Der beste Montageort für den Innenraumsensor ist an einem Ort, der nie direktes Sonnenlicht erhält, auch nicht durch Fenster.
- Page 69 Empfang. DP200 PM2.5-Luftqualitätssensor (optional – nicht im Lieferumfang enthalten) Das WH3000SE PRO unterstützt einen Innen- und einen Außen-PM2,5-Luftqualitätssensor, und die Konsole empfängt und sendet diese Daten direkt an ecowitt.net. Die Daten werden nicht auf der Konsole angezeigt (nur im Durchgang) und können nicht kalibriert werden.
-
Page 70: Displayeinheit
5.4 Displayeinheit Schließen Sie den 5V DC Adapter an der Rückseite der Gerätes Hinweis: Platzieren Sie die Außensensorik 5 - 10 Meter entfernt und warten Sie einige Minuten, damit sich die Funksensoren mit der Displayeinheit verbinden können. Legen Sie 3 AAA Batterien in die Displayeinheit (optional). Hinweis: Die Displayeinheit zeigt immer alle Bereich an. -
Page 71: Betrieb Displayeinheit
6. Betrieb Displayeinheit 6.1 Bildschirm 1.Uhrzeit 10. Regen (Niederschlag) 2. Mondphase 11. Außentemperatur 3. Barometer (Luftdruck) 12. rel. Luftfeuchtigkeit (Außenbereich) 4. Wettervorhersage 13. RF (Funkübertragung) Symbol 5. UV Index 14. rel. Luftfeuchtigkeit (Innenbereich) 6. Licht 15. Innentemperatur 7. Windgeschwindigkeit 16. Datum 8. -
Page 72: Erläuterung Displayeinheit
6.2 Erläuterung Displayeinheit Verbinden Sie die Displayeinheit mit dem Netzteil. Die Displayeinheit zeigt nun die Software Version Nummer 2 an. Alle Bereich des Displays werden nach 3 Sekunden angezeigt. Die Displayeinheit benötigt ca. 3 Minuten, um eine Verbindung mit der Außensensorik herzustellen. -
Page 73: Betriebsmodus
Drücken Sie die Taste, um die Niederschlagsrate, Niederschlag Tag, Niederschlag Woche, Niederschlag RAIN Monat, Niederschlag Total zu sehen. Drücken und halten Sie die Taste 2 Sekunden lang, um die Niederschlagswerte auf 0 zu setzen. Drücken Sie die Taste, um Windböen und die WIND + Windrichtung zu sehen. -
Page 74: Akustisches Signal
6.4.1 Akustisches Signal: - Drücken und Halten Sie die SET Taste 2 Sekunden lang, um den Signalton ein- bzw. auszuschalten. ON/OFF Symbol beginnt nun zu blinken. Drücken Sie die WIND/+ oder PRESSURE/- Taste für On oder OFF. “BEEP ON” (Signalton eingeschaltet) bedeutet, dass der Signalton immer ertönt, wenn eine Taste gedrückt wird. -
Page 75: Barometer (Luftdruck)
aktualisiert. Zeitzone und Sommerzeit werden automatisch aus dem Internet synchronisiert. 6.4.4 Barometer (Luftdruck) - Drücken Sie zehnmal die SET-Taste, um die ABS/REL-Druckeinheit auszuwählen, der Druckwert und die hPa-Ziffern beginnen zu blinken, drücken Sie die WIND/+- oder PRESSURE/--Taste, um die Einheit auszuwählen (hPa, inhg, mmhg). -
Page 76: Windgeschwindigkeit
6.4.7 Windgeschwindigkeit - Drücken Sie die SET Taste Taste 16 mal, um den Windgeschwindigkeitsindex einzustellen. (km/h, mph, knots, m/s, Standard: km/h ). - Im Normalbetrieb können Sie durch drücken der WIND/+ Taste zwischen Wind, Böen und Windrichtung wechseln. 6.4.8 Regen (Niederschlag) - Drücken Sie die SET Taste 17 mal, um den Niederschlagswert einzustellen. - Page 77 (2) Drücken Sie die ALARM Taste noch einmal, um den Alarm-Minimalwert einzustellen. Hinweis: - Drücken Sie die RAIN Taste, um den Alarmwert für den Niederschlag einzustellen. - Drücken Sie die WIND/+ Taste, um den Alarmwert für Wind oder Böen einzustellen. - Drücken Sie die ALARM Taste 3 mal oder drücken Sie die LIGHT /SNOOZE Taste, um in den Betriebsmodus zurück zu gelangen.
-
Page 78: Max/Min Modus
Alarm Einstellung Reihenfolge: (1) Einstellung Zeit (2) Einstellung Höchsttemperatur Innenbereich (3) Einstellung Minimaltemperatur Innenbereich (4) Einstellung Höchstwert relative Luftfeuchtigkeit Innenbereich (5) Einstellung Minimalwert relative Luftfeuchtigkeit Innenbereich (6) Einstellung Höchsttemperatur Außenbereich (7) Einstellung Minimaltemperatur Außenbereich (8) Einstellung Höchswert relative Luftfeuchtigkeit Außenbereich (9) Einstellung Minimalwert relative Luftfeuchtigkeit Außenbereich (10) Einstellung Höchwert Wind (11) Einstellung Höchswert Böen... -
Page 79: Kalibrierungsmodus
- Drücken Sie die TEMP. Taste, um die minimal Werte für Windchill und Taupunkt anzuzeigen. - Drücken und Halten Sie die PRESSURE/- Taste 2 Sekunden lang, um den minimalen Wert für die absolute und relative Luftfeuchtigkeit anzuzeigen. Hinweis: Drücken und Halten Sie die MAX/MIN Taste 2 Sekunden lang, um alle MAX/MIN Werte zu reseten. -
Page 80: Andere Eigenschaften
(2) Relative Luftfeuchtigkeit Innenbereich Kalibrierung (Bereich +/-10%) (3) Außentemperatur Kalibrierung (Auflösung +/-5˚C, Standart: 0 Grad) (4) Relative Luftfeuchtigkeit Außenbereich Kalibrierung (Bereich +/-10%) (5) Absoluter Luftdruck Kalibrierung (Bereich +/-50hpa) (6) Windrichtung Kalibrierung Wind (Einstellung bei Grad) (7) Windgeschwindigkeit Kalibrierung Wind, Standart 100% (Bereich 50% bis zu 150%) (8) Niederschlag Kalibrierung, Standart 100% (Bereich 50% bis zu 150%) -
Page 81: Funksignalstärke
in den Schlafmodus und sendet keine Daten ins Internet, wenn keine Taste innerhalb von 15 Sekunden gedrückt wird. Drücken und Halten Sie die LIGHT /SNOOZE Taste im Schlafmodus, oder schließen Sie den DC Adapter an, um die Displayeinheit aufzuwecken. 6.8.4 Funksignalstärke Das Funksignalsymbol zeigt die Empfangsqualität an. -
Page 82: Snooze (Schlummermodus)
Sturm / Regen Schneesturm Hinweis: Das Schneesymbol löst das Regensymbol ab, sobald die Außentemperatur unter 0˚ (32 F) fällt. 6.8.6 Snooze (Schlummermodus) Wenn der Zeitalarm ausgelöst wird, ertönt ein Alarmsignal und das Alarmauslösungssymbol fängt für 120 Sekunden an zu blinken. Drücken Sie die SNOOZE/LIGHT Taste, um den Alarm zu stoppen. -
Page 83: Spezifikationen
7. Spezifikationen: Außenbereich: Funkdistanz : 100m (bei optimalen Bedingungen - freier Sichtkontakt) Funkfrequenz : 868 MHz Temperaturbereich: -40˚C--60˚C Genauigkeit: + / - 1˚C Auflösung: 0.1˚C Messbereich rel. Luftfeuchtigkeit : 10%~99% Genauigkeit: +/- 5% Niederschlag: 0 – 6000mm Genaugikeit: + / - 10% Auflösung: 0.1mm Windgeschwindigkeit:... -
Page 84: Internet
(Displayeinheit): 3 x 1,5V Batterie, Typ LR6 AAA/Micro (nicht im Lieferumfang Enthalten) Netzteil (Eingangsspannung/-strom): 100-240V/AC, 59/60Hz, 0,2 A Netzteil (Ausgangsspannung/-strom): 5V/DC, 1 A Solarpanel: Polykristallin Betriebsspannung/-strom (Solarpanel) 7,5V, 50 mA Sendeleistung: -1.83dBm 8. Internet Die Wetterstation kann, wenn Sie mögen Ihre Wetterdaten an folgende Wetterplattform senden: Wetterplattform Website... -
Page 85: Wifi Verbindung
eigenen Wetterdaten einzugeben, überall auf der Welt. Benutzerdefinierte Unterstützt das Hochladen auf Website Ihre individuelle Website, wenn die Website das gleiche Protokoll mit Wunderground oder Ecowitt hat. Diese Wetterstation sendet Ihre Daten drahtlos via WiFi ins Internet. 8.1 WiFi Verbindung Um Wetterdaten an diese Dienste zu senden, müssen Sie Ihre Konsole über Wi-Fi mit dem Internet verbinden. - Page 86 Starten Sie die Folgen Sie den Wählen Sie Ihr Gerät Gerätesuche. Wenn Anweisungen und aus der Geräteliste sich Ihr Gerät in der bestätigen Sie die aus und drücken Sie Wlanliste befindet Kästchen, um den Next. dann springt es zu Punkt (4). "abgeschlossenen Der Name lautet: Vorgang"...
- Page 87 Beginnen Sie nun Ihr Drücken Sie auf Scannen und wählen Sie Ihre SSID Smartphone mit der aus der Liste aus. Geben Sie Wetterstation dann Ihr WiFi-Passwort ein "EasyWeather-WIFI" an und drücken Sie auf Weiter. Ihren Router Wenn Sie einen anzuschließen. Nach Dual-Band-Router (2,4 GHz erfolgreicher und 5,0 GHz) besitzen,...
- Page 88 Möglicherweise haben Sie die Wetterdienste bei der Erstkonfiguration konfiguriert, oder Sie können dies später tun. Öffnen Sie dazu die mobile Anwendung und wählen Sie Ihr Gerät in der Geräteliste aus. Dadurch gelangen Sie zum Bildschirm "Hochladen" für das Gerät. Navigieren Sie zu dem Wetterdienst, den Sie konfigurieren möchten, indem Sie auf "Weiter"...
- Page 89 Ecowitt.net Es wird empfohlen, den Ecowitt Weather Server zu verwenden. Ecowitt.net unterstützt das Hochladen aller Sensordaten. - Aktivieren Sie auf der ecowitt.net-Upload-Seite die Schaltfläche EIN (blau dargestellt) und legen Sie die Zeit für das Upload-Intervall fest. - Drücken Sie auf der Seite auf Speichern. - Drücken Sie auf "Registrieren bei ecowitt.net"...
- Page 90 - Innerhalb weniger Minuten wird das ecowitt.net-Dashboard aufgerufen und die Sensordaten angezeigt. Um ein Gerät von Ecowitt zu löschen, drücken Sie Gerät (oben rechts), um die ID auszuwählen, die Sie löschen möchten. Anmerkung: Wenn Sie das Captcha in Ihrem E-Mail-Postfach nicht erhalten haben, überprüfen Sie bitte den Spamordner.
- Page 91 bitte die ecowitt-Website in Ihrem Browser oder auf einem Computer. Wenn Sie sich nicht in der WS View Plus App registrieren konnten, gehen Sie bitte auf die Website, um sich zu registrieren und das Gerät hinzuzufügen. Anzeigen von Daten auf ecowitt.net Sie können die Daten Ihres Sensors über die Website ecowitt.net einsehen.
- Page 92 Graphik Liste...
- Page 93 Wetterkarte Email Alarm...
- Page 94 Wunderground.com Wenn Sie wunderground.com nutzen möchten, müssen Sie ein Konto haben und eine (neue) persönliche Wetterstation registrieren. Sie können dies auf der Seite Wunderground Uploading in der WS View Plus Anwendung tun: - Drücken Sie auf Registrieren bei Wunderground.com und schließen Sie die Registrierung auf der Seite ab: 1.
- Page 95 3. Wählen Sie Add New Device 4. Suchen Sie Personal Weather Station. Wählen Sie "other" und klicken Sie auf "Next".
- Page 96 5. Wählen Sie die Option "Adress" oder "Manual", und suchen Sie Ihre lokale Position. Drücken Sie "Weiter". 6. Dieses Mal werden Sie nach Details zu Ihrer Wetterstation gefragt. Fahren Sie fort und füllen Sie das Formular aus.
- Page 97 7. Nach Fertigstellung der Wetterstation werden Stations-ID und Schlüssel/Passwort angezeigt. - Notieren Sie sich die PWS-Kennung (ID) und das Passwort, das für Sie generiert wird. - Gehen Sie zurück zur App und geben Sie die Stationskennung und den Schlüssel ein. - Drücken Sie Speichern.
- Page 98 Um die WU-Stations-ID hinzuzufügen, drücken Sie das Symbol ○+ (oben rechts) Um die WU-Stations-ID zu löschen, drücken Sie Stations-ID (oben rechts), um die ID auszuwählen, die Sie löschen möchten Hinweis: WU Dashboard zeigt die vom WU-Server erhaltenen Daten an. Dies setzt voraus, dass Ihr mobiles Gerät das Internet erreichen kann. Daher ist dies auch möglich, wenn Sie sich nicht in Ihrem heimischen Wi-Fi-Netzwerk befinden, z.
- Page 99 hborhood/id906099986 Weather Underground: Forecast iOS- und Android-Anwendung für Vorhersagen https://itunes.apple.com/us/app/weather-underground-forecast/id48615 4808 https://play.google.com/store/apps/details?id=com.wunderground.andr oid.weather&hl=en PWS Weather Station Monitor Zeigen Sie die Wetterbedingungen in Ihrer Nachbarschaft oder sogar in Ihrem eigenen Garten an. Verbindet sich mit wunderground.com: https://itunes.apple.com/us/app/pws-weather-station-monitor/id713705...
- Page 100 Mein Gerät Drücken Sie auf dem Startbildschirm auf „Mein Gerät“ (unten links) und wählen Sie Geräteliste, um alle Ihre Geräte anzuzeigen. Sie können das Gerät in die Favoritenspalte verschieben, indem Sie die Sterntaste auf der Rückseite des Geräts drücken Hinweis: Diese Funktion setzt voraus, dass Ihr Telefon und die Konsole dasselbe Netz verwenden.
-
Page 101: Wartung
Einstellungen Sie können die gewünschten Anzeigeeinheiten oder die Standard-Startseite für die App einstellen, indem Sie im Untermenü "Einstellungen" wählen: 9. Wartung 1. Reinigen Sie den Regenmesser alle 3 Monate. Drehen Sie den Trichter gegen den Uhrzeigersinn und heben Sie ihn an, um den Regenmessermechanismus freizulegen. - Page 102 2. Reinigen Sie den Strahlungssensor und das Solarmodul alle 3 Monate mit einem feuchten Tuch. 3. Ersetzen Sie die Batterien alle 1-2 Jahre. Wenn die Batterien zu lange liegen bleiben, können sie aufgrund von Umweltproblemen auslaufen. Überprüfen Sie die Batterien in rauen Umgebungen alle 3 Monate (bei der Reinigung des Solarmoduls).
- Page 103 Problem Lösung 2. Entfernen Sie die Batterien mit der 10 m voneinander entfernten Sensoranordnung und der Konsole aus der Display-Konsole und warten Sie 10 Sekunden. Legen Sie die Batterien wieder ein. 3. Berühren Sie keine Tasten für einige Minuten. 4. Das Symbol für die Fernbedienungssuche wird auf dem Display angezeigt.
- Page 104 Problem Lösung Stellen Sie sicher, dass das Temperatursensor Thermo-Hygrometer in einem schattierten zeigt ein zu hohe Bereich an der Nordwand montiert ist. Temperatur an Innen- und 1. Warten Sie bis zu einer Stunde, damit sich die Außentemperatur Sensoren aufgrund der Signalfilterung stimmen nicht überein stabilisieren können.
- Page 105 Problem Lösung Die Mondphase ist Überprüfen Sie Ihr Kalenderdatum und stellen nicht korrekt Sie sicher, dass es korrekt ist Der Kontrast der Ersetzen Sie die Batterie der Konsole durch Displaykonsole ist einen neuen Satz Batterien. schwach Daten werden nicht 1. Bestätigen Sie, dass Ihr Passwort oder an Wunderground Schlüssel korrekt ist.
- Page 106 Problem Lösung 3. Stellen Sie sicher, dass die Konsole an das Stromnetz angeschlossen ist. Die Konsole stellt keine Verbindung zum WLAN her, wenn sie nur mit Batterien betrieben wird. 4. Die Konsole unterstützt und verbindet nur mit 2,4-GHz-Routern. Wenn Sie einen 5-GHz-Router besitzen und es sich um einen Dualband-Router handelt, müssen Sie das 5-GHz-Band deaktivieren und das...
- Page 107 Sie niemals Batterien – Ersetzen Sie leere Batterien immer durch einen kompletten Satz Batterien mit voller Leistung. Sollte das Gerät länger stromlos sein bzw. nicht benutzt werden, entfernen Sie die Batterien aus dem Gerät. Bei falsch eingelegten Batterien übernimmt der Hersteller keine Haftung! Elektro- und Elektronikgerätegesetz (ElektroG): Das Elektro- und Elektronikgerätegesetz (ElektroG) enthält eine...
- Page 108 das im Wesentlichen die gleichen Funktionen erfüllt, an einen Endnutzer abgegeben wird. Wenn ein neues Gerät an einen privaten Haushalt ausgeliefert wird, kann das gleichartige Altgerät auch dort zur unentgeltlichen Abholung übergeben werden; dies gilt bei einem Vertrieb unter Verwendung von Fernkommunikationsmitteln für Geräte der Kategorien 1, 2 oder 4 gemäß...
- Page 109 Alle Warenzeichen und Schutzrechte werden anerkannt. www.froggit.de HS Group GmbH & Co. KG Escherstr.31 50733 Koeln Germany Telefon 0221 / 367 48 05 E-Mail info@hs-group.de Registergericht Amtsgericht Koeln HRA 26493 Komplementaer: HS Group Verwaltungsgesellschaft mbH Sitz Koeln Registergericht Amtsgericht Koeln...
Need help?
Do you have a question about the WH3000SE PRO and is the answer not in the manual?
Questions and answers
WH3000SE does not connect to WiFi 2.4ghz wifi symbol flashing
The Froggit WH3000SE PRO may not be connecting to 2.4GHz WiFi with a flashing WiFi symbol due to one or more of the following reasons:
1. The WiFi settings (network name and password) on your modem are incorrect.
2. The console is not plugged into a power outlet (it does not connect to WiFi when running only on batteries).
3. The router is set to use only the 5GHz band. You must enable the 2.4GHz band and disable the 5GHz band if it is a dual-band router.
4. The console does not support guest networks. Ensure it is connecting to the main network.
Make sure the WiFi symbol is visible in the display's time field to confirm successful connection.
This answer is automatically generated