Advertisement
Quick Links
WH2600 PRO Wi-Fi Weather Station
1. Introduction ..................................................................................................................
2. Warnings and Cautions ................................................................................................
3. Quick Start Guide .........................................................................................................
4.Pre-Installation Checkout and Site Survey ...................................................................
4.1 Pre Installation Checkout ....................................................................................
4.2 Site Survey ..........................................................................................................
5. Getting Started .............................................................................................................
5.1 Parts List ..............................................................................................................
5.2 Sensor Set Up .....................................................................................................
5.2.1 Install wind vane ...........................................................................................
5.2.2 Install wind speed .........................................................................................
5.2.3 Install Batteries .............................................................................................
5.2.4 Mount outdoor sensor ......................................................................... Fehle
5.2.5 Reset Button and Transmitter LED ...............................................................
5.3 Indoor Thermo-Hygrometer-Barometer Transmitter ............................................
5.4 Best Practices for Wireless Communication .......................................................
5.5 Receiver ..............................................................................................................
5.5.1 Hardware Requirements ...............................................................................
5.5.2 APPs - WS View ...........................................................................................
5.5.3 Connections ................................................................................................
6. WIFI connection setting on mobile...............................................................................
6.1 Weather server: ......................................................................................... Fehle
6.2 How to get the WS View application on mobile device .......................................
6.3 How to create Weather server account and station ID .............................. Fehle
7. Glossary of Terms ........................................................................................................
with APPs
Operation Manual
1
Advertisement

Related Manuals for Froggit WH2600 PRO


Summary of Contents for Froggit WH2600 PRO
- Page 1 WH2600 PRO Wi-Fi Weather Station with APPs Operation Manual 1. Introduction ........................2. Warnings and Cautions ....................3. Quick Start Guide ......................4.Pre-Installation Checkout and Site Survey ..............4.1 Pre Installation Checkout ..................4.2 Site Survey ......................5. Getting Started ......................
-
Page 2: Warnings And Cautions
8. Specification ......................... 1. Introduction Thank you for your purchase of the WH2600 PRO weather station. The following user guide provides step by step instructions for installation, operation and troubleshooting. 2. Warnings and Cautions Warning: Any metal object may attract a lightning strike, including your weather station mounting pole. -
Page 3: Pre-Installation Checkout And Site Survey
Required Step Description Section Assemble and power up the sensor array Power up the indoor thermometer-hygrometer-barometer Power up the gateway receiver, connect to your 5.5.4 router and synchronize with sensor array and thermo-hygrometer-barometer. 4. Pre-Installation Checkout and Site Survey 4.1 Pre Installation Checkout Before installing your weather station in the permanent location, we recommend operating the weather station for one week in a temporary location with easy access. -
Page 4: Getting Started
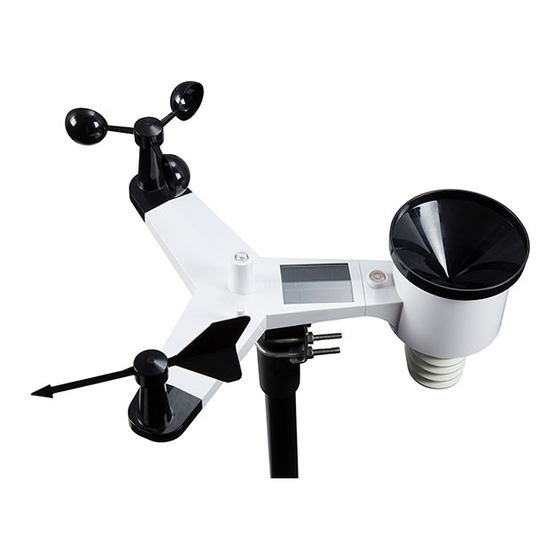
4. Wireless Range. The radio communication between gateway receiver and transmitter in an open field can reach a distance of up to 100 meter, providing there are no interfering obstacles such as buildings, trees, vehicles, high voltage lines. Wireless signals will not penetrate metal buildings. - Page 5 5.2 Outdoor Sensor Set Up Figure 1: Sensor assembly components 1 Wind vane 7 Solar panel 2 Wind speed cups 8 U-Bolts 3 Light sensor and UV sensor 9 Battery compartment door 4 Thermo- and hygro-meter senor 10 Reset button 5 Rain collector 11 LED (red) to indicate data transmission...
- Page 6 Figure 2: U-Bolt installation Loosely screw on the nuts on the ends of the U-bolts. You will tighten these later during final mounting. Final assembly is shown in Figure 3. Figure 3: U-Bolts and nuts installed The plate and U-Bolts are not yet needed at this stage but doing this now may help avoid damaging wind vane and wind speed cups later on.
- Page 7 freely. The wind vane’s movement has a small amount of friction, which is helpful in providing steady wind direction measurements. Figure 4: Wind vane installation diagram There are four alphabet letter of “N”,”E”,”S” and “W” around the wind direction, representing for the direction of North, East, South and West. Wind direction sensor has to be adjusted so that the directions on the sensor are matching with your real location.
- Page 8 5.2.4 Install the Rain Gauge Funnel Keep the Indication mark in straight line as below figure. Figure 6: Rain Gauge Funnel installation diagram 5.2.5 Install Batteries in outdoor sensor Insert 2XAA batteries in the battery compartment. The LED indicator on the back of the transmitter will turn on for four seconds and normally flash once every 16 seconds (the sensor transmission update period).
- Page 9 Note: We recommend Lithium batteries for cold weather climates, but alkaline batteries are sufficient for most climates. Rechargeable batteries have lower voltages and should never be used. 5.2.6 Mount assembled outdoor sensor package 5.2.6.1 Before you mount Before proceeding with the outdoor mounting detailed in this section, you may want to skip to setup instructions in section 0 and onwards first, while you keep the assembled outdoor sensor package nearby (although preferably not closer than 5 ft.
- Page 10 Finally, place the sensor package on top of the prepared mounting pipe.The U- Bolts should be loose enough to allow this but loosen the nuts as necessary. O nce placed, hand tightens all four nuts, taking care to d so evenly. Now you will need to align the whole package in the proper direction by rotati ng it on top of the mounting pipe as needed.
- Page 11 5.3 Indoor Sensor Set Up Note: To avoid permanent damage, please take note of the battery polarity before inserting the batteries. Remove the battery door on the back of the sensor. Insert two AA batteries. Figure 10 : Indoor sensor battery installation The indoor sensor will display indoor temperature, humidity and barometric pressure alternately.
- Page 12 batteries are sufficient for most climates. We do not recommend rechargeable batteries. They have lower voltages, do not operate well at wide temperature ranges, and do not last as long, resulting in poorer reception. Best Practices for Wireless Communication Note: To insure proper communication, mount the remote sensor(s) upright on a vertical surface, such as a wall.
- Page 13 Medium RF Signal Strength Reduction Glass (untreated) 5-15% Plastics 10-15% Wood 10-40% Brick 10-40% Concrete 40-80% Metal 90-100% 5.4 Gateway Receiver 5.4.1 Hardware Requirements 1. Broadband router 2. An “always-on” connection to the Internet. A high speed DSL or cable internet connection that maintains constant connection to the internet.
- Page 14 Place the sensor array and indoor thermo-hygrometer transmitter about 1 to 3 meter from the receiver and wait several minutes for the remote sensors to synchronize with the receiver. Once synchronized, the Indoor blue LED (Figure 12, reference 2) and Outdoor blue LED (Figure 12, reference 3) will be illuminated.
-
Page 15: Live Internet Publishing
Figure 13 : Console back view Ref. Description Reset button Press this button to reset the device for 5 seconds; short press to re-configure the internet AC Power connection 6.Live Internet Publishing Your console is capable of sending your sensor data to select internet-based weather services. -
Page 16: Wifi Connection Setting On Mobile
Ecowitt Weather Site: https://www.ecowitt.net Ecowitt is a new weather server that can host a bunch of sensors that other services don’t support at this time. 6.1 WIFI connection setting on mobile To send weather data to these services you must connect your console to the internet via Wi-Fi. - Page 17 Android version: Select the device you Operate as per the Start searching the have from the device information, tick the device. If the device list, then press Next box to confirm is in your WLAN “completed list., it will jump to operation”, press the 4) screen shot.
- Page 18 Press Scan and select Start to connect you SSID from the list, your phone to the then enter your WiFi weather station password and press “EasyWeather-WIFI” Next. to your router. If you own a dual band Configure router (2.4 GHz and successfully it will 5.0 GHz),make sure jump to “Upload...
- Page 19 Operate as per the Select the device you Tap on the settings icon information, tick the box have from the device and select “Configure a to confirm “completed list, then press Next New Device”. operation”, press Next. Enter your preferred Wi-Fi SSID (network name) and security password.
- Page 20 Return to WS view Switch your mobile device to the home screen. application Active “Setting”. Enter WLAN network, select”WH2650-WIFIxxxx” from the list. Wait Enter your preferred until connected. You may see a message such as Wi-Fi SSID (network “Unsecured Network” and “No Internet name) and security connection”: this is normal and can be ignored.
- Page 21 “Live Data” obtains directly from the outdoor sensor. It will show up after you select “Device List” from the main settings menu. Please keep the mobile device and gateway in the same network, otherwise no device(s) will show up in this list and you will not be able to select a device for displaying Android Screen iOS Screen...
- Page 22 6.2.2 Rain Total On the “Live Data” screen, press “More” button in the upper right and select Rain Total function. You can edit the rain total for the current day, week, month, or year. This is useful when you start using this system instead of another one that has accumulated data, or simply if you know the values to be incorrect.
- Page 23 the dedicated weather service you submitted. If you register with WU, the current day history data can be viewed on WS View app. On the “Live Data” screen, press the “More” button in the upper right and select “Weather Services” from the menu. a.
- Page 24 Register with Ecowitt.net option After add device and upload data successfully, if you found the data not reporting to server, presss Response Time to reset and check the response status. Finish the registration on Press the upper left menu the Ecowitt page button and select Devices.
- Page 25 Because the time will be updated to internet time automatically while WIFI connection. Once registered, select the dashboard to view your data, as shown below: Ecowitt.net is a responsive design and mobile friendly. Simply open your mobile devices web browser, browse to ecowitt.net, and bookmark your dashboard for quick access.
- Page 26 ioS Screen Upload your weather Register at If register data to Wunderground.com successfully, Wunderground.com Enter your valid e-mail you’ll receive a Station address and password ID and Station Input Station ID & to obtain the Station ID password / key.. You Station Key, press Save.
- Page 27 Select OK to fill in the Station ID and Station password / key automatically. Press Save Your station ID will be added on the WU StationID. Upload to Wunderground.com Setting finish. Press Next. Jump to the screen about Upload your weather data to Weathercloud.net Press Back if you don’t want to upload the data to other website.
- Page 28 Here is a short explanation showing data difference: Live Data is obtained by the mobile app directly t from the gateway. This can only happen when your mobile device and gateway are connected to the same Wi-Fi network. It will then show up after you select “Device List” from the main settings menu.
- Page 29 If you don’t have Weathercloud ID and Key, press “ Register at Weathercloud.net” to open your web browser to activating the Register with Weathercloud.net option You will then be prompted to Register at Weathercloud.net add a device/ Select “Create device” and enter your station’s Visit weathercloud.net and information: enter a Username, Email and...
- Page 30 Android Screen iOS Screen 1) Input Weathercloud ID & Weathercloud Key, press Save..then press Finish. Jump to the Device List home screen If you don’t have WOW ID and Key, press “ Register at WeatherObservationWebsite” to open your web browser to activating the Register with WOW option - 30 -...
- Page 31 Register at The actual form is longer, but all WeatherObservationWeb questions should be site self-explanatory. Complete and submit the form. You will shortly Choose create a new account receive an email with You will be presented with instructions on how to login a form to fill out Now wait for the email to arrive and click the link in that email to...
- Page 32 Authentication Key: This is a 6-digit number that is used to ensure data is coming from you and not another user. Begin setting up a new site by clicking “Enter a Site”: You will be presented with a form where you detail your station’s location and a bunch of other settings related to how you wish the site to operate.
- Page 33 You will need both “Site ID” and “Authentication Key” to setup the upload configuration for WOW in the Weather Server. e. Upload your weather data to Customized Websit Android Screen iOS Screen If you want to upload data to your customized website, select Enable button (display blue) and select the protocol type.
- Page 34 Tapping on your console’s entry in the device list will bring you to the page where you can change WU registration information. If you want to stop your console upload data to Wunderground, delete your Station ID and select “Save”. Mobile application –...
- Page 35 6.4 Mobile application – Check WU weather data and graph In the mobile application tap Menu choose WU Dashboard (Android version) and you will be presented with a page listing current conditions for that station. If you have added multiple WU IDs, tap on the WU Station ID to switch to view data from other IDs.
- Page 36 6.5 Mobile application – Remove or Add WU ID If you have previously registered your console for use with wunderground.com and wish to remove this device data display from App, use the “Manage WU Station” menu option after tapping on the settings icon, select “Delete” your console from the list and confirm you wish to delete the station.
- Page 37 Mobile application –Remove or Add WU ID (iOS) 6.6 Mobile application – Set Units You may want to change the units in which sensor values are reported. To do so, click on the “Configure Units” menu after tapping on the settings icon. Next, tap on the sensor type you wish to change the reporting units for and set the units as desired.
- Page 38 Mobile application – Change units (Android) Mobile application – Change units (iOs) 6.7 Viewing your Data on Wunderground.com - 38 -...
- Page 39 You can also observe your weather station’s data by using the wunderground.com web site. You will use a URL like this one, where your station ID replaces the text “STATIONID”: http://www.wunderground.com/personal-weather-station/dashboard?ID=STATIONI It will show a page such as this, where you can look at today’s data and historical data as well: There are also some very useful mobile apps.
- Page 40 WU Storm: iPad and iPhone application for viewing radar images, animated wind, cloud coverage and detailed forecast, and PWS station data https://itunes.apple.com/us/app/wu-storm/id955957721 Weather Underground: Forecast: iOS and Android application for forecasts https://itunes.apple.com/us/app/weather-underground-forecast/id486154808 https://play.google.com/store/apps/details?id=com.wunderground.android.weather& hl=en - 40 -...
- Page 41 PWS Weather Station Monitor: View weather conditions in your neighborhood, or even right in your own backyard. Connects to wunderground.com https://itunes.apple.com/us/app/pws-weather-station-monitor/id713705929 - 41 -...
-
Page 42: Maintenance
7.Maintenance The following steps should be taken for proper maintenance of your station Clean Rain Gauge Check the rain gauge every 3 months. Rotate the funnel counter-clockwise and lift it up. Clean the funnel and bucket with a damp cloth to remove any dirt, debris and insects. Spray the array lightly with insecticide, if there’s a bug infestation. -
Page 43: Troubleshooting Guide
8. Troubleshooting Guide Look through the following table and locate an issue or problem you are experiencing in the left column and read possible solutions in the right column. Problem Solution Check that the outdoor transmission LED is flashing Outdoor sensor not normally. - Page 44 Problem Solution Relative pressure Relative pressure refers to sea-level equivalent temperature and should generally agree closely with does not agree with the official station. If there is a disagreement, make official reporting sure you are not looking at absolute pressure, in station particular if your station is not near sea level.
- Page 45 Problem Solution No Wi-Fi Check for Wi-Fi light on the gateway. If wireless connectivity is operational, the Wi-Fi light will be connection/Gateway steady. configured failed If you have never been able to configure Wi-Fi to a working state, make sure your Wi-Fi supports 2.4 GHz signals (801 type B or G, or N).
-
Page 46: Specification
Problem Solution whether the configuration can be completed or not. Use one phone(A) as a hotspot, find another phone(B) to run WS View app to start the WIFI configuration process(ensure the wifi light is fast flashing) to see whether the configuration can be completed or not. 9. - Page 47 Resolution Measuring range air pressure : 700-1100hPa (20.67-32.5inHg) Accuracy +/-3hpa Resolution 0.1hPa (0.01inHg) General safety instruction Danger of asphyxiation: Keep all packaging materials (plastic bags, rubber bands, etc.) away from children. There is a danger of suffocation! Danger of burns: Caution! Leaking / leaking battery acid can lead to burns! Avoid contact of battery acid with eyes, mucous membranes and skin.
- Page 48 Notes on the return of batteries according to §12 BatterieVO: Batteries do not belong in the household waste. Please dispose of all batteries as required by law, disposal in domestic waste is expressly prohibited. Batteries and rechargeable batteries can be dispensed free of charge at municipal collection points or in the shops on the spot.
- Page 49 Hereby we declare, HS-Group GmbH & Co.KG, Escherstr. 31, 50733 D-Cologne, that this product is in compliance with the essential requirements and other relevant provisions of Directive 2014/53/EU. The declaration of conformity for this product can be found at: www.froggit.de or on request. - 49 -...
Need help?
Do you have a question about the WH2600 PRO and is the answer not in the manual?
Questions and answers