Table of Contents
Advertisement
Color Screen Weather Station User Manual
1. Introduction
Thank you for purchasing the color screen weather station with temperature, humidity,
barometric, moon phase and advanced forecasting. The following use guide provides step by step
instructions for installation, operation and troubleshooting.
2. Product Features:
Figure 1
1) Wireless outdoor and indoor humidity (%RH)
2) Wireless outdoor and indoor temperature (°F or °C)
3) Records min. and max. humidity
4) Records min. and max. temperature
5) Barometric pressure (inHg, mmHg or hPa)
6) Weather forecast
7) Time and date by manual setting (WH2800)
8) DCF Radio controlled time and date (WH2801)
9) 12 or 24-hour time display
10) Perpetual calendar
11) Time alarm with snooze
12) Moon phase
13) Can receive one sensor
14) LED backlight
15) Wall hanging or free standing
Advertisement
Table of Contents

Related Manuals for Froggit WH2800


Summary of Contents for Froggit WH2800
-
Page 1: Product Features
4) Records min. and max. temperature 5) Barometric pressure (inHg, mmHg or hPa) 6) Weather forecast 7) Time and date by manual setting (WH2800) 8) DCF Radio controlled time and date (WH2801) 9) 12 or 24-hour time display 10) Perpetual calendar... -
Page 2: Getting Started
Color Screen Weather Station User Manual 16) Included transmitter (Outdoor sensor) 17) Synchronized instant reception 3. Getting started Note: The power up sequence must be performed in the order shown in this section (remote transmitter first, display console second) to avoid the console synchronization time out. This weather station consists of a console (receiver), a thermo-hygrometer (remote transmitter),... -
Page 3: Thermo-Hygrometer Sensor Set Up
Color Screen Weather Station User Manual Figure 3 3.2 Thermo-Hygrometer Sensor Set Up Note: To avoid permanent damage, please take note of the battery polarity before inserting the batteries. Remove the battery door on the back of the sensor. Insert two AA batteries. Figure 4 We recommend lithium batteries for cold weather climates, but alkaline batteries are sufficient for most climates. -
Page 4: Radio Controlled Clock
Color Screen Weather Station User Manual and (+) (-) for the bottom battery. 3.3 Display Console Set Up Place the remote thermo-hygrometer about 5 to 10 meters away from the display console (if the sensor is too close, it may not be received by the display console). The console can be powered up by AC adapter or batteries. -
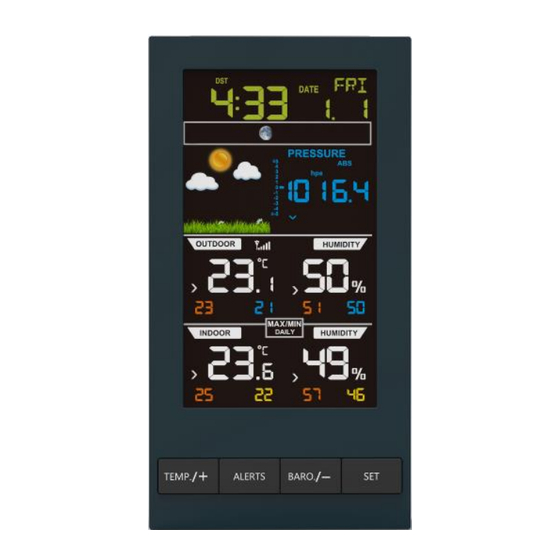
Page 5: Display Console Layout
Color Screen Weather Station User Manual transmitted to avoid interference. If the signal reception is not successful (normally during the day due to solar interference), the sensor search will be cancelled, the outdoor temperature and humidity will update as normal, and the RCC search will automatically resume every two hours until the signal is successfully captured. -
Page 6: Sensor Placement
Color Screen Weather Station User Manual 5. Date 16. Max outdoor humidity 6. Moon phase 17. Indoor temperature 7. Weather forecast icon 18. Max indoor temperature 8. Absolute/relative barometric pressure selection 19. Min indoor temperature 9. Barometric pressure 20. Indoor humidity 10. -
Page 7: Console Operation
Color Screen Weather Station User Manual earth (down a hill, for example). 5. Console Operation Note: The console has four keys for easy operation: TEMP./+ key, ALM key, BARO./- key and SET key. There are four program modes: Set Mode, Alarm Mode, calibration mode and Min/Max Mode. - Page 8 Color Screen Weather Station User Manual Beep on/off. The BEEP (ON or OFF) setting will begin flashing. Press the TEMP./+ key to toggle between BEEP ON and BEEP OFF. MAX/MIN record reset ON/OFF. Press SET key again, RST (ON or OFF) will begin flashing. This function is to switch off/on the automatically reset of MAX/MIN record at 0:00 every day, which is default turned on.
- Page 9 Color Screen Weather Station User Manual Note: In the Set mode, press the TEMP./+ key or BARO./- key to change or scroll the value. Hold the TEMP./+ key or BARO./- key for 3 seconds to increase/decrease rapidly. Note: Press the LIGHT/SNOOZE key (or wait 30 seconds for the programming mode to timeout), and the Set Mode will return to Normal Mode.
- Page 10 Color Screen Weather Station User Manual 5.4.1 Time ALARM Press ALARM button once, you will see the ALARM time. Press and hold the ALARM button for 2 seconds, you will enter the ALARM setting interface. Please follow the below sequence to operate settings: 1.
-
Page 11: Max/Min Mode
Color Screen Weather Station User Manual 4. Indoor humidity calibration. 5. Absolute pressure calibration. In calibration mode, press + and - buttons to adjust offset values, then press SET to confirm and proceed to next parameter. Press the ALARM button to cancel offset values. During calibration mode, press LIGHT/SNOOZE to exit calibration mode. -
Page 12: Moon Phase
Color Screen Weather Station User Manual Note: The weather forecast or pressure tendency is based on the rate of change of barometric pressure. In general, when the pressure increases, the weather improves (sunny to partly cloudy) and when the pressure decreases, the weather degrades (cloudy to rain). Sunny Partly Cloudy Cloudy... -
Page 13: Glossary Of Terms
Color Screen Weather Station User Manual 5.7.3 Temperature/Humidity Trend Arrows The temperature (2°F/1°C) and humidity (3%) trend indicators update every 30 minutes. The trend reflects changes over the past 3 hours. E.G.: At 3:00 — compares to 12:00 data; at 3:30 — compares to 12:30. -
Page 14: Specifications
Color Screen Weather Station User Manual HectoPascals (hPa) Pressure units in SI (international system) units of measurement. Same as millibars (1 hPa = 1 mbar) Hygrometer A hygrometer is a device that measures relative humidity. Relative humidity is a term used to describe the amount or percentage of water vapor that exists in air. -
Page 15: Declaration Of Conformity
Hereby we declare, HS-Group GmbH & Co.KG, Escherstr. 31, 50733 D-Cologne, that this product is in compliance with the essential requirements and other relevant provisions of Directive 1999/5 / The declaration of conformity for this product can be found at: www.froggit.de or on request.
Need help?
Do you have a question about the WH2800 and is the answer not in the manual?
Questions and answers