Table of Contents
Advertisement
Quick Links
PROFESSIONAL WEATHER STATION
About this manual
Thank you and congratulations on selecting this professional weather station! We are positive you will
enjoy the benefits of accurate weather readings and the precise radio controlled time information that
our instruments offer.
This manual will guide you step-by-step through setting up your device. Use this manual to become
familiar with your professional weather station, and save it for future reference.
Safety
Do not expose the main unit to rain or moisture
Use only recommended batteries
Remove the batteries if the weather station is not to be used for a long time. Old batteries can begin
to leak and damage the product.
Remember to insert the batteries according to the markings in the battery compartment. The wrong
polarity (+/-) can damage the weather station.
Damage that has occurred by careless handling is not covered by the guarantee
Production Description.
Display of indoor and outdoor temperature, wind speed, wind direction, humidity, rainfall amounts,
time and date
Alarm function for certain weather conditions as well as records of all minimum and maximum
values along with time and date of their recordings
Radio control time and date
Save the data when batteries is changed
Operates on 5x LR6/AA alkaline batteries (not included)
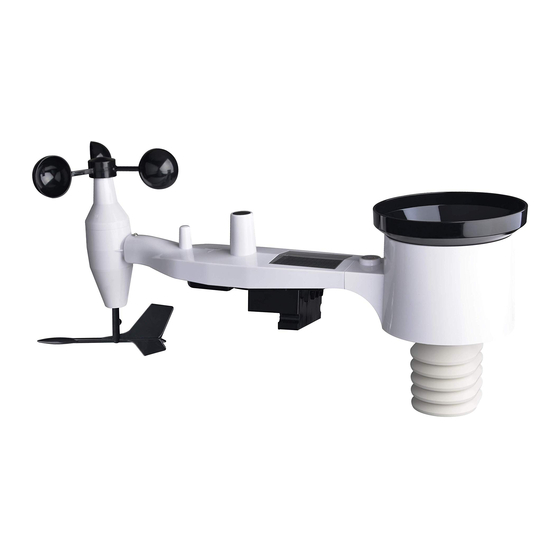
Contents
Main unit
Transmitter(thermo-hygro sensor)
Rain collector
Sensor for wind speed and wind direction
Sensor bracket
Adjustable hoops
Transmitter (thermo-hygro sensor) inside a radiation shield
Rain collector
Sensor for wind speed
Sensor for wind direction
Sensor bracket
Bubble level
Model no.: WH5300SE
Operation Manual
- 1 -
Advertisement
Table of Contents

Related Manuals for Froggit WH5300SE


Summary of Contents for Froggit WH5300SE
-
Page 1: About This Manual
PROFESSIONAL WEATHER STATION Model no.: WH5300SE Operation Manual About this manual Thank you and congratulations on selecting this professional weather station! We are positive you will enjoy the benefits of accurate weather readings and the precise radio controlled time information that our instruments offer. -
Page 2: Lcd Display
LCD Display The following illustration shows the full segments of the LCD for description purpose only and will not appear like this during normal operation and use. 1. Time alarm on icon 15. Rainfall unit 2. RCC tower icon for time reception 16. -
Page 3: Inserting The Batteries
Set up Guide Inserting the batteries Transmitter/outdoor unit 1. Turn the screwdriver counter clockwise to loosen the screw, turn aside the sheet metal (figure 1) 2. Pull out the battery compartment (figure 2) 3. Insert 2xAA alkaline battery in the battery compartment. (figure 3) Push the battery compartment into the rain collector unit. - Page 4 Receiver /Indoor unit After inserting the batteries into the Weather Station, all LCD segments will be turned on for a few seconds, all possible display segments are turned on for checking. After this, the weather station will make initial measurement and start to register the transmitter (the radio reception icon will be turned on).
-
Page 5: Program Mode
Tighten screw with Allen wrench Push cups onto stainless steel shaft Figure5 Note On the edge of wind direction sensor, there are four alphabet letter of “N”,”E”,”S”and “W” representing for the direction of North, East, South and West. Wind direction sensor has to be adjusted so that the directions on the sensor are matching with your real location. - Page 6 1 hour / 24 hour / week / month / total rainfall quantity (press the + key or MIN/MAX key shifts the display between the selectable rainfall quantities), while display the rainfall total quantity, pressing the SET key for 2 seconds will reset the rainfall total value to zero. ...
- Page 7 Without a calibrated source, wind speed can be difficult to measure. We recommend using a calibrated wind meter and a constant speed, high speed fan. Temperature Calibration Temperature errors can occur when a sensor is placed too close to a heat source (such as a building structure, the ground and when placed in direct sunlight without proper shielding in hot weather environments).
- Page 8 In the history mode, press the MIN/MAX key to select the record over the past 24hours at increments of -3 hours, -6 hours, -9 hours, -12 hours, -15 hours, -18 hours, -21 hours, -24 hours. Press the HISTORY key or key idle 30 second to return to Normal Mode Alarm Modes While in Normal Mode press the ALARM key to enter the High Alarm Mode, Press the ALARM key again to enter Low Alarm mode, press the ALARM key the third time to return the Normal Mode.
-
Page 9: Specifications
Min/Max Mode - While in Normal Mode, press the MIN/MAX key to enter the maximum mode - Press MIN/MAX key again to enter the minimum mode - Press MIN/MAX key again to return the Normal Mode. - In the maximum reading Mode, press the + key to display the following maximum values together with the time and date stamp when these values were recorded, if hold the SET key for 3s in the following individual maximum value will be reset to current reading together with the current time and date. - Page 10 1mm (if rain volume > 1000mm) Wind speed 0-180km/h (0~110mph) (show --- if outside range) Accuracy: +/- 1m/s (wind speed< 10m/s) +/-10% (wind speed > 10m/s) Measuring interval thermo-hygro sensor: 48 sec Indoor data Measuring interval temperature/humidity : 30 sec Indoor temperature range -9.9˚C--60˚C (14℉...
- Page 11 Appendix How to replace the sensor Replace Rain collector and thermo-hygro sensor - 11 -...
- Page 12 - 12 -...
- Page 13 Replace wind sensor Before replace the wind sensor, need to unplug the cable from rain sensor as illustration Notes on the return of batteries according to §12 BatterieVO: Batteries do not belong in the household waste. Please dispose of all batteries as required by law, disposal in domestic waste is expressly prohibited.
- Page 14 Hereby we declare, HS-Group GmbH & Co.KG, Escherstr. 31, 50733 D-Cologne, that this product is in compliance with the essential requirements and other relevant provisions of Directive 1999/5 / EC. The declaration of conformity for this product can be found at: www.froggit.de or on request. - 14 -...
Need help?
Do you have a question about the WH5300SE and is the answer not in the manual?
Questions and answers