Table of Contents
Advertisement
WH3000SE Professional Wi-Fi Internet
Table of Contents
1. Introduction ................................................................................................................................... 3
2. Warnings and Cautions ............................................................................................................... 3
3. Quick Start Guide ........................................................................................................................ 3
4. Pre-Installation Checkout and Site Survey .............................................................................. 3
4.1
Pre Installation Checkout ........................................................................................... 3
4.2
Site Survey ................................................................................................................. 4
5. Getting Started ............................................................................................................................. 4
5.1
Parts List ..................................................................................................................... 5
5.2
Sensor Array Set Up ................................................................................................... 5
5.2.1 Install Wind Vane ............................................................................................................. 5
5.2.2 Install Wind speed ........................................................................................................... 6
5.2.3 Install Batteries .............................................................................................................. 6
5.2.4 Mount outdoor sensor ..................................................................................................... 7
5.2.5 Reset Button and Transmitter LED ............................................................................... 7
5.3
Best Practices for Wireless Communication ............................................................. 8
5.4
Display Console .......................................................................................................... 9
6. Display Console Operation ....................................................................................................... 10
6.1
Screen Display .........................................................................................................10
6.2
Initial Display Console Set Up .................................................................................. 11
6.3
Key function .............................................................................................................. 11
6.4
Seting Mode.............................................................................................................. 12
6.4.1 Beep ................................................................................................................................ 12
6.4.2 MAX/MIN Daily ............................................................................................................... 12
6.4.3 DST .................................................................................................................................. 12
6.4.4 Time Zone ....................................................................................................................... 13
6.4.5 Time/Date ....................................................................................................................... 13
6.4.6 Pressure .......................................................................................................................... 13
6.4.7 Light ................................................................................................................................. 13
6.4.8 Temperature ................................................................................................................... 14
6.4.9 Wind speed ..................................................................................................................... 14
6.4.10
Rain ............................................................................................................................. 14
6.4.11
Moon phase................................................................................................................ 15
6.5
Alarm Mode .............................................................................................................. 15
6.6
MAX/MIN Mode ......................................................................................................... 16
Weather Station
Operation Manual
1
Advertisement
Table of Contents

Related Manuals for Froggit WH3000SE


Summary of Contents for Froggit WH3000SE
-
Page 1: Table Of Contents
WH3000SE Professional Wi-Fi Internet Weather Station Operation Manual Table of Contents 1. Introduction ........................... 3 2. Warnings and Cautions ....................... 3 3. Quick Start Guide ........................3 4. Pre-Installation Checkout and Site Survey ................3 Pre Installation Checkout ................... 3 Site Survey ......................... - Page 2 Calibration Mode ...................... 17 Other Features ......................17 6.8.1 Factory Reset/Clear Memory ..................17 6.8.2 Register New Transmitter ..................... 17 6.8.3 Backlight Operation ....................... 17 6.8.4 Tendency indicators ...................... 18 6.8.5 Wireless Signal Strength Indicator ................18 6.8.6 Weather forcaset ......................18 6.8.7 Snooze ..........................
-
Page 3: Introduction
1. Introduction Thank you for your purchase of the Solar Powered Wireless WiFi Weather Station. The following user guide provides step by step instructions for installation, operation and troubleshooting. 2. Warnings and Cautions Warning: Any metal object may attract a lightning strike, including your weather station mounting pole. -
Page 4: Site Survey
4.2 Site Survey Perform a site survey before installing the weather station. Consider the following: 1. You must clean the rain gauge every few months and change the rechargeable batteries every 2-3 years. Provide easy access to the weather station. 2. -
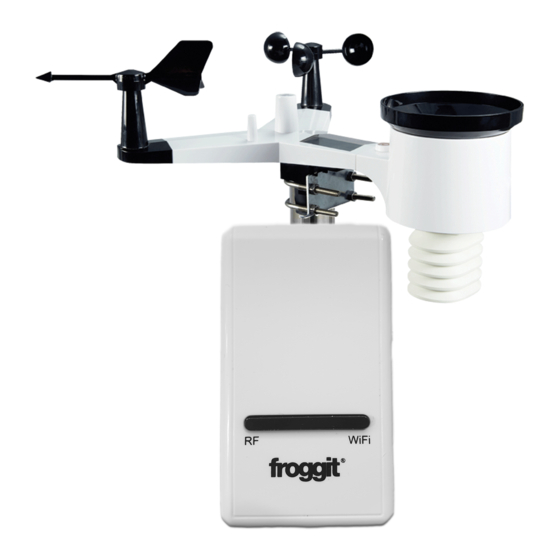
Page 5: Install Wind Vane
5.2 Sensor Set Up 1. Wind Vane 2. Wind Speed Sensor 3. UV sensor/ Light sensor 4. Thermo-hygro sensor 5. Rain collector 6. Bubble level 7. Solar panel 8. U-Bolt 9. Battery compartment 10. Reset button 11. LED Indicator: light on for 4s if the unit power up. Then the LED will flash once every 16 seconds (the sensor transmission update period). -
Page 6: Install Wind Speed
There are four alphabet letter of “N”,”E”,”S”and “W” around the wind direction, representing for the direction of North, East, South and West. Wind direction sensor has to be adjusted so that the directions on the sensor are matching with your real location. Permanent wind direction error will be introduced when the wind direction sensor is not positioned correctly during installation. - Page 7 Note: We recommend lithium batteries for cold weather climates, but alkaline batteries are sufficient for most climates. We do not recommend rechargeable batteries. They have lower voltages, do not operate well at wide temperature ranges, and do not last as long, resulting in poorer reception.
-
Page 8: Reset Button And Transmitter Led
Figure 10 Figure 11 Note: Use the bubble level next to the rain sensor to make sure sensor array is completely level.If the sensor is not level,the rain gauge,UV and solar radiation sensors will not measure properly. 5.2.5 Reset Button and Transmitter LED In the event the sensor array is not transmitting, reset the sensor array. -
Page 9: Best Practices For Wireless Communication
Figure 10 5.3 Best Practices for Wireless Communication Note: To insure proper communication, mount the remote sensor(s) upright on a vertical surface, such as a wall. Do not lay the sensor flat. Wireless communication is susceptible to interference, distance, walls and metal barriers. We recommend the following best practices for trouble free wireless communication. -
Page 10: Display Console
Plastics 10-15% Wood 10-40% Brick 10-40% Concrete 40-80% Metal 90-100% 5.4 Display console 1. Insert the 5V AC adaptor into the back of the display console Note: Place the outdoor sensor array about 5 to 10 feet from the display console and wait several minutes for the remote sensors to synchronize with the display console. - Page 11 Figure 12 Note: Your display console should have readings in all sections. Wind and Rain will show 0’s (connected) until wind or rian occur or are simulated. Note: If you only use battery to power up display console, you must press LIGHT/SNOOZE key to light up the LCD before press any other key.
-
Page 12: Display Console Operation
Figure 13 6. Display Console Operation 6.1. Screen Display 1.Time 10. Rain fall 2. Moon phase 11. Outdoor temperature 3. Barometric Pressure 12. Outdoor humidity 4. Weather forecast 13. RF icon 5. UV index 14. Indoor humidity... -
Page 13: Initial Display Console Set Up
6. Light 15. Indoor temperature 7. Wind speed 16. Date 8. Wind direction 17. WIFI icon 9. MAX/MIN Daily 18. DST 6.2. Initial Display Console Set Up Connect the power adapter to power up the display console. The unit will show software version number 2 seconds after power reset. The unit will turn on all segments of the LCD for 3 seconds after power reset, the unit will start to register the outdoor channel for 3 minutes. -
Page 14: Beep
Press this key to view Rain Rate, event, Rain Day, Rain Week, Rain RAIN Month, and Rain total Press the RAIN key 2s to reset current display rain Press this key to view wind/gust and wind direction WIND + Press this key to view Absolute Pressure average of 12hr, 24hr, PRESSURE 48hr and 72hr Press and hold 2s this key to view the absolute and relative... -
Page 15: Dst
- Press the SET key twice to select the MAX/MIN Daily section, ON/OFF section digits will start flashing,press the WIND/+ or PRESSURE/- key to select ON or OFF . (Default is ON,ON: clear at 0:00 every day). 6.4.3 DST(daylight saving time): - Press the SET key third time to select the Daylight saving time section, ON/OFF section digits will start flashing,press the WIND/+ or PRESSURE/- key to select ON or OFF . -
Page 16: Pressure
6.4.6 Pressure 1) Viewing Absolute vs. Relative Pressure To switch between absolute and relative pressure, press and hold the [PRESSURE -] button for two seconds. Absolute pressure is the measured atmospheric pressure, and is a function of altitude, and to a lesser extent, changes in weather conditions. Absolute pressure is not corrected to sea-level conditions. -
Page 17: Light
Thus, your absolute pressure may read 28.62 inHg (969 mb) at an altitude of 1000 feet (305 m), but the relative pressure is 30.00 inHg (1016 mb). The standard sea-level pressure is 29.92 inHg (1013 mb). This is the average sea-level pressure around the world. -
Page 18: Rain
6.4.10 Rain - Press the SET key 17th to select rainfall unit ( in/mm; default: mm). - In normal mode,press and release the RAIN key to view rain of rate, event, day, week, month and total. - Press the RAIN key for 2 seconds to reset current display rain. Note: Note: ast 10 minutes rainfall multiplication 6. -
Page 19: Max/Min Mode
2) Press ALARM key again to display low alarm Note: - Press RAIN key to select display rate or day rain alarm data. - Press WIND/+key to select display wind or gust alarm data. - Press ALARM key third time or press LIGHT /SNOOZE key back to normal mode 6.5.2 Alarm mode setting: 1) Press and hold for 2 seconds ALARM key enter alarm setting mode: 2) Press the WIND/+ or PRESSURE/- to arm/disarm alerts and adjust alert values. -
Page 20: Calibration Mode
- Press TEMP. key to view wind chill, heat index and dew point max. - Press RAIN key to view rain rate, rain day, rain week and rain month max. - Press WIND/+ to view wind and gust max. - Press PRESSURE/- to hold 2 seconds to view pressure absolute and relative max. 6.6.2 Press again to display min data - Press TEMP. -
Page 21: Other Features
6.7.1 Calibration Order: -5 ˚C , default: 0 degrees) offset calibrated (range +/-10%) -5 ˚C , default: 0 degrees) -10%) -50hpa) by degree) 50% to 150%) 50% to 150%) 6.8 Other Features 6.8.1 Factory Reset/Clear Memory To restore the console to factory default, perform the following steps: 1. -
Page 22: Tendency Indicators
Tendency Humidity Temperature Pressure indicators Rising Rising > 3% Rising >= 1C/2F Rising > 1hpa Steady Change <= 3% Change < 1C/2F Change <= 1hpa Falling Falling > 3% Falling >= 1C/2F Falling > 1hpa 6.8.5 Wireless Signal Strength Indicator T he wireless signal strength displays reception quality. -
Page 23: Snooze
Storm rainy Storm Snowy Note: Snowy icon will appear in place of rainy icon when the outdoor temperature is below 0 ˚C (32 F). Weather Forecasting Description and Limitations In general, if the rate of change of pressure increases, the weather is generally improving (sunny to partly cloudy). -
Page 24: Specification
alarm. 7. Specification: Outdoor data Transmission distance in open field : 100m Frequency 433/868 MHz (option) Temperature range -40˚C--60˚C Accuracy + / - 1˚C Resolution 0.1˚C Measuring range rel. humidity 10%~99% Accuracy +/- 5% 0 – 6000mm (show --- if outside range) Rain volume display Accuracy + / - 10%... -
Page 25: Connecting The Weather Station Console To Wifi
This weather station sends data to three free hosting services: Hosting Service Website Description Weather WeatherUndeground.com Weather Underground is a free weather Undergound hosting service that allows you to send and view your weather station data real-time, view graphs and gauges, import text data for more detailed analysis and use iPhone, iPad and Android applications available at Wunderground.com. - Page 26 Note: If you don't have an account on wunderground.com, please press Register on WU and create a WU account and save the station ID and password for the future usage. 3. Read and follow the tips to operate the display console(receiver): (1) Plug the console with an AC adapter.
- Page 27 Wi-Fi icon: 4. While the Wi-Fi icon is flashing, check the WLAN on your mobile phone and find the EasyWeather-WiFi. Make sure your phone is connected to EasyWeather-WiFi and select NO when the message "No Internet access" appears(If connected fail, close all the background running program on the mobile and try it again).
- Page 28 the Upload page. Enter your station ID and password for the weather server and press Save. Your station ID of wunderground.com will be added on the WU Station List. Press Next till enter the WIFI Mode page. Press Scan and select your Router SSID and enter the WIFI Password.
- Page 29 Note: Once the console has connected to your WiFi network, the Wi-fi icon on the console will stop flashing and become solid. Basic Functions: Check weather data and graph Choose the Station you want to check on the WU Station List and see the current weather data and graph (data achieved from the Wunderground.com).
- Page 30 Your Device(s) Once the device is connected successfully with WIFI, it will display on Your Device(s). Tap the device to view or change the station setting. Add monitoring WU ID Remove monitoring WU ID...
-
Page 31: Registering With Weatherunderground.com And Weathercloud.net
Set Unit Click the Unit on the setting column of the main interface to set the units for temperature, pressure, wind speed and rain. 9. Registering with WeatherUnderground.com and WeatherCloud.net 9.1 WeatherUnderground.com 9.1.1 Registering through the PC or Mac Website 1. - Page 32 up option. 2. Select More | Register Your PWS. 3. Click Send Validation Email. Respond to the validation email from Wunderground (it may take a few minutes). 4. Select More | Register Your PWS again and enter all of the information requested. 5.
- Page 33 Enter the Station ID (ID), Station Key (Password) and Station Number (StationNum) into the WS View. Below figure is an example, and your station ID and password will be different. Note: Your station ID will have the form: KSSCCCC###, where K is for USA station (I for international), SS is your state, CCCC is your city and ### is the station number in that city.
- Page 34 WunderStation iPad App Visit: http://www.WunderStation.com to download the WunderStation iPad app.
- Page 35 Mobile Apps Visit: http://www.wunderground.com/download/index.asp for a complete list of Mobile apps for iOS and Android. Alternately, you can find your data on your mobile device’s web browser.
- Page 36 9.2 WeatherCloud 1. Visit WeatherCloud.net and enter a Username, Email and Password. 2. Respond to the validation email from WeatherCloud (it may take a few minutes).
-
Page 37: Maintenance
3. Select Create Device and enter your weather station information. After registering your station, make a note of the following: Weathercloud ID Enter the Weathercloud ID (ID), Key (password) into the Ambient Tool. Leave the Station Number (StationNum) blank. 10. -
Page 38: Troubleshooting Guide
In snowy environments, spray the top of the weather station with anti-icing silicon spray to prevent snow build up. 11. Troubleshooting Guide Problem Solution Outdoor sensor The sensor array may have initiated properly and the data is array does not registered by the console as invalid, and the console must be reset. - Page 39 Problem Solution details. Rain gauge reports An unstable mounting solution (sway in the mounting pole) may result rain when it is not in the tipping bucket incorrectly incrementing rainfall. Make sure you raining have a stable, level mounting solution. Data not reporting to 1.
- Page 40 This manual may contain errors and misprints. However, the information in this manual is regularly reviewed and corrections made in the next issue. We accept no liability for technical errors or printing errors, and their consequences. All trademarks and copyrights are acknowledged. www.froggit.de HS Group GmbH & Co. KG Escherstr.31 50733 Koeln...
- Page 41 Hereby we declare, HS-Group GmbH & Co.KG, Escherstr. 31, 50733 D-Cologne, that this product is in compliance with the essential requirements and other relevant provisions of Directive 1999/5 / EC. The declaration of conformity for this product can be found at: www.froggit.de or on request.
Need help?
Do you have a question about the WH3000SE and is the answer not in the manual?
Questions and answers