Bosch GLM400CL Operating/Safety Instructions Manual
Hide thumbs
Also See for GLM400CL:
- Operating/safety instructions manual (20 pages) ,
- Operating/safety instructions manual (128 pages)
Table of Contents
Advertisement
1.800.561.8187
IMPORTANT:
Read Before Using
Operating/Safety Instructions
Consignes d'utilisation/de sécurité
Instrucciones de funcionamiento
y seguridad
GLM400CL
Call Toll Free for Consumer Information and Service Locations
Pour obtenir des informations et les adresses de nos centers de service
après-vente, appelez ce numéro gratuit
Llame gratis para obtener información para el consumidor y
For English Version
www.
IMPORTANT :
Lire avant usage
ubicaciones de servicio
.com
IMPORTANTE:
Leer antes de usar
information@itm.com
Advertisement
Table of Contents

Related Manuals for Bosch GLM400CL


Summary of Contents for Bosch GLM400CL
- Page 1 Operating/Safety Instructions Consignes d’utilisation/de sécurité Instrucciones de funcionamiento y seguridad GLM400CL Call Toll Free for Consumer Information and Service Locations Pour obtenir des informations et les adresses de nos centers de service après-vente, appelez ce numéro gratuit Llame gratis para obtener información para el consumidor y...
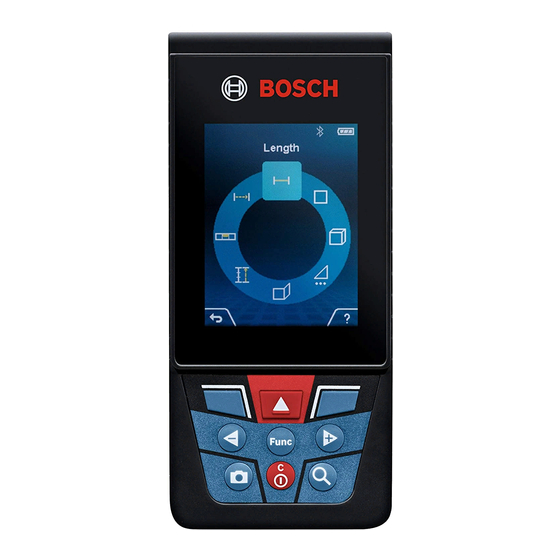
- Page 2 05.05.2017 Settings Tool Settings 7:26:12 Length Bluetooth Language 30º 30´05˝ 5 45´08˝ 60´10˝⅝ 76´01˝5⁄ 1 6 GLM400CL 1.800.561.8187 information@itm.com www. .com...
- Page 3 1.800.561.8187 information@itm.com www. .com...
- Page 4 1.800.561.8187 information@itm.com www. .com...
- Page 5 90° 90° Professional GLM 120 C Professional GLM 120 C Professional GLM 120 C 1.800.561.8187 information@itm.com www. .com...
- Page 6 1´00˝ 2´00˝ 1.800.561.8187 information@itm.com www. .com...
- Page 7 180° 180º 90° 180° 90º 180º 180° 90° 180º 90º 1.800.561.8187 information@itm.com www. .com...
- Page 8 2 607 001 391 1 608 M00 05B BT 150 0 601 096 B00 1.800.561.8187 information@itm.com www. .com...
-
Page 9: Safety Symbols
Safety Symbols The definitions below describe the level of severity for each signal word. Please read the manual and pay attention to these symbols. This is the safety alert symbol. It is used to alert you to potential personal injury hazards. Obey all safety messages that follow this symbol to avoid possible injury or death. -
Page 10: Electrical Safety
DO NOT use measuring tools, attachments and accessories outdoors when lightening conditions are present. Electrical safety Batteries can explode or leak, cause injury or fire. To reduce this risk, always follow all instructions and warnings on the battery label and package. Do not short any battery terminals. - Page 11 Measuring, detection and layout tool use and care Use the correct measuring, detection and layout tool for your application. The correct measuring, detection and layout tool will do the job better and safer at the rate for which it was designed.
- Page 12 When cleaning a tool be careful not to disassemble any portion of the tool since internal wires may be misplaced or pinched or may be improperly mounted. Certain cleaning agents such as gasoline, carbon tetrachloride, ammonia, etc. may damage plastic parts. Safety Rules for Laser Tools The following label is on your laser tool for your safety.
- Page 13 DO NOT remove or deface any warning or caution labels. Removing labels increases the risk of exposure to laser radiation. Do not use the measuring tool if the display glass is visibly damaged (e.g. cracks in the surface, etc.). This poses a risk of injury.
- Page 14 DO NOT use this measuring tool for any purpose other than those outlined in this manual. This could result in serious injury. DO NOT disassemble the measuring tool. There are no user serviceable parts inside. Disassembling the laser will void all warranties on the product.
- Page 15 The Bluetooth® word mark and logos are registered trade- marks owned by Bluetooth SIG, Inc. and any use of such marks by Robert Bosch Tool Corporation is under license. ISED (Canada) Notice This device complies with Industry Canada license- exempt RSS standard(s).
- Page 16 FCC Caution The manufacturer is not responsible for radio interfer- ence caused by unauthorized modifications to this equip- ment. Such modifications could void the user’s authority to operate the equipment. This device complies with Part 15 of the FCC Rules. Op- eration is subject to the following two conditions: 1) This device may not cause harmful interference, and 2) This device must accept any interference received, in-...
-
Page 17: Intended Use
of comprehensive guidelines and established permitted levels of RF energy for the general population. These guidelines are based on the safety standards previ- ously set by international standard bodies. These stan- dards include a substantial safety margin designed to assure the safety of all persons, regardless of age and health. - Page 18 Features The numbering of the product features shown refers to the illustration of the measuring tool on the graphic page. 1 Display Display Elements 2 Measuring button a Result line 3 Soft key b Target indicator (crosshair) 4 Plus button c Display tilt angle (Select to the right) d Date/time...
-
Page 19: Technical Data
Technical Data Digital Laser Measure GLM400CL Measuring range (typical) 3 in - 400 ft (0.08 –122 m Measuring range (typical, unfavorable conditions) 196 ft (60 m ) Measuring accuracy (typical) ±1/16 in (±1.5 mm Measuring accuracy (typical, unfavorable conditions) ±1/10 in (±3 mm ) Lowest indication unit 1/32 in (0.5 mm) - Page 20 - Rated voltage 3.6 V - Capacity 3120 mAh - Number of battery cells - Charging time approx. 5.5 h - Output voltage 5.0 V - Charging current 1000 mA - Protection class / II Degree of Protection IP54 (dust and splash water protected) ®...
-
Page 21: Initial Start-Up
Initial Start-Up - Use only the chargers listed in the technical data. Only these battery chargers are matched to the lithium-ion battery of your measuring tool. - The use of chargers from other manufacturers can lead to defects on the measuring tool; a higher voltage (e.g. 12 V) from a vehicle charger is not suitable for charging this measuring tool. -
Page 22: Operation
time can be noticeably longer. The measuring tool cannot be used on its own during the charging process. ® The Bluetooth function switches off during the charging procedure. Existing connections to other devices are interrupted. This can lead to data loss. Notes for Optimum Handling of the Battery in the Measuring Tool Store the measuring tool only within the allowable temperature... -
Page 23: Switching On And Off
Do not leave the switched on measuring tool unattended and switch the tool off after use. Other persons could be blinded by the laser beam. Switching On and Off During work, ensure that the reception lens 20, laser beam output 19, and camera 18 are not closed off or covered, otherwise correct measurement will not be possible. - Page 24 further measurement, repeat this process. With the laser beam continuously switched on and in the the continuous measurement function, measurement will begin after the measuring button 2 [ ] is pressed for the first time. Do not point the laser beam at persons or animals and do not look into the laser beam yourself, not even from a large distance.
-
Page 25: Settings Menu
Permanent Laser Beam If necessary, you can switch the measuring tool to permanent laser beam operation. To do so, use soft key 3 [ ] to select the basic settings for the measuring tool. Use buttons 4 [+] or 11 [–] to select the permanent laser beam and confirm this by pressing button 13 [Func]. -
Page 26: Timer Function
Timer Function The timer function is useful when measuring in hard-to-reach areas, for example, or when the measuring tool should be kept stationary during measurement. Select the timer function in the settings. Select the required time period between triggering the timer and starting measurement and confirm by pressing the measuring button 2 [ ] or button 13 [Func]. -
Page 27: Setting The Language
“Tool” Menu Select the menu “Tool” in the menu “Settings”. Use button 4 [+] or 11 [–] to select the desired tool setting and confirm with button 13 [Func]. Select the desired tool setting. To exit the “Tool” menu (o), press the On/Off/Clear button 9 [ ] or soft key 12 [ Tool Settings Language... -
Page 28: Changing The Unit Of Measure
Changing the Unit of Measure Select the “Measurement unit” in the tool settings. Unit of measure “in” (inches) is set by default. Set the required unit of measure and confirm by pressing button 13 [Func]. To exit the menu item, press the On/Off/Clear button 9 [ ] or soft key 3 [ ]. -
Page 29: Measuring Functions
Measuring Functions Note: Integrated Help Function Help in the form of an animation is stored in the measuring tool for each measuring function. To do so, select button 13 [Func], buttons 4 [+] or 11 [–] and then soft key 3 [ The animation shows you the detailed procedure for the selected measuring function. - Page 30 Area Measurement Select the area measurement Then measure the width and length one after the other as with a length measurement. The laser beam remains switched on between the two measurements. The distance to be measured flashes in the indicator for area measurement The first measured value is shown at the top of the 09.06.2017 13:20:23...
- Page 31 than direct distance measurement. Depending on application, greater measuring errors are possible than with direct distance measurement. To improve the measuring accuracy, we recommend using a tripod (accessory). The laser beam remains switched on between the individual measurements. a) Indirect height measurement (see figure B) Select the indirect height measurement Ensure that the measuring tool is at the same height as the lower measuring point.
- Page 32 Upon completion of the measurement, the result 09.06.2017 13:20:23 for the sought distance “X” is displayed in the 60º 48´06˝ result line a. The measuring values for the distance 60.0 “1” and the angle “ ” are displayed in the 24´09˝⅜...
- Page 33 Now measure the length L2 of the second wall. The individual measured value displayed in the measured-value line h is added to the length L1. The sum of the two lengths (displayed in the bottom measured-value line h) is multiplied by the saved height H.
- Page 34 Gradient Measurement/Digital Spirit Level Select the inclination measurement/digital spirit level The measuring tool automatically switches between two states. The digital spirit level is used to check the horizontal or vertical alignment of an object (e.g. washing machine, refrigerator, etc.). When the 1°...
- Page 35 Press button 11 [–] to browse backwards through the saved values. If there is no value available in the memory, “0.000” is shown at the bottom of the display and “0” at the top. The oldest value is located in position 1 in the memory, while the newest value is in position 50 (when 50 memory values are available).
- Page 36 (e.g., smartphones, tablets). For information on the necessary system requirements for a ® Bluetooth Further information can be found on the Bosch product page. ® For data transmission via Bluetooth , time delays between mobile terminal/device and measuring tool may occur. This can be possible due to the distance between both devices or the object being measured.
-
Page 37: Working Advice
The charge duration varies depending on the charging current. Working Advice Further information can be found on the Bosch product page. The measuring tool is equipped with a radio interface. Local operating restrictions, e.g. in airplanes or hospitals, are to be observed. - Page 38 Influence Effects on the Measuring Result Due to physical effects, faulty measurements cannot be excluded when measuring on different surfaces. Included here are: – Transparent surfaces (e.g., glass, water), – Reflecting surfaces (e.g., polished metal, glass), – Porous surfaces (e.g. insulation materials), –...
- Page 39 Accuracy Check of the Distance Measurement The accuracy of the measuring tool can be checked as follows: – Select a permanently unchangeable measuring section which is approx. 9.8 to 32 ft (3 to 10 m) long and which you know the exact length of (e.g. room width, door opening). The measurement should be performed under favorable conditions, i.e.
-
Page 40: Troubleshooting
Troubleshooting Cause Corrective Measure Temperature warning flashes, measurement not possible Measuring tool not within the Wait until the measuring tool temperature range between has reached the operating +14°F and 113°F ( –10°C temperature. and +45°C). “ERROR” indication in the display Addition/Subtraction Only add/subtract measured measured... - Page 41 Cause Corrective Measure surfaces used Repeat the calibration on a calibration were horizontal or vertical surface; accurately aligned if required, check the surface (horizontal or vertical). first with a level. The measuring tool was Repeat the calibration and moved or tilted while pressing hold the measuring tool in the button.
- Page 42 Cause Corrective Measure Battery charge indicator (g), temperature warning and “ERROR” indicator in the display Temperature Wait until charge- measuring tool not within temperature range is reached. the allowable charge- temperature range. Battery charge-control indicator (g) and “ERROR” indication in the display Check if the plug-in connection not correct has been established correctly...
-
Page 43: Maintenance And Service
Bosch power tools. Do not open the measuring tool yourself. In all correspondence and spare parts orders, please always include the 10-digit article number given on the type plate of the measuring tool. - Page 44 LIMITED WARRANTY OF BOSCH LASER AND MEASURING TOOL PRODUCTS be free from defects in material or workmanship for a period of coverage to two (2) years when you register your product within eight (8) weeks after date of purchase. Product registration within eight weeks after date of purchase), or you may register on-line.
- Page 45 THIS WARRANTY PROGRAM DOES NOT APPLY TO (“Seller”) warrants tripods and leveling rods for a period of one (1) year from date of purchase. THIS LIMITED WARRANTY DOES NOT APPLY TO OTHER ACCESSORY ITEMS AND RELATED ITEMS. THESE ITEMS RECEIVE A 90 DAY LIMITED WARRANTY. To make a claim under this Limited Warranty, you must return the complete product, transportation prepaid.
Need help?
Do you have a question about the GLM400CL and is the answer not in the manual?
Questions and answers