Advertisement
• Description
• Description
• Descripción
• Açıklama
1
2
3
1 2 3 4
POWER
-
+
7
5
4
•
•
Installation notes
Notas de instalación
•
•
Notes d'installation
Montaj notları
Don't install in heat-source and damp place.
Ne pas installer à proximité de sources de chaleur ni à un endroit humide.
No instalar cerca de fuentes de calor y en lugares húmedos.
Isı kaynaklarının olduğu ve ıslak-rutubetli ortamlara monte etmeyiniz.
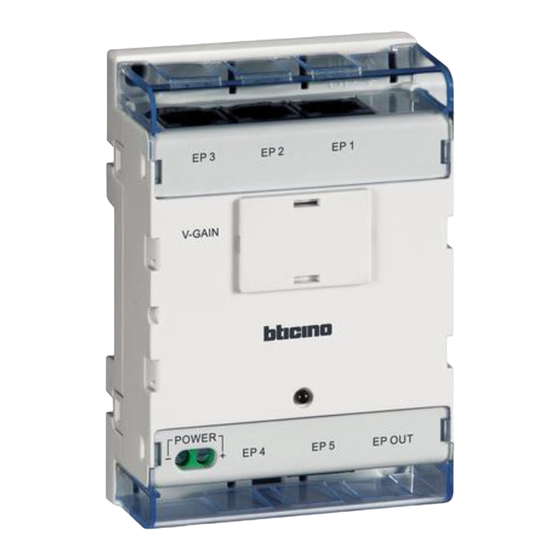
1 – 5. Are entrance panel 1, 2, 3, 4, 5: connect No. 1– 5 entrance panel output interface.
6.
Entrance panel – OUT: connect system BUS.
7.
Additional Power supply connector 30 Vdc.
Note: (1 – 6) these six terminals are RJ45 connectors, use CAT5 cable.
1 – 5. Postes externes 1, 2, 3, 4, 5: connecter interface postes externes 1– 5.
6.
Poste externe – OUT: connecter BUS système.
7.
Connecteur supplémentaire Alimentation 30 Vcc
Note : (1 – 6) ces six terminaux sont des connecteurs RJ45, utiliser un câble CAT5.
1 – 5. Las placas exteriores son 1, 2, 3, 4, 5: conectar la interfaz salida placa exterior N.° 1-5.
6.
Placa exterior - SALIDA: conectar BUS sistema
7.
Conector alimentación adicional de 30 Vcc.
Notas: (1 – 6) estos seis terminales son conectores Rj45, usar el cable CAT5.
1 – 5. Alan giriş paneli 1, 2, 3, 4, 5: 1-5 no'lu giriş paneli çıkış arayüzü bağlantısı.
6.
Giriş paneli - ÇIKIŞ: sistem BUS bağlantısı.
7.
Ek güç kaynağı konektörü 30 VDC.
Not: (1 – 6) bu altı terminal RJ45 konektörleridir, CAT5 kablo kullanınız.
DIP switch setting instruction
Commutateur réglage instruction
Instrucciones ajuste DIP switch
DIP anahtarı ayar talimatları
Color signal
Signal couleur
Señal de color
Renkli sinyali
B/W signal
Signal noir et blanc
6
Señal B/W
S/B sinyali
Distance
Distance
1
Distancia
Mesafe
OFF
0 – 300 m
KAPALI
ON
300 – 700 m
AÇIK
ON
700 – 1000 m
AÇIK
ON
1000 –1500 m
AÇIK
ON
1500 – 2000 m
AÇIK
•
•
Installation way (1)
Modo de instalación (1)
•
•
Installation (mode 1)
Montaj (yöntem 1)
1. To fasten the body on the wall use
screw.
2. Insert the cover into body and fasten it.
1. Pour fixer le corps au mur, utiliser des
vis.
2. Placer la couverture sur le corps et la
fixer.
323004
ON
1 2 3 4
AÇIK
OFF
KAPALI
2
3
4
OFF
OFF
OFF
KAPALI
KAPALI
KAPALI
OFF
OFF
OFF
KAPALI
KAPALI
KAPALI
ON
OFF
OFF
AÇIK
KAPALI
KAPALI
ON
ON
OFF
AÇIK
AÇIK
KAPALI
ON
ON
ON
AÇIK
AÇIK
AÇIK
2
1
1. Usar un tornillo para fijar el cuerpo en
la pared.
2. Insertar la tapa en cuerpo y fijar.
1. Gövdeyi duvara monte etmek için vida
kullanınız.
2. Kapağı gövdeye yerleştiriniz ve
sabitleyiniz.
Advertisement
Table of Contents

Related Manuals for Bticino 323004


Summary of Contents for Bticino 323004
- Page 1 323004 • Description • Description • Descripción 1 – 5. Are entrance panel 1, 2, 3, 4, 5: connect No. 1– 5 entrance panel output interface. Entrance panel – OUT: connect system BUS. • Açıklama Additional Power supply connector 30 Vdc.
- Page 2 • • Installation (way 2) Dismantle guide • • Installation (mode 2) Guide démontage • • Instalación (modo 2) Guía desmontaje • • Montaj (yöntem 2) Sökme prosedürü 1. Use screw driver aim at the buckle and 1. Usar un destornillador en el bloqueo y pull down to separate body and cover girarlo para separar el cuerpo y la tapa on one side.
Need help?
Do you have a question about the 323004 and is the answer not in the manual?
Questions and answers