
Subscribe to Our Youtube Channel
Related Manuals for D-Link xStack Storage DSN-1100


Summary of Contents for D-Link xStack Storage DSN-1100
- Page 1 Storage D-Link xStack Storage iSCSI SAN Array Managed SAN Solution DSN-1100 Hardware Reference Guide Version 1.0...
- Page 2 The inf ormat ion is provided “ as is” wit hout warrant y of any kind and is subj ect t o change wit hout not ice. The only warrant ies f or D-Link product s and services are set f ort h in t he express warrant y st at ement s accompanying such product s and services.
- Page 3 Export of t echnical dat a cont ained in t his document may require an export license f rom t he Unit ed St at es government . Please cont act D-Link Syst ems, Inc. f or any export compliance quest ions.
- Page 4 Document Revision Level Revision Date Notes Version 1.0 November 10, 2008...
- Page 5 Related Documentation In addit ion t o t his document , t he f ollowing document s are available f rom D-Link. xSt ack St or age Management Cent er Sof t ware User 's Gui de . This guide provides t he ...
- Page 6 You can f ind sof t ware updat es and user document at ion on t he D-Link websit e. D-Link provides f ree t echnical support f or cust omers wit hin t he Unit ed St at es and wit hin Canada f or t he durat ion of t he warrant y period on t his product .
-
Page 7: Table Of Contents
Contents Chapter 1 Introduction ..........................9 1. 1 Model ....................9 1. - Page 8 This Page Left Intentionally Blank viii Contents...
-
Page 9: Chapter 1 Introduction
St orage Management Cent er. For t he lat est inf ormat ion about support ed drives, consult t he Int eroperabilit y Mat rix f ound on t he D-Link Support Web sit e: support . dlink. com Model The DSN-1100 st orage syst em is present ly available as a single model. -
Page 10: Benefits And Features
Benefits and Features High-perf ormance, low-lat ency iSCSI st orage syst em, wit h a highly int egrat ed, reliable, mult if unct ion ASIC f or f ully f eat ured, int egrat ed st orage virt ualizat ion Modular design wit h expansion up t o 5 SATA disk drives ... -
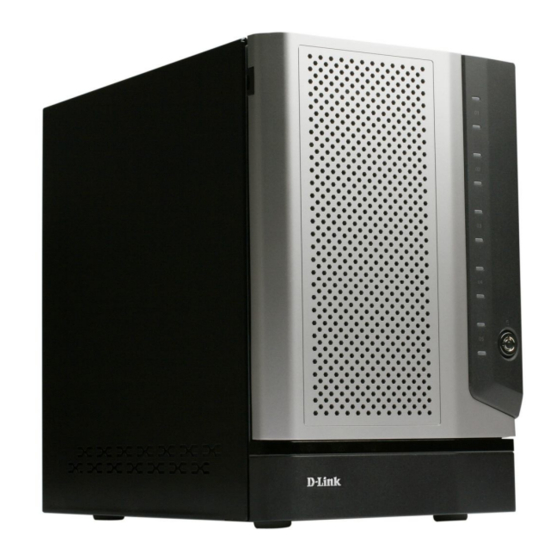
Page 11: Chapter 2 Dsn-1100 Layout
Chapter 2 DSN-1100 Layout This chapt er describes t he hardware component s on t he DSN-1100 st orage syst em. The t opics covered in t his chapt er are: Sect ion 2. 1, Front Panel Component s Sect ion 2. -
Page 12: Front Panel Components
Front Panel Components The f ront of t he DSN-1100 st orage syst em has t he f ollowing component s: Power LED – shows t he DSN-1100 power on st at us. (see Figure 2-1 and Table 2-1) Ready/ Fault LED –... - Page 13 Table 2-1. Front Panel LEDs Color Description Power Green ON = DSN-1100 is powered on. OFF = power is not being received. Ready/Fault Array is powered off or performing its Power On Self Test. ON = a fault has occurred. Green ON = normal operation.
- Page 14 Drive Power LED Drive Activity and Fault LED Figure 2-2. Hard Drive Power and Activity LEDs Table 2-2. Hard Drive LEDs (for each drive 00 through 04) Color Description Drive Power Blue ON Drive is powered and operational. Drive Activity Green Blinking Data being transmitted or received from corresponding SATA drive.
-
Page 15: Inside
Inside Front Cover The f ront panel of t he DSN-1100 st orage syst em enclosure f eat ures a lockable f ront door which hides t he f ollowing component s: Syst em power swit ch (see Figure 2-3 and Table 2-3). ... -
Page 16: Rear Panel Components
Rear Panel Components The rear of t he DSN-1100 st orage syst em enclosure has t he f ollowing component s: Dat a port s - f our 1 GbE RJ-45 iSCSI dat a port s. Each iSCSI dat a port has port speed and ... - Page 17 Figure 2-5. Close-Up View of the DSN-1100 Rear Panel Table 2-4. Rear Panel Switch Switch Description Reset Resets the DSN-1100 storage system. Please use the tip of a pen or a paper clip to reset the system. Note: This reboots the system and does not reset the unit to initial factory settings. Table 2-5.
- Page 18 This Page Lef t Int ent ionally Blank Chapter 2 DSN-1100 Layout...
-
Page 19: Chapter 3 Installing The Dsn-1100 Storage System
Chapter 3 Installing the DSN-1100 Storage System This chapt er describes how t o inst all t he DSN-1100 st orage syst em. The t opics covered in t his chapt er are: Sect ion 3. 1, Sit e Considerat ions ... -
Page 20: Site Considerations
Site Considerations The sit e where you inst all t he DSN-1100 st orage syst em can af f ect it s perf ormance. Theref ore, choose a sit e t hat conf orms t o t he requirement s in t he f ollowing sect ions. 3.1.1 General Considerations Observe t he f ollowing considerat ions when select ing a locat ion t o inst all t he DSN-1100... -
Page 21: Unpacking The Dsn-1100 Storage System
Unpacking the DSN-1100 Storage System Af t er receiving t he DSN-1100 st orage syst em, perf orm t he f ollowing st eps t o ensure t hat it and ot her cont ent s arrived saf ely. Inspect t he out er shipping cont ainer f or any damage t hat may have occurred in shipping. Report any sign of damage t o t he appropriat e shipping agency. -
Page 22: Connecting To The Iscsi Data Ports
Connecting to the iSCSI Data Ports The f ollowing sect ions describe how t o connect t he DSN-1100 dat a port s. 3.4.1 Connecting to the DSN-1100 Host Network Connection Ports The DSN-1100 st orage syst em has f our RJ-45 dat a port s. These port s connect t o your SAN using eit her a st raight -t hrough or cross-over RJ-45 Et hernet cable (t he DSN-1100 st orage syst em aut o-senses t he t ype of cable used). -
Page 23: Connecting The Power Cords
Connecting the Power Cords The DSN-1100 st orage syst em has a single power recept acle: Plug t he f emale end of t he power cord int o t he 3-pronged power connect ors on t he back of t he DSN-1100 st orage syst em. Plug t he ot her end of t he power cord int o a working AC out let t hat is not cont rolled by a wall swit ch. - Page 24 This Page Lef t Int ent ionally Blank Chapter 3 Installing the DSN-1100 Storage System...
-
Page 25: Appendix A Replacing And Upgrading Frus
Appendix A Replacing and Upgrading FRUs This appendix describes how t o replace or upgrade t he Field Replaceable Unit s (FRUs) in your DSN-1100 st orage syst em. FRUs t hat can be replaced or upgraded include: Bat t ery Pack ... - Page 26 Screw Screw Screw Screw Screw Screw Figure A-1. Removing the Cover Slide Cover to Rear and Lift Up Figure A-2. Slide the Cover Back and Remove Appendix A Replacing and Upgrading FRUs...
-
Page 27: Installing The Battery Pack
Installing the Battery Pack The xSt ack St orage Array accommodat es a shrink-wrapped bat t ery pack. Because writ e-back caching is always enabled, we recommend you have a bat t ery t o back up t he buf f er cache cont ent s. - Page 28 To inst all a bat t ery in your xSt ack St orage SAN Array, f ollow t hese st eps: Hold t he bat t ery as shown t o align t he f ast ener st rips. Make sure t he bat t ery cable and connect or is locat ed nearest t o t he bat t ery socket J11 on t he cont roller (see Figure A-4).
- Page 29 Caref ully f eed t he bat t ery’ s connect or up t hrough t he hole in t he mount ing plat e as shown in Figure A-6. Do not damage t he insulat ion on t he wires. Figure A-6 Align the Battery Plug with Connector J11 Align t he bat t ery plug wit h connect or J11 as shown in Figure A-7 and insert it f ully int o t he socket .
- Page 30 The connect or locked f irmly int o connect or J11 as shown in Figure A-8. Figure A-8 Battery Plug Locked in Place The inst alled bat t ery is shown in Figure A-9. Figure A-9 The Installed Battery Appendix A Replacing and Upgrading FRUs...
-
Page 31: Upgrading Or Replacing Memory
Upgrading or Replacing Memory Your DSN-1100 st orage syst em support s up t o 1 GB of buf f er(cache) memory and 512 MB of syst em memory using a t ot al of t wo Dual In-line Memory Module (DIMM) socket s on t he DSN- 1100 st orage syst em Cont roller: One DIMM socket s ( J14 ) is f or buf f er (cache) memory. - Page 32 Figure A-11 Buffer(Cache) Memory DIMM Socket Figure A-12 Syst em Memory DIMM Socket Appendix A Replacing and Upgrading FRUs...
- Page 33 Table A-1. xSt ack St orage Array DIMM Specif icat ions Requirement Description PC2700/DDR333 speed SDRAMs must be JEDEC compliant and DDR333 capable, with a CAS latency of 2.5. PC2100/DDR400 speed DIMMs can be used if they support a 2.5 CAS latency when operating at DDR333 speed.
- Page 34 Figure A-13. Removing a DIMM Module Hold t he new DIMM above t he DIMM socket , so it s polarizat ion not ch is locat ed at t he right end of t he DIMM socket . Slowly insert t he new DIMM by sliding t he end wit h t he met al f ingers int o t he DIMM socket (see Figure A-14).
-
Page 35: Installing Or Replacing Sata Drive
Installing or Replacing SATA Drive Removal of a populat ed drive/ t ray assembly can have unf oreseen ef f ect s including t he loss of all dat a in a volume. A drive can be part of a volume t hat may or may not be redundant . - Page 36 A.3.2 Installing a Hard Drive in a Drive Tray Follow t hese st eps t o inst all a hard drive in a drive t ray. If t here is one, remove t he plast ic air dam f rom t he t ray by squeezing t he t wo levers t oget her and lif t ing t he piece out of t he t ray as shown in A-17.
- Page 37 Place new hard drive in t ray as shown in Figure A-19. Figure A-19 Place Hard Drive in Tray Align t he mount ing holes and insert f our mount ing screws t o hold t he drive securely in t he drive t ray as shown in Figure A-.
- Page 38 Your hard drive is ready f or inst allat ion. Proceed t o A. 3. 3. A.3.3 Drive and Tray Installation A drive/ t ray assembly can be inst alled by insert ing t he drive/ t ray assembly int o t he open drive bay as shown in Figure A-21.
- Page 39 Figure A-22 Press Here Until You See the Lever Move Inwards Figure A-23 Press Lever Inwards Until it Locks DSN-1100 Hardware Reference Guide...
-
Page 40: Replacing A Power Supply
Replacing a Power Supply The DSN-1100 xSt ack St orage Array cont ains one user replaceable power supply. It can be replaced as f ollows. To replace t he power supply, use t he f ollowing procedure. Power down t he DSN-1100 st orage syst em and remove t he power cord f rom t he back panel. - Page 41 Remove t he t wo screws shown in Figure A-25 f ound on t he bot t om of t he chassis. Screw Screw Figure A-25 Remove These Two Screws on the Bottom of the Chassis Open t he clip which holds t he power supply wiring harness in place as shown in Figure A-26. Figure A-26 Open the Power Supply Harness Retention Clip DSN-1100 Hardware Reference Guide...
- Page 42 Remove t he power supply harness connect or as shown in Figure A-27. Figure A-27 Remove the Power Supply Harness Connector Caref ully slide t he power supply out of t he chassis as shown in Figure A-28. NOTE: Be sure not t o damage t he insulat ion on t he wiring harness Figure A-28 Remove the Power Supply Harness Connector To inst all a power supply, please reverse t hese st eps.
Need help?
Do you have a question about the xStack Storage DSN-1100 and is the answer not in the manual?
Questions and answers