Table of Contents
Advertisement
Available languages
Available languages
Quick Links
Advertisement
Table of Contents

Related Manuals for SPX RADIODETECTION RD8100


Summary of Contents for SPX RADIODETECTION RD8100
- Page 1 RD8100 ™ Multifunction precision cable and pipe locators User Guide Guía del usuario Kurzbedienungsanleitung Gebruikershandleiding Guide d’utilisation 用户指南 Uživatelská příručka دليل املستخدم 90/UG104INT/07...
- Page 2 ENGLISH ESPAÑOL DEUTSCH NEDERLANDS FRANÇAIS 中文 ČESKÝ عريب...
-
Page 3: About This Guide
Preface About this guide CAUTION: This guide provides basic operating instructions for the RD8100 locator and transmitter. It also contains important safety information and guidelines and as such should be read in its entirety before attempting to operate the RD8100 locator and transmitter. This guide is intended as a quick reference guide only. - Page 4 WARNING! Direct connection to live conductors is POTENTIALLY LETHAL. Direct connections to live conductors should be attempted by fully qualified personnel only using the relevant products that allow connections to energized lines. WARNING! The transmitter is capable of outputting potentially lethal voltages. Take care when applying signals to any pipe or cable and be sure to notify other technicians who may be working on the line.
-
Page 5: Windows Applications
3 Year Extended Warranty RD8100 locators and transmitters are covered by a 1 year warranty as standard. Customers can extend their warranty period to a total of 3 years by registering their products within 3 months of purchase. There are 2 ways to register your product: 1. - Page 6 RD8100 locator 16 17 GPS active, seeking satellite lock GPS satellite lock acquired 3-5 satellites in view 6-8 satellites in view 9-11 satellites in view 12 or more satellites in view...
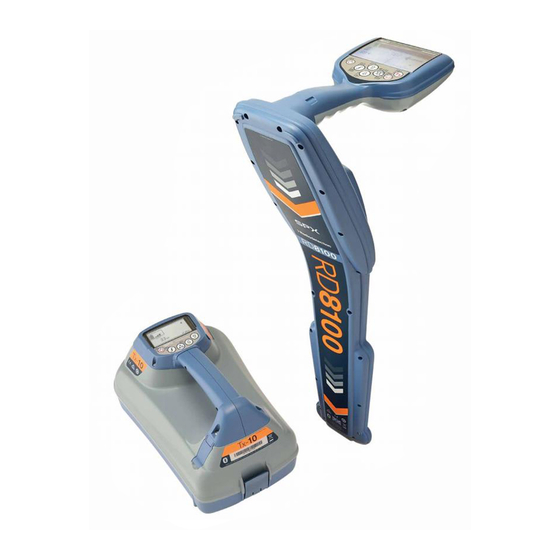
- Page 7 Locator features Keypad. 23. Radio Mode icon. LCD with auto backlight. 24. Power Mode icon. Speaker. 25. Accessory / Measurement icon. Battery compartment. 26. CD Mode icon. Optional Lithium-Ion battery pack. 27. A-Frame icon. Accessory connector. 28. Frequency / current / menu readout. Headphone connector.
-
Page 8: Tx-1, Tx-5 And Tx-10 Transmitters
Tx-1, Tx-5 and Tx-10 transmitters... -
Page 9: Transmitter Features
Transmitter features 15. Clamp icon: Indicates when a signal Keypad. clamp or other accessory is connected. LCD. 16. DC Power connected indicator. Removable accessory tray. 17. Induction mode indicator. D-cell battery tray. 18. A-Frame: Indicates when the Optional Lithium-Ion battery pack. transmitter is in Fault-Find Mode. - Page 10 Keypad actions and shortcuts Switch the locator or transmitter on by pressing the key. Once powered up, the keys function as follows: Locator keys K EY ● S H O R T P R E S S ● ■ ■ ■ ● LON G P R E S S Enter the menu Switch power off...
-
Page 11: Before You Begin
Before you begin IMPORTANT! This guide is intended to be a quick reference guide. We recommend you read the full operation manual before you attempt to operate the RD8100 locator. First use The RD8100 locators and transmitters can be powered by D-cell alkaline batteries, D-cell NiMH batteries, or by an accessory Lithium-Ion (Li-Ion) battery pack. - Page 12 Note that when browsing the locator menu, the keys act as left and right arrows. When browsing the transmitter menu, the keys act as left and right arrows. To navigate menus: Press the key to enter the menu. Use the keys to scroll through the menu options.
- Page 13 • LANG: Select menus language. • OPT F: Run SideStepauto to auto-select a locate frequency for the connected utility. ™ • BATT: Set battery type: ALK, NiMH or Li-ION and enable / disable Eco mode. • MAX P: Set the transmitter to output its maximum wattage. •...
-
Page 14: Running A Self-Test
Select the ALK Battery type using the arrows. Press the key to enter the ECO sub menu Select ECO using the arrows. Press the key three times to accept your selection and return to the main operation screen. Locating pipes and cables For more detailed descriptions of using the locator and transmitter, and for detailed locate techniques, refer to the Operation... - Page 15 Press the key to select ‘START. Press the key to start the test. The transmitter will automatically select a general purpose frequency for use on the connected utility. Locating with Active Frequencies Active frequencies are applied to the target pipe or cable using the transmitter, and provide the most effective way of tracing buried pipes or cables.
- Page 16 Locating with Passive Frequencies Passive frequency detection takes advantage of signals that are already present on buried metallic conductors. The RD8100 supports four types of passive frequencies: Power, Radio, CPS* and Cable TV (CATV)* signals. You can detect these frequencies without the aid of the transmitter.
-
Page 17: Current Direction (Cd)
The RD8100 locator features TruDepth , a feature that helps you to ensure the accuracy ™ of your locates or Survey Measurements. The depth and current are automatically removed from the display when the locator is at an angle of more than 7.5° from the path of the cable or pipe being located, or when the locator determines that signal conditions are too poor for reliable measurements. -
Page 18: Submersible Antenna
Sondes, Flexrods and FlexiTrace Sondes are battery powered transmitters that are useful for tracing non-metallic pipes. They can be fixed to Flexrods to allow them to be pushed through pipes or conduits, and some are suitable for blowing through ductwork. The RD8100 can detect a range of sonde frequencies, including those transmitted by flexiprobe P540c pushrod systems ™... -
Page 19: Bluetooth Wireless Connections
RD Manager PC Software RD Manager is the RD8100 locator system PC companion, and it allows you to manage and customize your locator. RD Manager is also used to retrieve and analyze survey and usage data, run an eCert calibration, and to perform software upgrades. You can use RD Manager to register your products to obtain an extended warranty, setup your locator by performing a number of maintenance tasks such adjusting date and time, activating and de-activating active frequencies, or by setting-up functions like CALSafe or... -
Page 20: Resetting Connections
Pairing to a PDA or PC Connection requirements: • Any RD8100 locator. • A compatible Bluetooth enabled PDA or Bluetooth enabled PC or Laptop. NOTE: The procedure below describes the pairing process between a RD8100 locator and a PDA. Pairing to a PC follows the same steps for the RD8100 locator and similar steps for your PC or laptop. -
Page 21: Saving Measurements
Bluetooth error codes If an error occurs when attempting to perform any Bluetooth command using the locator to the transmitter or the locator to a PC or PDA, the LCD will display a code to help you resolve the problem on the locator. The codes are as follows: B T CO D E D E S CR I P T I ON... - Page 22 NOTE: Erasing measurements cannot be undone! Press the key to enter the menu. Press the keys to select LOG menu. Press the key to enter the LOG menu. Scroll up or down to select the DEL option. Press the key to make the selection and return to the main menu. To send stored data to a paired PDA or PC: Stored data can be transferred wirelessly to a compatible PDA running Radiodetection’s SurveyCERT app or a PDA or PC compatible application.
- Page 23 Logs can be retrieved using the RD Manager PC application for usage analysis and survey validation. Refer to the RD Manager operation manual for further information. The RD8100 locator can be paired to an external GPS module or use its internal GPS module (GPS models only) to be able to detect and store its latitude, longitude and accurate UTC time alongside its location data.
- Page 24 Preparing the locator: Press the key to enter the menu. Scroll to the BT menu using the keys. Press the key to enter the BT menu. Scroll to the PAIR menu and press the key to enter it. Scroll to the BT-TX option. NOTE: You must complete the pairing process within 90 seconds to prevent the locator’s Bluetooth connection from timing out.
-
Page 25: Changing Frequencies
NOTE: If any iLOC commands fail, move closer to the transmitter and repeat the process. Changing frequencies Once the transmitter and the locator are paired, you can change the transmitter’s output frequency remotely using the locator: On the locator, select the frequency you want by pressing the key until the frequency is displayed on screen. -
Page 26: Care And Maintenance
SideStep SideStep allows you to change the output frequency on the transmitter. SideStep changes the selected frequency by several Hertz and automatically sets the locator’s locate frequency to match the transmitter’s output frequency. On the locator, select the frequency you want by pressing the key until the frequency is displayed on screen. -
Page 27: Batteries And Power Supply
Do not use this equipment when damaged or faulty. Batteries and power supply Only use the rechargeable battery packs, chargers and power supplies approved by Radiodetection. If not using rechargeable packs, use good quality Alkaline or NiMH batteries only. Batteries should be disposed of in accordance with your company’s work practice, and/ or any relevant laws or guidelines in your country. -
Page 28: Service And Maintenance
Radiodetection representative for the latest information regarding the RD8100 locator or any Radiodetection product. ©2020 Radiodetection Ltd. All rights reserved. Radiodetection is a subsidiary of SPX Corporation. RD8100, SurveyCERT, Power Filters, Peak+, eCert, StrikeAlert, SideStep, SideStepAuto, CALSafe, iLOC, Current Direction, RD Manager, flexiprobe, flexitrax and Radiodetection are either trademarks of Radiodetection in the United States and/or other countries. - Page 29 Preámbulo Acerca de esta guía PRECAUCIÓN: Esta guía ofrece instrucciones de operación básicas para el localizador RD8100 y su transmisor Tx. Además contiene información e instrucciones de seguridad importantes, por lo que debe leerse completamente antes de intentar operar el localizador RD8100 y su transmisor Tx.
- Page 30 ADVERTENCIA: La conexión directa con cables con tensión es POTENCIALMENTE LETAL. Las conexiones directas a conductores con tensión deben ser realizadas solo por personal altamente calificado, utilizando únicamente los productos pertinentes que permitan conexiones a líneas con tensión. ADVERTENCIA: El transmisor puede emitir tensiones potencialmente letales. Preste atención al aplicar señales a una tubería o cable y asegúrese de notificar a otros técnicos que puedan estar trabajando en la línea.
- Page 31 3 años de garantía extendida Los localizadores RD8100 y transmisores Tx cuentan con 1 año de garantía estándar. Los clientes pueden extender el período de garantía a un total de 3 años al registrar sus productos en un periodo de tiempo de 3 meses tras la compra. Puede registrar su producto de 2 formas: 1.
- Page 32 Localizador RD8100 16 17 GPS activo, intentando fijar la señal Se fijó la señal con el satélite GPS 3-5 satélites a la vista 6-8 satélites a la vista 9-11 satélites a la vista 12 o más satélites a la vista...
- Page 33 Características del 21. Nivel de volumen. localizador 22. Flechas de dirección de corriente. 23. Icono del modo Radio. Teclado 24. Icono del modo Potencia. Pantalla LCD con retroiluminación 25. Icono de Medición / Accesorios. automática. 26. Icono del modo CD. Altavoz.
- Page 34 Transmisores Tx-1, Tx-5 y Tx-10...
- Page 35 Características del 15. Icono de pinza: Indica cuando se ha conectado una pinza de señal u otro transmisor accesorio. Teclado 16. Indicador de Potencia de corriente Pantalla LCD directa conectada. Bandeja de accesorios extraíble. 17. Indicador del modo inducción. Bandeja de la batería tipo D. 18.
- Page 36 Acciones del teclado numérico y accesos rápidos Encienda el localizador o el transmisor presionando la tecla . Una vez encendido, las teclas funcionan de la siguiente manera: Teclas del localizador TE CLA ● PU L SAC I Ó N C O R TA ●...
-
Page 37: Antes De Comenzar
Antes de comenzar ¡IMPORTANTE! Esta guía es solo una referencia rápida. Le recomendamos que lea el manual de instrucciones antes de comenzar a usar el localizador RD8100. Uso por primera vez Los localizadores RD8100 y los transmisores Tx pueden recibir alimentación de pilas alcalinas o de o por un banco de baterias de iones de litio (Li-Ion battery pack) optional. - Page 38 Tenga en cuenta que al desplazarse por el menú del localizador, las teclas actúan como flechas hacia la izquierda y derecha. Al desplazarse por el menú del transmisor, las teclas actúan como flechas hacia la izquierda y derecha. Para navegar por los menús: Pulse la tecla para entrar en el menú.
- Page 39 • IDIOMA: Selecciona el idioma de los menús. • OPT F: Ejecuta SideStepauto para seleccionar automáticamente una frecuencia de ™ localización para el servicio conectado. • BAT: Establece el tipo de pilas: ALC, NiMH o Li-ION y activa/desactiva el modo Eco. •...
- Page 40 potencia máxima a medida que se agotan los niveles de la pila o la batería. El modo Eco está desactivado de manera predeterminada. Para activar el modo Eco: para entrar en el menú. Pulse la tecla Desplácese hasta el menú BAT utilizando las flechas Presione la tecla para entrar en el menú...
- Page 41 SideStepauto™ El transmisor puede ser usado para recomendar una frecuencia de localización de uso general para una tarea de localización específica al medir la impedancia del cable o tubería objetivo. Para ejecutar SideStepauto , conecte el transmisor al servicio objetivo y luego: ™...
- Page 42 ¡ADVERTENCIA! No utilice la pinza en conductores con tensión sin aislamiento. ¡ADVERTENCIA! Antes de aplicar o retirar la pinza de alrededor de un cable de alimentación, asegúrese de que la pinza siempre esté conectada al transmisor. Localización con frecuencias pasivas La detección de frecuencia pasiva aprovecha las señales que ya están presentes en los conductores metálicos subterráneos.
-
Page 43: Uso De Accesorios
Lecturas de profundidad, corriente y brújula ¡ADVERTENCIA! Nunca utilice la lectura de medición de la profundidad como una guía para la actividad mecánica u otra actividad de excavación. Siempre siga instrucciones de excavación seguras. El localizador RD8100 puede medir y visualizar la profundidad de servicios, localizar la corriente de la señal y la orientación del cable o la tubería con respecto al localizador. - Page 44 Estetoscopios y pinzas de señal del localizador Se pueden usar pinzas de localizador para identificar un cable o tubería objetivo entre un número de cables diferentes al comprobar la señal de localización más potente. Cuando los cables están agrupados o comprimidos, se puede usar una antena de estetoscopio en lugar de una pinza.
- Page 45 Antena sumergible Esta antena se conecta al localizador y se utiliza para buscar tuberías y cables bajo el agua a profundidades de hasta 300 pies/100 metros. ¡ADVERTENCIA! La antena sumergible debe ser utilizada únicamente por personal certificado y con experiencia, y solo después de haber leído el manual de instrucciones por completo! Software para PC RD Manager RD Manager es el programa para PC del sistema de localizador RD8100 que le permite...
- Page 46 Pulse la tecla (localizador) o (transmisor) para entrar en el menú BT. Desplácese hacia arriba o hacia abajo hasta la opción ENCENDIDO. Pulse la tecla para encender la función Bluetooth y regresar al menú anterior. Puede apagar la función Bluetooth para prolongar la vida de la batería o para acatar las normas en las áreas donde se consideren peligrosas las comunicaciones inalámbricas.
- Page 47 Reinicio de las conexiones Si tiene problemas con la función de Bluetooth del RD8100, Radiodetection recomienda reiniciar la conexión y volver a re-conectar el dispositivo: Pulse la tecla para entrar en el menú. Desplácese hasta el menú BT con las flechas Pulse la tecla para entrar el menú...
- Page 48 Para guardar las mediciones Para guardar las mediciones de la inspección, pulse la tecla Para obtener resultados exactos el localizador debe mantenerse lo más quieto posible mientras se guardan los datos. El localizador siempre guardará las mediciones en la memoria interna. Si el Bluetooth está encendido, conectado con un dispositivo y la función BT-PC está...
- Page 49 Desplácese hasta el menú REG mediante las flechas Pulse la tecla para entrar en el menú REG. Desplácese hacia arriba o hacia abajo hasta la opción ENVIAR. Pulse la tecla y el localizador intentará enviar los datos de inspección guardados a la PDA.
- Page 50 • SBAS: Ajuste el modo SBAS (sistema de aumento basado en satélites) para mejorar la precisión del GPS. Cuando esté encendido, ON, el sistema GPS demorará más en fijar la señal. • REINICIAR: Seleccionar SÍ para configurar el GPS interno (en modelos con GPS solamente).
- Page 51 Mientras se realiza la conexión, el transmisor y el localizador muestran un icono de Bluetooth que parpadea. La conexión puede tardar hasta un minuto. Si el proceso de conexión se realiza correctamente, el transmisor mostrará el icono y el localizador mostrará...
- Page 52 Ajuste de potencia iLOC le permite ajustar la potencia de salida del transmisor de manera remota; también puede poner el transmisor en el modo espera y luego activarlo de manera remota. Las opciones de potencia del transmisor se encuentran en el menú TXSAL en el localizador.
-
Page 53: Cuidado Y Mantenimiento
Cuando la unidad esté a 30 días de la fecha de servicio, al iniciarla se mostrará el número de días que quedan. El localizador dejará de funcionar en la fecha que corresponde al servicio. CALSafe está desactivado de manera predeterminada. Puede activar la función CALSafe y editar la fecha de calibración/servicio CALSafe con el software para PC RD Manager. -
Page 54: Actualizaciones De Software
RD8100 o cualquier producto de Radiodetection. ©2020 Radiodetection Ltd. Todos los derechos reservados. Radiodetection es una filial de SPX Corporation. RD8100, SurveyCERT, Power Filters, Peak+, eCert, StrikeAlert, SideStep, SideStepAuto, CALSafe, iLOC, Current Direction, RD Manager, flexiprobe, flexitrax y Radiodetection son marcas comerciales de Radiodetection en los Estados Unidos y/u otros países. - Page 55 Tel: +61 (0) 2 9707 3222 rd.sales.au@spx.com © 2020 Radiodetection Ltd. All rights reserved. Radiodetection is a subsidiary of SPX Corporation. Radiodetection and RD8100 are either trademarks of Radiodetection in the United States and/or other countries. Due to a policy of continued development, we reserve the right to alter or amend any published specification without notice.
Need help?
Do you have a question about the RADIODETECTION RD8100 and is the answer not in the manual?
Questions and answers