
Subscribe to Our Youtube Channel
Related Manuals for SPX Radiodetection RD8200


Summary of Contents for SPX Radiodetection RD8200
- Page 1 RD8200 ™ Precision Multifunction Cable & Pipe Locator Operation manual 90/RD8200-OM-ENG/03...
-
Page 2: Table Of Contents
Table of Contents 6.2 Verifying depth measurements ....29 Section 1 - Preface ........1 6.3 Current readings ........30 1.1 Important notices ......... 1 1.2 Compliance ..........2 Section 7 - Locating techniques ....32 1.3 Intellectual property ........3 7.1 Identifying target utilities ...... - Page 3 13.7 Time and date error messages ....51 13.12 TX10-B iLOC locator model, operation 13.8 TX5 and TX10 locator models, operation mode and active frequencies ....54 mode and active frequencies ....52 13.13 TX 10-B iLOC Fault Find locator models 55 13.9 TX5 Fault Find locator models ....
-
Page 4: Section 1 - Preface
Section 1 - Preface energized lines. Before you begin Thank you for your interest in Radiodetection’s RD8200 ® WARNING! The transmitter is capable of outputting cable and pipe locator. potentially lethal voltages. Take care when applying signals The RD8200 delivers the latest in locating technology in to any pipe or cable and be sure to notify other technicians a powerful yet ergonomic and light-weight design. -
Page 5: Compliance
Batteries survey measurements to a paired device, always ensure a minimum separation of 200mm (8 inches) between the WARNING! Only use charging equipment provided by Bluetooth antenna and your body. The location of the Radiodetection. The use of alternative chargers may cause antenna is shown in Section 3, figure 3.1. -
Page 6: Intellectual Property
Manufacturing ISO 9001:2015 1.3 Intellectual property © 2020 Radiodetection Ltd. All rights reserved. Radiodetection is a subsidiary of SPX Corporation. Radiodetection and RD8200 are registered trademarks of Radiodetection in the United States and/or other countries. Trademarks and Notices. The following are trademarks... -
Page 7: Section 2 - Introduction
Section 2 - Introduction Users can opt out any time from receiving software and 2.1 About this manual technical notifications or just from receiving marketing material. This manual provides underground utilities survey professionals with comprehensive operating instructions 2.4 Manual outline for the RD8200 locator and transmitter system. -
Page 8: Training
Before inserting the earth stake into the ground, ensure there are no shallow cables or services that could be damaged by the earth stake. authorized accessories only. Incompatible accessories may damage the equipment or give inaccurate readings. If you intend to uncover a sub-surface utility by digging, you must follow your company, region and country’s codes of practice for excavation. -
Page 9: Section 3 - System Overview
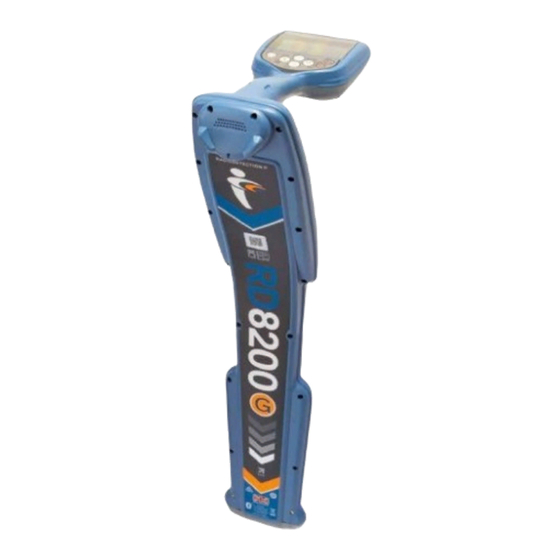
Section 3 - System overview Figure 3.1: RD8200 Locator © 2021 Radiodetection Ltd... -
Page 10: Rd8200 Locator
20 Peak / Proportional arrows: Indicates the location of 3.1 RD8200 locator the line relative to the locator 21 Battery icon: Indicates the battery level Locator features 22 Gain and Log number: Displays the log number Keypad momentarily after a survey measurement is saved to LCD with auto backlight memory Haptic (vibration) feedback... - Page 11 Figure 3.2 Tx Transmitter © 2021 Radiodetection Ltd...
-
Page 12: Tx-5 And Tx-10 Transmitters
23 Bluetooth icon (Tx-10B model only): Indicates status 3.2 Tx-5 and Tx-10 transmitters of iLOC connection. A flashing icon means pairing is in progress Transmitter features Keypad Removable accessory tray D-cells battery holder Optional Lithium-Ion rechargeable battery pack Bluetooth module antenna (model dependent) Figure 3.3 Tx-5 and Tx-10 signal transmitters Transmitter keypad Power key... - Page 13 (8200G model) or select an external GPS source Transmitter menu options UNITS Select metric or imperial units Adjust the speaker volume from 0 UTIL Enable or disable utility selection (mute) to 3 (loudest) Utility Selection – Only visible if ULIST FREQ Enable or disable individual frequencies utility section is active...
-
Page 14: Section 4 - Operation
Section 4 - Operation 4.1 First use Power options RD8200 systems are shipped as standard configured to use D cell alkaline batteries. Both the locator and transmitter can also be powered using good quality rechargeable D-cell NiMH batteries or the optional accessory Li-Ion rechargeable battery packs. - Page 15 NOTE: Prolonged use of high power output on the transmitter will reduce battery life. Removing / fitting battery packs Locator battery pack: Open the battery compartment using the release catch (figure 4.1) If using a Li-Ion battery pack un-plug the lead connector (see figure 4.7) Lift the accessory cover slightly and press the battery retaining latch inwards...
- Page 16 Figure 4.8 Release then remove the accessory tray Turn the release catch, then open the battery compartment Release the retaining catch (fig 4.10) by pressing gently, then lift the battery pack away Line up the battery pack clips with the corresponding recesses on the transmitter body and press into place (fig 4.11) Close the battery pack, turn the retaining latch and...
-
Page 17: Power On / Off
Scroll through locate In active locating: SideStep (see ‘iLOC’ frequencies from low to high section) When using Current Direction™: Perform a CD Reset When using active In Peak+ antenna frequencies: mode: Toggle Peak, Peak+, Switch between Null, Broad Peak and Guidance and Null Guidance antenna arrows... -
Page 18: Antenna Modes
Transmitter key actions 4.5 System setup Short press Long press The RD8200 locator and transmitter settings can be accessed via the menu. Once in the menu it is possible Enter the menu Switch power off to change settings according to your personal preferences operating requirements. -
Page 19: Dynamic Overload Protection
Press the key to accept your selection and return Press the key (on the locator) or the key (on to the main menu the transmitter) to enter the FREQ menu Press the key to return to the main operation Scroll through the frequency options using the screen keys If you are using the optional Li-Ion RD8200 battery... -
Page 20: Overload Warning
4.7 Overload warning WARNING! Muting audio on the locator will disable StrikeAlert Audio alarm. In cases of high levels of electromagnetic interference, the DOP will not be able to prevent the RD8200 from becoming overloaded. RD8200 becomes 4.11 Swing Warning overloaded, users will be alerted by a flashing mode icon. -
Page 21: Iloc™ And Sidestep
(Tx-10B), PCs, laptops or handheld devices running a Press the key to exit the menu compatible application. NOTE: SideStepauto has to be enabled for each Direct Refer to Section 12 for further information about Connection using the START option. At any time the Bluetooth wireless connections and how to pair your user may manually change the frequency using the devices. -
Page 22: Transmitter Eco Mode
4.18 Transmitter Eco mode 6. Press the key to exit the menu When in high voltage mode the transmitter will display a When using alkaline D-Cells in Tx-5 and Tx-10(B) high voltage warning triangle. transmitter models you can extend the effective use of the batteries by enabling Eco mode. -
Page 23: Calsafe
2. The display will show the word TICKT followed by 4.21 CALSafe™ UTIL Usage logging equipped RD8200 locators can be set to 3. Press the antenna key and use the keys disable them once they are beyond the expected service to select the desired utility or marking type / calibration date. - Page 24 RESET: Select YES to reset the internal GPS GPS active, seeking satellite lock (8200G GPS equipped model only) INT: Select this to use the internal GPS if present GPS satellite lock acquired EXTM: Select this to use GPS from RD MAP+ (features need to be enabled in the app) 3 –...
-
Page 25: Section 5 - Locating Cables And Pipes
Section 5 - Locating cables and pipes This section introduces the principals and techniques of locating buried cable and pipe utilities with the RD8200 system. For more information on the theory of cable and pipe location, refer to The theory of buried cable and pipe location which is available to download from www.radiodetection.com Contact your local Radiodetection sales office or... -
Page 26: Choice Of Frequency For Active Location
frequencies may be provided. Typical examples of these WARNING! The transmitter is capable of outputting and reasons for their use are illustrated below. potentially lethal voltages. Take care when handling the terminals, connection leads and ground stake, notify other 512Hz technicians working on the line of the hazard and guard exposed conductors to prevent accidental contact. -
Page 27: Antenna Modes
Selecting frequencies Signal strength Compass It is important to select the correct or appropriate frequency for your particular application. For more information refer to the application note “The theory of buried cable and pipe location”, which is available as a To select Peak mode: free download from www.radiodetection.com... -
Page 28: Compass
To select Broad Peak mode: In Peak+ mode the following indicators are displayed by the LCD: Press the key until the Broad Peak mode Right and left arrows icon is displayed on the LCD. Signal strength Null mode Compass ... -
Page 29: Sweep And Search
Set the locator sensitivity to approximately 50% by 5.7 Sweep and search pressing the There are a number of techniques available for locating unknown lines in an area. Using these techniques is NOTE: it may be necessary to adjust the sensitivity level particularly important before conducting any excavation throughout the pinpointing to keep the bar graph on work to help ensure that buried lines are not damaged. -
Page 30: Nulling Out
Inductive search 5.8 Nulling Out An inductive search procedure is a more certain Sometimes it is possible for some utilities to be masked technique for locating unknown lines. This type of search by other utilities and this can happen when one or more requires a transmitter and locator and two people. - Page 31 One person Nulling Out technique Figure 5.6 Nulling Out - Single person sweep 1. Lay the transmitter on its side using the side support arm. 2. Sweep the area around the transmitter with the receiver at least 10m/30’ from it. 3.
-
Page 32: Section 6 - Depth And Current Readings
Section 6 - Depth and current readings 6.1 TruDepth™ The RD8200 locator provides automatic depth of buried cables, pipes and sondes and when the locator is correctly orientated above the target line or sonde. Current readings are also displayed simultaneously if the locator is orientated correctly (feature not available in sonde or passive frequency modes). -
Page 33: Current Readings
Method 2 conditions are suitable so the following techniques should be used to check critical readings: Apply a signal to a cable or pipe of known depth. Check that the route of the line is straight for at least Locate the cable or pipe;... - Page 34 The line with the highest current measurement, rather Signal current measurements than the line giving the strongest response, is the target Pinpoint the line and confirm the accuracy of the Peak line to which the transmitter signal has been connected. pinpoint with null arrows.
-
Page 35: Section 7 - Locating Techniques
Section 7 - Locating techniques Return signal flowing on another line. Use a double- 7.1 Identifying target utilities ended connection to by-pass the ground return if possible Induction Choose a signal application point where the line is If several conductors are running in parallel, and it is not furthest from other lines and not in a congested possible to connect a transmitter, each line may be area... -
Page 36: Signal & Ground Connection
7.2 Signal & ground connection Manhole covers 7.3 Double-ended connections Sometimes when locating, it is not possible to insert the Large diameter water pipes and gas distribution pipes ground stake into the earth, for example, when locating that are laid in sections sometimes have insulated joints on hard ground such as roads. -
Page 37: Section 8 - Fault-Finding
Section 8 - Fault-finding cable and clip the connector to the ground stake 8.1 About fault-finding ensuring that a positive connection is achieved RD8200 locators are capable of locating cable to ground NOTE: Always connect the black connection lead to a faults caused by damaged cable sheaths and can also ground stake and not a water pipe or buried cable, as be used to locate damage to insulation on pipelines. -
Page 38: How To Find A Fault
towards the green spike.) The fault direction arrow Take readings at the survey intervals determined by the should be pointing away from the ground stake. If it is reference reading. To locate the cable or pipe while not, make sure that the transmitter is connected correctly using the fault find signal during a Fault-Find survey, (red connector to the cable and black to the ground press the... -
Page 39: Section 9 - Current Direction (Cd)
Section 9 - Current Direction (CD) 9.1 Understanding CD Current Direction recognition is a feature that helps to positively identify a line at points distant from the application of the signal. It is highly desirable, if not essential, for positive identification of long distance lines. These lines can be traced and positively identified through congested areas or when running parallel to other lines. -
Page 40: Cd Reset
To perform a CD reset: 9.2 CD reset While using any CD frequency, About CD reset Press and hold the When you trace a signal on very long target lines, the Alternatively transmitter signal gradually bleeds into the ground by capacitance. -
Page 41: Section 10 - Survey Measurements
Section 10 - Survey measurements RD8200 locator models are capable of recording up to 10.2 Pairing to Android 1000 survey measurement records to internal memory. When a measurement is taken and saved, the RD8200 locator will store the most relevant measurements taken On the locator: and information, such as: Press the... -
Page 42: Erasing Measurements
NOTE: RD Manager Online is compatible with PCs 10.4 Erasing measurements running Windows 10 64 bit. The RD8200 locator allows you to delete all To obtain RD Manager Online: measurements. Erasing the survey measurements will wipe the RD8200 memory and is usually recommended Visit https://www.radiodetection.com/rdmanager_online when you begin a new survey and you have saved your... -
Page 43: Section 11 - Iloc
Section 11 - iLOC™ iLOC is a standard feature of all RD8200 locator models. iLOC lets you control the TX-10B Bluetooth transmitter remotely using your locator. With iLOC you can adjust the output frequency, power settings and use SideStep. iLOC commands are sent over a Bluetooth module that can operate at distances of up to 450m / 1400ft in direct line of sight. -
Page 44: Troubleshooting
Once the locator and transmitter have successfully Paired but connection attempt failed. Power BT005 cycling may be required paired the transmitter should be power cycled to complete the process. You can then use iLOC to BT006 Corrupt response received from transmitter remotely change the transmitter’s output frequency and power levels from the locator. -
Page 45: Sidestep
iLOC commands are sent using the key, press it to send the new frequency to the transmitter. Sleep / wake the transmitter The locator’s LCD will display SEND momentarily and then OK if the transfer is successful. To help you prolong battery life you can put the transmitter in standby mode (sleep), and reactivate it If the transfer is unsuccessful, the LCD will display again, using the locator. -
Page 46: Section 12 - Using Accessories
Section 12 - Using accessories Several cables or pipes run in close proximity to 12.1 About accessories each other. Both the transmitter and locator are compatible with a A cable or pipe is accessible at an inspection hole or wide range of accessories. -
Page 47: Transmitter Clamps
conductors WARNING! Before applying or removing the clamp around a power cable, ensure that the clamp is connected to the transmitter at all times. The clamp may buzz or vibrate if it is placed around a power cable that has significant net current flow. This is normal and does not harm the equipment. -
Page 48: Transmitter External Power Supply
Plug the clamp into the transmitter output socket. WARNING!. The transmitter must only be connected to live services using the appropriate accessory such as a plug Put the clamp around the pipe or cable and ensure connector or live cable connector. that the jaws are closed. - Page 49 insertion or pushing through pipes etc. and the smaller sensitivity so the bar graph reads between 60% and diameter sondes can be used in conjunction with jetting 80%. machines and blown through the duct. A suitable The sonde radiates a Peak field from the center of its Radiodetection locator can then be used to locate the axis with a ghost signal at each end of the Peak.
-
Page 50: Stethoscopes
Repeat 1, 2 and 3 with the antenna vertical and WARNING! Failure to follow the Tx-5 or Tx-10 resting on or just above the ground. The locator instructions above may result in the tip of the FlexiTrace should then be directly above the sonde with the becoming too hot to touch, resulting in risk of personal injury antenna in line with it. -
Page 51: Submersible Antenna
Small stethoscope antenna the line. The transmitting signal should be applied by Direct Connection with the strongest possible signal and The small stethoscope antenna has a 25mm (2”) at the frequency that the submersible antenna is concave head at the end of a 2m (6½ ft) lead. The small calibrated to. - Page 52 fixing stud support rubber o-ring locating ball pins fixing stud mount bracket Figure 12.15: Bracket secured Stretch the other end of the rubber o-ring over the remaining fixing stud as for Figure 14.15 Use the hand tightening bolts to loosen up the arm brackets and to attach it over the bracket’s arm hand tightening bolts support ball.
-
Page 53: Section 13 - Appendices
Section 13 - Appendices year, either at Radiodetection or a Radiodetection- 13.1 Care and maintenance approved repair center. The RD8200 locator and transmitter are robust, durable Regularly check your locator for correct operation using and weatherproof. However you can extend your eCert (see section 14.6) and the on-board Self-Test. -
Page 54: Warranty And Extended Warranty
frequencies, setting up custom frequencies, or setting- E-mail alerts and notification of new software releases up functions like CALSafe or StrikeAlert. are sent to all registered users. RD Manager Online is also used to retrieve and analyze NOTE: To upgrade your software you need to have surveys data and internal logged data (logging and GPS created an account using RD Manager Online and have models only). -
Page 55: Tx5 And Tx10 Locator Models, Operation Mode And Active Frequencies
13.8 TX5 and TX10 locator models, operation mode and active frequencies Active Operation PDLU SLQ H2O+ RD4K Mode Frequencies • • • • • • • • • 512Hz CD Clamp • • 570Hz CD Clamp • • • 577Hz CD Clamp •... -
Page 56: Tx 10 Fault Find Locator Models
13.10 TX 10 Fault Find locator models CD pairs PDLU H2O+ • • • • • 8KFF • • • • CDFF (See Current Direction) 13.11 TX 10 locator models Current Direction (CD) frequencies CD pairs PDLU H2O+ • • 256Hz / 512Hz •... -
Page 57: Tx10-B Iloc Locator Model, Operation Mode And Active Frequencies
13.12 TX10-B iLOC locator model, operation mode and active frequencies Operation PTL PTLM PDL PDLU PXL TL PL DL SLQ H2O+ RD4K Active Mode Frequencies • • 163Hz CD Clamp • • 208Hz CD Clamp • • 273Hz CD Clamp •... -
Page 58: Tx 10-B Iloc Fault Find Locator Models
Operation PTL PTLM PDL PDLU PXL TL PL DL SLQ H2O+ RD4K Active Mode Frequencies CD Clamp LPC/LCC • Induction 83kHz Clamp (83,000Hz) CD Clamp LPC/LCC • • • • • • • • • Induction 83kHz Clamp (83,077Hz) CD Clamp LPC/LCC •... -
Page 59: List Of Supported Accessories
13.15 List of supported accessories Locator Accessories High Gain Stethoscope 10/RX-STETHOSCOPE-HG Small Stethoscope 10/RX-STETHOSCOPE-S Large Stethoscope 10/RX-STETHOSCOPE-L CD Stethoscope 10/RX-CD-STETHOSCOPE 640Hz Submersible DD Antenna (10m Cable) 10/RX-SUBANTENNA-640 8kHz Submersible DD Antenna (10m Cable) 10/RX-SUBANTENNA-8K 512Hz Submersible DD Antenna (10m Cable) 10/RX-SUBANTENNA-512 Additional Submersible Cable Length (Per Metre) 10/RX-SUBANTENNA-CABLE... - Page 60 10/RX-CLAMP-4 4" (100mm) Locator Clamp 10/RX-CLAMP-100 10/RX-CLAMP-5 5" (130mm) Locator Clamp 10/RX-CLAMP-130 Locator CD/CM Clamp (Current Direction and 10/RX-CD-CLAMP Current Measurement) Locator mobile phone holder - complete kit 10/RX-PHONE-HOLDER-K 10/RX-TABLET-7-8-HOLDER- Locator tablet holder - complete kit Mobile device support bracket and arm 10/RX-HOLDER-MOUNT Mobile phone holder 10/RX-PHONE-HOLDER...
- Page 61 Transmitter Accessories 10/TX-LPC-XX Live Plug Connector (XX= EU, UK, US) Live Cable Connector (with Crocodile 10/TX-LCC clips) 10/TX-CLAMP-2 2" (50mm) Transmitter Clamp 10/TX-CLAMP-50 10/TX-CLAMP-4 4" (100mm) Transmitter Clamp 10/TX-CLAMP-100 10/TX-CLAMP-5 5" (130mm) Transmitter Clamp 10/TX-CLAMP-130 10/TX-CLAMP-8.5 8.5” (215mm) Transmitter Clamp 10/TX-CLAMP-215 CD Transmitter Clamp 10/TX-CD-CLAMP...
- Page 62 Tx Direct Connection Lead 10/TX-DC-LEAD Tx Direct Connection Lead, crocodile clip 10/TX-DC-LEAD-TEL Tx Direct Connection Lead with banana 10/TX-DC-LEAD-BAN connectors, insulated plug/socket Tx Direct Connection Lead with banana 10/TX-DC-LEAD-OPEN connectors, Open Grid Europe Tx-10 Isolation Transformer (for locating 10/TX121-XX 3-phase core-core shorts) (XX= DE, EN, FR, NL) Accessories for tracing or locating non-conductive utilities Standard Sonde 33kHz, depth up to 5m...
- Page 63 S6 Microsonde Kit, incl. battery and case 10/SONDE-MICRO-33 10/SONDE-MICRO- Pack of 10 × Batteries for S6 Microsonde BATPACK 10/SONDE-MINI-33 S9 MiniSonde, incl. battery and case Pack of 10 × Batteries for S9 MiniSonde 10/SONDE-MINI-BATPACK S13 Sonde Kit (includes M10 Stud and Plain End 10/SONDE-S13-33 Caps, two Batteries and Case) Pack of ten spare Batteries for S13 Sonde...
- Page 64 10/TRACE50-XX FlexiTrace 50m (Tx powered pushrod transmitter) XX = D, F, GB, NL) 10/TRACE80-XX FlexiTrace 80m (Tx powered pushrod transmitter) (XX = D, F, GB, NL) 4.5mm 50m Flexrod 10/FLEXRODF50-4.5 4.5mm 80m Flexrod 10/FLEXRODF80-4.5 6.7mm 50m Flexrod 10/FLEXRODF50-7 6.7mm 100m Flexrod 10/FLEXRODF100-7 6.7mm 150m Flexrod 10/FLEXRODF150-7...
- Page 65 Locator power accessories and spares Li-Ion rechargeable battery pack with mains 10/RX-MBATPACK-LION-K-XX charger (includes power lead) (1) Li-Ion rechargeable battery pack with auto charger 10/RX-ABATPACK-LION-K Li-Ion rechargeable battery pack with mains and 10/RX-MABATPACK-LION-K- automotive charger (includes power lead) (1) 2 cells battery tray (2x D Cell / LR20) (2) 10/RX-2DCELL-TRAY (1) Compatible with RD7200/RD8200, RD8100/RD8100 and Marker (MRX) Locators (2) Compatible with RD7200/RD8200, RD7100/RD8100 and RD7000+/RD8000 Locators...
- Page 66 Li-Ion mains charger (includes power lead) (1) 10/TX-MCHARGER-LION-XX Li-Ion rechargeable battery pack (no charger) (1) 10/TX-BATPACK-LION 8 cells battery tray (8x D Cell / LR20) 10/TX-8DCELL-TRAY (1) Li-Ion rechargeable packs cannot be charged in the transmitter Replace XX with AU, EU, UK or US D Cell batteries Alkaline Battery (D-Cell, LR20, MN1300) 10/1DCELL-ALK...
- Page 67 Transport and Storage Accessories Locator backpack and bag for Tx transmitter 10/LOCATOR-BACKPACK- (without tool tray) - set of soft carry bags Locator backpack 10/LOCATOR-BACKPACK Tx transmitter (without tool tray) soft carry bag 10/TX-BAG Locator and Tx transmitter soft carry bag 10/LOCATORBAG Locator and Tx transmitter hard case 10/RD7K8KCASE-USA...
- Page 68 Toll-free: +1 800 267 6013 Tel: +1 (905) 624 8909 sales@sensoft.ca www.sensoft.ca Copyright © 2021 Radiodetection Ltd. All rights reserved. Radiodetection is a subsidiary of SPX Corporation. Radiodetection and RD8200 are registered trademarks of Radiodetection in the United States and/or other countries. Trademarks and Notices. The following are trademarks of Radiodetection: RD8200, eCert, TruDepth, SideStep, SideStepauto, Peak+, Power Filters, StrikeAlert, CALSafe, Current Direction, RD Manager Online and RD Map.
Need help?
Do you have a question about the Radiodetection RD8200 and is the answer not in the manual?
Questions and answers