Carlyle 06D Installation And Start-Up Instructions
2-cylinder compressors
Hide thumbs
Also See for 06D:
- Service manual (167 pages) ,
- Installation instructions manual (9 pages) ,
- Application manual (72 pages)
Table of Contents
Advertisement
Quick Links
GENERAL
1. Inspect compressor for shipping damage and file claim with
shipping company if damaged or incomplete.
2. Check compressor nameplate for correct model and voltage
designation.
3. Before installation, review all Carlyle compressor application
literature to assure yourself that the proper compressor has been
selected and is being applied in a proper manner. The required
application literature is available through Carlyle.
SAFETY INSTRUCTIONS
WARNING: Failure to follow these instructions could
result in serious injury.
1. Follow recognized safety procedures and practices.
2. Do not remove any compressor bolts or fittings until factory-
supplied holding charge has been relieved. Exhaust holding
charge pressure through low-pressure connection (shown in
Figs. 2-5) by removing the connection cap and depressing the
internal disc.
3. Do not apply any power to the compressor unless suction and
discharge service valves are installed and opened.
4. Do not operate or provide any electrical power to the compres-
sor unless the terminal box cover is in place and secured. Mea-
surement of amps and volts during running conditions must be
taken at other points in the power supply.
5. Do not remove terminal box cover until all electrical sources
have been disconnected.
6. Follow recommended safety precautions listed on terminal
box cover label before attempting any service work on the
compressor.
GENERAL INSTALLATION PROCEDURES
Holding Charge
Compressor is factory supplied with a 5 to 15 psig (1.4 to 2 bar)
charge of dry air. This internal pressure must be relieved before
attempting to remove any compressor fitting or part.
Relieve holding charge by removing the cap on the low pressure
connection fitting and depressing the internal disc. See Figs.
2-5 for applicable low pressure connection fitting location.
Service Valves
Remove valve pads and attach factory supplied suction and dis-
charge gaskets and service valves to the compressor. Torque
5/16''-18 mounting bolts 16 to 20 lb-ft (21.7 - 27.1 N-m) and
1/2''-13 mounting bolts 80 to 90 lb-ft (108.5 -122 N-m). When
brazing piping to valve, disassemble valve or wrap in a wet cloth
to prevent heat damage.
Oil
1. Check to see that oil level is 1/3 to 1/2 way up on compressor
sightglass before starting and after 15 to 20 minutes of opera-
tion. Compressors may be shipped with or without an oil charge
based on model. All compressors must contain the specified oil
charge prior to start up as a condition of warranty.
Installation and
Start-Up Instructions
2. To add oil: Relieve internal crankcase pressure, isolate crank-
case, and add oil through the oil fill connection (see Fig. 2 thru 5).
To remove excess oil: Reduce internal crankcase pressure to
2 psig (1.15 bar), isolate crankcase then loosen the oil drain plug
allowing oil to seep out past the threads of the plug.
CAUTION: With the compressor crankcase under slight
pressure, do not remove the oil drain plug as the entire oil
charge could be lost. Do not reuse drained oil or oil that
has been exposed to the atmosphere.
3. When additional oil or a complete oil change is required, use
only the listed Carlyle approved oils.
For CFC and HCFC refrigerants use:
Manufacturer
Totaline
Witco Suniso
Shrieve Chemical
Texaco Ind.
IGI Petroleum Ind.
For HFC refrigerants use:
Manufacturer
ICI EMKARATE
*Lubrizol Lubrikuhl
**Mobil Arctic
**Castrol
Castrol
Totaline
**Medium and high temperature applications only.
ELECTRICAL
General
Consult the wiring diagram located inside the compressor termi-
nal box cover and Fig. 1 diagram shown below for wiring connec-
tion locations.
Overload Wiring
1. Connect (1) control circuit lead to the empty side tab (#1 termi-
nal location of the top overload as shown in Fig. 1 below) of the
overload using a push-on quick-connect wire terminal.
Fig. 1 - Three Phase Across-the-Line Start Internal
Thermostat
06D
Brand Name
150
3GS
Zerol 150
WFI-32-150
Cryol-150
Brand Name
RL68H
2916S
EAL 68
SW 68
E 68
P903-1701
Advertisement
Table of Contents

Related Manuals for Carlyle 06D


Summary of Contents for Carlyle 06D
- Page 1 2. Check compressor nameplate for correct model and voltage allowing oil to seep out past the threads of the plug. designation. 3. Before installation, review all Carlyle compressor application CAUTION: With the compressor crankcase under slight literature to assure yourself that the proper compressor has been pressure, do not remove the oil drain plug as the entire oil selected and is being applied in a proper manner.
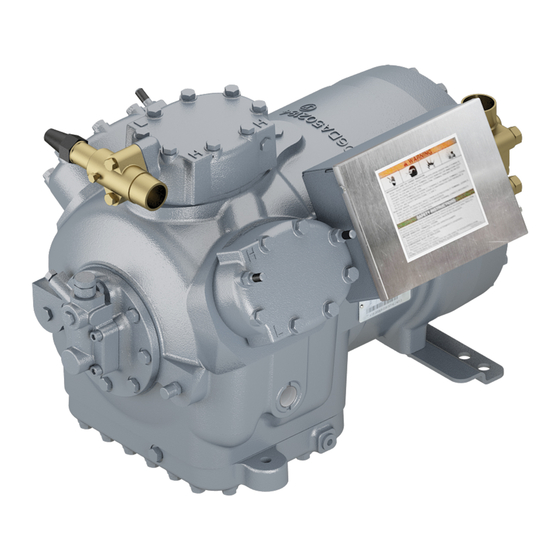
- Page 2 Fig. 2 – 06D 2-Cylinder Compressors 8 and 9 CFM (.23 and .25 m /min) Fig. 3 - 06D 4-Cylinder Compressors 13 and 16 CFM (.36 and .45 m /min)
- Page 3 Fig. 4 – 06D 4-Cylinder Compressors 18 and 20 CFM (.52 and .56 m /min) Fig. 5 – 06D 6-Cylinder Compressors 24/25, 28, 37 and 41 CFM (.68, .79, 1.05 and 1.16 m /min)
- Page 4 The use of an oil safety switch is required as a condition of warranty for those 06D compressors which are applied on systems in which two or more 06D com- pressors are connected in parallel. On units in which single 06D compressors are applied, the use of an oil pressure switch is recommended.
Need help?
Do you have a question about the 06D and is the answer not in the manual?
Questions and answers