Table of Contents
Advertisement
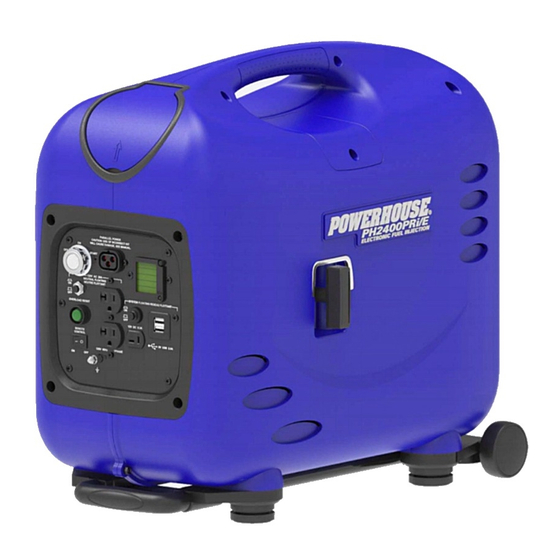
POWERHOUSE
®
INVERTER GENERATOR
PH 2400 PRi/E
WITH ELECTRONIC FUEL INJECTION
Owner's Manual
PLEASE READ THIS MANUAL CAREFULLY
BEFORE OPERATING THE GENERATOR
TIP: To navigate between hyperlink topics using a keyboard, select ALT+◄ or ALT+►.
POWERHOUSE WEB SITE
Warranty Registration
Find a Dealer
Find a Service Center
Advertisement
Table of Contents
Troubleshooting

Related Manuals for Powerhouse PH2400PRi/E


Summary of Contents for Powerhouse PH2400PRi/E
- Page 1 WITH ELECTRONIC FUEL INJECTION Owner’s Manual PLEASE READ THIS MANUAL CAREFULLY BEFORE OPERATING THE GENERATOR TIP: To navigate between hyperlink topics using a keyboard, select ALT+◄ or ALT+►. POWERHOUSE WEB SITE Warranty Registration Find a Dealer Find a Service Center...
- Page 2 GENERATOR COMPONENTS ..........................9 PH2400PRi/E Generator .....................................9 PH2400PRi/E Access Doors ................................... 10 PH2400PRi/E Control Panel ................................... 11 PH2400PRi/E Ignition Keys with USB ..............................11 PH2400PRi/E Remote Key Fob ................................11 PH2400PRi/E Digital LCD ..................................12 Indicator Light ........................................12 Display Reset Button .......................................12 SETUP &...
- Page 3 Identifying the Correct Parallel Kit ................................44 Identifying Trouble During Parallel Operation ............................45 SPECIFICATIONS ...............................46 WARRANTY AND CONSUMER INFORMATION ....................47 POWERHOUSE® Generator Warranty ............................... 47 California Emission Control Warranty Statement .......................... 48 Emission Control System Warranty ..............................49 APPENDIX A - EMISSION CONTROL SYSTEM ....................50 APPENDIX B - VEHICLE BATTERY CHARGING SAFETY ...................51...
-
Page 4: Fcc Notice
PREFACE Thank you for purchasing a POWERHOUSE® Inverter Generator. This manual covers the operation and maintenance of a POWERHOUSE PH2400PRi/E Inverter Generator. ® This Owner's Manual is an essential part of the generator and must remain with it when lent to another user or upon transfer of ownership. -
Page 5: Warranty Registration
Barcode Number (BCN) Date of Purchase Name of Selling Dealership Warranty Registration Register your unit today at www.powerhouse-products.com/new-unit-registration-form/. Online registration is accepted as proof of purchase and significantly speeds up identification of your generator with warranty support. For warranty assistance: Phone: 1-877-544-4449... - Page 6 SAFETY ALERTS AND ICONS This generator is designed to give safe and dependable service if operated according to instructions. Read and understand this Owner’s Manual and all safety alerts and labels before operating the generator. Safety Alert Icons Informational Icons The following safety alert icons are used throughout this manual to The following icons call your attention to alert you to potential hazards.
- Page 7 Electrical & Electrocution Alerts To prevent electrical shock, the generator should be grounded. Do not exceed the current limit specified for any one ▲ ▲ Connect a length of heavy cable between the generator’s receptacle. grounding terminal and an external ground source. Do not connect the generator to a household circuit.
- Page 8 Battery Safety Alerts Battery electrolyte is poisonous. If swallowed, drink large quantities of water or milk and follow ▲ with milk of magnesia or vegetable oil and seek medical help immediately. Batteries give off explosive gases; keep sparks, flames and cigarettes away. Provide adequate ▲...
-
Page 9: Generator Components
GENERATOR COMPONENTS PH2400PRi/E Generator FRONT OF GENERATOR, Right Side Fuel Access Door Spark Plug Access Door PH2400PRi/E Control Panel Recoil Starter Grip Extendable Handle BACK OF GENERATOR, Left Side Maintenance Access Door Exhaust Grille Battery Access Door Wheels Table of Contents... - Page 10 PH2400PRi/E Access Doors Your generator has four primary access doors. You can remove the access doors as shown below when performing setup and maintenance. Maintenance Access Door Spark Plug Access Door Battery Access Door Fuel Access Door To navigate between hyperlink topics using a keyboard, select ALT+◄ or ALT+►.
- Page 11 120V 20A Duplex *The parallel power receptacle enables you to increase your power output when you own the optional parallel kit (#67164) and a second compatible POWERHOUSE® generator for Parallel Mode Operation. PH2400PRi/E Ignition Keys with USB PH2400PRi/E Remote Key Fob...
-
Page 12: Indicator Light
PH2400PRi/E Digital LCD Use the digital LCD (liquid crystal display) on the control panel to monitor the generator's operating status. Digital LCD When the generator is running, the LCD illuminates to display real-time data for voltage, amps, watts, total hours of operation, and approximate fuel level. - Page 13 SETUP & PRE-OPERATION ▲ Ensure that the generator is OFF and on a level surface for all setup and pre-operation checks. ▲ When working with a battery, read and comply with all and warnings. Battery Safety Alerts Your generator ships from the factory in a pre-operation state. In this section, to enable generator startup, you will complete the following steps: 1) Connect and 2) charge the 12V battery completely, 3) add engine oil, and 4) add fuel.
- Page 14 To connect directly to the battery: Remove the battery access door and screw. Unplug the quick connect cable from the wiring harness. Remove the battery hold down strap, then remove the battery. Connect the positive and negative alligator clips of your charging cables to the corresponding battery terminals. 2.
-
Page 15: Checking And Adding Engine Oil
Checking and Adding Engine Oil Engine oil capacity: 15.6 fl oz (0.97 pt) / 460 ml Use a premium quality, 4-stroke engine oil that is a certified API grade SF/SG or better. • For environmental temperatures above 32°F (0°C), use SAE 10W-30 viscosity oil. •... -
Page 16: Checking And Adding Fuel
Checking and Adding Fuel Fuel tank capacity: 1.2 gal (4.7 L) ▲ Before adding fuel to the generator, read and comply with all Safety Alerts and Icons ▲ Read and comply with all when adding fuel to the generator. Explosion & Fire Alerts Cautions on Gasoline Blends Use only automotive unleaded gasoline in the generator, preferably with an octane rating of 87 or higher. -
Page 17: Startup And Shutdown
STARTUP & SHUTDOWN You can start the generator using any of the following methods: • Ignition Key Startup at the control panel • Remote Startup using the remote switch at the control panel and the remote key fob • Recoil Pull Startup using the recoil handle on the right side of the generator Ignition Key Startup ▲... -
Page 18: Remote Startup
Remote Startup ▲ Before using the generator, read and comply with all Safety Alerts and Icons Before starting the generator, make sure the 12V battery is fully charged. The generator requires at least 10.5 cranking volts of battery charge to provide power for startup components and sensors. To start the generator with the remote key fob: 1. - Page 19 Recoil Pull Startup ▲ Before using the generator, read and comply with all Safety Alerts and Icons Before starting the generator, make sure the 12V battery is fully charged. The generator requires at least 10.5 cranking volts of battery charge to provide power for startup components and sensors. To pull-start the generator using the starter grip: 1.
- Page 20 Shutdown ◊ You must shut down the generator using the same method you chose for startup. To shut down the generator: 1. Turn off any appliances connected to the generator. 2. Shut down the generator using the same method you chose for startup. If you started the generator with the ignition key or recoil starter grip: –...
-
Page 21: Generator Operation
GENERATOR OPERATION ▲ Before using the generator, read and comply with all Safety Alerts and Icons Ground the generator with a length of heavy cable by connecting the generator’s grounding terminal to an ▲ external ground source. Electrical & Electrocution Alerts Read and comply with all ▲... -
Page 22: Powering A Dc Device
DC Application ▲ Before using the generator, read and comply with all Safety Alerts and Icons This generator provides a 12V, 8.3A supply through the DC receptacle on the control panel. The DC receptacle is designed for , but it can also be used to power a maximum 7A DC device. Charging an External 12V Battery ◊... -
Page 23: Charging An External 12V Battery
Charging an External 12V Battery ▲ When working with a battery, read and comply with all and warnings. Battery Safety Alerts While the generator is running, the DC receptacle can be used to charge an external 12V lead acid battery. Before connecting charging cables to a battery that is installed in a vehicle, disconnect the vehicle’s ground ▲... -
Page 24: Environmental Impacts On Generator Performance
Environmental Impacts on Generator Performance Environmental conditions, such as high altitude and extreme temperatures, adversely impact the generator’s performance. When environmental conditions are combined in any way, performance issues are compounded. In other words, running the generator in an extreme temperature comes with its own considerations, but if you are also at a high altitude any performance issues are multiplied and increasingly difficult to overcome. -
Page 25: Overspeed Protection
The 120V receptacles do not supply voltage, regardless of breaker settings. • Power is not restored after the overload reset button is pressed or after the generator is shut down and restarted. Contact an authorized POWERHOUSE service center. ® Find a Service Center... - Page 26 Clearing a Low Oil Condition (steady red light) When the generator detects a low oil condition, the red indicator light illuminates. The low oil alarm system automatically shuts down the engine before the oil level falls below a safe limit. 000.0 00.0 0000...
-
Page 27: Clearing A Fault Condition
3. Shut down the generator, then correct the condition(s) causing the fault code(s). Some fault codes can only be corrected by a service technician. If you are unable to correct the fault condition, take the generator to an authorized POWERHOUSE service center. -
Page 28: Fault Codes
• When you correct the condition that is producing the fault, the generator resumes normal operation. • If you are unable to locate or correct the condition, you must take the generator to an authorized POWERHOUSE Service ® Center. - Page 29 Identifying the Correct Parallel Kit PH2400PRi/E Parallel Configuration When two compatible PH2400PRi/E generators are operating in parallel, the AC receptacles on the Parallel Kit Box supply the combined power output of both generators to your appliance(s). PH24 Parallel Kit Box...
- Page 30 Startup (Parallel Operation) ▲ Before using the generator, read and comply with all Safety Alerts and Icons ◊ Before connecting a parallel kit to your generator, make sure you use the correct parallel kit (PH24). See Identifying the Correct Parallel Kit ◊...
-
Page 31: Using A Start Capacitor When Powering An Air Conditioner
Using Parallel Mode to Run an Air Conditioner (13,500 –15,000 BTU) You can power a single 13.5K to 15K BTU air conditioner when using two compatible POWERHOUSE® generators in parallel mode. It is important to follow these steps and use a start capacitor. - Page 32 You need to correct the cause of the overload and reset the generators before applying a load again. 1. Turn off any appliance connected to the parallel kit or the generators. ◊ All POWERHOUSE generators come with InverterProtec technology. When an overload occurs, power to the ®...
-
Page 33: Maintenance Schedule
The oil should be changed after the first 4 to 6 hours of operation to remove any manufacturing debris or contamination. Use genuine POWERHOUSE® parts or the equivalent. ▲... -
Page 34: Changing The Engine Oil
Changing the Engine Oil Engine oil capacity: 15.6 fl oz (460 ml) Change the oil after the first 4 to 6 hours of operation to remove any manufacturing debris or contamination, and as recommended in the . Change the oil while the generator is OFF and the engine is still warm to Maintenance Schedule assure rapid and complete draining. - Page 35 5. Place a funnel into the oil reservoir and refill with the recommended oil. Do not overfill. 6. After refilling, insert the dipstick back into the oil reservoir, remove it, and check the oil level. (To ensure an accurate reading, do not tighten or screw the dipstick into the reservoir.) Ensure that the oil level is at the top of the etching on the dipstick.
-
Page 36: Cleaning The Air Filter Element
Cleaning the Air Filter Element A dirty air filter will restrict airflow to the fuel system. To prevent fuel system malfunction, clean the air filter element as recommended in the . Clean more frequently when operating the generator in extremely dirty Maintenance Schedule areas with high dust or sand. -
Page 37: Cleaning The Spark Plug
Cleaning the Spark Plug Recommended spark plug: A7RTC To ensure proper engine operation, the spark plug must be properly cleaned, gapped, and free of deposits. Clean and replace the spark plug as recommended in the Maintenance Schedule Always use an A7RTC resistor-type spark plug. Using a non-resistor spark plug will interfere with AC output and the electronics and may prevent the engine from starting. -
Page 38: Cleaning The Spark Arrestor
Cleaning the Spark Arrestor To ensure optimal engine performance, clean the spark arrestor every 100 hours to remove any carbon buildup. Clean the spark arrestor as recommended in the Maintenance Schedule Failure to remove carbon buildup on the spark arrestor can cause a decrease in horsepower. Make sure the generator is OFF. - Page 39 Replacing the 12V Battery Clean and replace the 12V battery as recommended in the Maintenance Schedule To remove the battery for maintenance or replacement: 1. On the left side of the generator, remove the screw and the Battery Access Door. 2.
-
Page 40: Transportation And Storage
TRANSPORTATION AND STORAGE Transporting the Generator To prevent fuel spillage when transporting, the generator should be secured upright in its normal operating position with the ignition switch and the remote switch in the OFF position. Do not operate the generator while it is on or in a vehicle. ▲... -
Page 41: Troubleshooting
• For the air filter, see Cleaning the Air Filter Are the fuel filter and air filter free of debris? Element. • For the fuel filter, see the PH2400PRi/E Service Manual. Is there a spark from the spark plug? Take the generator to an... -
Page 42: Appliance Does Not Operate
Disconnect any appliances connected to the generator. Reset the AC circuit breaker. Is the AC circuit breaker tripped “OFF”? PH2400PRi/E Control Panel Press and hold the green overload reset button for 3 Is the generator producing voltage? Is the generator overloaded? Check the U: (current/voltage) line on the LCD. -
Page 43: No Output At The Dc Receptacle
No Output at the DC Receptacle Reset the DC circuit breaker. Is the DC circuit breaker tripped "OFF"? PH2400PRi/E Control Panel Take the generator to an authorized POWERHOUSE® service center. Find a Service Center Engine Does Not Start with Remote Key Fob Engine Will Not Start. -
Page 44: Troubleshooting (Parallel Operation)
• Parallel operation works only with two matching POWERHOUSE PH2400PRi/E generators. ® • Use only the correct PH24 (#67164) Parallel Kit with your PH2400PRi/E generator, shown below. PH24 #67164 The correct parallel CORRECT kit (PH-24) has an LCD screen on the top of the kit. - Page 45 Identifying Trouble During Parallel Operation CONDITION CAUSE CORRECTION One or more The alert "OVER" is Excess Power Load: Correct the excess power load: generators displayed on the LCD of Turn off any appliance connected to the parallel The appliance one or both generators. kit or the generators.
-
Page 46: Tune Up Specifications
SPECIFICATIONS Generator Model PH2400PRi/E Part number 66873 Rated frequency 60Hz Rated voltage 120V Rated current (in Parallel) 19.2A (35.8A) Max current (in Parallel) 20A (36.7A) Rated output (in Parallel) 2300W (4300W) Max output (in Parallel) 2400W (4400W) DC output 12V, 8.3A... -
Page 47: Warranty And Consumer Information
Coverage Pre-approved parts and labor costs will be covered by POWERHOUSE® for any failure that is proven to be a failure in material or workmanship under normal use during the applicable warranty time period. This coverage is limited to parts, labor and ground shipping of repair parts. It is the responsibility of the end user to return the product to the nearest authorized repair center as directed by the warranty administration center. -
Page 48: California Emission Control Warranty Statement
Your emission control system may include parts such as the carburetor, fuel tanks, fuel caps, fuel lines, the ignition system, and catalytic converter. Also included may be hoses, belts, clamps, connectors and other emission-related assemblies. Where a warrantable condition exists, LKQ Specialty Products Group (POWERHOUSE®) will repair your small off-road engine at no cost to you including diagnosis, parts and labor. -
Page 49: Emission Control System Warranty
Emission Control System Warranty Your POWERHOUSE® generator engine complies with U.S. Environmental Protection Agency, Environment of Canada, and the state of California (if the model is certified by CARB). The following systems and/or parts are covered by this warranty. Failures or improper operation of the following systems and components will be diagnosed and repaired with no charge for labor or parts. -
Page 50: Appendix A - Emission Control System
You can trust that the replacement parts supplied by POWERHOUSE® have been manufactured to the same production standard as the original parts. The use of replacement parts or accessories which are not designed by POWERHOUSE® may affect the engine emission performance. -
Page 51: Appendix B - Vehicle Battery Charging Safety
APPENDIX B - VEHICLE BATTERY CHARGING SAFETY (a) SAVE THESE INSTRUCTIONS. THIS MANUAL CONTAINS IMPORTANT SAFETY AND OPERATING INSTRUCTIONS. (b) WORKING IN THE VICINITY OF A LEAD-ACID BATTERY IS DANGEROUS. BATTERIES GENERATE EXPLOSIVE GASES DURING NORMAL BATTERY OPERATION. FOR THIS REASON IT IS OF THE UTMOST IMPORTANCE THAT EACH TIME BEFORE USING YOUR CHARGER, YOU READ AND FOLLOW THE INSTRUCTIONS PROVIDED EXACTLY. - Page 52 POWERHOUSE ® LKQ Specialty Products Group Elkhart, IN 46516 USA www.Powerhouse-Products.com PH2400PRi-E Owner’s Manual (v. 1.0, 2018-2018-11-27) This manual version applies to BCNs equal to or greater than: 19011543039410001 © LKQ Specialty Products Group 2018 All rights reserved.
Need help?
Do you have a question about the PH2400PRi/E and is the answer not in the manual?
Questions and answers