Kaiterra Sensedge Mini User Manual
Air quality monitor
Hide thumbs
Also See for Sensedge Mini:
- Installation manual (26 pages) ,
- Manual (13 pages) ,
- Modbus user manual (8 pages)

Related Manuals for Kaiterra Sensedge Mini


Summary of Contents for Kaiterra Sensedge Mini
- Page 1 Kaiterra Sensedge Mini Air Quality Monitor Made in China www.kaiterra.com support@kaiterra.com Origins Technology Limited. 18 Xinzhong St Dushiyangguang4-1106, Dongcheng, Beijing, China...
- Page 2 Important Safeguards Please read the safety warnings before use and take the necessary precautions to reduce the risk of fire, electric shock, or injury. The Kaiterra limited warranty applies only if the unit is used according to these instructions. WARNING ...
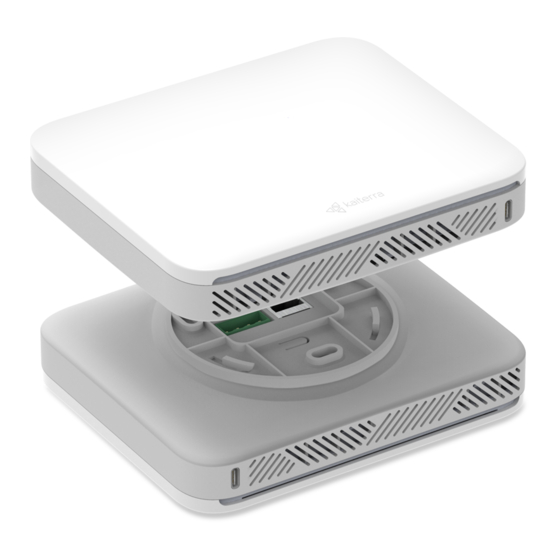
- Page 3 Externals and Air Flow Air is drawn into the Sensedge Mini from the lower side, as well as the air intake on the upper side. It is vital that neither side of the device is covered. Any changes in airflow may affect the readings and accuracy.
- Page 4 Make sure to pull at a 90 degree angle. Sensors may be inserted in either sensor bay, and in any order. They may be swapped both when the Sensedge Mini is powered on and operational, and when the device is turned off.
- Page 5 Flash red No network connection Installation The Sensedge Mini can be mounted on a concrete block wall, drywall, ceiling, or to an electrical box. For detailed instructions on installation, power, and connectivity setup, please visit our support center website at http://support.kaiterra.com/sensedge-mini...
- Page 6 Kaiterra provides a 1-year limited manufacturer warranty on the Sensedge Mini. To obtain a copy of the warranty for this product, please visit https://support.kaiterra.com/policies Troubleshooting For additional support, please contact your sales representative or email us at support@kaiterra.com...
- Page 7 CHINESE Kaiterra 睿石 Mini 空气质量监测仪用户手册 包装清单 睿石 Mini 主机 睿石 Mini 传感器模块 x 2 墙面/石膏板墙安装圆盘底座 有底盒安装方盘底座 石膏板螺丝&锚栓(3 对) 底盒螺丝(美标)x 2 底盒螺丝(国标/欧标)x 2 固定螺丝 x 2 USB 数据线 充电器 校准测试报告...
- Page 8 睿石 Mini 是一款商用空气质量监测仪。此手册为用户首次使用设备提供指导,更多信息 可以在 Kaiterra 官网的“客户支持”中查询,链接地址: http://support.kaiterra.com/sensedge-mini。 外观和空气流动 睿石 Mini 的进气口位于设备的上方和下方,使用时请确保设备的任何一侧都不能被覆盖。 气流的变化可能影响睿石 Mini 的读数及准确性。 供电和联网方式 睿石 Mini 提供多种供电和联网选择: 供电: USB-C:仅可使用设备随附的数据线及充电器或适配器 DC 电源接口:用于 12V,1000mA 供电 PoE(通过以太网供电):适用于型号 SE000200P 联网: 2.4GHz Wi-Fi (802.11 b/g/n) 以太网:用于通过以太网进行数据传输 RS-485:用于支持 Modbus 通讯...
- Page 9 传感器模块 睿石 Mini 采用模块化设计,便于控制及更换传感器。其中,二氧化碳和温湿度传感器内 置于设备内部,设备下方的两个传感器凹槽可用于装载各种其他的传感器模块。 安装传感器模块时,只需将传感器轻压入凹槽内,确保铝制外壳上的 Kaiterra 标志朝外即 可。当正确安装后,模块将被锁定于凹槽内,如设备已经接入电源,模块凹糟上方的模块 状态指示灯会短暂亮起且呈红色。 如需拆卸模块,轻轻提起拉环,使拉环与模块呈 90 度角,然后向外拉动,即可从凹槽内 拆下模块。 传感器模块可以安装到任何一个传感器凹槽中,并且任意顺序安装均可。传感器模块在睿 石 Mini 开机运行时以及关闭时均可进行更换。 默认情况下,睿石 Mini 随机附带 KM-200 和 KM-203 传感器模块,检测 PM2.5、与 TVOC、温度和相对湿度。 传感器模块状态指示灯含义: 指示灯不亮 传感器正常工作 红灯闪烁一次 传感器模块接入电源成功 红灯长亮 需要更换传感器模块 红灯闪烁 传感器模块故障 红灯慢速闪烁 传感器进入睡眠模式 设备控制和状态 向右拨动开关,打开设备。当设备状态指示灯短暂亮起,表示设备成功开机。...
- Page 10 如需重置设备,请使用回形针长按重置孔,直到状态指示灯开始快速闪烁红色,即表示设 备重置成功。 状态指示灯含义: 通用: 指示灯不亮 设备正常工作 红灯短暂亮起 设备成功开机 红灯快速闪烁 设备重置成功 配置: 黄灯闪烁 设备处于配置模式 黄灯持续快闪 5 秒钟 通过配置工具识别设备 绿灯快速闪烁 正在接入网络或通讯 绿灯明暗变换闪烁 正在接入云端 故障排除: 红灯长亮 设备故障 红灯闪烁 没有网络连接 安装睿石 Mini 睿石 Mini 支持墙面表面安装、石膏板墙安装、吊顶安装以及有底盒安装等方式。 关于产品安装说明、供电以及联网设置等更多信息,请访问 Kaiterra 官网“客户支持”: 获取或者扫描下方二维码。 http://support.kaiterra.com/sensedge-mini...
- Page 11 质保政策 Kaiterra 为睿石 Mini 提供一年的有限保修服务,如需完整质保政策文档,请访问 https://support.kaiterra.com/policies。 故障排除 如需其他支持,请联系您的销售代表或发送邮件至 support@kaiterra.com,与我们取得 联系。...
- Page 12 END - FCC Caution Any Changes or modifications not expressly approved by the party responsible for compliance could void the user's authority to operate the equipment. This device complies with part 15 of the FCC Rules. Operation is subject to the following two conditions: (1) This device may not cause harmful interference, and (2) this device must accept any interference received, including interference that may cause undesired operation.
- Page 13 Hereby, Origins Technology Limited declares that this product is in compliance with essential requirements and other relevant provisions of Directive 2014/53/EU. This product is allowed to be used in all EU member states. RADIO FREQUENCY MAXIMUM TRANSMIT POWER AND FREQUENCY BAND INFORMATION Frequency bands Maximum output power...
Need help?
Do you have a question about the Sensedge Mini and is the answer not in the manual?
Questions and answers