Table of Contents
Advertisement
Quick Links
Advertisement
Table of Contents

Related Manuals for Adaptec RAID 1210SA


Summary of Contents for Adaptec RAID 1210SA
- Page 1 ’ UIDE ATA RAID 1210SA DAPTEC ERIAL...
- Page 2 Adaptec Serial ATA RAID 1210SA User’s Guide...
- Page 3 Copyright © 2003 Adaptec, Inc. All rights reserved. No part of this publication may be reproduced, stored in a retrieval system, or transmitted in any form or by any means, electronic, mechanical, photocopying, recording or otherwise, without the prior written consent of Adaptec, Inc., 691 South Milpitas Blvd., Milpitas, CA 95035.
- Page 4 Adaptec Customer Support If you have questions about installing or using your Adaptec product, check this — document first you will find answers to most of your questions here. If you need further assistance, use the support options listed below.
- Page 5 German: To speak with a Technical Support Specialist, call +49 89 43 66 55 22, Monday to Friday, 9:00 to 17:00, CET. For support via e-mail, submit your question to Adaptec’s Technical Support Specialists at French: To speak with a Technical Support Specialist, call +49 89 43 66 55 33, Monday to Friday, 9:00 to 17:00, CET.
- Page 6 This device complies with part 15 of the FCC rules. Operation is subject to the following two conditions: (1) this device may not cause harmful interference and (2) this device must accept any interference received, including interference that may cause undesired operation. Adaptec, Inc. FOR HOME OR OFFICE USE European Union Compliance Statement...
- Page 7 Canadian Compliance Statement This Class B digital apparatus meets all requirements of the Canadian Interference- Causing Equipment Regulations. Cet appareil numérique de la classe B respecte toutes les exigences du Règlement sur le matériel brouilleur du Canada. Japanese Compliance (Voluntary Control Council Initiative) This equipment complies to class B Information Technology equipment based on VCCI (Voluntary Control Council for Interface).
-
Page 8: Table Of Contents
Operating System Compatibility 1-2 Storage Requirements 1-2 Motherboard Compatibility 1-2 Device Compatibility 1-2 Kit Contents 1-3 Adaptec 1210SA Controller 1-3 About the Documentation 1-4 Installing the Adobe Acrobat Reader 1-4 Controller Features 1-5 Overview of the Installation Process 1-5 Storage Management Software Overview 1-6... - Page 9 Installing Adaptec Storage Manager – Browser Edition Overview 4-1 Supported Browsers 4-2 Custom and Compact Installations 4-2 Installing Adaptec Storage Manager on Windows 4-3 Configuring Internet Browsers on Windows 4-4 Installing Adaptec Storage Manager on Linux 4-7 Using Adaptec Storage Manager – Browser Edition...
- Page 10 Enclosure Properties 5-22 Logical Device Properties 5-23 Viewing and Creating Tasks 5-24 Task Viewer 5-24 New Tasks 5-25 BIOS Utilities What is ARC? A-1 Using the ACU A-2 Managing Arrays A-2 Creating Arrays A-4 Initializing Disk Drives A-6 Using SATASelect A-7 Starting and Exiting SATASelect A-7 Using the SATASelect Menus A-7 Using the CCU A-8...
-
Page 11: Introduction
Storage Management Software Overview Safety Information Read this First Read this chapter before you begin installing your new Adaptec Serial ATA RAID 1210SA controller. This is a guide to the rest of the document, providing a summary of the installation process. -
Page 12: System Requirements
Complies with the PCI Local Bus Specification, Revision 2.2. Provides large memory-mapped address ranges. Device Compatibility The Adaptec 1210SA supports up to two Serial ATA hard drives only, using two Serial ATA cables supplied in this kit. ® 2000 and Windows XP Introduction ®... -
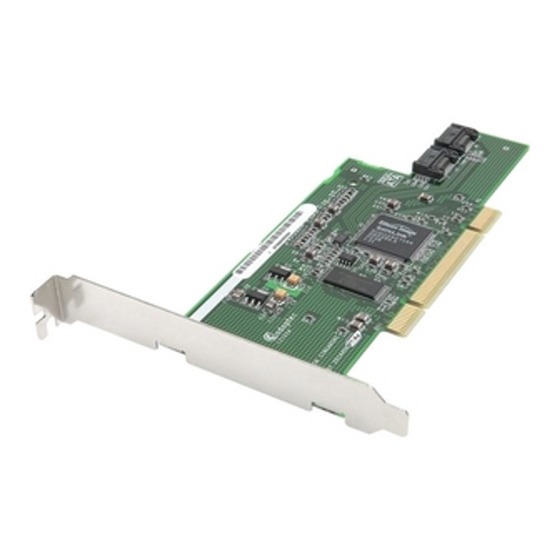
Page 13: Kit Contents
Warranty card Technical Support ID (TSID) label (see Adaptec 1210SA Controller The Adaptec 1210SA controller is shown below. Note the position of the Serial ATA interface connectors necessary for attaching the Serial ATA hard drives. Connector for Serial ATA drive 1... -
Page 14: About The Documentation
.) You need the Reader to view Portable www.adobe.com Document Format (PDF) documents such as the Adaptec Serial ATA RAID 1210SA User’s Guide, which is included in the Adaptec installation CD. To install the reader on: Windows—Insert the Adaptec installation CD and wait for the Autorun. -
Page 15: Controller Features
Controller Features The Adaptec 1210SA supports the following features: RAID levels 0, 1 and simple volume using Adaptec’s HostRAID technology. PCI Local Bus Specification, Revision 2.2 with PCI clock speeds up to 66 MHz. Operating system independent configuration and RAID creation using Adaptec RAID Configuration (ARC). -
Page 16: Storage Management Software Overview
4 Install Adaptec Storage Manager – Browser Edition as described in Chapter 4, Installing Adaptec Storage Manager – Browser Edition. 5 Register your controller at Storage Management Software Overview The Adaptec 1210SA includes the following software tools to manage your storage subsystem: Adaptec Storage Manager –... -
Page 17: Safety Information
Safety Information To ensure you personal safety, as well as the safety of you equipment: Keep your work area and the computer clean and clear of debris. Before opening the system cabinet, unplug the power cord. Notes and Cautions This User’s Guide uses notes and cautions that emphasize important information, as described below: Note: Emphasizes important information that, if ignored, would not result in injury, property damage, or data loss. - Page 18 When you need to put your controller down, use an antistatic surface such as the bag supplied in your kit. If you plan to return the controller to Adaptec, put it back in its antistatic bag immediately.
-
Page 19: Installing The Controller
Installing the Controller In this Chapter... Overview Installing the Controller Checking Your Controller and Devices Determining the Boot Controller Overview To install the controller and drives, all you need is one or two of each the following: Serial ATA hard disk drives Serial ATA cables (supplied in this kit) Configuration of Serial ATA devices is simple for the following reasons:... - Page 20 Installing the Controller To install the controller in the system cabinet: 1 Shut down your computer and disconnect the power cord. 2 Open the computer cabinet and identify an unused PCI slot. 3 If your computer accepts low-profile brackets only, install the low-profile bracket supplied with your kit.
-
Page 21: Checking Your Controller And Devices
To add a second bootable controller, you may need to enter Setup and change the hard disk boot sequence so that the Adaptec 1210SA heads the list. If Setup does not allow this change, your system BIOS may not be configurable to allow the Adaptec 1210SA controller to act as a second boot device. -
Page 22: Installing The Driver
Installing the Driver in a New Windows System on page 3-2 Installing the Driver in an Existing Windows System on page 3-4 Installing Red Hat Linux 7.3 or 8.0 on page 3-6 Installing SuSE Linux 8.0 or 8.1 on page 3-9 Note: Visit www.adaptec.com downloads. for the most recent driver... -
Page 23: Installing The Driver In A New Windows System
Enter system setup and verify that your system is set to boot from the CD-ROM drive. See your system documentation for details. b Insert the Adaptec installation CD and restart your system from the CD. Follow instructions and respond to prompts as needed to boot and get to the Main Menu. - Page 24 Appendix Note: Once the array is created and its properties are assigned, you cannot change the array properties using the ACU. Instead, use Adaptec Storage Manager - Browser Edition. 11 Optional—Type in a label for the array and press Enter.
-
Page 25: Installing The Driver In An Existing Windows System
17 Press S to specify that the driver is on the floppy disk; then, press Enter. Windows searches the disk for a suitable driver. 18 When the Adaptec Serial ATA RAID driver is found, press Enter. Follow the remaining on-screen instructions. Installing the Driver in an Existing Windows System In this scenario, you are adding a controller to a system that already has a Windows operating system. - Page 26 9 If creating an array, proceed to volume, your installation is complete. 10 Press Ctrl-A when prompted to enter the Adaptec RAID Configuration (ARC) utility. Use ARC to create the array containing your new Serial ATA hard drives. (For more details...
-
Page 27: Installing Red Hat Linux 7.3
Enter system setup and verify that your system is set to boot from the CD-ROM drive. See your system documentation for details. b Insert the Adaptec installation CD and restart your system from the CD. Follow instructions and respond to prompts as needed to boot and get to the Main Menu. - Page 28 4 If creating an array, proceed to Step 5 Press Ctrl-A when prompted to enter the Adaptec RAID Configuration (ARC) utility. You will use ARC to create the array and logical drive that you will use to install Linux. (For...
- Page 29 Appendix Note: Once the array is created and its properties are assigned, you cannot change the array properties using the ACU. Instead, use Adaptec Storage Manager - Browser Edition. 11 Optional—Type in a label for the array and press Enter.
-
Page 30: Installing Or Updating The Driver In An Existing Linux System
Enter system setup and verify that your system is set to boot from the CD-ROM drive. See your system documentation for details. b Insert the Adaptec installation CD and restart your system from the CD. Follow instructions and respond to prompts as needed to boot and get to the Main Menu. - Page 31 5 Press Ctrl-A when prompted to enter the Adaptec RAID Configuration (ARC) utility. You will use ARC to create the array and logical drive that you will use to install Linux. (For more details about the ARC utility, see 6 From the ARC menu, select Array Configuration Utility (ACU).
-
Page 32: Installing Or Updating The Driver In An Existing Linux System
13 Select between the different creation methods for RAID 0 or RAID 1. (For more details about the creation methods, see Appendix RAID 0—Select No Init (default), or Migrate RAID 1—Select Build (default), Clear, or Quick Init 14 When the array is finished building, or if you are continuing from Step 4, insert the SuSE CD Disk 1 in the CD-ROM drive... - Page 33 Installing Adaptec Storage Manager on Windows Installing Adaptec Storage Manager on Linux Overview This chapter discusses the installation procedure for installing Adaptec Storage Manager – Browser Edition to enable remote and local management of arrays. For instructions on using this application, see Chapter...
-
Page 34: Installing Adaptec Storage Manager - Browser Edition
On Linux Adaptec-supplied and installed version of Mozilla Netscape 7 or later When using Adaptec Storage Manager, you need to log on to your system with administrator privileges. Custom and Compact Installations If you are considering performing a custom or compact installation, read this section prior to performing the installation. -
Page 35: Installing Adaptec Storage Manager On Windows
The security certificate generated during installation is added to the Certificate Store. If you click No at this point, you will need to install the certificate the first time you run Adaptec Storage Manager. Installing Adaptec Storage Manager – Browser Edition for details. -
Page 36: Configuring Internet Browsers On Windows
If you are managing a local storage array and your computer uses a proxy server, you need to configure your browser to enable Adaptec Storage Manager to bypass the proxy server. Also, if you are managing remote systems, you need to configure Adaptec Storage Manager to bypass the proxy server when communicating with these systems. - Page 37 Privacy tab. There is no setting for blocking Intranet cookies. If you are using a proxy server to access the Internet, you must bypass the proxy server to access the Adaptec Storage Manager Web server. To verify whether you are using a proxy server: 1 From Internet Option window, click the Connections tab.
- Page 38 If you know the IP address of the system you want to manage remotely: 1 Choose Edit> Preferences > Advanced> Proxies > Manual proxy configuration > No Proxy For 2 Type the managed system’s IP address. Installing Adaptec Storage Manager – Browser Edition Chapter 5, Using Adaptec Edition.
-
Page 39: Installing Adaptec Storage Manager On Linux
Installing Adaptec Storage Manager on Linux Note: When performing this installation, keep in mind that Linux is case sensitive. To install Adaptec Storage Manager on a Linux computer and configure the desired Internet browser: 1 Insert the Adaptec installation CD. - Page 40 10 Remove the Adaptec installation CD. Your computer must have a Web browser supporting JavaScript and cookies. To use Adaptec Storage Manager, you need to log on to your computer with root privileges. Installing Adaptec Storage Manager – Browser Edition...
-
Page 41: Using Adaptec Storage Manager - Browser Edition
Using Adaptec Storage Manager – Browser Edition In this Chapter... Overview Architecture Overview Logging In Installing a Security Certificate Registering Your Software The Basics Creating an Array Deleting Arrays Modifying Arrays User Interface Options Viewing Events Getting Help Displaying and Modifying Properties... -
Page 42: Overview
Overview This chapter describes how to use Adaptec Storage Manager – Browser Edition to manage arrays. Once you are logged in, you will find convenient online help to guide you through the details of creating, configuring, and managing arrays. Note: Your controller may not support all of the features described. -
Page 43: Architecture Overview
Architecture Overview Adaptec Storage Manager – Browser Edition consists of the three major components: A supported Web browser, which should already be installed on the system. The Adaptec Web service which supplies content displayed on the Web browser. An Adaptec-supplied storage agent. -
Page 44: Logging In
In Windows, click Start > Programs > Adaptec Storage Manager > Adaptec Storage Manager – Browser Edition. In Linux, click Start > System > Adaptec Storage Manager. The Login screen, shown below, is presented. 2 Enter the host name or IP address of the system you want to manage and the username and password you would use to log into that system. - Page 45 When connection to the remote system is established, the System Login screen appears. Note: If you are using a proxy server to access the Internet, you must bypass the proxy server to access the Adaptec Storage Manager Web server. See Browsers on Windows on page 4-4...
-
Page 46: Installing A Security Certificate
Installing a Security Certificate If you chose not to install a security certificate when you installed Adaptec Storage Manager – Browser Edition, you must install the certificate when you run the application for the first time. To create the certificate: 1 When the Security Alert window appears, click View Certificate. -
Page 47: The Basics
The Basics An example of a typical Adaptec Storage Manager – Browser Edition screen is shown below. Note: Depending on your operating system, browser, and color scheme you may notice some differences between this illustration and your screen. At the top of the screen is the header frame. In this area is the name of the system that you are currently connected to and a number of buttons that perform various actions or open additional windows. -
Page 48: Pop-Up Tool Tips
Beneath the controller information are Physical Devices and Logical Devices views that show connected devices and existing arrays on this controller. Controller information and device views are repeated for each additional Adaptec RAID controller in the system. Select the controller by clicking anywhere on the controller information. - Page 49 The selected display mode button will appear in a lighter shade of blue than the other two buttons. The default display is the Text Description View, but in the condensed view used when Adaptec Storage Manager is loaded, the display is the same in all three modes.
-
Page 50: Logical Devices
2 MB, this possibility is effectively eliminated. Logical Devices As described earlier, when Adaptec Storage Manager loads, the Logical Devices view is expanded and you can see the arrays present on the controller. At the top of this view are the following buttons: Create, Modify, and Delete. -
Page 51: Creating An Array
Click Create to open the Create Array wizard. This wizard offers the following options: Create arrays using default settings. Expand the wizard by clicking Advanced to see additional options and customize settings. Using Adaptec Storage Manager – Browser Edition 5-11... -
Page 52: Advanced Options
Spanned Volumes and RAID Volumes—As described in the Glossary, a spanned volume more drives to form a volume, while a two or more arrays of the same type. Using Adaptec Storage Manager – Browser Edition concatenates segments from two or RAID volume concatenates 5-12... - Page 53 9-GB RAID 1s, you would use this option to restrict the size of the first array you create. Note: The capacity of RAID 1 is limited to the capacity of the smaller drive. Using Adaptec Storage Manager – Browser Edition 5-13...
- Page 54 Stripe Size—For a RAID 0, where data is striped across multiple drives, stripe size determines how much data is written on each drive for a given stripe. Note: Adaptec recommends that you do not change the stripe size. For RAID 1 arrays, which need to be initialized, advanced options allow you to select which method is used to initialize the array and set the priority of the initialization task.
-
Page 55: Deleting Arrays
2 If the capacity and/or RAID type of the new array requires greater total drive capacity than the current array, the additional capacity must be on drives that are not already used in the current array. Using Adaptec Storage Manager – Browser Edition 5-15... -
Page 56: User Interface Options
Tool tips are enabled by default and appear after a brief delay. You can either disable the tool tips or have them pop up immediately. Close the window by clicking the X in the top right corner. Using Adaptec Storage Manager – Browser Edition 5-16... -
Page 57: Viewing Events
This service can display on-screen popup alert messages as well as notify users, through e-mail, of controller events. The default is Running. Notifier Service Event Levels Most Adaptec controllers support three event levels: Critical Warning Informational (This level may not be supported by your controller.) - Page 58 If you wish to add more users, repeat the steps above. Note: If you need to notify more than the three allocated users, Adaptec recommends that you create an e-mail group address to be notified. Using Adaptec Storage Manager – Browser Edition...
-
Page 59: Getting Help
Click This Application tab to view information about the name and version of the application, as well as a link to the online help. Click the Technical Support tab for the link to Adaptec’s Technical Support Web site. Click the Sales tab to find telephone numbers and an e-mail address for Adaptec Sales, as well as links to Adaptec’s Online... -
Page 60: Channel Or Port Properties
Controller Info Lists the following information about the selected controller: Model—Adaptec model number. This is also displayed on the main screen for each controller. Serial number—A number that uniquely identifies your controller. Host bus—The type and the number of the bus to which this controller is connected. -
Page 61: Physical Device Properties
Selecting the detailed option shows information for all segments on the drive. In this view, the following information is displayed for each segment: Number of the segment Start and end blocks Segment size and type Using Adaptec Storage Manager – Browser Edition 5-21... -
Page 62: Enclosure Properties
Unblink All—Clicking this button cancels the effect of the Blink LED button for all drives. Enclosure Properties Selecting an enclosure and clicking Properties will open a screen with the following tabs: General, Fans, PSU, Temperature, Devices and Speaker. Using Adaptec Storage Manager – Browser Edition 5-22... -
Page 63: Logical Device Properties
Logical Device Properties Selecting a logical device and clicking Properties will open a screen with the following tabs: Logical Drive and Cache Settings. Using Adaptec Storage Manager – Browser Edition 5-23... -
Page 64: Viewing And Creating Tasks
Tasks for a channel, controller, or the system, all relevant tasks are displayed. When Adaptec Storage Manager is installed, a scheduled task is created to perform a weekly background consistency check of all hot spares in the system. This task can be seen by clicking Tasks when nothing is selected. -
Page 65: New Tasks
Once you have selected the time and day, click OK. Using Adaptec Storage Manager – Browser Edition 5-25... -
Page 66: Bios Utilities
Using the CCU Using the SATA Configuration Utility Using the Disk Utilities What is ARC? The Adaptec RAID Configuration (ARC) utility is an embedded BIOS utility that includes: Array Configuration Utility (ACU)—Enables the creation, configuration, and management of arrays. SATASelect Utility—Enables changing Serial ATA (SATA) device and controller settings. -
Page 67: Using The Acu
Press <Ctrl><A> for Adaptec RAID Configuration Utility If your computer contains two or more Adaptec 1210SA controllers, a list of controllers is displayed. Use the arrow keys to select the controller you want to configure and press Enter. - Page 68 Deleting Arrays Caution: Back up the data on an array before you delete it. Otherwise, all data on the array is lost. Deleted arrays cannot be restored. To delete an existing array: 1 Turn on your computer and press Ctrl+A when prompted to access the ARC utility.
-
Page 69: Creating Arrays
Assigning Array Properties Note: Once the array is created and its properties are assigned, you cannot change the array properties using the ACU. Instead, use Adaptec Storage Manager - Browser Edition. (See Chapter 5 for details.) To assign properties to the new array: 1 In the Array Properties menu, select an array type and press Enter. - Page 70 Otherwise, all data will be lost. If you stop the Build or Clear process on a RAID 1 from ACU you can only restart it from Adaptec Storage Manager - Browser Edition. (See A RAID 1 created using the Quick Init option may return some data miscompares if you later run a consistency check.
-
Page 71: Initializing Disk Drives
Initializing Disk Drives If an installed disk does not appear in the disk selection list for creating a new array or if it appears grayed out, you may have to initialize it before you can use it as part of an array. Drives attached to the controller must be initialized before they can be used in an array. -
Page 72: Using Sataselect
Using SATASelect The SATASelect utility enables you to change device and controller settings without opening the system chassis or handling the card. Starting and Exiting SATASelect To start SATASelect: 1 Turn on your computer and press Ctrl+A when prompted to access the ARC utility. -
Page 73: Using The Ccu
Using the CCU To access the Controller Configuration Utility (CCU): 1 Turn on your computer and press Ctrl+A when prompted to access the ARC utility. 2 If multiple controllers are installed, select the controller you want to configure and press Enter. 3 From the ARC menu, select SATASelect. -
Page 74: Using The Sata Configuration Utility
Using the SATA Configuration Utility The SATA Configuration utility enables you to modify the SATA Channel Interface options and SATA Device Configuration options. To access the SATA Configuration utility: 1 Turn on your computer and press Ctrl+A when prompted to access the ARC utility. -
Page 75: Using The Disk Utilities
Using the Disk Utilities The Disk Utilities enable you to low-level format or verify the media of your Serial ATA hard disks. To access the disk utilities: 1 Turn on your computer and press Ctrl+A when prompted to access the ARC utility. 2 If multiple controllers are installed, select the controller you want to configure and press Enter. -
Page 76: Supported Raid Types
Otherwise, the RAID tends to be limited in capacity and performance to that of the smallest and slowest drive. The Adaptec 1210SA supports up to two drives; therefore, only RAID 0 and RAID 1 arrays are supported. These array types are described below. -
Page 77: Raid 0
RAID 0 A RAID 0 is created by striping data across two or more disk drives. This striping scheme creates no redundancy to protect the data. However, because the drives share load equally, RAID 0 provides the best read and write performance of any RAID type. RAID-0 Data 0 Data 1... -
Page 78: Specifications
Specifications DC Power Requirements Voltage Ripple and noise Current Requirements Adaptec 1210SA Environmental Specifications Ambient temperature Relative humidity Altitude Note: Forced airflow is recommended, but not required. 5 V ± 10% 50 mV peak-to-peak maximum 1 A maximum 0 °C to 50 ° C... -
Page 79: Glossary
Glossary activity See task. Array Configuration Utility. An application used to create, configure, and manage arrays from the controller’s BIOS or MS-DOS. array A logical disk created from available space and made up of one or more segments on one or more physical disks. Arrays are typically used to provide data redundancy or enhanced I/O performance. - Page 80 Glossary bad segment Segment that is in an unknown state. background consistency check Option that forces the controller to constantly check all portions of disks used by all arrays to see if the disks can return data from the blocks. See also consistency check command.
- Page 81 Glossary clear Foreground initialization of a fault-tolerant array. A clear operation zeros all blocks of the array. The array is not accessible until the clear task is complete. concatenation Joining of physical or logical drives in sequential order. consistency check command Command that reads all the blocks of a RAID 1 to determine if the blocks are consistent.
- Page 82 Glossary disk ID Unique disk identifier that consists of the channel number, SATA ID. For example, (channel:ID:LUN) 1:04:0. See also channel. drive LED Disk indicator LED that illuminates during read or write operations. event Notification or alert from the system, indicating that a change has occurred.
- Page 83 Glossary foreign disk Disk that has previously been initialized on another Adaptec RAID controller. The RAID signature on the disk allows the RAID controller to identify whether or not the disk was initialized on the controller it is currently connected to.
- Page 84 Glossary logical device Volume comprised of space from one or more physical drives and presented to the operating system as if it were a single storage unit. low-level format Process performed by the drive firmware that completely cleans any data off the hard disk. migration See reconfiguration.
- Page 85 Glossary quick init An array initialized using the Quick Init option is available immediately, with no on-going background controller activity. All data written to an array that has been quick initialized is protected. RAID Redundant Array of Independent Disks (alternative definition Redundant Array of Inexpensive Disks).
- Page 86 Glossary redundant The ability of an array to maintain operability when one or more hardware failures occur. RAID 1 is redundant. In the event of a drive failure, redundant arrays can be restored to normal operation by replacing the failed drive and rebuilding the array. rescan Process of updating the current screen to show all currently available resources.
- Page 87 stripe Contiguous set of data distributed across all the disks in an array. A striped array distributes data evenly across all members in equal- sized sections called stripes. stripe size The amount of data in each section of a striped array. striped array RAID task...
- Page 88 Adaptec, Inc. 691 South Milpitas Boulevard Milpitas, CA 95035 USA ©2003 Adaptec, Inc. All rights reserved. Adaptec and the Adaptec logo are trademarks of Adaptec, Inc. which may be registered in some jurisdictions. Part Number: 513587-06, Ver. AB JG 05/03...
Need help?
Do you have a question about the RAID 1210SA and is the answer not in the manual?
Questions and answers