Table of Contents
Advertisement
Quick Links
Advertisement
Table of Contents

Related Manuals for Adaptec 1200A


Summary of Contents for Adaptec 1200A
- Page 1 Adaptec ATA RAID 1200A Installation and User’s Guide...
- Page 2 Copyright © 2001-2002 Adaptec, Inc. All rights reserved. No part of this publication may be reproduced, stored in a retrieval system, or transmitted in any form or by any means, electronic, mechanical, photocopying, recording or otherwise, without the prior written consent of Adaptec, Inc., 691 South Milpitas Blvd., Milpitas, CA 95035.
- Page 3 – EN61000-4-11 (1994) Supply dips and variation: 30% and 100% In addition, all equipment requiring U.L. listing has been found to comply with EMC Directive 73/23/EEC as amended by 93/68/EEC in accordance with EN60950 with amendments A1, A2, A3, A4, A11. ATA RAID 1200A...
- Page 4 Australian/New Zealand Compliance Statement This device has been tested and found to comply with the limits for a Class B digital device, pursuant to the Australian/New Zealand standard AS/NZS 3548 set out by the Spectrum Management Agency. Canadian Compliance Statement This Class B digital apparatus meets all requirements of the Canadian Interference- Causing Equipment Regulations.
- Page 5 Adaptec Customer Support If you have questions about installing or using your Adaptec product, check this document first—you will find answers to most of your questions here. If you need further assistance, use the support options listed below. Technical Support Identification (TSID) Number Before contacting Technical Support, you need your unique 12-digit TSID number.
- Page 6 English: To speak with a Technical Support Specialist, call +49 89 43 66 55 44, Monday to Friday, 9:00 to 17:00, GMT. For support via e-mail, submit your question to Adaptec’s Technical Support Specialists at ask.adaptec.com You can order Adaptec cables online at...
- Page 7 Software is furnished will be free from defects in material or workmanship under normal use and service for a period of thirty (30) days from the date of delivery to you. ADAPTEC AND ITS LICENSORS DO NOT AND CANNOT WARRANT THE PERFORMANCE OR RESULTS YOU MAY OBTAIN BY USING THE SOFTWARE OR DOCUMENTATION.
- Page 8 This warranty gives you specific legal rights and you may also have other rights which vary from state to state. 8. The entire liability of Adaptec and its licensors, and your exclusive remedy for a breach of this warranty, shall be: a.
-
Page 9: Table Of Contents
RAID Performance Hints 1-6 Installing the Hardware Adaptec ATA RAID 1200A Card Layout 2-2 Installing the Adaptec ATA RAID 1200A Card 2-2 Connecting the LED Activity Indicator (Optional) 2-4 Setting up ATA Hard Disk Drives 2-5 Setting Jumpers on ATA Disk Drives 2-5... - Page 10 Adaptec ATA RAID 1200A Installation and User’s Guide Using the BIOS Array Configuration Utility Introduction 3-1 Create Array 3-2 Array Mode 3-3 Array Name 3-4 Select Disk Drives 3-4 Block Size 3-4 Start Creation Process 3-5 Start Creation With RAID 1 3-5...
- Page 11 Using the Adaptec ATA RAID Management Software Installing the Adaptec ATA RAID Management Software 5-2 Using the Adaptec ATA RAID Management Software 5-3 Viewing the Array 5-4 Viewing the Controller 5-6 Viewing the Channel 5-6 Create Arrays 5-7 Create RAID 0 (Striping) 5-8...
-
Page 12: Introduction
PCI (Peripheral Component Interconnect) bus. Features The Adaptec ATA RAID 1200A is a low profile small form factor card that provides two channels with 256 bytes of FIFO per channel. Each channel uses an internal ATA connector that supports two ATA hard drives in a master/slave configuration. -
Page 13: Contents Of Kit
ATA, EIDE, IDE, or UltraDMA. This Installation and User’s Guide explains how to install the Adaptec ATA RAID 1200A card, connect ATA hard disk drives to it, run the BIOS Array Configuration Utility to create the first array for bootable array configuration, and then install the software device drivers for your operating system. -
Page 14: System Requirements
A minimum of one ATA drive CD-ROM or DVD-ROM drive Floppy disk drive 64 MB or more of system memory 5 MB of free hard disk space for the Adaptec ATA RAID Management Software Operating Systems The Adaptec ATA RAID 1200A supports these operating systems:... -
Page 15: Ata/100 Compatibility Requirements
Microsoft Windows 2000, Windows NT, and Windows XP. Bootable Controller If you are using the Adaptec ATA RAID 1200A card with a SCSI card in the system and want to make the Adaptec ATA RAID 1200A card bootable, confirm in the system CMOS that this option is available. -
Page 16: Installation Overview
Installation Overview To Install the Adaptec ATA RAID 1200A hardware and software, follow these steps: 1 Install the Adaptec ATA RAID 1200A card in your system (see Chapter 2 Connect ATA drives to the Adaptec ATA RAID 1200A card (see... -
Page 17: Raid Performance Hints
Adaptec ATA RAID 1200A Installation and User’s Guide RAID 1, Mirroring—Data is mirrored on one pair of disks providing 100 percent redundancy. Offers complete fault tolerance. If one disk fails, data is still available. Increases read performance through striping, but write performance is unaffected. -
Page 18: Installing The Hardware
Mounting ATA Drives and Connecting Power Cables 2-6 Connecting Your Hard Disk Drives Set Mainboard CMOS Setup This chapter explains how to install the Adaptec ATA RAID 1200A card and connect ATA hard drives to it. Warning: Before handling the Adaptec ATA RAID 1200A card... -
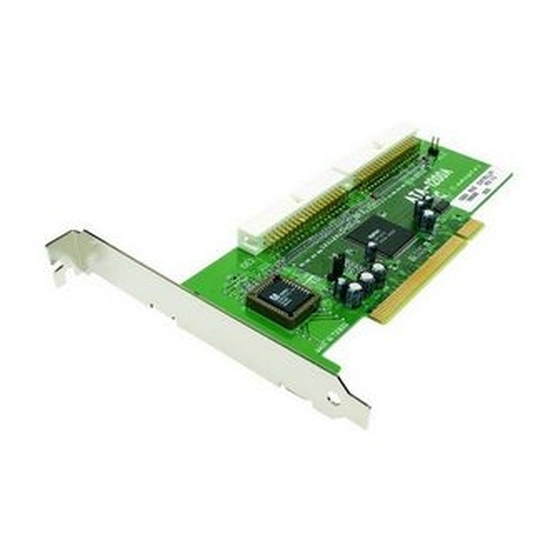
Page 19: Adaptec Ata Raid 1200A Card Layout
Adaptec ATA RAID 1200A Card Layout Figure 2-1 identifies the major components on the Adaptec ATA RAID 1200A card. You might find it helpful to refer to this figure while installing the Adaptec ATA RAID 1200A and attaching ATA disk drives to it. - Page 20 4 Insert the Adaptec ATA RAID 1200A card in the PCI expansion slot; press down firmly until it clicks into place, then replace the slot cover screw as shown in Note: f you are using this Adaptec ATA RAID 1200A card...
-
Page 21: Connecting The Led Activity Indicator (Optional)
An LED on the front panel of most computers lights to indicate activity on your hard disks. If you want the LED to light whenever there is activity on hard disks connected to the Adaptec ATA RAID 1200A card, you must disconnect the LED cable from the... -
Page 22: Setting Up Ata Hard Disk Drives
Setting up ATA Hard Disk Drives Setting up ATA drives before connecting them to the Adaptec ATA RAID 1200A card typically involves setting jumpers, mounting ATA drives inside your computer, and connecting power cables to each device. Since setup can vary from device to device or computer to computer, always refer to the ATA drive’s or computer’s... -
Page 23: Mounting Ata Drives And Connecting Power Cables
Figure 2-4 ATA Drive Mounted in Drive Bay Connecting Your Hard Disk Drives The Adaptec ATA RAID 1200A supports up to four ATA drives in a master/slave configuration. Before connecting drives to the Adaptec ATA RAID 1200A, be sure to also review... -
Page 24: Connecting Ata Disk Drives To The Adaptec Ata Raid 1200A Card
Connecting ATA Disk Drives to the Adaptec ATA RAID 1200A Card Connect all hard disk drives to the Adaptec ATA RAID 1200A card using the 40-pin ATA/100 cables included in your kit. The ATA/100 cables have the following color-coded connectors: Blue—Connects to the controller... - Page 25 Adaptec ATA RAID 1200A Installation and User’s Guide To connect ATA drives to the Adaptec ATA RAID 1200A card, follow these steps: 1 Connect the blue connector of an ATA/100 cable to the channel 1 connector on the controller card as shown in careful to match pin 1 of the cable to pin 1 of the connector.
- Page 26 2 Connect the black connector of the ATA/100 cable to a master drive. If you have not already set up your drives, refer to up ATA Hard Disk Drives on page 2-5 Figure 2-7 Connecting an ATA Drive 3 If you are connecting only two hard disk drives, connect the blue connector of the second ATA/100 cable to the channel 2 connector on the controller card, just as you did in that you have finished connecting both drives, your hardware...
-
Page 27: Set Mainboard Cmos Setup
Figure 2-9 Connecting Four ATA Drives Set Mainboard CMOS Setup The Adaptec ATA RAID 1200A card is a PCI Plug and Play device. Therefore, you should not have to make any changes to the system CMOS. The system should automatically assign the Interrupt and Port address. -
Page 28: Using The Bios Array Configuration Utility
Before you can use your BIOS Array Configuration Utility, make sure you have done the following: 1 Installed the Adaptec ATA RAID 1200A card into a valid PCI slot. 2 Attached the hard disk drives. -
Page 29: Create Array
Press the arrow keys to navigate between options. Press Enter to confirm any selection. Press Esc to return to the Main menu. Create Array This option allows you to create RAID arrays with the hard disk drives attached to your Adaptec ATA RAID 1200A card. -
Page 30: Array Mode
After you have selected the Create Array option in the Main menu, press Enter to display the Create RAID menu as shown in Figure 3-2. Figure 3-2 Create RAID Menu Caution: If you proceed to create RAID, all the data stored in the hard disks will be lost. -
Page 31: Array Name
Adaptec ATA RAID 1200A Installation and User’s Guide JBOD (Volume)—This option is recommended for high capacity without redundancy or added performance features. Requires at least two drives. For more information about RAID levels, see on page 1-5. Figure 3-3 RAID Array Modes... -
Page 32: Start Creation Process
Start Creation Process After you have made your selections, select this option and press Enter to start the creation process. Note: If you skip the Select Disk Drive option before selecting the Start Creation process, you will get an error message at the end of the creation process. -
Page 33: Create And Duplicate
Wait, or press Esc to cancel. Delete Array This option allows you to remove a RAID array on your Adaptec ATA RAID 1200A card. Note: After you have made and confirmed this selection, all the data stored in the hard disk drive will be lost. -
Page 34: Select Boot Disk
Select Boot Disk This option allows you to select the boot disk from among the hard disk devices attached to the Adaptec ATA RAID 1200A card. Warning: If you create an array with your boot disk, you must remove the boot mark before you can delete the RAID array. -
Page 35: Installing The Device Driver
Installing the Device Driver In this Chapter Installing the Device Driver for Windows 98 Installing the Device Driver for Windows Me Installing the Device Driver for Windows 2000 Installing the Device Driver for Windows NT 4.0 Installing the Device Driver for Windows XP This chapter explains how to install the device driver for the following Windows operating systems: Windows 98 (and Windows 98 Second Edition) -
Page 36: Installing The Device Driver For Windows 98
When installing Windows 98 on a hard disk drive or an array attached to the Adaptec ATA RAID 1200A, connect only the hard disk drive or array that you intend to use as the Windows 98 boot drive. -
Page 37: Installing The Driver When Windows 98 Is Already Installed
12 You will be prompted to restart the computer. Select Yes. Installing the Driver When Windows 98 is Already Installed To install the Adaptec ATA RAID 1200A driver if Windows 98 is already installed, follow these steps: 1 Start Windows 98. -
Page 38: Installing The Device Driver For Windows Me
When installing Windows Me on a hard disk drive or an array attached to the Adaptec ATA RAID 1200A, connect only the hard disk drive or array that you intend to use as the Windows Me boot drive. -
Page 39: Installing The Driver When Windows Me Is Already Installed
Installing the Driver When Windows Me is Already Installed To install the Adaptec ATA RAID 1200A driver if Windows Me is already installed, follow these steps: 1 Start Windows Me. Windows Me will automatically discover the new hardware and start the Found New Hardware Wizard to guide you through the device driver installation. -
Page 40: Installing The Driver When Windows 2000 Is Already Installed
Adaptec ATA RAID 1200A Installation and User’s Guide 4 Insert the Adaptec ATA RAID 1200A driver floppy disk into the floppy disk drive and press Enter. 5 You will be presented with a selection of driver options. Using the arrow keys, select the following driver and press Enter:... -
Page 41: Installing The Device Driver For Windows Nt
Installing the Driver When Installing Windows NT 4.0 Before you begin to install Windows NT 4.0, you will need the driver floppy disk supplied with your Adaptec ATA RAID 1200A controller kit. To install the driver when installing Windows NT 4.0, follow these steps: 1 Start your system with the Windows NT 4.0 Boot disk in the... -
Page 42: Installing The Driver When Windows Nt 4.0 Is Already Installed
Adaptec ATA RAID 1200A Installation and User’s Guide Installing the Driver When Windows NT 4.0 is Already Installed To update or install the Adaptec ATA RAID 1200A driver if Windows NT is already installed, follow these steps: 1 Start Windows NT. -
Page 43: Installing The Device Driver For Windows Xp
3 A message will appear after a short time, prompting you to install your driver. Press S to specify a driver. 4 Insert the Adaptec ATA RAID 1200A driver floppy disk into the floppy disk drive and press Enter. 5 You will be presented with a selection of driver options. Using... -
Page 44: Installing The Driver When Windows Xp Is Already Installed
Adaptec ATA RAID 1200A Installation and User’s Guide Installing the Driver When Windows XP is Already Installed To install the Adaptec ATA RAID 1200A driver if Windows XP is already installed, follow these steps: 1 Start Windows XP. Windows XP will automatically discover the new hardware and start the Found New Hardware Wizard to guide you through the device driver installation. -
Page 45: Using The Adaptec Ata Raid Management Software
Installing the Adaptec ATA RAID Management Software Using the Adaptec ATA RAID Management Software 5-3 With Adaptec ATA RAID Management Software, you can add, delete, or reconfigure RAID arrays on your system. You can use the easy to use on-screen features to manage your RAID configurations and monitor device information and event notifications. -
Page 46: Installing The Adaptec Ata Raid Management Software
Adaptec ATA RAID 1200A Installation and User’s Guide This chapter explains how to use Adaptec ATA RAID Management Software to perform the following operations: Install the Adaptec ATA RAID Management Software View arrays, ATA devices, and controllers Create, delete, rename, and monitor arrays... -
Page 47: Using The Adaptec Ata Raid Management Software
Using the Adaptec ATA RAID Management Software Using the Adaptec ATA RAID Management Software After you have installed the Adaptec ATA RAID Management Software, click the Start button on the Windows task bar and select the Adaptec ATA RAID Management Software program (see Figure 5-2). -
Page 48: Viewing The Array
Adaptec ATA RAID 1200A Installation and User’s Guide Viewing the Array From the Main menu, select the Array tab. The left pane displays the arrays and the hard disk drives. The right pane displays detailed information for the arrays and hard disk drives you have selected. - Page 49 This option allows you to verify data integrity and fix miscompares. Rename Figure 5-5 RAID 0/1 Drop-down Menu See the different RAID level sections in this chapter for more information on how to use these options. Using the Adaptec ATA RAID Management Software Figure 5-5):...
-
Page 50: Viewing The Controller
Adaptec ATA RAID 1200A Installation and User’s Guide Viewing the Controller From the Main menu, select the Controller tab, the left pane displays the host bus adapter (HBA). The right pane displays detailed information for the HBA you have selected... -
Page 51: Create Arrays
Create Arrays To create a RAID array, go to the Main menu and from the toolbar, select a RAID array. The Adaptec ATA RAID Management Software supports the following RAID levels: RAID 0—Striping mode for boosting performance. RAID 1—Mirroring mode for data security. -
Page 52: Create Raid 0 (Striping)
Adaptec ATA RAID 1200A Installation and User’s Guide Create RAID 0 (Striping) To create a RAID 0 array, follow these steps: 1 From the Main menu Menu bar, select Configuration>Create>RAID 0 (Striping) or, from the Main menu toolbar, select RAID 0. -
Page 53: Create Raid 1 (Mirroring)
Create RAID 1 (Mirroring) To create a RAID 1 array, follow these steps: 1 From the Main menu Menu bar, select Configuration>Create>RAID 1 (Mirroring) or, from the Main menu toolbar, select RAID 1. Using the Adaptec ATA RAID Management Software... - Page 54 Adaptec ATA RAID 1200A Installation and User’s Guide 2 From the Available Disks screen, select the disk and click Add for Source Disk. Select another disk and click Add for Target Disk (see Figure 5-10). Note: You must have two hard disk drives to create a RAID 1 array.
-
Page 55: Create Raid 0/1 (Mirrored Striping)
Note: You must have four hard disk drives to create a RAID 0/1 array. 4 You will be prompted to restart your system. Click Yes to restart. After you have restarted your system, the Main menu will display your built array. Using the Adaptec ATA RAID Management Software 5-11... -
Page 56: Create Jbod (Volume) Array
Adaptec ATA RAID 1200A Installation and User’s Guide Create JBOD (Volume) Array To create a JBOD array, follow these steps: 1 From the Main menu Menu bar, select Configuration>Create>JBOD (Volume) or, from the Main menu toolbar, select JBOD. 2 From the Available Disks screen, select the disk, then click Add. -
Page 57: Delete Arrays
A drop-down menu will be displayed. Click Delete. 2 The following message appears: All data on the array will deleted! Are you sure you want to continue? Click Yes to continue. Using the Adaptec ATA RAID Management Software Figure 5-11). 5-13... -
Page 58: Rename Arrays
Adaptec ATA RAID 1200A Installation and User’s Guide 3 You will get a confirmation message notifying you that the array you specified has been deleted. You will be prompted to restart your system. Click Yes to restart. Warning: To delete a bootable RAID array when an aoperating system is already installed, you must do so in the BIOS. -
Page 59: Duplicate
Using the Adaptec ATA RAID Management Software With the Rescan option, you can view the change status of each device and array. Figure 5-12 Rescan Menu Duplicate From the Main menu Menu bar, select Configuration>Monitor>Duplicate The Duplicate option verifies data integrity and fixes any miscompares. -
Page 60: Troubleshooting
General Troubleshooting Procedures The following tips are general troubleshooting procedures: Check that the Adaptec ATA RAID 1200A card is seated evenly all the way into the PCI slot. Check that the PCI expansion slot is 5V and compliant with PCI 2.2 or previous version, and supports Bus Mastering. -
Page 61: Frequently Asked Questions
A: In order to get optimized performance, Adaptec suggests using hard disk drives with the same model. Q: Can I use multiple Adaptec ATA RAID 1200A controllers in my system? A: No, only one Adaptec ATA RAID 1200A controller is supported in each system. - Page 62 3 If you have another drive available for use in rebuilding the RAID 1 array, skip this step and proceed to step 4. If you have no other drive available for rebuild, select option 1 to power the system and replace the problem drive with a functional unit.
-
Page 63: Index
Adaptec ATA RAID Management Software creating arrays deleting arrays 5-13 duplicate 5-15 installing renaming arrays 5-14 rescan 5-14 using viewing arrays viewing controller viewing Event Log viewing hard disk drives viewing the channel ATA hard drives connecting to card mounting... - Page 64 Adaptec ATA RAID 1200A Installation and User’s Guide operating systems supported overview RAID defining JBOD support performance hints RAID 0 support RAID 0/1 support RAID 1 support supported levels RAID 0 RAID 0/1 RAID 1 setting up ATA hard drives...
- Page 65 Adaptec, Inc. 691 South Milpitas Boulevard Milpitas, CA 95035 © 2001-2002 Adaptec, Inc. All rights reserved. Adaptec, and the Adaptec logo are trademarks of Adaptec, Inc. which may be registered in some jurisdictions. : 512790-06, Ver. AC JG 11/02 UMBER...
Need help?
Do you have a question about the 1200A and is the answer not in the manual?
Questions and answers