
Related Manuals for Adaptec ATA II 1220SA


Summary of Contents for Adaptec ATA II 1220SA
- Page 1 Serial ATA II 1430SA, 1420SA, 1220SA HostRAID Controllers Installation and User’s Guide...
- Page 2 Copyright ©2006 Adaptec, Inc. All rights reserved. No part of this publication may be reproduced, stored in a retrieval system, or transmitted in any form or by any means, electronic, mechanical, photocopying, recording or otherwise, without the prior written consent of Adaptec, Inc., 691 South Milpitas Blvd., Milpitas, CA 95035.
- Page 3 Adaptec Customer Support If you have questions about installing or using your Adaptec product, check this document first—you will find answers to most of your questions. If you need further assistance, use the support options listed below. To expedite your service, have your computer in front of you.
- Page 4 Limited 3-Year Hardware Warranty 1. Adaptec, Inc. (“Adaptec”) warrants to the purchaser of this product that it will be free from defects in material and workmanship for a period of three (3) years from the date of purchase. If the product should become defective within the warranty period, Adaptec, at its option, will repair or replace the product, or refund the purchaser’s purchase price for the product, provided it is delivered at the...
- Page 5 This device complies with part 15 of the FCC rules. Operation is subject to the following two conditions: (1) this device may not cause harmful interference and (2) this device must accept any interference received, including interference that may cause undesired operation. Adaptec, Inc. Tested to Comply With FCC Standards...
-
Page 6: Table Of Contents
HostRAID Controller Features ... 13 Array Level Features ... 13 Upgrading the HostRAID Controller Firmware ... 13 About the Adaptec 1430SA Controller ... 14 About the Adaptec 1420SA Controller ... 15 About the Adaptec 1220SA Controller ... 16 Kit Contents and System Requirements Kit Contents ... - Page 7 Creating a Bootable Array Setting the Boot Controller ... 26 Creating an Array... 26 Creating an Array with the ACU... 26 Creating an Array with Adaptec Storage Manager... 27 Making Your Array Bootable ... 28 Installing the Driver and an Operating System Before You Begin...
- Page 8 Understanding Adaptec Storage Manager Features... 40 Overview... 40 Physical Devices View... 41 Logical Devices View ... 41 Changing How Drives are Displayed ... 41 Collapsed and Expanded Views ... 42 Component Views... 43 Solving Problems Troubleshooting Checklist ... 45 Recovering from a Disk Drive Failure ... 45 Failed Disk Drive Protected by a Hot Spare...
- Page 9 Using the AFU for DOS Introduction ... 61 System Requirements ... 61 Compatibility ... 61 Running the AFU from the GUI ... 62 Running the AFU from the Command Line ... 62 HELP ... 62 LIST ... 62 SAVE... 63 UPDATE...
-
Page 10: About This Guide
Terminology Used in this Guide... 11 How to Find More Information ... 11 This Installation and User’s Guide explains how to install your Adaptec It also describes the utilities included in your controller kit, and provides a basic overview of Serial ATA technology. -
Page 11: About Your Hostraid Controller
Array (also known as a container or logical drive) Note: The Adaptec Storage Manager User’s Guide refers to arrays as logical drives. Why? Your HostRAID controller creates arrays, which your operating system (and Adaptec Storage Manager) recognizes as logical drives. -
Page 12: About Your Hostraid Controller
In this chapter... HostRAID Controller Features... 13 Upgrading the HostRAID Controller Firmware... 13 About the Adaptec 1430SA Controller... 14 About the Adaptec 1420SA Controller... 15 About the Adaptec 1220SA Controller... 16 This chapter provides an overview of standard HostRAID controller features, and describes the unique features of your SATA HostRAID controller. -
Page 13: Hostraid Controller Features
HostRAID Controller Features Flash ROM for updates to controller firmware Adaptec Flash Utility (AFU), BIOS, and the Array Configuration Utility (ACU). Event logging and broadcasting, including messaging for alphanumeric pagers. Support for Adaptec Metadata Format (AMF) allowing the migration of simple volumes and arrays to Adaptec RAID controller cards. -
Page 14: About The Adaptec 1430Sa Controller
About the Adaptec 1430SA Controller The Adaptec 1430SA is a low-profile 4-port PCIe SATA II HostRAID controller with these features: J1 Connector (I2C) Aggregate LED Mounting bracket Form factor PCI compatibility Ports Connectors RAID levels Simple volume Disk drives Maximum number of disk drives... -
Page 15: About The Adaptec 1420Sa Controller
About the Adaptec 1420SA Controller The Adaptec 1420SA is a low-profile PCI-X to 4 port SATA II HostRAID controller with these features: Mounting bracket Form factor PCI compatibility Ports Connectors RAID levels Simple volume Disk drives Maximum number of disk drives... -
Page 16: About The Adaptec 1220Sa Controller
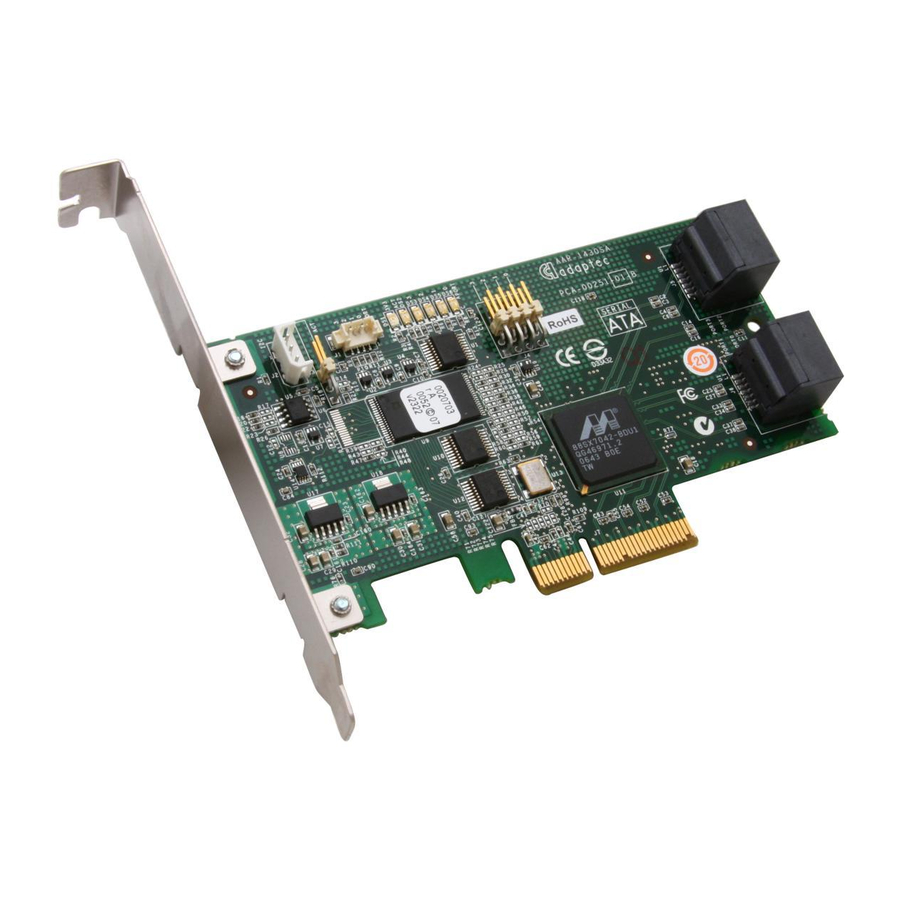
About the Adaptec 1220SA Controller The Adaptec 1220SA is a low-profile PCIe to 2 port SATA II HostRAID controller with these features: Mounting bracket Form factor PCI compatibility PCI bus width (max) PCI bus speed (max) Ports Connectors RAID levels... -
Page 17: Kit Contents And System Requirements
Kit Contents and System Requirements In this chapter... Kit Contents... 18 System Requirements ... 18 This chapter lists the contents of your HostRAID controller kit and the system requirements that must be met for you to successfully install and use your controller. -
Page 18: Kit Contents
Red Hat Linux SUSE Linux Novell® NetWare® Note: For up-to-date operating system version support, refer to the Adaptec Web Site at www.adaptec.com. At least 256 MB (or more) of RAM Available compatible PCI/PCI-X/PCIe slot (depending on your controller model-see Your HostRAID Controller on page... -
Page 19: Getting Started
Getting Started In this chapter... Choosing a RAID Level... 20 Selecting Disk Drives... 20 Selecting Cables ... 20 Installation Options ... 21 This chapter provides the basic information you need to set up your disk drives and arrays the way you want them. It also describes the options you have for installing your HostRAID controller and disk drives, and creating arrays for data storage. -
Page 20: Choosing A Raid Level
You can use different-sized disk drives in the array, but the array will be limited to the capacity of the smallest and slowest disk drive. For more information, refer to the Adaptec Storage Manager User’s Guide or Adaptec Storage Manager online Help. -
Page 21: Installation Options
Create a bootable array (see Install your operating system and the driver (see Install Adaptec Storage Manager and begin to manage your data storage (see Installing on an Existing Operating System Install and connect your controller and internal disk drives (see If your controller has an external connector, you can connect external disk drives as well (or instead). -
Page 22: Installing The Hostraid Controller And Disk Drives
Installing the HostRAID Controller and Disk Drives In this chapter... Before You Begin ... 23 Installing the HostRAID Controller ... 23 Connecting Disk Drives to SATA HostRAID Controllers ... 24 Checking Your Controller and Devices... 24 Determining the Boot Controller... 24 Next Steps ... -
Page 23: Before You Begin
Chapter 5: Installing the HostRAID Controller and Disk Drives Before You Begin Read the Safety Information on Familiarize yourself with your HostRAID controller’s physical features and the RAID levels that it supports (see Ensure that you have the right quantity of disk drives for the RAID level you want to use for your arrays (see page Ensure that you have the proper cables for your controller and disk drives (see... -
Page 24: Creating A Bootable Array
To add a second bootable controller, you may need to enter Setup and change the hard disk boot sequence so that the Adaptec Serial ATA II RAID controller heads the list. If Setup does not allow this change, your system BIOS may not be configurable to allow the Adaptec Serial ATA II RAID controller to act as a second boot device. -
Page 25: Creating A Bootable Array
Creating an Array ... 26 Creating an Array with the ACU ... 26 Creating an Array with Adaptec Storage Manager ... 27 Making Your Array Bootable ... 28 This chapter explains how to set your HostRAID controller to be the boot controller, and how to create a bootable array. -
Page 26: Setting The Boot Controller
If your system won't contain more than one bootable controllers, skip this section. Adaptec HostRAID controller supports bootable disk drives and arrays. The default setting of the HostRAID controller and system Setup allows you to install and boot from either a disk drive connected to the motherboard, or from a drive or array connected to the HostRAID controller. -
Page 27: Creating An Array With Adaptec Storage Manager
Creating an Array with Adaptec Storage Manager This section describes how to use the Adaptec Storage Manager configuration wizard to build a RAID 0, 1, or 10 array. Note: You will need the HostRAID Installation CD to complete this task. -
Page 28: An Operating System
11). In the following figure, Adaptec Storage Manager has used two equal-sized disk drives to automatically create one logical drive with RAID 1. To specify a size for the logical drives, or to make other changes to the configuration, click Modify logical devices. -
Page 29: Installing The Driver And An Operating System
Installing the Driver and an Operating System In this chapter... Before You Begin ... 30 Creating a Driver Disk ... 30 Installing with Windows ... 30 Installing with Red Hat Linux ... 31 Installing with SUSE Linux... 31 Installing with NetWare ... 32 This chapter explains how to install your HostRAID controller driver and an operating system onto a bootable array (see Note:... -
Page 30: Before You Begin
Before You Begin Install and connect your HostRAID controller and internal disk drives (see Create a bootable array (see Create a driver disk (see next section). Creating a Driver Disk Before you install your driver, you will need to create a driver disk. You will need a floppy disk to complete this task. -
Page 31: Installing With Red Hat Linux
Insert the driver disk, then wait until you are prompted to install a driver. Press S to specify that the driver is on a floppy disk, then press Enter. The computer reads the disk. When the Adaptec SATA driver is found, press Enter. Follow the on-screen instructions to complete the installation. Continue with... -
Page 32: Installing With Netware
Installing with NetWare You will need your NetWare Installation CD to complete this task. To install the driver when installing NetWare: Restart your computer, then install NetWare. (For instructions, refer to your NetWare documentation.) To be able to load additional drivers later, select Manual install mode during the first part of the installation. -
Page 33: Installing The Driver On An Existing Operating System
Installing the Driver on an Existing Operating System In this chapter... Before You Begin ... 34 Creating a Driver Disk ... 34 Installing on Windows ... 34 Installing on Red Hat or SUSE Linux... 35 Installing on NetWare ... 35 This chapter explains how to install your HostRAID controller driver on an existing operating system. -
Page 34: Before You Begin
Turn on your computer, then insert the HostRAID Installation CD included in your controller kit. Follow the on-screen instructions to get to the Adaptec Start Menu. Click Create Driver Disk, from the Main Menu. Select one of the operating systems from this list:... -
Page 35: Managing Your Storage Space
Chapter 8: Installing the Driver on an Existing Operating System Continue with Managing Your Storage Space on page Installing on Red Hat or SUSE Linux To install the module on Red Hat or SUSE Linux: Insert and mount the RAID Installation CD: Red Hat—... -
Page 36: Managing Your Storage Space
Once you have installed your HostRAID controller, disk drives (or other devices), and device driver, you can begin to build and manage your storage space. This chapter introduces Adaptec Storage Manager, and describes the other utilities included with your HostRAID controller. -
Page 37: About Adaptec Storage Manager
With Adaptec Storage Manager, you can group disk drives into logical drives and build in redundancy to protect your data and improve system performance. You can also use Adaptec Storage Manager to monitor and manage all the controllers and disk drives in your storage space from a single location. -
Page 38: About The Arc Utility
The ARC utility is primarily intended for pre-operating system installation configuration. About the AFU The Adaptec Flash Utility (AFU) is a text-based DOS utility that you can use to update, save, or verify your HostRAID controller’s firmware BIOS and Non-Volatile Random Access Memory (NVRAM). -
Page 39: Understanding Adaptec Storage Manager
This chapter provides an overview of Adaptec Storage Manager, the user-friendly GUI that you use to easily create and manage arrays. For more details on using Adaptec Storage Manager to set up and manage arrays, refer to the online Help. -
Page 40: Features
Adaptec Storage Manager provides an expandable tree view of the systems and controllers you are managing. You can perform most configuration and management tasks by selecting a controller from the tree and working with related objects. The figure below shows how Adaptec Storage Manager displays information about Physical and Logical devices. -
Page 41: Physical Devices View
Note: A drive shaded in light blue is not part of any disk group. Displays physical device information in relative size capacity format. A full- length bar is displayed for the largest drive; proportionally shorter bars are displayed for other drives. Chapter 10: Understanding Adaptec Storage Manager... -
Page 42: Collapsed And Expanded Views
Build progress In the Physical devices view... Click to expand and collapse information about physical drives. The expanded display shows the following information about each drive: Capacity of the drive Drive ID Drive state Chapter 10: Understanding Adaptec Storage Manager... -
Page 43: Component Views
When you click a hot spare, the logical devices protected by that spare are highlighted. In the graphical views, if the logical device uses only part of the available storage, only those segments are highlighted (in dark blue). Chapter 10: Understanding Adaptec Storage Manager... -
Page 44: Solving Problems
Solving Problems In this chapter... Troubleshooting Checklist ... 45 Recovering from a Disk Drive Failure ... 45 This chapter provides basic troubleshooting information and solutions for solving your HostRAID controller problems. -
Page 45: Troubleshooting Checklist
Did the driver install correctly? If you are still unable to resolve a problem, you can find additional troubleshooting information and direction on the Adaptec Web site at www.adaptec.com and the Adaptec Support Knowledgebase at ask.adaptec.com. Recovering from a Disk Drive Failure This section explains how to recover when a disk drive fails: If the array was protected by a hot spare (see next section). -
Page 46: Failed Disk Drive Not Protected By A Hot Spare
If the controller fails to rebuild the array, check that the cables, disk drives, and controllers are properly installed and connected. Then, if necessary, use Adaptec Storage Manager to rebuild the array. For instructions, refer to the Adaptec Storage Manager User’s Guide or online Help. Failure in Multiple Arrays Simultaneously If there’s a disk drive failure in more than one array at the same time (one failure per array),... -
Page 47: Understanding Raid
Understanding RAID In this chapter... RAID Technology Overview ... 48 RAID 0 (Non-RAID Arrays)... 49 RAID 1 Arrays ... 50 RAID 10 Arrays ... 50 When you create arrays (or logical drives), you can assign a RAID level to protect your data. Each RAID level offers a unique combination of performance and redundancy. -
Page 48: Raid Technology Overview
Appendix A: Understanding RAID RAID Technology Overview RAID is the technology of grouping several physical drives in a computer into an array that you can define as one or more logical drives. Each logical drive appears to the operating system as a single drive. -
Page 49: Raid 0 (Non-Raid Arrays)
When selecting a RAID level for your system, consider the following factors. Physical Drive RAID Data Capacity Level Redundancy Utilization 100% Physical drive utilization, read performance, and write performance depend on the number of drives in the array. Generally, the more drives in the array, the better the performance. RAID 0 (Non-RAID Arrays) An array with RAID 0 includes two or more disk drives (maximum twelve) and provides data striping, where data is distributed evenly across the disk drives in equal-sized sections. -
Page 50: Raid 1 Arrays
Disk Drives in Logical Drive RAID 10 Arrays A RAID 10 array is built from two or more equal-sized RAID 1 arrays. Adaptec RAID controllers support a maximum number of 48 disk drives in a RAID 10 array. Data in a RAID 10 array is both striped and mirrored. Mirroring provides data protection, and striping improves performance. -
Page 51: Using The Arc Utility
Creating and Managing Arrays... 52 Using SATASelect... 57 Formatting and Verifying Disk Drives ... 59 The Adaptec RAID Configuration (ARC) utility is an embedded BIOS-based utility that you can use to create, configure, and manage arrays, and format or verify disk drives. Note:... -
Page 52: Introduction To The Arc Utility
Press Enter when all disks for the new array are selected. The Array Properties menu displays. Assigning Array Properties Once the array is created and its properties are assigned, you cannot change the array properties using the ACU. Instead, use Adaptec Storage Manager (See Appendix B: Using the ARC Utility page 59). - Page 53 To assign properties to the new array: In the Array Properties menu, select an array type, then press Enter. Only the available array types, RAID 0, 1, and 10 are displayed. RAID 0 and 1 requires two to four drives. RAID 10 requires a minimum of four disk drives. Optional: Type a label of no more than 15 characters for the array, then press Enter.
-
Page 54: Managing Arrays
To modify the Write Cache setting for an array, press Ctrl+W. The ACU allows you to use drives of different sizes in a RAID 1. However, during a build operation, only the smaller drive can be selected as the source drive. When migrating from single volume to RAID 0, migrating from a larger drive to a smaller drive is allowed. - Page 55 Force from Offline The Hotkey Ctrl+F under manage arrays will make the failed array usable. Below is a list of states applied: Failed simple volume will be marked as optimal state Failed R1 will be marked to degraded state Failed R10 will be marked to degraded state Viewing Array Properties To view the properties of an existing array: From the ACU menu, select Manage Arrays.
-
Page 56: Adding/Deleting Hotspares
Enabling/Disabling Write Cache To Enable/Disable Write Cache for an array: From the Main menu, select Manage Arrays. From the List of Arrays, select the array you want to modify the Write Cache setting for, then press Ctrl+W. A confirmation dialog appears to modify setting. Press Y to change the current Write Cache setting. -
Page 57: Atapi Support
Press Enter. Read the warning message and ensure that you have selected the correct disk drives to configure. Type to continue. ATAPI Support The following devices are supported: The 1220SA supports detection of SATA ATAPI TAPE Drive and CDROM. The 1220SA supports booting from the ELTORITO bootable CD/DVD media. If a bootable CD/DVD media is detected, that bootable media gets precedence in the booting order. -
Page 58: Sataselect Options
The following table lists the available and default settings for each SATAlSelect option and the description of each option. The default settings are appropriate for most systems and appear in bold type in the table. Adaptec recommends that you do not change the settings. SATASelect Options... -
Page 59: Formatting And Verifying Disk Drives
Formatting and Verifying Disk Drives You can use the disk utilities to low-level format or verify your disk drives. (New disk drives are low-level formatted at the factory and do not need to be low-level formatted again.) Caution: Before you format a disk drive, back up all data. Formatting destroys all data on a disk drive. -
Page 60: Using The Afu For Dos
Running the AFU from the Command Line... 62 AFU Command Line – Step-by-Step ... 65 This chapter describes how to use the Adaptec Flash Utility (AFU), a text-based DOS utility that you can use to update, save, or verify the HostRAID controller’s firmware BIOS. -
Page 61: Introduction
Introduction The AFU is a DOS utility used to update, save, or verify the HostRAID controller’s firmware BIOS. The AFU is easy to use and contains safeguards to prevent you from accidentally damaging the HostRAID controller’s flash contents. Still, you must be careful to use the AFU correctly, otherwise, you could render the HostRAID controller inoperable. -
Page 62: Running The Afu From The Gui
At the DOS command prompt (typically A:\>) type The AFU’s main menu is displayed. Select Select Controllers, then select the Adaptec HostRAID controllers to be flashed. When selecting a single controller, the system automatically selects it. When selecting multiple controllers, use the spacebar, then press Enter. -
Page 63: Save
Example This example shows a typical system response to a A:\> AFU LIST Adaptec Flash Utility V1.0-0 B1406 (c)Adaptec Inc. 1999–2005. All Rights Reserved. Controllers Detected and Recognized: Controller #0 (03:01:00) Adaptec ASC-48300 SAVE command saves the contents of a HostRAID controller’s flash in a UFI file. The name SAVE of the UFI file is based on the HostRAID controller type and cannot be changed. -
Page 64: Update
(c)Adaptec Inc. 1999–2005. All Rights Reserved. Updating Controller 0 (Adaptec AAR-1430) Reading flash image file (Build 1406) AFU is about to update firmware on controller(s) Adaptec AAR-1430 ***PLEASE DO NOT REBOOT THE SYSTEM DURING THE UPDATE*** This might take a few minutes. -
Page 65: Version
A:\> AFU VERSION /C 0 Adaptec Flash Utility V1.0-0 B1406 (c)Adaptec Inc. 1999–2005. All Rights Reserved. Version Information for Controller #0 (Adaptec AAR-1430) ROM: Build 1406 [VALID] AFU Command Line – Step-by-Step This section provides step-by step instructions for updating the flash. - Page 66 If you have multiple HostRAID controllers only—At the DOS prompt, type then press Enter. This command displays the Adaptec SATA HostRAID controllers in your system. Note the HostRAID controller number for the controller you want to update; you may need it in Step 6 to perform the update.
-
Page 67: Safety Information
Handle the controller by its bracket or edges only. Avoid touching the printed circuit board or the connectors. Put the controller down only on an antistatic surface such as the bag supplied in your kit. If you are returning the controller to Adaptec, put it back in its antistatic bag immediately. -
Page 68: Technical Specifications
Technical Specifications In this chapter... Environmental Specifications... 69 DC Power Requirements... 69 Current Requirements... 69... -
Page 69: Environmental Specifications
Altitude Note: Forced airflow is recommended, but not required. DC Power Requirements Ripple and noise DC Voltage Current Requirements Adaptec Model AAR-1430SA AAR-1420SA AAR-1220SA Appendix E: Technical Specifications 0 °C to 50 ° C 10% to 90%, noncondensing up to 3,000 meters 50 mV peak-to-peak (max) 3.3 V ±... -
Page 70: Glossary
Glossary activity See task. Array Configuration Utility. An application used to create, configure, and manage arrays from the controller’s BIOS or MS-DOS. array A logical disk created from available space and made up of one or more segments on one or more physical disks. - Page 71 Glossary build Background initialization of a redundant array. The array is accessible throughout. RAID 1 copies the contents of the primary drive to a secondary drive. See clear. See channel. cache Fast-access memory on the controller that serves as intermediate storage for data that is read from, or written to, drives.
- Page 72 RAID 1 arrays. See redundant. foreign disk Disk that has previously been configured on another Adaptec RAID controller. The RAID signature on the disk allows the RAID controller to identify whether or not the disk was configured on the controller it is currently connected to.
- Page 73 Glossary legacy disk Disk that contained a valid partition table when connected to the controller. The controller manages the disk as a legacy disk array where there is a one-to-one logical-to-physical mapping of array to disk. logical device Volume comprised of space from one or more physical drives and presented to the operating system as if it were a single storage unit.
- Page 74 Glossary RAID Redundant Array of Independent Disks (alternative definition Redundant Array of Inexpensive Disks). RAID 0 A single-level array consisting of two or more equal-sized segments residing on different disks. RAID 0 distributes data evenly across its respective drives in equal-sized sections called stripes. RAID 0 arrays are not redundant.
- Page 75 stripe size The amount of data in each section of a striped array. striped array RAID RAID task An operation that occurs only on the RAID controller, asynchronous to all other operations; for example, initializing a disk or verifying an array. Some tasks can take an extended period of time, particularly if the RAID controller is also performing intensive data I/O while the task is running.
-
Page 76: Index
Adaptec customer support Adaptec Flash Utility. See AFU Adaptec RAID Configuration Utility. See HRCONF Adaptec Storage Manager installing Array Configuration Utility. See ACU arrays creating (ACU) non-RAID RAID 1 RAID 10 customer support data striping disk drives connecting to SATA controllers... - Page 77 SuSE driver installation technical support Technical Support Identification (TSID) number terminology Adaptec Storage Manager throughput tools disk utilities SATASelect TSID Number See Technical Support Identification Number utilities Disk Drive SATASelect verifying disk drives...
- Page 78 Adaptec, Inc. 691 South Milpitas Boulevard Milpitas, CA 95035 USA ©2006 Adaptec, Inc. All rights reserved. Adaptec and the Adaptec logo are trademarks of Adaptec, Inc. which may be registered in some jurisdictions. Part Number: CDP-00181-02-A, Rev. A JB 09/06...
Need help?
Do you have a question about the ATA II 1220SA and is the answer not in the manual?
Questions and answers