Advertisement
Quick Links
VeritiPro
Thermal Cycler Installation and Operation
™
Catalog Number A47394
Doc. Part No. 100093319
Note: For safety and biohazard guidelines, see the "Safety"
™
appendix in the VeritiPro
Thermal Cycler User Guide
(Pub. No. MAN0019157). Read the Safety Data Sheets (SDSs) and
follow the handling instructions. Wear appropriate protective
eyewear, clothing, and gloves.
Product description
This document summarizes procedures for installing and using the
™
VeritiPro
Thermal Cycler with 6-zone 96-well 0.2 mL block and
™
VeriFlex
"better than gradient
instructions, see the VeritiPro
MAN0019157).
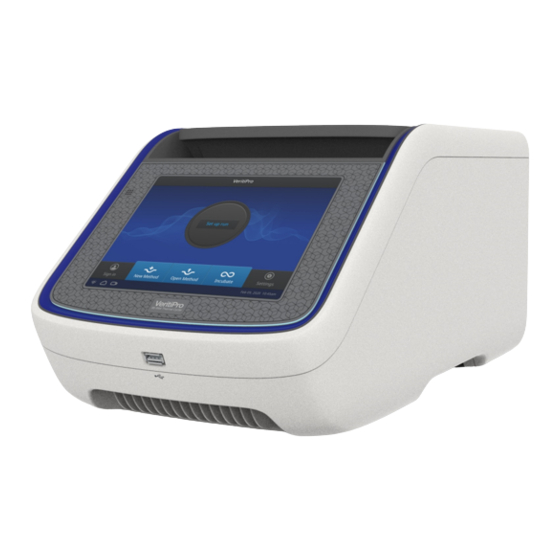
Fig. 1 VeritiPro
Thermal Cycler
™
Required materials not provided
• Can of compressed air (For use in cleaning wells of sample
block).
• (Optional) Electrical protective devices.
Note: The use of one or more of the following electrical
protective devices is recommended.
·
Power line regulator (100–240 V)
·
Surge protector/line conditioner (10-kVA)
·
Uninterruptible power supply (1.5-kVA)
Set up the VeritiPro
™
IMPORTANT! Save the packing materials and box in case you
need to ship the instrument in for service.
1. Open the shipping crate to unpack the instrument. You should
receive one box containing the thermal cycler and the
accessories.
2. Remove the packing material, then inspect the instrument for
shipping damage.
3. Use compressed air to clear out each well of the sample block
to remove particles that may have collected inside during
shipping.
4. Move the instrument to an installation site that meets the
spatial and weight requirements for the thermal cycler (see
"Technical specifications" on page 5).
For Research Use Only. Not for use in diagnostic procedures.
Pub. No. MAN0019367 Rev. A.0
™
" technology. For detailed
™
Thermal Cycler User Guide (Pub. No.
Thermal Cycler
5. Connect the instrument to a power outlet.
a. Connect the power cord to the instrument.
1
Power cord port
1
b. Install any desired electrical protective devices.
c. Connect the power cord to a wall plug.
6. Turn the power switch on, then wait for the instrument to start
up. Proceed with the installation after the touchscreen displays
the Home screen, indicating that the instrument is active.
When you power on the instrument, the instrument will take
under a minute to start up.
1
Power switch
1
The Home screen will display following successful installation.
QUICK REFERENCE
Advertisement

Related Manuals for Thermo Scientific Applied Biosystems VeritiPro


Summary of Contents for Thermo Scientific Applied Biosystems VeritiPro
- Page 1 QUICK REFERENCE VeritiPro Thermal Cycler Installation and Operation ™ Catalog Number A47394 Doc. Part No. 100093319 Pub. No. MAN0019367 Rev. A.0 5. Connect the instrument to a power outlet. Note: For safety and biohazard guidelines, see the “Safety” ™ a. Connect the power cord to the instrument. appendix in the VeritiPro Thermal Cycler User Guide (Pub.
-
Page 2: Connect The Pcr Instrument To The Internet
Connect by mobile device 1. Download the "Instrument Connect Mobile Application" on your mobile device. ™ ™ a. For iPad or iPhone devices, download the application ™ from the iTunes music store by searching for Instrument Connect by Thermo Fisher Scientific. b. - Page 3 How to use the VeritiPro Thermal Cycler ™ Prepare samples using MicroAmp tubes/tube strips with ™ Operate the instrument using the touchscreen. For detailed separate cap strips ™ instructions on using the thermal cycler, see the VeritiPro Thermal The following procedure describes how to properly load and seal Cycler User Guide (Pub.
- Page 4 Prepare samples using MicroAmp tube strips with Seal tube strips with cap strips ™ attached caps IMPORTANT! Apply significant downward pressure on the sealing The following procedure describes how to properly load and seal tool in all steps to form a complete seal on top of the tubes. MicroAmp tube strips with attached caps using the MicroAmp 96- well tray/retainer set.
-
Page 5: Technical Specifications
Reaction volume of 1 µL. Technical specifications 30 seconds after clock starts. Temperature accuracy ±0.5°C and Temperature non-uniformity < 0.75°C. Feature Specification Maximum block ramp rate 6.0°C/sec Power and communication port symbols Maximum sample ramp rate 4.4°C/sec Port Description Temperature accuracy ±0.25°C (35–99.9°C) AC power cable port Temperature range for protocol run...
Need help?
Do you have a question about the Applied Biosystems VeritiPro and is the answer not in the manual?
Questions and answers