Advertisement
Table of Contents
- 1 Table of Contents
- 2 Parts List
- 3 Installation to Wood Stud Wall
- 4 Installation to Metal Stud Wall
- 5 Installation to Solid Concrete and Cinder Block Wall
- 6 Attaching Adapter Brackets to Screen
- 7 Attaching Mounting Bracket Using Hook on Option
- 8 Attaching Mounting Bracket Using Tilt Option
- Download this manual
Advertisement
Table of Contents

Related Manuals for PEERLESS HT642-002


Summary of Contents for PEERLESS HT642-002
- Page 1 Installation and Assembly: Wall Mount Model: HT642-002 Max Load Capacity: 75 lb (34 kg) ISSUED: 03-02-11 SHEET #: 125-9192-1...
-
Page 2: Table Of Contents
• Make sure that the supporting surface will safely support the combined load of the equipment and all attached hard- ware and components. • Never exceed the Maximum Load Capacity of 75 lb (34 kg). • If mounting to wood wall studs, make sure that mounting screws are anchored into the center of the studs. Use of an "edge to edge" stud finder is highly recommended. • Always use an assistant or mechanical lifting equipment to safely lift and position equipment. • Tighten screws firmly, but do not overtighten. Overtightening can damage the items, greatly reducing their holding power. • This product was designed and intended to be mounted to the following supporting surfaces checked below with the hardware included in this product as specified in the installation sheet. To mount this product to an alternative supporting surface, contact Peerless customer care at 1-800-865-2112. • This product was designed to be installed on the following wall construction only; WALL CONSTRUCTION ADDITIONAL HARDWARE REQUIRED Wood Stud None x Wood Beam None x Solid Concrete None... -
Page 3: Parts List
Before you start make sure all parts listed are included with your product. PARTS LIST Description Qty. Part # A cross support bracket 201-1881 B wall plate 201-1678 C # 8 washer 540-1001 D M4 x 12 mm phillips screw 504-9013 E M6 x 16 mm phillips screw 520-9274... -
Page 4: Installation To Wood Stud Wall
Installation to Wood Stud Walls WARNING • Installer must verify that the supporting surface will safely support the combined load of the equipment and all attached hardware and components. • Tighten wood screws so that wall plate is firmly attached, but do not overtighten. Overtightening can damage the screws, greatly reducing their holding power. • Never tighten in excess of 80 in. • lb (9 N.M.). • Make sure that mounting screws are anchored into the center of the stud. The use of an "edge to edge" stud finder is highly recommended. • Hardware provided is for attachment of mount through standard thickness drywall or plaster into wood studs. Install- ers are responsible to provide hardware for other types of mounting situations. Use a stud finder to locate the edges of the stud. Use of an edge-to-edge stud finder is highly recommended. -
Page 5: Installation To Metal Stud Wall
Installation to Metal Stud Walls STUD FOR METAL STUD WALLS ONLY: Drill four 1/2" (13mm) dia. holes through drywall and studs at lo- cations corresponding to wall plate. Insert togglers (G) as shown below... Skip to Step 2 page 7 WARNING • Product must be mounted through drywall that has a minimum thickness of 1/2" and into metal studs, 26 gauge or heavier. -
Page 6: Installation To Solid Concrete And Cinder Block Wall
Installation to Solid Concrete and Cinder Block Wall WARNING • When installing Peerless wall mounts on cinder block, verify that you have a minimum of 1-3/8" of actual concrete thickness in the hole to be used for the concrete anchors. Do not drill into mortar joints! Be sure to mount in a solid part of the block, generally 1" minimum from the side of the block. Cinder block must meet ASTM C-90 specifica- tions. It is suggested that a standard electric drill on slow setting is used to drill the hole instead of a hammer drill to avoid breaking out the back of the hole when entering a void or cavity. -
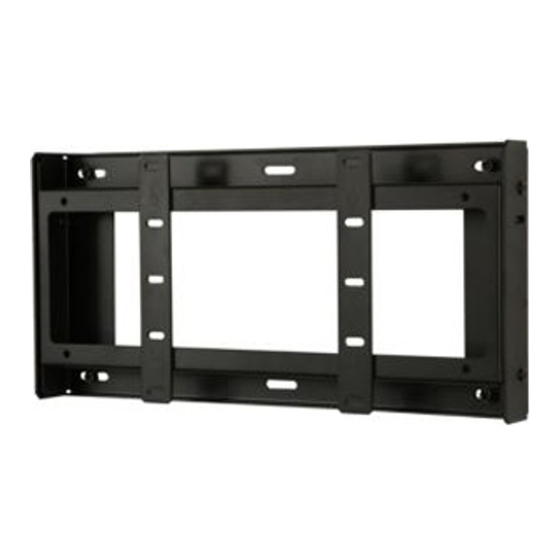
Page 7: Attaching Adapter Brackets To Screen
Using information provided in detail 1 secure two adapter brackets (L) to back of display using four M4 x 12 mm phillips screws (D) or four M6 x 16 mm phillips screws (E). NOTE: When using M4 x 12 mm phillips screws (D), #8 washers (C) are required. NOTE: Adapter brackets (L) have 2" of vertical adjustment as shown in detail 1. -
Page 8: Attaching Mounting Bracket Using Hook On Option
Attaching Mounting Bracket Using Hook On Option Attach four M5 x 12 mm serrated washer head Position slots of adapter plate (A) onto the four socket pin screws (J) to the holes on the sides of M5 x 12 mm serrated washer head socket pin wall plate (B) using the 4mm security allen wrench screws (J) attached to wall plate (B). -
Page 9: Attaching Mounting Bracket Using Tilt Option
Tighten with the 4 mm security allen wrench (F). MOUNTING SURFACE NOT SHOWN FOR CLARITY BOTTOM OF DISPLAY 9 of 9 ISSUED: 03-02-11 SHEET #: 125-9192-1 © 2011, Peerless Industries, Inc. All rights reserved. All other brand and product names are trademarks or registered trademarks of their respective owners.
Need help?
Do you have a question about the HT642-002 and is the answer not in the manual?
Questions and answers