Table of Contents
Advertisement
Available languages
Available languages
Quick Links
FUNK–WETTERSTATION
Art.-Nr.: 4-LD5210
FUNK–WETTERSTATION
Bedienungs- und Sicherheitshinweise
STATION MÉTÉO RADIOGUIDÉE
Utilisation et avertissements de sécurité
STAZIONE METEOROLOGICA RADIOCONTROLLATA
Istruzioni per lúso e per la sicurezza
RADIO-CONTROLLED WEATHER STATION
Usage and safety instructions
IAN 334272_1907
Advertisement
Chapters
Table of Contents

Related Manuals for Auriol 4-LD5210


Summary of Contents for Auriol 4-LD5210
- Page 1 FUNK–WETTERSTATION Art.-Nr.: 4-LD5210 FUNK–WETTERSTATION Bedienungs- und Sicherheitshinweise STATION MÉTÉO RADIOGUIDÉE Utilisation et avertissements de sécurité STAZIONE METEOROLOGICA RADIOCONTROLLATA Istruzioni per lúso e per la sicurezza RADIO-CONTROLLED WEATHER STATION Usage and safety instructions IAN 334272_1907...
- Page 2 Bedienungs- und Sicherheitshinweise ..................- 1 - Utilisation et avertissements de sécurité ................... - 17 - Istruzioni per l’uso e per la sicurezza ....................- 33 - Usage and safety instructions ........................- 49 -...
-
Page 3: Table Of Contents
Bedienungs- und Sicherheitshinweise Inhaltsverzeichnis Temperatur .............. - 11 - Inhaltsverzeichnis ............- 1 - Temperaturwarnung........- 11 - Einleitung ..............- 2 - Frostwarnung ..........- 11 - Bestimmungsgemäße Verwendung ......- 2 - Temperatur- und Frostwarnung aktivieren Lieferumfang .............. - 2 - und deaktivieren .......... -
Page 4: Einleitung
FUNK–WETTERSTATION Einleitung Herzlichen Glückwunsch zum Kauf Ihrer neuen Wetterstation. Sie haben sich damit für eine hochwertige Wetterstation entschieden. Die Bedienungsanleitung ist Bestandteil dieser Wetterstation. Sie enthält wichtige Hinweise für Sicherheit, Gebrauch und Entsorgung. Machen Sie sich vor der Benutzung der Wetterstation mit allen Bedien- und Sicherheitshinweisen vertraut. -
Page 5: Wichtige Sicherheitshinweise
Wichtige Sicherheitshinweise Sicherheitshinweise für Benutzer WARNUNG ! VERLETZUNGSGEFAHR! Diese Wetterstation kann von Personen (einschließlich Kindern ab 8 Jahren) mit verringerten physischen, sensorischen oder mentalen Fähigkeiten oder Mangel an Erfahrung und Wissen benutzt werden, wenn sie beaufsichtigt oder bezüglich des sicheren Gebrauchs der Wetterstation unterwiesen wurden und die daraus resultierenden Gefahren verstehen. -
Page 6: Den Außensensor Sicher Aufhängen Oder -Stellen
Den Außensensor sicher aufhängen oder -stellen Platzieren Sie den Außensensor so, dass er vor direkten Witterungseinflüssen geschützt ist, z. B. unter einem Vordach oder Carport. Der Außensensor hat Schutzklasse IPX4 - ist somit vor Spritzwasser geschützt. Achten Sie darauf, dass: ... -
Page 7: Außensensor
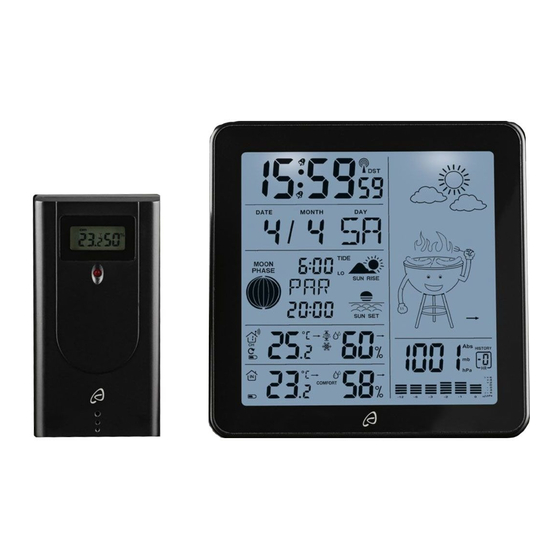
Außensensor - 5 -... - Page 8 SNOOZE/LIGHT-Taste MODE -Taste + -Taste Grill-Wettersymbol Luftdruck - -Taste Außenluftfeuchtigkeit CH –Taste Raumluftfeuchtigkeit Standfuß zum Ausklappen (Station) Batteriestandsanzeige/innen RESET -Taste Standfuß zum Ausklappen (Station) Raumtemperatur Batteriestandsanzeige/außen Alarm 2 Schiebeschalter Alarm 1 Schiebeschalter Außentemperatur/Sensordaten HISTORY -Taste Sonnenuntergang Standort CITY -Taste Mondphase Funk-Anzeige (Außensensor) Außentemperatur (Außensensor) Sonnenaufgang...
-
Page 9: Inbetriebnahme
Inbetriebnahme Legen Sie die Batterien zuerst in das Batteriefach des Außensensors 38 und dann erst in das Batteriefach der Wetterstation 18 ein. Ziehen Sie die Schutzfolie von der Wetterstation und dem Außensensor ab. Öffnen Sie das Batteriefach des Außensensors 38 und legen Sie die mitgelieferten Batterien polrichtig ein. Die Kontroll-LED 37 leuchtet vorübergehend auf und die Temperatur und Luftfeuchtigkeit werden angezeigt. -
Page 10: Funkempfang Neu Starten
Funkempfang neu starten Sie können den Funkempfang neu starten, indem Sie die + -Taste 22 und - -Taste 23 gemeinsam 2 Sekunden gedrückt halten. Das Funksymbol 17 blinkt im Display, die Wetterstation empfängt das DCF77- Funksignal. Dieser Vorgang kann 3-10 Minuten dauern. Schnelleinstellung Bei der Einstellung von numerischen Werten können Sie durch Drücken und Halten der Tasten die Schnelleinstellung verwenden. -
Page 11: Standorttabelle
Standorttabelle Deutschland Bologna Krakau Palma de Mallorca Aachen Salamanca Cagliari Posen Berlin Sevilla Catania Stettin Düsseldorf Valencia Florenz Warschau Dresden Saragossa Foggia Russland Frankreich St Petersburg Erfurt Genua Schweden Frankfurt Besancon Lecce Flensburg Biarritz Messina Göteborg Freiburg Bordeaux Mailand Malmö Hannover Brest Neapel... -
Page 12: Auf- Und Untergangszeiten Von Sonne
Auf- und Untergangszeiten von Sonne Nachdem Sie den Ort eingegeben haben, berechnet Ihre Wetterstation Sonnenaufgang die ungefähren Auf- und Untergangszeiten der Sonne. ! Hinweis: Die kalkulierten Zeiten dienen nur zur Orientierung. Sonnenuntergang Abweichungen können z. B. durch das örtliche Gelände oder das vorherrschende Wetter entstehen. -
Page 13: Weckalarm Aktivieren Und Deaktivieren
Weckalarm aktivieren und deaktivieren Sie können mit den Schiebeschaltern AL 1 -29 und AL 2 -28 die beiden Alarme getrennt aktivieren (ON) oder deaktivieren (OFF). Wenn der Alarm angeschaltet ist, erscheint das jeweilige Glockensymbol und/oder -15 auf dem Display. Wird der Alarm innerhalb von 2 Minuten nicht deaktiviert, wird er automatisch ausgeschalten und ertönt nach 24 Stundenn erneut. -
Page 14: Tendenzen
Wenn das Wettersymbol zu blinken beginnt und der Luftdruck sinkt, ist dies ein Zeichen dafür, dass sich das Wetter verschlechtert. Wenn der Luftdruck wieder ansteigt, werden die Symbole wieder kontinuierlich angezeigt. Ein Pfeil zeigt die Wettertendenz Sonnig Leicht bewölkt Bewölkt Regen Schneefall Tendenzen... -
Page 15: Luftdruck Der Vergangenen 12 Stunden
Luftdruck der vergangenen 12 Stunden Drücken Sie die HISTORY -Taste 30, um die Luftdruckwerte der letzten 12 Stunden abzulesen. 0 – HR = gegenwärtiger Luftdruck - 1 HR = Luftdruck eine Stunde früher - 2 HR = Luftdruck zwei Stunden früher usw. Außensensor/Kanaleinstellung Mit Ihrer Wetterstation können bis zu drei Außensensoren gleichzeitig verwendet werden. -
Page 16: Vereinfachte Eu-Konformitätserklärung
Oberfläche beschädigen. Reinigen Sie das Gerät mit einem weichen, trockenen, fusselfreien Tuch, wie es z. B. zur Reinigung von Brillengläsern verwendet wird. Vereinfachte EU-Konformitätserklärung Hiermit erklärt digi-tech gmbh, dass die Wetterstation 4-LD5210 der Richtlinie RED 2014/53/EU entspricht. Der vollständige Text der EU-Konformitätserklärung ist unter der folgenden Internetadresse verfügbar: http://www.digi-tech-gmbh.com/ce/334272_1907_GWS.pdf Entsorgung Das Produkt und die Verpackungsmaterialien sind recycelbar, entsorgen Sie diese getrennt für eine bessere... -
Page 17: Garantiebedingungen
Garantiebedingungen Die Garantiefrist beginnt mit dem Kaufdatum. Bitte bewahren Sie den Kassenbon gut auf. Diese Unterlage wird als Nachweis für den Kauf benötigt. Tritt innerhalb von drei Jahren ab dem Kaufdatum dieser Wetterstation ein Material- oder Fabrikationsfehler auf, wird die Wetterstation von uns – nach unserer Wahl – für Sie kostenlos repariert oder ersetzt. -
Page 18: Bestell-Service
Telefon: +49 (0)6198 571825 00800 5515 6616 00800 5515 6616 0800 563862 IAN 334272_1907 Art.-Nr.: 4-LD5210 Lieferant Bitte beachten Sie, dass die folgende Anschrift keine Serviceanschrift ist. Kontaktieren Sie zunächst die oben benannte Servicestelle. Name: digi-tech gmbh Str.: Valterweg 27A... - Page 19 Utilisation et avertissements de sécurité Sommaire Température............- 27 - Sommaire .............. - 17 - Avertissement de température ...... - 27 - Introduction ............- 18 - Avertissement de gel ........- 27 - Utilisation conforme ..........- 18 - Activer et désactiver l´avertissement de Contenu de l‘emballage ........
-
Page 20: Introduction
STATION MÉTÉO RADIOGUIDÉE Introduction Cher Client, merci de votre achat. Avec cette station météo de haute qualité, vous avez fait un bon choix. Le mode d’emploi est partie constituante de cet appareil. Il comporte des consignes importantes pour la sécurité, l’utilisation et l’évacuation de votre appareil. -
Page 21: Avertissements De Sécurité Avertissements De Sécurité
Avertissements de sécurité Avertissements de sécurité pour les utilisateurs ATTENTION ! RISQUE DE BLESSURE ! Cet appareil peut être utilisé par des personnes dont les capacités physiques, sensorielles ou intellectuelles sont restreintes ou limitées par un manque d’expérience ou de connaissances (les enfants à partir de 8 ans compris), si elles ont été... -
Page 22: Accrochez Ou Posez Votre Sonde Extérieure À Un Endroit Sûr
Accrochez ou posez votre sonde extérieure à un endroit sûr Placez la sonde extérieure de manière à ce qu'il soit protégé des intempéries directes, par exemple sous un auvent ou un abri d'auto. Le capteur fait partie de la classe de protection IPX4 - il est donc protégé contre les éclaboussures d'eau. -
Page 23: Sonde Extérieure
Sonde extérieure - 21 -... - Page 24 Touche SNOOZE/LIGHT Touche - MODE Touche + Icône météo pour barbecue Pression atmosphérique Touche - Hygrométrie extérieure Touche – CH Hygrométrie intérieure Support inclinable (Station) Affichage piles faibles/intérieur Touche – RESET Support inclinable (Station) Température intérieure Affichage piles faibles/extérieur Bouton poussoir Alarme 2 Température extérieure/données de la Bouton poussoir Alarme 1 sonde...
-
Page 25: Mise En Service
Mise en service Activez d’abord la sonde extérieure 38, puis la station de base 18 en y mettant respectivement des piles. Retirez le film protecteur de la station de base et de la sonde extérieure. Ouvrez le compartiment à piles de la sonde extérieure 38 et mettez-y les piles livrées avec l’appareil en en respectant les polarités. -
Page 26: Redémarrer La Réception Du Signal Radio
Redémarrer la réception du signal radio Vous pouvez démarrer à nouveau la réception radio en appuyant simultanément sur la touche 22 + - et la touche 23 - - pendant deux secondes. Le symbole de réception radio 17 clignote à l´écran. La station météo capte le signal radio DCF77. -
Page 27: Tableau De Villes/Localisation
Tableau de villes/Localisation Allemagne Palma de Bologna Krakau Mallorca Aix-la-Chapelle Salamanca Cagliari Posen Berlin Sevilla Catania Szczecin Düsseldorf Valencia Florenz Varsovie Russie Dresde Saragossa Foggia Erfurt France Genova St Petersburg Suède Francfort Besançon Lecce Flensburg Biarritz Messina Göteborg Fribourg Bordeaux Milano Malmö... -
Page 28: Les Heures De Lever Et De Coucher Du Soleil
Les heures de lever et de coucher du soleil Dès que vous avez saisi la localisation, votre station météo calcule les Lever du soleil heures approximatives de lever et de coucher du soleil. ! Remarque: Les heures calculées ne sont données qu´à titre indicatif. Des écarts peuvent survenir par exemple en fonction du terrain local ou Coucher du soleil de la météo prédominante. -
Page 29: Activer Et Désactiver L´heure De Réveil
Activer et désactiver l´heure de réveil Avec les boutons poussoirs AL 1 -29 et AL 2 -28, vous pouvez activer les deux alarmes séparément (ON) ou les désactiver (OFF). Lorsque l´alarme est activée, le symbole de la cloche correspondant et / ou -15 apparaît à... -
Page 30: Tendances
Les symboles météo indiquent la tendance météo pour les prochaines heures et non la météo actuelle. Lorsque le symbole météo commence à clignoter et que la pression atmosphérique baisse, cela signifie que le temps se dégrade. Lorsque la pression atmosphérique augmente à nouveau, les symboles sont affichés de manière continue. -
Page 31: Pression Atmosphérique Des 12 Dernières Heures
Pression atmosphérique des 12 dernières heures Appuyez sur la touche HISTORY 30 pour consulter les valeurs de pression atmosphérique des 12 dernières heures 0 – HR = Pression atmosphérique actuelle - 1 HR = Pression atmosphérique 1 heure plus tôt -2 HR = Pression atmosphérique 2 heures plus tôt, etc. -
Page 32: Consignes De Nettoyage
Declaration UE de conform ite simplifiée Le soussigné, digi-tech gmbh, déclare que du type station météo radioguidée 4-LD5210 est conforme à la directive 2014/53/EU. Le texte complet de la déclaration UE de conformité est disponible à... -
Page 33: Garantie De Digi-Tech Gmbh
Garantie de digi-tech gmbh Nous accordons sur ce produit une garantie de 3 ans à partir de la date de l’achat. En cas de vice de fabrication, vous bénéficiez de recours légaux contre le vendeur. La présente garantie n'affecte pas vos droits légaux. -
Page 34: Service De Commande Pour Sondes
Téléphone: +49 (0)6198 571825 00800 5515 6616 00800 5515 6616 0800 563862 IAN 334272_1907 Art.-Nr.: 4-LD5210 Fournisseur Veuillez noter que l’adresse suivante n’est pas une adresse de SAV. Prière de contacter d’abord l’adresse indiquée plus haut. Nom: digi-tech gmbh Rue: Valterweg 27A... - Page 35 Istruzioni per l’uso e per la sicurezza Contenuto Avviso di temperatura ........- 43 - Contenuto .............. - 33 - Avviso di gelo ..........- 43 - Introduzione ............- 34 - Attivare e disattivare l’avviso di Utilizzo conforme alle norme ......- 34 - temperatura e di gelo ........
-
Page 36: Introduzione
STAZIONE METEOROLOGICA RADIOCONTROLLATA Introduzione Complimenti per aver acquistato il vostro nuovo stazione meteorologica. Avete scelto un prodotto di alta qualità. L’istruzioni per l’uso sono parte integrante di questo stazione meteorologica. Contengono importanti avvertenze per la sicurezza, per l’utilizzo e lo smaltimento del prodotto. Assicuratevi di aver letto attentamente tutte le avvertenze di uso e di sicurezza prima di utilizzare la stazione meteorologica. -
Page 37: Importanti Istruzioni Di Sicurezza
Importanti istruzioni di sicurezza Avvertenze di sicurezza per l'utente AVVERTENZE! PERICOLO DI FERIMENTO! Questo apparecchio può essere utilizzato da persone (inclusi bambini a partire da 8 anni) con capacità fisiche, sensoriali o mentali ridotti o che non hanno dimestichezza o nozioni sufficienti solo in presenza di altre persone o se sono stati istruiti su come usare in maniera sicura l’apparecchio e sui pericoli connessi al suo utilizzo. -
Page 38: Display E Pulsanti
il sensore sia in posizione verticale o appeso; ci sia sempre sufficiente areazione (lasciate almeno uno spazio di 10 cm da tutti i lati); l’apparecchio non sia esposto alla luce diretta del sole; l’apparecchio non si trovi in prossimità di campi magnetici (ad es. altoparlanti); ... -
Page 39: Sensore Esterno
Sensore esterno - 37 -... - Page 40 Tasto SNOOZE/LIGHT Tasto MODE Tasto + Simbolo meteo (barbecue) Tasto - Pressione atmosferica Umidità esterna Tasto CH Umidità aria ambiente Piedino ripiegabile (stazione) Indicatore del livello di batteria Tasto RESET Piedino ripiegabile (stazione) Temperatura ambiente Indicatore del livello di batteria/esterno Levetta Allarme 2 Levetta Allarme 1 Temperatura esterna/dati del sensore...
-
Page 41: Messa In Funzione
Messa in funzione Inserite dapprima la batteria nel sensore esterno 38 e poi nella stazione meteorologica 18. Rimuovete la pellicola di protezione dalla stazione meteorologica e dal sensore. Aprite il vano batteria del sensore esterno 38 e inserite le batterie in dotazione tenendo conto della polarità. La lampada di controllo 37 si illumina temporaneamente e viene visualizzata la temperatura. -
Page 42: Riavviare La Ricezione Del Segnale Radio
Riavviare la ricezione del segnale radio È possibile riavviare la ricezione del segnale radio tenendo premuto per due secondi il tasto + - 22 insieme al tasto - - 23. Il simbolo della torre radio 17 lampeggia sul display e la stazione meteorologica riceve il segnale radio DCF77. -
Page 43: Tabella Posizione Geografica
Tabella posizione geografica Germania Palma di Maiorca Bologna Cracovia Aquisgrana Salamanca Cagliari Poznań Berlino Siviglia Catania Stettino Düsseldorf Valencia Firenze Varsavia Dresda Saragozza Foggia Russia Erfurt Francia Genova San Pietroburgo Svezia Francoforte Besançon Lecce Flensburgo Biarritz Messina Göteborg Friburgo Bordeaux Milano Malmö... -
Page 44: Orario Del Sorgere E Del Tramonto Del Sole
Orario del sorgere e del tramonto del Sole Dopo avere impostato il luogo, la stazione meteorologica calcola gli Sorgere del Sole orari approssimativi del sorgere e del tramonto del Sole. ! Attenzione: gli orari calcolati vengono forniti solo a titolo Tramonto del Sole orientativo. -
Page 45: Attivare E Disattivare L'allarme Sveglia
Attivare e disattivare l’allarme sveglia Tramite le levette AL 1 -29 e AL 2 -28 è possibile attivare (ON) o disattivare (OFF) separatamente entrambi gli allarmi. In caso di allarme attivato, compare il simbolo della campana -15 sul display. Se l’allarme non viene disattivato entro 2 minuti, si spegnerà in automatico e suonerà nuovamente dopo 24 ore. -
Page 46: Previsioni Meteo
Previsioni meteo Attenzione: La stazione meteorologica cue inizia le previsioni circa 6 ore dopo l’inserimento del meteo attuale. I simboli del meteo mostrano la tendenza meteorologica per le prossime ore e non le condizioni meteo attuali. Se il simbolo del meteo inizia a lampeggiare e la pressione atmosferica diminuisce, significa che il tempo sta peggiorando. -
Page 47: Pressione Atmosferica Delle Ultime 12 Ore
Premere il tasto MODE 21 1 volta a lungo e brevemente per 2 volte, impostare hPa o inHg premendo il tasto + - 22 o il tasto - - 23 per visualizzare la pressione in Ettopascal (hPa) o pollici di mercurio (inHg). Pressione atmosferica delle ultime 12 ore Premete il tasto HISTORY 30 per leggere i valori della pressione atmosferica delle ultime 12 ore. -
Page 48: Riavvio (Reset)
Dichiarazione di conformità ue semplificata Il fabbricante, digi-tech gmbh, dichiara che il tipo di apparecchiatura stazione meteorologica 4-LD5210 è conforme alle direttive 2014/53/EU. Il testo completo della dichiarazione di conformità UE è disponibile al seguente indirizzo Internet: http://www.digi-tech-gmbh.com/ce/334272_1907_GWS.pdf Smaltimento Il prodotto e il materiale da imballaggio sono riciclabili. -
Page 49: Garanzia Di Digi-Tech Gmbh
Garanzia di digi-tech gmbh Questi stazione meteorologica prevedono una garanzia di 3 anni dalla data di acquisto. In caso di difetti di questi orologi da parete vi spettano i diritti legali nei confronti del venditore del prodotto. Questi diritti legali non vengono limitati dalla garanzia indicata qui di seguito. -
Page 50: Servizio Ordini
Telefono: +49 (0)6198 571825 00800 5515 6616 00800 5515 6616 0800 563862 IAN 334272_1907 Art.-Nr.: 4-LD5210 Fornitore Prendere nota che l’indirizzo seguente non è un indirizzo destinato all’assistenza. Prendere contatto dapprima con il punto di Assistenza precedentemente indicato. Nome: digi-tech gmbh Via.: Valterweg 27A... - Page 51 Usage and safety instructions Table of contents Snooze feature (SNOOZE) ........- 59 - Table of contents ............ - 49 - Temperature unit ............ - 59 - Introduction ............. - 50 - Temperature warning ........- 59 - Intended use ............- 50 - Frost warning ..........
-
Page 52: Introduction
RADIO-CONTROLLED WEATHER STATION Introduction Congratulations on the purchase of your new weather station. You have chosen a high quality product. The instruction manual is part of the product- it contains important information about safety, use and disposal. Read the manual with all usage and safety notes before using the weather station. Only use the weather station in the intended way and for the intended applications. -
Page 53: Important Safety Information
Important safety information Important safety information for users WARNING! RISK OF INJURY! This device may be used by persons (including children over 8 years of age) with reduced physical, sensory or mental abilities or lack of experience and knowledge, if they are supervised or instructed regarding the safe use of the device and understand the dangers that may arise. -
Page 54: Display And Control Panel
no direct sunlight reaches the device; the device doesn’t stand near magnetic fields (i.e. speakers); no foreign objects or dust penetrate the housing; sensitive surfaces are protected before placement. Display and control panel - 52 -... -
Page 55: Outdoor Sensor
Outdoor sensor - 53 -... - Page 56 SNOOZE/LIGHT-button MODE -button + -button weather symbol Air pressure - -button Outdoor humidity CH –button Indoor humidity Foldable stand (Station) Low battery indicator, indoor RESET -button Foldable stand (Station) Indoor temperature Low battery indicator, outdoor Alarm 2 slide switch Alarm 1 slide switch Outdoor temperature/sensor data HISTORY -button Sunset...
-
Page 57: Setup
Setup Insert batteries into the outdoor sensor 38 first and then insert batteries into the weather station 18. Remove the protective film from the weather station and the outdoor sensor. Open the battery compartment of the outdoor sensor 38 and insert the included batteries in the correct polarity. The LED indicator 37 will briefly light up and the display will show the temperature. -
Page 58: Restarting Radio Signal Reception
Restarting radio signal reception Radio signal reception can be restarted by pressing the + -button 22 and the - -button 23 together for 2 seconds. The radio signal indicator 17 will blink on the display and the weather station will attempt to receive the DCF77 time signal. -
Page 59: Location Table
Location table Germany Bologna Krakow Palma de Mallorca Aachen Salamanca Cagliari Poznan Berlin Sevilla Catania Szczecin Dusseldorf Valencia Firenze Warsaw Russia Dresden Zaragoza Foggia French Erfurt Genova St Petersburg Sweden Frankfurt Besancon Lecce Flensburg Biarritz Messina Goteborg Freiburg Bordeaux Milano Malmo Hannover Brest... -
Page 60: Sunrise And Sunset Times
Sunrise and sunset times After setting your location, the weather station will calculate the approximate sunrise Sunrise and sunset times. ! Note: The calculated time are not exact. Deviations are possible depending on, Sunset for example, the terrain at your location or the weather at your location. To show the sunrise and sunset times for another location, press and hold the CITY-button 31 for 2 seconds. -
Page 61: Activating Or Deactivating The Alarm
Activating or deactivating the alarm The slide switches AL1 -29 and AL2 -28 can be used to activate (ON) or deactivate (OFF) both alarms separately. If alarms are activated, the bell symbol and/or -15 for each alarm will appear on the display. When the alarm sounds, if it is not turned off within 2 minutes, the alarm will stop automatically and sound again after 24 hours. -
Page 62: Weather Forecast
Weather forecast NOTE: The weather station starts the forecast about 6 hours after the current weather is entered. The weather symbols show the weather tendency for the next hours and not the current weather. If the weather symbol starts to blink and the air pressure drops, this is a sign that the weather is getting worse. If the air pressure rises again, the symbols will be shown continuously. -
Page 63: 12-Hour Air Pressure History
12-hour air pressure history Press the HISTORY -button 30 to view the air pressure history for the last 12 hours. 0 – HR = current air pressure - 1 HR = air pressure 1 hour ago -2 HR = air pressure 2 hours ago... and so on Outdoor sensor/channel setting You can use the weather station with up to 3 outdoor sensors at the same time. -
Page 64: Simplified Eu Declaration Of Conformity
Simplified EU declaration of conformity Hereby, digi-tech gmbh declares that the radio equipment type radio-controlled weather station 4-LD5210 is in compliance with Directive 2014/53/EU. The full text of the EU declaration of conformity is available at the following internet address: http://www.digi-tech- gmbh.com/ce/334272_1907_GWS.pdf... -
Page 65: Warranty Conditions
Warranty conditions The warranty duration starts on the date of purchase. Please keep the receipt in a safe place. The receipt is needed as a proof of purchase. If a defect occurs in the weather station within 3 years, the weather station will be repaired or replaced (according to our choice) free of charge. -
Page 66: Order Service
Telephone: +49 (0)6198 571825 00800 5515 6616 00800 5515 6616 0800 563862 IAN 334272_1907 Art.-Nr.: 4-LD5210 Supplier Please note that the following address is not a service address. Please first contact the service address (see above). Name: digi-tech gmbh Street: Valterweg 27A... - Page 67 Valterweg 27A DE-65817 Eppstein GERMANY Stand der Informationen · Version des informations Versione delle informazioni · Last information update: 10/2019 Art.-Nr.: 4-LD5210 IAN 334272_1907...
Need help?
Do you have a question about the 4-LD5210 and is the answer not in the manual?
Questions and answers
Come togliere la sveglia
To turn off the alarm on the Auriol 4-LD5210, use the slide switches AL1 (29) and AL2 (28) to set the alarms to OFF. Each alarm can be deactivated separately using its corresponding switch.
This answer is automatically generated