Dräger PEX 3000 Instructions For Use Manual
Hide thumbs
Also See for PEX 3000:
- Manual (100 pages) ,
- Instructions for use manual (209 pages) ,
- Manual (96 pages)
Table of Contents
Advertisement
Advertisement
Chapters
Table of Contents

Related Manuals for Dräger PEX 3000


Summary of Contents for Dräger PEX 3000
- Page 10 Notes on Approval Marking Serial No. In areas regulated by UL standards, the gas detection transmitter shall be supplied by a Limi- ted Voltage/Current Circuit, i.e. the open circuit voltage available to the circuit shall not exceed 42.4 V peak and the current available shall be limited to 8 A measured after 1 minute of opera- tion.
- Page 12 Dräger Safety AG & Co. KGaA Revalstraße 1 D-23560 Lübeck Germany Phone +49 451 8 82- 0 +49 451 8 82- 20 80 www.draeger.com 90 23 885 - GA 4677.300_MUL091 © Dräger Safety AG & Co. KGaA Edition 06 - January 2011 (Edition 01 - January 2007) Subject to alteration...
- Page 13 Transmitter PEX 3000 Instructions for Use Page 1 of 42 9023810 - 2nd edition - September 2005...
-
Page 14: Table Of Contents
Contents Contents For Your Safety ............4 Intended Use . - Page 15 Contents Operation ..............20 Shut downs .
-
Page 16: For Your Safety
For Your Safety For Your Safety The lines highlighted by grey shading contain appropriate instructions for the com- missioning, service, inspection and testing the operability, especially considering the safety. Strictly follow the Instructions for Use Any use of the transmitter requires full understanding and strict observation of these instructions. -
Page 17: Intended Use
As the operation of the PEX 3000 in combination with the mentioned remote sen- sing heads does not really differ from the operation of the PEX 3000 with built-in sensors, they are not explicitly considered in these instructions for use. Likewise also the operation of further housing types, e.g. -
Page 18: Measuring Function For The Explosion Protection Acc. To 94/9/Ec
In the 1st supplement to the EC-type examination certificate TPS 04 ATEX 1 003 X the transmitters PEX 3000, type XTR 00x and XTR 009x, with Ex-sensor PR M (part- no. 68 09 225) have been approved in respect to the measuring function for explo- sion protection acc. -
Page 19: Installing Transmitter
Installing Transmitter Installing Transmitter Mounting Orientation: The measuring signal of the transmitter is depending on the inclination. The transmitter must be mounted such that the sensor’s gas entrance area of the sensor is pointing downwards. If to be mounted at the ceiling a mounting bracket must be used. -
Page 20: Mounting The Transmitter
Installing Transmitter Mounting the transmitter By means of fours screws (diameter 4 mm) through the holes of the housing (drilling template see page 29). Installing Electrical Connections — Electrical wiring is only to be laid and connected by an expert paying attention to the pertinent regulations and laws concerning electrical equipment in poten- tially explosive atmospheres as well as the approval conditions. - Page 21 Sensing head Polytron SE Ex ➀ ➁ ➂ — PEX 3000, all types PEX 3000, types XTR 0090 and XTR 0091 Connection to central controller: Connection to sensing head Connect terminal +24V to +24 Volt Connect terminal br/br to terminal 1...
-
Page 22: Internal Wiring In The Transmitter's Enclosure
Installing Transmitter Internal wiring in the transmitter’s enclosure Connect the individual conductors (conductor length min. 55 mm, 5 mm insulation stripped) to the spring terminal clamp so that it is short. Use ferrules in case of stran- ded cables. — For the wiring of power supply and signal loop cables only cables with a cross- section of at least 0.75 mm may be used. -
Page 23: Menu Structure
Menu structure Menu structure The transmitter PEX 3000 is provided with a 7-segment-LED-display and two scroll keys (key and key ) to navigate through the described menus. Pressing both the scroll keys simultaneously results in an OK-function, indicated as “keys ( )“... - Page 24 Menu structure Normal operation (Measuring Mode) displaying values between 0 and 99 resp. 0 and 9.9 Signal output 4 to 20 mA if a fault if the detected is detected fault is removed Fault long Display shows E0 to E8 (>3 s) Signal output 1 mA short (>1 s and <3 s)
-
Page 25: Calibration Menu
Calibration Menu Calibration Menu To enter the calibration menu press the key for more than one second but less than 3 seconds. The display shows a flashing point on the right bottom indicating the calibration mode. ZE – Zero Adjustment Navigate by means of keys until the display shows ZE (“ZEro“) and enter the menu by pressing the keys (... -
Page 26: Maintenance Menu
Maintenance Menu Maintenance Menu To enter the maintenance menu press key for more than 3 seconds until the display shows “SL” and the point on the right bottom flashes to indicate the maintenance mode. SL – Set Output to x mA By means of this function the transmitter’s output signals can be set to certain constant values. -
Page 27: Cu - Sensor Current Adjustment
Maintenance Menu CU – Sensor Current Adjustment This function is used to adjust the sensor current if the necessary sensor current is different from the ex-factory-adjustment. Ex-factory values are: Type XTR 0000, XTR 0001, XTR 0090 and XTR 0091: 270 mA Type XTR 0010 and XTR 0011: 276 mA Attention: Adjustment of the sensor current must be followed by calibration of... -
Page 28: Start-Up
Start-up Start-up Remove cover of the transmitter’s enclosure. Attention: Dust explosion protection is not ensured after having opened the transmitter’s enclosure! The Ex area has to be temporary de-classified if necessary. Switch on supply voltage — After having switched on the transmitter all the LED segments including both the decimal points are activated for approx. -
Page 29: Calibrating Transmitter
Calibrating transmitter Calibrating transmitter For this chapter: — Mentioning Type XTR 0000 also includes type XTR 0001 as well as the transmit- ters type XTR 0090 or XTR 0091 with remote sensing head SE Ex PR M (100 % LEL). —... -
Page 30: Sensitivity Adjustment
Calibrating transmitter Sensitivity adjustment Before sensitivity adjustment the zero point must be adjusted! Navigate by means of keys until the display shows SP ("SPan“) and enter the menu by pressing the keys ( ). The output signal is set to 3.4 mA to signal the calibration procedure mode to the controller unit. -
Page 31: Following Completion Of Calibration
Calibrating transmitter — If after sensitivity adjustment of the type XTR 0010 by means of 4.4 % LEL ethanol a reference value of 32 is displayed, so the true sensitivity of the Ex- sensor LC M for ethanol is 32 * 2 / 10 = 6,4 mV/% LEL. This value is 5-fold higher than with the Ex-sensor PR M because of the internal amplification of the Ex-sensor LC M. -
Page 32: Operation
Operation Operation — Corresponding to the gas concentration the transmitter produces is a current bet- ween 4 and 20 mA, especially Output current Meaning 0 mA Cable is broken or power supply has failed 1 mA Failure: Zero underrange by more than 5 % of full scale value Failure of electronics Broken cable or short-circuit in the sensor circuit 3.4 mA... -
Page 33: Service
Service Service Observe standard EN 50073 and/or the relevant national laws and regulations. Daily Visual inspection to establish readiness for operation. Commissioning Check zero- and sensitivity adjustment, page 17 to page 18. Check signal transmission to the controller and correct triggering of alarms. At regular intervals, as specified by those responsible for the gas detection system (and which should not exceed an interval of six months):... -
Page 34: Maintenance
Maintenance Maintenance Sensor Replacement — Use sensors only which are listed in the order list page 27. Type XTR 0000, XTR 0001: Ex-Sensor PR M, part-no. 68 09 225, Type XTR 0010, XTR 0011: Ex-Sensor LC M, part-no. 68 10 350. Attention: The transmitter must be de-energised before disconnecting the sensor. -
Page 35: Fault - Cause - Remedy
Fault - Cause - Remedy Fault - Cause - Remedy Fault Cause Remedy Display off Cable faulty Check cable to central controller. Transmitter cannot be calibrated Sensor faulty or poisoned Replace sensor, page 22. Signal output is 1 mA, display shows E0, Transmitter is faulty See following table. -
Page 36: Design And Measuring Principle
Design and measuring principle Design and measuring principle The transmitter PEX 3000 consists of housing, an Ex-sensor and corresponding electronics. The housing made of conductive plastic prevents electrostatic charge-up and is resistant to solvents. The Ex-sensor is a transducer for measuring the partial pressure of flammable gases and vapours present in the atmosphere. -
Page 37: Technical Data
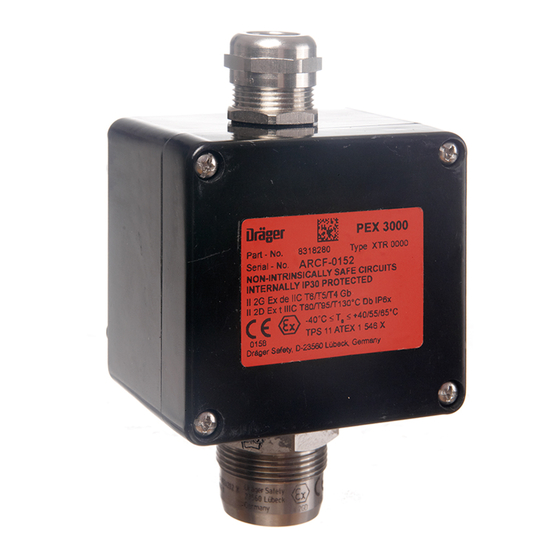
Technical Data Technical Data Measuring range Type XTR 0000, XTR 0001: 0 to 99 % LEL Type XTR 0010, XTR 0011: 0 to 9.9 % LEL Type XTR 0090, XTR 0091 with sensing head SE Ex PR M: 0 to 99 % LEL Type XTR 0090, XTR 0091 with sensing head SE Ex LC M: 0 to 9.9 % LEL Signal transmission to central controller output current 4 mA to 20 mA... - Page 38 Technical Data Device description acc. to 94/9/EC Typ XTR 0000, XTR 0001, XTR 0010 or XTR 0011 0158 II 2G EEx de IIC T6/T5/T4 II 2D IP 6x T85/T100/T135 C ≤ Ta ≤ +40/+55/+65 –40 TPS 04 ATEX 1 003 X NON-INTRINSICALLY SAFE CIRCUITS INTERNALLY IP30 PROTECTED Year of manufacturing...
-
Page 39: Order List
Order list Order list Name and description Part-No. Transmitter Transmitter PEX 3000, Typ XTR 0000 83 18 280 small housing, measuring range 0 to 100 % LEL Transmitter PEX 3000, Typ XTR 0010 83 18 290 small housing, measuring range 0 to 10 % LEL... - Page 40 Order list Page 28 of 42 9023810 - 2nd edition - September 2005...
-
Page 41: Drilling Templates
Drilling templates Drilling templates Type XTR 0000 / XTR 0010 / XTR 0090 68 mm Page 29 of 42 9023810 - 2nd edition - September 2005... - Page 42 Drilling templates Page 30 of 42 9023810 - 2nd edition - September 2005...
- Page 43 Drilling templates Type XTR 0001 / XTR 0011 / XTR 0091 99 mm Page 31 of 42 9023810 - 2nd edition - September 2005...
- Page 44 Drilling templates Page 32 of 42 9023810 - 2nd edition - September 2005...
-
Page 45: Ec-Type Examination Certificate
EC-Type examination certificate EC-Type examination certificate Page 33 of 42 9023810 - 2nd edition - September 2005... - Page 46 EC-Type examination certificate Page 34 of 42 9023810 - 2nd edition - September 2005...
- Page 47 EC-Type examination certificate Page 35 of 42 9023810 - 2nd edition - September 2005...
-
Page 48: Ec-Declaration Of Conformity
EC-Declaration of Conformity EC-Declaration of Conformity Page 36 of 42 9023810 - 2nd edition - September 2005... - Page 49 EC-Declaration of Conformity Page 37 of 42 9023810 - 2nd edition - September 2005...
-
Page 50: Index
Index Index Accessories ............27 Ambient temperatures . - Page 51 Index Liability ............. . . 4 Maintenance .
- Page 52 Index Ventilation ............. 7 Warm-up time .
- Page 53 Index Page 41 of 42 9023810 - 2nd edition - September 2005...
- Page 54 Dräger Safety AG & Co. KGaA Revalstraße 1 D-23560 Lübeck Germany Tel. +49 451 8 82 - 27 94 Fax +49 451 8 82 - 49 91 www.draeger-safety.com 90 23 810 - GA 4675.730 en © Dräger Safety AG & Co. KGaA 2nd edition - September 2005 Subject to alteration Page 42 of 42...
- Page 55 REGARD – 1 REGARD single channel control unit Installation and Operating manual Part number 4208591 Issue 4 03/09/04 Draeger Safety UK Ltd Ullswater Close Kitty Brewster Industrial Estate Blyth NE24 4RG Tel 01670 352891 Fax 01670 544475 Issue 4 03/09/04...
- Page 56 Contents Scope of this manual......................4 Intended use .......................4 Revision 4 manual includes ..................4 Introduction........................4 Description.........................4 Main circuit board....................4 Display circuit board....................5 Pellistor input board (Optional) ................5 Options board (Optional) ..................6 Enclosure........................6 Installation........................6 Unpacking ........................6 Mounting........................6 Cabling........................7 Mains supply......................7 Transmitter......................7 Alarms........................7 Remote reset......................7 Location ........................8 Internal batteries......................8...
- Page 57 Glossary ........................19 Appendix A - Mounting holes ..................20 Appendix B – Terminal details ..................21 Appendix C – Potentiometers ..................21 Appendix D – Analogue jumpers and test points ............22 Appendix E – Electrical connections................23 Appendix F – Specifications..................29 Issue 4 03/09/04 3 of 29...
-
Page 58: Scope Of This Manual
Scope of this manual This manual details the information needed to safely install and operate the REGARD–1 single channel control unit manufactured by Draeger Safety UK Ltd. This manual does not include information related to the associated transmitter or measuring head. Intended use The REGARD–1 control unit is designed for the continuous monitoring of flammable, toxic and/or other gases and the control of alarms, indicators or other equipment via... -
Page 59: Display Circuit Board
Display circuit board The display board comprises of a large LCD, LED’s, reset switch, piezo horn and associated electronics. The display board connects to the main circuit board via a short ribbon cable. A small DIL switch allows the full-scale deflection of the display board to be set and the TWA computation to be activated (according to software version). -
Page 60: Options Board (Optional)
Options board (Optional) The options board comprises of a TWA alarm relay, PC connection port and an isolated repeat 4..20mA output. The option board connects to SK6 and SK9. The field terminals associated with the TWA relay and repeat 4.20mA output are mounted on the main circuit board. -
Page 61: Cabling
Cabling The main cable access is via the bottom edge of the enclosure. There are five pre- formed M20 cable gland holes provided. A single pre-formed M20 cable gland is located on the top of the enclosure. It is recommended that the cable glands be fitted to the enclosure before the enclosure is mounted on the wall. -
Page 62: Location
Note : The pre-formed cable gland holes should be drilled using a 20mm hole saw and not physically knocked out. Location The control panel should be mounted in a location, which is both accessible and visible. Where the ambient noise level is high it is recommended that a local alarm sounder is installed. -
Page 63: Commissioning
Commissioning Factory defaults The control unit is delivered with the following default settings Measuring range 0 to 1 Alarm 1 Undetermined value/rising/non-latching Alarm 2 Undetermined value/rising/non-latching Alarm 3 Undetermined value/rising/non-latching Fault Non-latching/ fixed at 3.2mA Calibration Undetermined Set measuring range Altering the setting of the DIL switch on the display board changes the measuring range. -
Page 64: Set Alarm Levels (Control Unit With Display)
For Display board with Rev x.01 software: Range D.P. 0 - 1 0 - 3 0 - 5 0 - 8 0 - 10 0 - 20 0 - 25 0 - 30 0 - 50 0 - 100 0 - 200 0 - 250 0 - 300 0 - 500... -
Page 65: Set Alarm Levels (Control Unit Without Display)
Set alarm levels (control unit without display) Each individual alarm (A1, A2 and A3) level is set using the same procedure. Connect a digital voltmeter to TP1 and TP2. Adjust the input to the control unit until the desired alarm trip point (mV’s) is indicated on the DVM. Adjust the alarm potentiometer until the alarm is triggered. -
Page 66: Set Latching/Non-Latching Alarm Relay Mode
Function A1 rising A1 latching A2 rising A2 latching A3 rising A3 latching Fault latching A2 special * see Note Table 3 * Note: SW1–8 allows the A2 relay to be used as a switch for an audible alarm. In the ‘OFF’... -
Page 67: Pellistor Input (Optional)
Pellistor input (Optional) The Pellistor board is connected to SK2 on the main circuit board once jumpers A to E are removed (see Appendix D). Two additional PCB pillars support the top edge of the circuit board. A single DIL switch allows the drive current ranges and Pellistor sensitivities to be set. -
Page 68: Pellistor Span Calibration (Control Unit Without Display)
Potentiometer FSD (VR1) on the main circuit board should be turned fully anticlockwise. Apply a known calibration gas to the Pellistor and allow the reading to stabilise for two minutes. Adjust VR3 on the Pellistor circuit board until the display shows the correct gas value. -
Page 69: 24 Volt Dc Output
24 volt DC output Two terminals are provided to power external devices including a galvanic isolator. The maximum current available is 100mA (see technical specification for detail). A polyfuse protects the output against overload or short circuit. Digital outputs An independent digital output is provided for both alarms 1 and 2. These outputs provide switching 24vdc at 100mA. -
Page 70: Servicing
Servicing The recommended service interval for the control unit is twelve months, however this interval may be shortened depending upon the service interval of the associated transmitter. If batteries are fitted to the control unit then these batteries should be maintained in- accordance with the instructions of the battery manufacturer. - Page 71 0 - 20 ppm H2S 0 - 50 ppm H2S 0 - 100 ppm H2S 0 - 100 ppm CO 0 - 300 ppm CO 0 - 1000 ppm CO 0 - 1 ppm Cl2 0 - 10 ppm Cl2 0 - 25 ppm Cl2 Issue 4 03/09/04 17 of 29...
- Page 72 0 - 100 ppm NH3 0 - 300 ppm NH3 0 - 1000 ppm NH3 0 - 50 ppm NO 0 - 10 ppm NO2 0 - 5 % O2 0 - 25 % O2 0 - 100 % O2 0 - 10 PPM SO2 Issue 4 03/09/04 18 of 29...
-
Page 73: Fault Finding
Fault finding Fault condition Repair procedure Control unit non operational Check and replace input fuse if necessary. Check third party electrical supply. Display blank Check cable connection between main circuit board and display board. Adjust contrast potentiometer on display board. Self test routine fails Replace display board Under-range displayed... -
Page 74: Appendix A - Mounting Holes
Appendix A - Mounting holes Sky hook 185mm Mounting holes = 6mm 227mm Issue 4 03/09/04 20 of 29... -
Page 75: Appendix B - Terminal Details
Appendix B – Terminal details Battery * Relay contacts are shown in their de-energised state. Appendix C – Potentiometers Issue 4 03/09/04 21 of 29... -
Page 76: Appendix D - Analogue Jumpers And Test Points
Appendix D – Analogue jumpers and test points Battery Jumpers H G F E D C B A Inhibit jumper Test Points Issue 4 03/09/04 22 of 29... -
Page 77: Appendix E - Electrical Connections
Appendix E – Electrical connections (sig) (sig) Polytron 1 Polytron 2 Black Yellow Signal Brown SE Ex Polytron 2 IR Issue 4 03/09/04 23 of 29... - Page 78 Signal Signal Polytron IR Ex Polytron IR C02 Signal Signal Polytron 2 Polytron 2 XP Tox XP Ex Issue 4 03/09/04 24 of 29...
- Page 79 Stahl 9303 Polytron 1 Issue 4 03/09/04 25 of 29...
- Page 80 Stahl 9303 Polytron 2 Issue 4 03/09/04 26 of 29...
- Page 81 Remote reset switch Horn Lamp Issue 4 03/09/04 27 of 29...
- Page 82 A1 relay +ve supply Horn -ve supply A2 relay A1 relay (to silence the alarm) +ve supply Horn -ve supply Issue 4 03/09/04 28 of 29...
- Page 83 Appendix F – Specifications Description Single channel control unit Single channel control unit for a standard 4..20mA for a standard Pellistor input input 270mm × 270mm × 90mm 270mm × 270mm × 90mm Size <2.5Kg <2.5Kg Weight (without batteries) Enclosure material ABS - VO ABS - VO Colour...
- Page 86 Series MR Flowmeters Model MR3000 • Available for use with both water and air • Flow tube and body molded of high-impact polycarbonate • Precision adjusting valve for accurate, leak-free flow control Features • Molded High Impact Polycarbonate • High Quality Construction •...
- Page 87 Series MR Flowmeters SPECIFICATIONS Accuracy ± 4% Full Scale Body & Tube Polycarbonate Floats Black glass, Carbide, Stainless Steel or Aluminum Temperature 150º F / 65º C Maximum Pressure 100 PSI 6.9 Bar Maximum Fittings Brass or Stainless Steel Valve Brass or Stainless Steel Cartridge Type (optional)
- Page 88 LPH SERIES N O N - A D J U S T A B L E F L O W M O N I T O R Monitor Flows of Corrosive and Non-Corrosive Liquids and Gases KEY FEATURES APPLICATIONS Compact, Dependable, Economical •...
- Page 89 LPH SERIES N O N - A D J U S T A B L E F L O W M O N I T O R Monitor Flows of Corrosive and Non-Corrosive Liquids and Gases SWITCH DATA SPST SPDT Maximum Switching Voltage DC (V) AC (V)
- Page 90 Nylon Housings All nylon housings Nylon / PC also available Low Cost Ideal for portable analysers 705NC 710N 730N Headline nylon housings are available in two versions: all nylon with transparent nylon bowl, or with lower cost polycarbonate bowl. Housings for element sizes 12-32 to 25-178 are available, either with a manual drain valve or with no drain.
- Page 91 Nylon Housings All nylon housings Nylon / PC also available Low cost Ideal for automotive use 750NC 760N 775NC Depending on the chemical nature of the gas being filtered, other plastic filter housings should be considered e.g. polypropylene, (pages 24-25) or PVDF (page 26).
- Page 92 Baureihe 52 - Type 52 2/2 - Wege Magnetventil 2/2 - Way Solenoid valve Standardtype Ventil in Ruhestellung durch Federkraft geschlossen-(NC). Der erregte Magnet zieht den Magnetanker entgegen der Kraftwirkung der Feder an den Gegenkern. Das Ventil öffnet. Ventile dieser Bauart benötigen keinen Differenzdruck. Beachten Sie bitte, daß...
- Page 93 Maßzeichnung Standardausfürung Schaltfunktion/Function: in Ruhestellung gesperrt - NC. Dimensional drawing of standard type normally closed - NC. Schaltfunktion/Function: in Ruhestellung geöffnet - NO. normally open - NO. Anschlußplan / Connection diagram Für Wechsel- und Gleichspannung. For AC and DC. Erdung oder Schutzschaltung nach Vorschrift des zuständigen EVU. Grounding or earthing of the protective circuit in accordance with regulations of the responsible electric supply company.
- Page 94 Stückliste - Parts list Baureihe / Type 52-NC K1.1 Armatur / Valve body K5.1 Magnethülse, komplett / Solenoid sleeve, complete K5.4 6-kt. Mutter / Hexagon nut K5.5 Scheibe / Disk K6.1 Magnet / Solenoid K7.1 Stecker / Plug Stückliste - Parts list K1.1 Armatur / Valve body K3.1 Verschraubung / Screw joint *K3.2...
- Page 95 Ventiloptionen / Valve options Handbetätigung-HA Manual operation-HA K1.1 Armatur / Valve body 3.65 K3.62 Spindel / Spindle K3.65 O-RIng / O-ring 3.62 (Nur für Magnet .032+.012!) (Only for solenoid .032+.012!) P-Anschluß beidseitig Verteilerleisten P-connection both ways Manifold Mit Hohlschraube und Dichtung incl.
- Page 96 Bulletin No. G306A-B Drawing No. LP0666 Released 4/08 Tel +1 (717) 767-6511 Fax +1 (717) 764-0839 www.redlion.net MODEL G306A - GRAPHIC COLOR LCD OPERATOR INTERFACE TERMINAL WITH TFT QVGA DISPLAY AND TOUCHSCREEN ® CONFIGURED USING CRIMSON SOFTWARE (BUILD 424 OR NEWER) UP TO 5 RS-232/422/485 COMMUNICATIONS PORTS (2 RS-232 AND 1 RS-422/485 ON BOARD, 1 RS-232 AND 1 RS422/485 ON OPTIONAL COMMUNICATIONS CARD)
-
Page 97: Appendix F - Specifications
PECIFICATIONS POWER REQUIREMENTS: 8. ENVIRONMENTAL CONDITIONS: Operating Temperature Range: 0 to 50°C Must use Class 2 or SELV rated power supply. Storage Temperature Range: -20 to 70°C Power connection via removable three position terminal block. Operating and Storage Humidity: 80% maximum relative humidity (non- Supply Voltage: +24 VDC ±20% condensing) from 0 to 50°C. - Page 98 G306A NSTALLING AND OWERING THE MOUNTING INSTRUCTIONS The chassis ground is not connected to signal common of the unit. Maintaining isolation between earth ground and signal common is not required This operator interface is designed for through-panel mounting. A panel cut- to operate your unit.
- Page 99 RS232 PORTS The G306A has two RS232 ports. There is the PGM port and the COMMS port. Although only one of these ports can be used for programming, both ports can be used for communications with a PLC. The RS232 ports can be used for either master or slave protocols with any G306A configuration.
- Page 100 DH485 COMMUNICATIONS RS422/485 COMMS PORT The G306A’s RS422/485 COMMS port can also be used for Allen Bradley The G306A has one RS422/485 port. This port can be configured to act as DH485 communications. either RS422 or RS485. WARNING: DO NOT use a standard DH485 cable to connect this port to Allen RS422/485 4-WIRE RS485 2-WIRE Bradley equipment.
- Page 101 OFTWARE PERATION TOUCHSCREEN ® CRIMSON SOFTWARE This operator interface utilizes a resistive analog touchscreen for user input. ® Crimson software is available as a free download from Red Lion’s website The unit will only produce an audible tone (beep) when a touch on an active or it can be purchased on a CD, see “Ordering Information”...
- Page 102 BATTERY & TIME KEEPING Remove the old battery* from the holder and replace with the new battery. WARNING - EXPLOSION HAZARD - THE AREA MUST BE Replace the rear cover, cables, and re-apply power. Using Crimson or the KNOWN TO BE NON-HAZARDOUS BEFORE SERVICING/ unit’s keypad, enter the correct time and date.
- Page 103 PTIONAL EATURES AND CCESSORIES OPTIONAL COMMUNICATION CARD COMPACTFLASH SOCKET CompactFlash socket is a Type II socket that can accept either Type I or II Red Lion offers optional communication cards for fieldbus communications. cards. Use cards with a minimum of 4 Mbytes and a maximum of 2 Gbytes with These communication cards will allow your G306A to communicate with many the G306A’s CompactFlash socket.
- Page 104 Olympic Delivery Authority TOWN AND COUNTRY PLANNING ACT 1990 Appeals to the Secretary of State If you are aggrieved by the decision of your Local Planning Authority to refuse permission for ∗ the proposed development or to grant it subject to conditions, then you can appeal to the Secretary of State for the Environment under Section 78 of the Town and Country Planning Act 1990.
- Page 110 References: i Mansell. Eton Manor Sports Complex, Planning Condition EMOD 52, Soil Remediation Measures, Supporting evidence for discharge of Condition. January 2011. 6752-ETM-NPK-W-REP-0006_P04. ii Atkins Limited. Ground Gas Risk Assessment for the Tennis Hall in Eton Manor Sports Complex, Planning Delivery Zone 7, London 2012 Olympic Park.
Need help?
Do you have a question about the PEX 3000 and is the answer not in the manual?
Questions and answers