Powerfix Profi 283350 Operation And Safety Notes
Drill and plug jig kit
Hide thumbs
Also See for 283350:
- Operation and safety notes (20 pages) ,
- Operation and safety notes (26 pages)
Table of Contents
Advertisement
Available languages
Available languages
Quick Links
SET DE GUÍA DE BROCA Y TACOS / SET DI
CALIBRI PER TASSELLI E PUNTE DA TRAPANO
SET DE GUÍA DE BROCA Y TACOS
Instrucciones de utilización y de seguridad
CONJUNTO DE BROCAS E GUIAS
PARA CAVILHAS
Instruções de utilização e de segurança
BOHR- UND DÜBELLEHRE-SET
Bedienungs- und Sicherheitshinweise
IAN 283350
SET DI CALIBRI PER TASSELLI E
PUNTE DA TRAPANO
Indicazioni per l'uso e per la sicurezza
DRILL AND PLUG JIG KIT
Operation and Safety Notes
Advertisement
Table of Contents

Related Manuals for Powerfix Profi 283350


Summary of Contents for Powerfix Profi 283350
- Page 1 Instrucciones de utilización y de seguridad Indicazioni per l’uso e per la sicurezza CONJUNTO DE BROCAS E GUIAS DRILL AND PLUG JIG KIT PARA CAVILHAS Operation and Safety Notes Instruções de utilização e de segurança BOHR- UND DÜBELLEHRE-SET Bedienungs- und Sicherheitshinweise IAN 283350...
- Page 2 Instrucciones de utilización y de seguridad Página IT / MT Indicazioni per l’uso e per la sicurezza Pagina Instruções de utilização e de segurança Página GB / MT Operation and Safety Notes Page DE / AT / CH Bedienungs- und Sicherheitshinweise Seite...
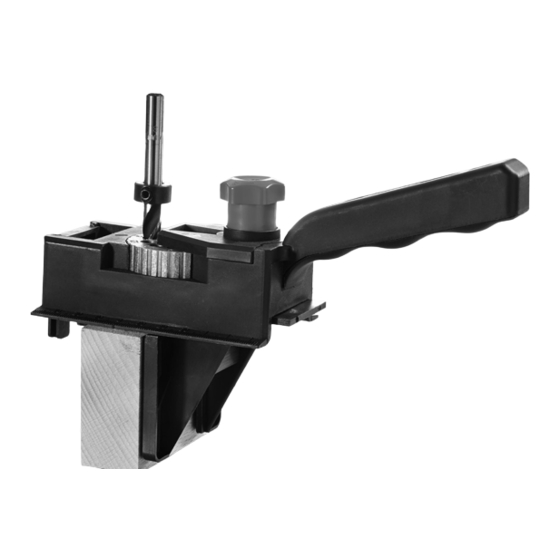
- Page 3 1x ø 6 mm 1x ø 8 mm 1x ø 10 mm 1x H 2,5 mm 25 mm 34 mm 25 mm 10mm 10mm 20mm...
- Page 5 Set de guía de broca y tacos Características técnicas Profundidad de perforación máx.: ø 6 mm: 25 mm, Introducción ø 8 mm: 35 mm, ø 10 mm: 55 mm Enhorabuena por la adquisición de su nuevo producto. Ha elegido un producto de alta calidad. Familiarícese Seguridad con el producto antes de la primera puesta en funcio- namiento.
- Page 6 Ajustar el tamaño de Coloque el producto sobre la tabla A y posi- perforación (ver fig. A) cione el tope paralelo de manera que la plantilla de perforado elegida se encuentre 1. Bloquee el producto girando el seguro justo en el punto marcado con una „x“. Puede el sentido contrario a las agujas del reloj.
-
Page 7: Limpieza Y Conservación
las escalas laterales que incorpora el producto de manera que quede mirando hacia abajo (ver fig. G). (ver fig. P). Taladre el orificio en el punto marcado (ver fig. H). Coloque el producto de manera que el acce- Marque la tabla B en el punto en el que luego fi- sorio de alineamiento encaje en el orificio ya jará... -
Page 8: Desecho Del Producto
Desecho del producto El embalaje está compuesto por materiales no contaminantes que pueden ser des- echados en el centro de reciclaje local. Para obtener información sobre las posibilidades de desecho del producto al final de su vida útil, acuda a la administración de su comunidad o ciudad. -
Page 9: Contenuto Della Confezione
Set di calibri per tasselli e punte Guida di allineamento da trapano Dati tecnici Introduzione Profondità di Congratulazioni per l‘acquisto del vostro nuovo perforazione massima: ø 6 mm: 25 mm, prodotto. Con esso avete optato per un prodotto ø 8 mm: 35 mm, di qualità. - Page 10 Realizzare i fori (giunti a T) Disconnettere sempre il trapano dalla rete elettrica prima di operazioni di installazione Nota: è necessario un trapano dotato e durante le pause di lavoro. di accumulatore. ATTENZIONE! RISCHIO DI LESIONI! Impostazione della misura Consultare il manuale di istruzioni del trapano di perforazione (vedi fig.
- Page 11 Realizzare i fori (giunti a L) ATTENZIONE! RISCHIO DI LESIONI! Consul- tare il manuale di istruzioni del trapano dotato di Nota: è necessario un trapano dotato di accumu- accumulatore. latore. ATTENZIONE! RISCHIO DI LESIONI! Consul- Fissare le tavole A e B da lavorare parallela- tare il manuale di istruzioni del trapano dotato di mente al banco di lavoro.
- Page 12 Estrarre la guida di allineamento prodotto e spingerla nella flangia di guida inferiore, così che sia rivolta verso il basso (v. fig. S). Orientare il prodotto in modo tale che la guida di allineamento sia infilata nel foro già per- forato e che la dima di foratura selezionata si trovi esattamente sopra la linea contrassegnata precedentemente (v.
-
Page 13: Utilização Adequada
Conjunto de brocas e guias Dados técnicos para cavilhas Profundidade de perfuração máxima: ø 6 mm: 25 mm, Introdução ø 8 mm: 35 mm, ø 10 mm: 55 mm Damos-lhe os parabéns pela aquisição do seu novo produto. Acabou de adquirir um produto de Segurança grande qualidade. - Page 14 Configurar o tamanho Coloque o produto na placa A e ajuste o encosto da broca (veja Fig. A) paralelo de tal maneira que o gabarito es- colhido se encontre exatamente no ponto „x“. 1. Desbloqueie o produto girando a trava Podes verificar e corrigir as posições da mar- contra o sentido dos ponteiros.
-
Page 15: Limpeza E Conservação
Marque a placa B com uma linha no local em cima da linha previamente desenhada na onde queres fixar posteriormente a placa A placa B (veja Fig. P). (veja Fig. L). Fure agora o orifício na placa B. Puxe a ajuda de posicionamento do produto Posteriormente, insira uma bucha de madeira e empurre por baixo no encosto paralelo... - Page 16 Drill and Plug Jig Kit Technical Data Maximum bore depth: ø 6 mm: 25 mm, Introduction ø 8 mm: 35 mm, ø 10 mm: 55 mm We congratulate you on the purchase of your new product. You have chosen a high quality product. Safety Familiarise yourself with the product before using it for the first time.
- Page 17 Adjusting the drill size using the measuring scale on both sides of (see Fig. A) the product (see Fig. G). Drill the hole in the marked location (see Fig. H). 1. Turn the latch counter-clockwise to unlock. Make a line in the location on board B where 2.
-
Page 18: Cleaning And Care
Now drill the hole in board B. Remove the guide from the product and in- Then insert a dowel coated with wood glue stall the guide into lower rail so it faces down (not included) in the hole (see Fig. N). (see Fig. -
Page 19: Bestimmungsgemäße Verwendung
Bohr- und Dübellehre-Set seitliche Messskala Ausrichtungshilfe Einleitung Technische Daten Wir beglückwünschen Sie zum Kauf Ihres neuen Produkts. Sie haben sich damit für ein hochwertiges Maximale Bohrtiefe: ø 6 mm: 25 mm, Produkt entschieden. Die Bedienungsanleitung ist ø 8 mm: 35 mm, Teil dieses Produkts. - Page 20 Löcher bohren Verwenden Sie das Produkt auf einer stabilen, (T-Verbindungen) ebenen und unbeschädigten Oberfläche (z. B. einer Werkbank). Hinweis: Sie benötigen einen Akku-Bohrer. Trennen Sie die Bohrmaschine vor Einstellarbei- VORSICHT! VERLETZUNGSGEFAHR! Ziehen ten und bei Arbeitspausen immer vom Netz. Sie die Bedienungsanleitung Ihres Akku-Bohrers hinzu.
- Page 21 Löcher bohren Löcher bohren (L-Verbindungen) (ebene Verbindungen) Hinweis: Sie benötigen einen Akku-Bohrer. Hinweis: Sie benötigen einen Akku-Bohrer. VORSICHT! VERLETZUNGSGEFAHR! Ziehen VORSICHT! VERLETZUNGSGEFAHR! Ziehen Sie die Bedienungsanleitung Ihres Akku-Bohrers Sie die Bedienungsanleitung Ihres Akku-Bohrers hinzu. hinzu. Befestigen Sie das zu bearbeitende Brett A am Befestigen Sie die zu bearbeitenden Bretter A Werktisch.
-
Page 22: Reinigung Und Pflege
Löcher bohren (Dübellöcher für Regalböden) Hinweis: Sie benötigen einen Akku-Bohrer. VORSICHT! VERLETZUNGSGEFAHR! Ziehen Sie die Bedienungsanleitung Ihres Akku-Bohrers hinzu. Markieren Sie das zu bearbeitende Brett an den entsprechenden Stellen mit Linien (s. Abb. R). Bohren Sie an der gewünschten Stelle das erste Loch. - Page 23 OWIM GmbH & Co. KG Stiftsbergstraße 1 DE-74167 Neckarsulm GERMANY Model-No.: HG01976 Version: 12/ 2016 Estado de las informaciones · Versione delle informazioni Estado das informações · Last Information Update · Stand der Informationen: 02 / 2017 Ident.-No.: HG01976022017-5 IAN 283350...
Need help?
Do you have a question about the 283350 and is the answer not in the manual?
Questions and answers