Advertisement
Quick Links
GE
Sensing
XMO2
Thermoparamagnetic Oxygen Transmitter
User's Manual
910-141A5
September 2007
Attention!
This manual should be used for XMO2 units with the Terminal User Program (Option D=1 or 2)
only. For XMO2 units with the IDM User Program (Option D = 3 or 4), manual number 910-141B (or a later
revision) must be used.
Advertisement

Related Manuals for GE XMO2


Summary of Contents for GE XMO2
- Page 1 This manual should be used for XMO2 units with the Terminal User Program (Option D=1 or 2) only. For XMO2 units with the IDM User Program (Option D = 3 or 4), manual number 910-141B (or a later revision) must be used.
- Page 2 2. If GE instructs you to send your instrument to a service center, it must be shipped prepaid to the authorized repair station indicated in the shipping instructions.
- Page 3 Grounding the XMO2 Transmitter........
- Page 4 September 2007 Table of Contents (cont.) Chapter 4: Field Calibration Introduction ................4-1 Factory Calibration Procedures .
- Page 5 September 2007 Table of Contents (cont.) Chapter 6: General Programming Introduction................6-1 Entering the General Menu .
- Page 6 September 2007 Table of Contents (cont.) Chapter 7: Advanced Programming Introduction ................7-1 Entering the Advanced Menu .
- Page 7 XMO2 Assembly ........
- Page 8 Chapter 1...
- Page 9 Features and Capabilities Introduction........... . 1-1 Basic Features.
- Page 10 September 2007 Introduction This chapter introduces you to the features and capabilities of the GE Sensing XMO2 Thermoparamagnetic Oxygen Transmitter. The following specific topics are discussed: • Basic Features - a brief discussion of the XMO2 Transmitter’s basic features and capabilities •...
- Page 11 XMO2 provides automatic microprocessor-based atmospheric pressure compensation of the oxygen signal for these applications. • The XMO2’s modular construction means that the unit can be field-calibrated quickly and easily. Also, the plug-in measuring cell can be replaced with a pre-calibrated spare in just minutes.
- Page 12 September 2007 Theory of Operation The XMO2 measures the concentration of oxygen in a gas mixture by utilizing the unique paramagnetic properties of oxygen. As its magnetic susceptibility is approximately 100 times greater than that of most other common gases, oxygen can be easily distinguished from these gases based on its behavior in a magnetic field.
- Page 13 September 2007 Theory of Operation Figure 1-2 below shows the arrangement of the two thermistor pairs. (cont.) Wind Generating Magnetic Field (Cooled) Thermistors Induced Gas Flow Induced Gas Flow Wind Receiving (Warmed) Thermistors Figure 1-2: Arrangement of the Thermistor Pairs A small portion of the sample gas flow is allowed to diffuse from the lower chamber into the upper chamber of the measurement cell.
- Page 14 In addition to maintaining a constant oxygen bridge temperature, the XMO2 microprocessor compensates for any zero point shift in the oxygen bridge circuit output caused by background gas changes. Finally, the bridge circuit voltage is further adjusted for variations in background gas composition and/or atmospheric pressure by internal, microprocessor-based compensation algorithms.
- Page 15 XMO2’s RS232 digital output to external devices The XMO2 is designed to be installed in a sample system as close as possible to the process sample point. Thus, it is available in two environmental packages: •...
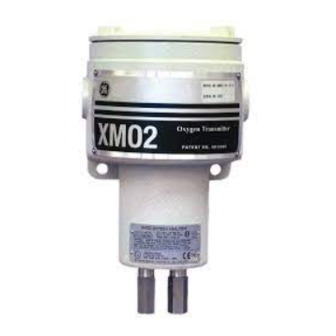
- Page 16 Flame Arrestor Flame Arrestor Figure 1-4: The XMO2 Transmitter The standard XMO2 transmitter maintains the measurement cell at an operating temperature of 45°C (113°F). An optional 60° (140°F) or 70°C (158°F) cell operating temperature is available upon request. Note: The 60° (140°F) or 70°C (158°F) cell operating temperatures should be selected only when necessary, as the higher cell operating temperature results in reduced sensitivity.
- Page 17 Long Cables (optional) GE provides a standard 10 ft (3 m), 4-conductor, color-coded cable with each XMO2 to connect to the power input and the analog output. Optional cables are available in lengths up to 450 ft (137 m) as P/N X4(*), where * specifies the length in feet.
- Page 18 Chapter 2...
- Page 19 Wiring the XMO2 Transmitter ........
- Page 20 1. Select a location in the sample system that provides at least 9 in. (230 mm) of clearance above the top cover of the XMO2 for access to the interior of the transmitter’s enclosure. 2. Mount the XMO2 transmitter in the sample system via its two mounting holes.
- Page 21 You can order a complete sample system from GE Sensing that is System mounted on a steel panel and includes the XMO2 transmitter and all necessary components and plumbing. Several standard sample systems are available, and custom-designed sample systems can be built to your exact specifications.
- Page 22 2. Using the mounting holes provided, fasten the sample system to a convenient vertical surface. The system must be installed in an orientation that keeps the XMO2 transmitter upright and level to within ±15°. 3. After the sample system has been mounted, use 1/4” stainless steel tubing to connect all inlet and outlet lines to the 1/4”...
- Page 23 Wiring Modification Power 1. When connecting the line power, select the cable entry closest to the XMO2 chassis ground. 2. Use shielded cable* to connect the line power to the XMO2. Terminate the shield at the internal ground screw (see Figure 2-3 on page 2-7).
- Page 24 September 2007 Grounding the XMO2 Before proceeding, the XMO2 transmitter must be properly Transmitter grounded. This can be done using either the external ground screw located on the outside of the enclosure or the internal ground screw located below the printed circuit board (PCB) inside the enclosure. To perform this task, proceed as follows: 1.
- Page 25 4-20 mA (+) White TB1-3 4-20 mA (-) Green TB1-4 If you are using your own cable to wire the XMO2, refer to Table 2-3 below for cable requirements. Table 2-3: Non-GE Cable Requirements MAX. CABLE LENGTH WIRE SIZE 0.35 0.60...
- Page 26 The 24 VDC power input, 4-20 mA analog output, and RS232 digital output wiring connections are made to terminal block TB1 inside the XMO2 enclosure (see Figure 2-3 below). To access this terminal block, loosen the locking set screw and remove the cover from the transmitter.
- Page 27 7. Carefully plug the TB1 connector back onto the printed circuit board, and reinstall the cover on the XMO2. 8. Connect the other ends of the cables to the 24 VDC power supply, the 4-20 mA input of the display/control device, and the serial port of the computer or terminal (see the instruction manuals for those devices for details).
- Page 28 • System 1 moisture analyzer The PS5R-C24 Power The GE PS5R-C24 power supply converts a 100-240 VAC input to Supply the required 24 VDC output. Figure 2-4 below shows the PS5R-C24 connections. As indicated, the AC input Line, Neutral and Ground...
- Page 29 XMO2. See Figure B-3 on page B-3 for an interconnection diagram, and refer to the TMO2D User’s Manual (910-084) for details on its operation.
- Page 30 Chapter 3...
- Page 31 Introduction........... . 3-1 Powering Up the XMO2 Transmitter ......3-1 Establishing a Sample Gas Flow .
- Page 32 XMO2 transmitter, the sample system, and any other optional equipment. Powering Up the XMO2 The XMO2 transmitter does not have a power switch. It begins taking Transmitter measurements and generating an analog output signal in the 0-25 mA range as soon as it is connected to a 24 VDC power source.
- Page 33 XMO2 transmitter. 4. Take a reading of the XMO2 4-20 mA analog output. In some applications, pressure changes due to flow rate changes can cause noticeable errors in the oxygen measurement. In such cases, consider the following corrective measures: •...
- Page 34 To prepare for this calibration method, refer to Figure 3-1 on page 3-4 and perform the following preliminary steps: 1. Turn the power on and allow at least 30 minutes for the XMO2 to reach temperature stability. 2. Loosen the set screw that locks the XMO2 cover in place, and unscrew the cover.
- Page 35 Pushbutton Calibration (cont.) Cover Set Screw Circuit Board Figure 3-1: XMO2 Cover, Set Screw, and PCB To perform the offset gas pushbutton calibration, refer to Figure 3-2 below and complete the following steps: Switch S1 Switch S3 Figure 3-2: PCB #703-1139 Calibration Switches...
- Page 36 2. Using the sample system controls, stop the flow of sample gas to the XMO2 inlet port and initiate a flow of the same offset gas specified on the XMO2 Calibration Sheet. Establish the same flow rate and pressure conditions used for the sample gas, and allow the offset gas to flow through the XMO2 for at least three minutes.
- Page 37 To prepare for this calibration method, refer to Figure 3-1 on page 3-4 and perform the following preliminary steps: 1. Make sure that the RS232 digital output of the XMO2 has been connected to a computer or terminal in accordance with the instructions given in Chapter 2, Installation.
- Page 38 Calibration (cont.) current oxygen concentration. Allow the XMO2 to warm up for at least 30 minutes to allow the measurement cell operating temperature to stabilize. Then, proceed with the following steps: 1. Using the sample system controls, stop the flow of sample gas to the XMO2 inlet port and initiate a flow of the same offset gas specified on the XMO2 Calibration Sheet.
- Page 39 To change this range using RS232 digital communication, perform the following steps: 1. If the XMO2 is not set up for Easy Menu Entry, enter the XMO2 Basic Menu by slowly keying in...
- Page 40 Resume? The range of the 4-20 mA analog output has now been changed. Be sure to revise your XMO2 Calibration Sheet to show the new range. For additional information, or if programming assistance is required, refer to Chapter 5, Basic Programming.
- Page 41 Chapter 4...
- Page 42 Field Calibration Introduction........... . 4-1 Factory Calibration Procedures .
- Page 43 How to perform a two-gas (Zero and Span Gas) Pushbutton or RS232 Digital Communication calibration. Factory Calibration Prior to shipment, your XMO2 was calibrated at the factory for the Procedures range specified at the time of purchase. The following standard ranges are available: •...
- Page 44 To supplement this factory calibration data, calibration data points generated in the field for these parameters can be added into the XMO2 software. Refer to Chapter 6, General Programming, for complete instructions. The factory calibration can be further enhanced by performing periodic recalibrations in the field.
- Page 45 Calibration page 4-4 and perform the following preliminary steps: 1. Turn the power on and allow at least 30 minutes for the XMO2 to reach temperature stability. 2. Loosen the set screw that locks the XMO2 cover in place, and unscrew the cover.
- Page 46 Cover Set Screw Circuit Board Figure 4-1: XMO2 Cover, Set Screw, and PCB Note: The XMO2’s digital printed circuit board (PCB #703-1139) is located directly below the cover (see Figure 4-1 above). Switch S1 Switch S3 Figure 4-2: PCB #703-1139 Calibration Switches...
- Page 47 2. Using the sample system controls, stop the flow of sample gas to the XMO2 inlet port and initiate a flow of the same offset gas specified on the XMO2 Calibration Sheet. Establish the same flow rate and pressure conditions used for the sample gas, and allow the offset gas to flow through the XMO2 for at least three minutes.
- Page 48 RS232 communication link, complete the following steps: 1. Using the sample system controls, stop the flow of sample gas to the XMO2 inlet port and initiate a flow of the same offset gas specified on the XMO2 Calibration Sheet. Establish the same flow rate and pressure conditions used for the sample gas, and allow the offset gas to flow through the XMO2 for at least three minutes.
- Page 49 1. Using the sample system controls, stop the flow of sample gas to the XMO2 inlet port and initiate a flow of the same zero gas specified on the XMO2 Calibration Sheet. Establish the same flow rate and pressure conditions used for the sample gas, and allow the zero gas to flow through the XMO2 for at least three minutes.
- Page 50 1. Using the sample system controls, stop the flow of sample gas to the XMO2 inlet port and initiate a flow of the same span gas specified on the XMO2 Calibration Sheet. Establish the same flow rate and pressure conditions used for the sample gas, and allow the span gas to flow through the XMO2 for at least three minutes.
- Page 51 Two-Gas RS232 3. Using the sample system controls, stop the flow of sample gas to Communication the XMO2 inlet port and initiate a flow of the same span gas Calibration (cont.) specified on the XMO2 Calibration Sheet. Establish the same flow rate and pressure conditions used for the sample gas, and allow the span gas to flow through the XMO2 for at least three minutes.
- Page 52 Chapter 5...
- Page 53 Basic Programming Introduction........... . 5-1 Establishing the RS232 Communication Link.
- Page 54 Advanced Menu - offers problem-solving functions to repair the errors diagnosed in the General Menu Data entered into the XMO2 User Program by the user overrides any previously entered data, and is retained in memory for several years, even if power to the XMO2 is interrupted.
- Page 55 Do not use a virtual Com port, such as Com 3 or Com 4, for communicating with the XMO2. 2. With both the XMO2 and the computer turned off, connect a serial cable from the XMO2 to the PC. See Chapter 2, Installation, for detailed instructions.
- Page 56 September 2007 Programming Keystrokes When the XMO2 is in Operate Mode, it ignores all keystrokes except keys. When the key is pressed, the [ENTER] [ENTER] computer terminal displays Enter Code: and waits for the user to enter the correct passcode for access to the User Program. While the passcode is being entered, the XMO2 continues to update the data display, alarm status, and recorder output.
- Page 57 Press [ENTER] xx.xx %O2 Note: If the XMO2 is set up for Easy Menu Entry, pressing [Shift]+[1] switches the XMO2 directly to Programming Mode and enters the Basic Menu. See Chapter 7, Advanced Programming, for instructions on setting up Easy Menu Entry.
- Page 58 To use the Quick Offset option, complete the following steps: 1. Using the sample system controls, stop the flow of sample gas to the XMO2 inlet port and initiate a flow of the same offset gas specified on the XMO2 Calibration Sheet. Establish the same flow rate and pressure conditions used for the sample gas, and allow the offset gas to flow through the XMO2 for at least three minutes.
- Page 59 September 2007 VIEW OFFSET Option The View Offset option lets you view the Offset Curve for the XMO2. The offset curve shows the difference in %O between the most recent Quick Offset calibration and the original factory calibration data. To view the Offset Curve, at least one Quick Offset calibration must have been performed in the field.
- Page 60 To use the Quick Zero option, complete the following steps: 1. Using the sample system controls, stop the flow of sample gas to the XMO2 inlet port and initiate a flow of the same zero gas specified on the XMO2 Calibration Sheet. Establish the same flow rate and pressure conditions used for the sample gas, and allow the zero gas to flow through the XMO2 for at least three minutes.
- Page 61 To use the Quick Span option, complete the following steps: 1. Using the sample system controls, stop the flow of sample gas to the XMO2 inlet port and initiate a flow of the same span gas specified on the XMO2 Calibration Sheet. Establish the same flow rate and pressure conditions used for the sample gas, and allow the span gas to flow through the XMO2 for at least three minutes.
- Page 62 September 2007 VIEW DRIFT CURVE Option The View Drift Curve option lets you view the Drift Curve for the XMO2. The drift curve shows the difference in %O between the most recent Quick Zero/Quick Span calibrations and the original factory calibration data. To view the Drift Curve, at least one Quick Zero/Quick Span calibration must have been performed in the field.
- Page 63 September 2007 SET LOW INPUT VALUE The Set Low Input Value option lets you specify the %O value in the Option gas that corresponds to a 4.00 mA current at the analog output. Note: This option appears if DriftCal is ON or OFF and if a one- or two-gas calibration has been selected.
- Page 64 September 2007 SET HIGH INPUT VALUE The Set High Input Value option lets you specify the %O value in the Option gas that corresponds to a 20.00 mA current at the analog output. Note: This option appears if DriftCal is ON or OFF and if a one- or two-gas calibration has been selected.
- Page 65 September 2007 RESUME Option The Resume option returns the XMO2 to Operate Mode from Programming Mode. Note: This option appears if DriftCal is ON or OFF and if a one- or two-gas calibration has been selected. To use the Resume option, press until the following prompt appears.
- Page 66 Chapter 6...
- Page 67 General Programming Introduction........... . 6-1 Entering the General Menu .
- Page 68 Introduction The XMO2 transmitter contains an interactive User Program that allows the user to customize the XMO2 for any application, perform calibrations, and change operating parameters as necessary. Using the built-in RS232 digital output, the User Program is accessed via a computer terminal.
- Page 69 Press [ENTER] xx.xx %O2 Note: If the XMO2 is set up for Easy Menu Entry, pressing [Shift]+[2] switches the XMO2 directly to Programming Mode and enters the General Menu. See Chapter 7, Advanced Programming, for instructions on setting up Easy Menu Entry.
- Page 70 September 2007 CALIBRATE SYSTEM Menu The Calibrate System? menu is used to store the calibration data and/ or to set the desired oxygen signal compensation parameters. It includes eight possible submenu options, of which a total of 4 or 5 can appear at any one time.
- Page 71 September 2007 SYSTEM MODE Option The System Mode option is used to specify the XMO2’s response time, oxygen signal compensation settings, and calibration mode. To use the System Mode option, refer to the menu map in Figure C-2 on page C-2 and complete the following steps: Note: This menu option always appears.
- Page 72 SYSTEM MODE Option The next prompt allows the user to specify whether the calibration (cont.) data will be entered numerically from the XMO2 Calibration Sheet (see page 8-6 for a sample calibration sheet) or from the introduction of the appropriate calibration gases.
- Page 73 Always consult the factory before proceeding with this option. The Gas Curve option is used to enter calibration data for an XMO2 that is configured with neither pressure compensation nor background gas compensation. To use the Gas Curve option, refer to the menu...
- Page 74 %O2 and Introduce x.xx %O2 prompts for the number of points specified at the # Points prompt. This completes the programming of the Gas Curve option, and the XMO2 returns to the Calibrate System? menu. General Programming...
- Page 75 (the data for your curves is supplied on an XMO2 calibration sheet similar to the one shown on page 8-6). To use the Background Grid option, refer to the menu map in Figure C-2...
- Page 76 %O2, Curve #n programming actual mV values, Enter Point? or press to have the XMO2 interpolate the mV values. The next prompt to appear depends on the above response and on whether you selected Numeric Entry or Introduce Gases at the Calibrate Mode prompt on page 6-5.
- Page 77 [Enter] x.xx %O2, Curve #n interpolation, or press Interpolate Point? return to the Enter Point? prompt. After the XMO2 performs the linear interpolation, you are returned to the Enter Point? prompt on page 6-9. 6-10 General Programming...
- Page 78 If you selected Introduce Gases and [Y]: Option (cont.) If you selected Introduce Gases at the Calibrate Mode prompt and at the Enter Point? prompt, you may begin calibrating the XMO2 at the current %O2 point by introducing a gas with the appropriate oxygen/background gas composition.
- Page 79 PRESSURE CURVE Option The Pressure Curve option is used to enter pressure calibration data for an XMO2 that has been supplied with an atmospheric pressure sensor. To use the Pressure Curve option, refer to the menu map in Figure C-3 on page C-3 and complete the following steps:...
- Page 80 When the displayed value stabilizes, press [Enter] The XMO2 displays working... as it records the calibration data, and then repeats the mmHg and Introduce xxx.x mmHg prompts for the number of points specified at the # Points prompt. This completes the programming of the Pressure Curve option, and the XMO2 returns to the Calibrate System? menu.
- Page 81 XMO2 that is configured with pressure compensation. Data is entered as a series of calibration curves, each of which represents a particular pressure (the data for your curves is supplied on an XMO2 calibration sheet similar to the one shown on page 8-6). To use the Pressure Grid...
- Page 82 %O2, Curve #n programming actual mV values, Enter Point? or press to have the XMO2 interpolate the mV values. The next prompt to appear depends on the above response and on whether you selected Numeric Entry or Introduce Gases at the Calibrate Mode prompt on page 6-5.
- Page 83 [Enter] to begin the x.xx %O2, xxx.x mmHg interpolation, or press Interpolate Point? return to the Enter Point? prompt. After the XMO2 performs the linear interpolation, you are returned to the Enter Point? prompt on page 6-15. 6-16 General Programming...
- Page 84 (cont.) If you selected Introduce Gases at the Calibrate Mode prompt and at the Enter Point? prompt, you may begin calibrating the XMO2 at the current %O2 and pressure values by introducing a gas with the appropriate oxygen concentration and pressure.
- Page 85 The Pressure/Background Grid option is used to enter calibration GRID Option data for an XMO2 that is configured with both background gas and pressure compensation. Data is entered as a series of grids, each of which represents a particular pressure. The data for each grid is...
- Page 86 September 2007 PRESSURE/BACKGROUND To accept the current value, press GRID Option (cont.) CALIBRATE GRID #N . To change the [Enter] # Curves [x]: current value, use the numeric keys to enter a new value and press [Enter] twice. Note: The # Curves prompt repeats until all of the grids specified in the # Grids prompt have been programmed.
- Page 87 Pressure Grid is completed and you will be returned to the # Curves prompt to program the next grid. • Numeric Entry/ - enter tabulated mV value • Numeric Entry/ - XMO2 interpolates mV value • Introduce Gases/ - use appropriate calibration gas • Introduce Gases/ - XMO2 interpolates mV value...
- Page 88 [Enter] x.xx %O2, Curve #n, xxx.x mmHg interpolation, or press Interpolate Point? return to the Enter Point? prompt. After the XMO2 performs the linear interpolation, you are returned to the Enter Point? prompt on page 6-20. General Programming 6-21...
- Page 89 GRID Option (cont.) If you selected Introduce Gases at the Calibrate Mode prompt and at the Enter Point? prompt, you may begin calibrating the XMO2 at the current %O2/%N2/pressure point by introducing a gas with the appropriate pressure and oxygen/background gas composition.
- Page 90 The DriftCal Handler can be either enabled or disabled in this menu. When enabled, it allows the user to configure the XMO2 for either of the following calibration methods: •...
- Page 91 Then, press [YES] confirm your choice. [Enter] Note: If DriftCal is disabled above, the XMO2 returns directly to the Calibrate System menu. The Select Number of Gases prompt: At the following prompt, specify the number of gases to be used for the DriftCal calibration.
- Page 92 [Enter] At the Offset Gas ON for prompt, set the time interval for which the XMO2 waits before recording the new calibration point. GE Sensing recommends a time of 0.00 and calibrating the unit after it has reached equilibrium with the specified calibration gas.
- Page 93 DriftCal Enabled and One The Perform Offset option: Gas Selected (cont.) This option performs an one-gas calibration of the XMO2 using the offset gas and time interval specified in the Set Offset Gas option. IMPORTANT: Be sure the XMO2 is connected to the correct offset gas at the correct flow rate prior to using the Perform Offset option.
- Page 94 When you are done viewing the Drift: x.xx %O2 @ xx.xx %O2 data, press [Enter] Press [YES] This completes the prompts for the View Offset option, and the XMO2 returns to the One-Gas DriftCal menu. General Programming 6-27...
- Page 95 The Zero Gas ON for prompt lets the user set a time interval for which the XMO2 waits before recording the new calibration point. GE Sensing recommends a time of 0.00 and calibrating the unit after it has reached equilibrium with the specified calibration gas.
- Page 96 The Span Gas ON for prompt lets the user set a time interval for which the XMO2 waits before recording the new calibration point. GE Sensing recommends a time of 0.00 and calibrating the unit after it has reached equilibrium with the specified calibration gas.
- Page 97 DriftCal Enabled and Two The Perform ZeroCal option: Gases Selected (cont.) This option performs a zero gas calibration of the XMO2 using the zero gas and time interval specified in the Set Zero Gas option. IMPORTANT: Be sure the XMO2 is connected to the correct zero gas at the correct flow rate prior to using the Perform ZeroCal option.
- Page 98 DriftCal Enabled and Two The Perform SpanCal option: Gases Selected (cont.) This option performs a span gas calibration of the XMO2 using the span gas and time interval specified in the Set Span Gas option. IMPORTANT: Be sure the XMO2 is connected to the correct span gas at the correct flow rate prior to using the Perform SpanCal option.
- Page 99 Drift: x.xx %O2 @ xx.xx %O2 data, press [Enter] Press [YES] The XMO2 now displays the current %O2 drift at the current span gas oxygen level. When you are done viewing the Drift: x.xx %O2 @ xx.xx %O2 data, press...
- Page 100 Drift Curve data before you select and confirm a Yes response below. Press to select the desired WARNING: Reset DriftCal? response. Then, press [YES] [Enter] confirm your choice. This completes the prompts for the Reset DriftCal option, and the XMO2 returns to the Two-Gas DriftCal menu. General Programming 6-33...
- Page 101 September 2007 DriftCal Enabled and One The Done? option: or Two Gases Selected This option is used to exit the DriftCal Handler submenu and return to the Calibrate System menu. At the next prompt, the following two responses are available: •...
- Page 102 September 2007 DONE? Option The Done? option returns the XMO2 to the General Menu from the Calibrate System? submenu. Note: This menu option always appears. To use the Done? option, refer to the menu map in Figure C-2 on page C-2 and press until the following prompt appears.
- Page 103 September 2007 CALIBRATE RECORDER The Calibrate Recorder? menu is used to scale the XMO2’s 4-20 mA Menu analog output to any range within the maximum calibrated range of your unit. Refer to the menu map in Figure C-6 on page C-6, and...
- Page 104 September 2007 TEST INPUTS Menu The Test Inputs? menu is used to monitor a variety of XMO2 input signals. It includes the following nine options: • O2 Input (raw oxygen sensor mV signal) • Comp Input (background gas compensation mV signal) •...
- Page 105 Test Inputs? menu: xxx.x Bkgd mV This completes the prompts for the Comp Input option, and the XMO2 returns to the Test Inputs? menu. PRESSURE INPUT Option The Pressure Input option lets you monitor the pressure sensor input compensation signal.
- Page 106 Option input signal (without offset correction) for troubleshooting purposes. The acceptable range for this signal is -500 mV to +500 mV. Note: This signal also appears at test point E4 on the XMO2 printed circuit board #703-1139. Press to view the...
- Page 107 When ready, press any key to Bridge Power Input return to the Test Inputs? menu: x.xxx Power V This completes the prompts for the Bridge Power Input option, and the XMO2 returns to the Test Inputs? menu. 6-40 General Programming...
- Page 108 Test Inputs? menu: -x.x Agnd mV This completes the prompts for the Analog Ground Input option, and the XMO2 returns to the Test Inputs? menu. DONE? Option The Done? option is used to exit the Test Inputs? submenu and return to the main General menu.
- Page 109 September 2007 TEST RECORDER Menu The Test Recorder? option lets you check the accuracy of the XMO2 4-20 mA analog output. To use this option, refer to the menu map in Figure C-6 on page C-6, and proceed as follows:...
- Page 110 The Set Error Handling menu is used to enable or disable all error Menu handling for the following devices: • a terminal or PC connected via the XMO2’s RS-232 port • the XMO2’s 4-20 mA analog output Note: The error handling for each individual error condition is programmed in the Set Error Handling? option of the Advanced Menu (see page 7-36).
- Page 111 September 2007 TERMINAL Option The Terminal option lets you enable or disable all error handling for a terminal or PC connected to the XMO2 via its RS-232 serial port. To use this option, proceed as follows: Press [Enter] to enter the...
- Page 112 OUTPUT Option (cont.) If Enable was selected: If Enable was selected at the mA Output? prompt, you may program the 4-20 mA analog output of the XMO2 to respond to error conditions in one of the following ways: •...
- Page 113 September 2007 DONE? Option The Done? option is used to exit the Set Error Handling? submenu and return to the main General menu. At the next prompt, the following two responses are available: • Yes - exit immediately to the main General menu •...
- Page 114 Chapter 7...
- Page 115 Advanced Programming Introduction........... . 7-1 Entering the Advanced Menu .
- Page 116 Introduction The XMO2 transmitter contains an interactive User Program that allows the user to customize the XMO2 for any application, perform calibrations, and change operating parameters as necessary. Using the built-in RS232 digital output, the User Program is accessed via a computer terminal.
- Page 117 Press [ENTER] xx.xx %O2 Note: If the XMO2 is set up for Easy Menu Entry, pressing [Shift]+[3] switches the XMO2 directly to Programming Mode and enters the Advanced Menu. See the instructions later in this chapter to set up Easy Menu Entry.
- Page 118 SET GAS TYPE Option The Set Gas Type? option is used to specify the gas to be measured by the XMO2 (the default gas is O ). Refer to Figure C-7 on page C-7 and proceed as follows:...
- Page 119 The Set Background Display? option is used to specify the DISPLAY Option background gas to be measured by the XMO2 (the default is the generic %Bkgd) and to enable or disable its display. Refer to Figure C-7 on page C-7 and proceed as follows:...
- Page 120 SET PRESSURE TYPE The Set Pressure Type? option is used to specify the pressure Option compensation measurement units for the XMO2 (the default is the generic Pres). See Figure C-7 on page C-7 and proceed as follows: Press until this prompt...
- Page 121 September 2007 DONE Option The Done? option returns the XMO2 to the Advanced Menu from the Setup? submenu. To use this option, refer to the menu map in Figure C-7 on page C-7 and press until the following prompt appears.
- Page 122 September 2007 SYSTEM MODE Option The System Mode? option is used to specify the XMO2’s response type, pressure/background gas signal compensation settings, and calibration range. To use the System Mode? option, refer to the menu map in Figure C-8 on page C-8 and complete the following steps: Note: This menu option always appears.
- Page 123 September 2007 SYSTEM MODE Option The next prompt is used to choose between the two available analog (cont.) output ranges and resolutions. All units are shipped from the factory with a range of 0.00-100.00% with a resolution of 0.01%, but a range of 0.000-10.000% with a resolution of 0.001% is available for special applications.
- Page 124 September 2007 O2 INPUT Option The O2 Input? option is used to specify an AutoZero value for the measurement bridge and/or to perform an Auto Zero of the bridge with a flow of a 0.000% oxygen gas, such as nitrogen. To use the O2 Input? option, refer to the menu map in Figure C-8 on page C-8 and complete the following steps: Note: This menu option always appears.
- Page 125 Connect a source of the chosen zero gas (typically nitrogen) to the XMO2 inlet. Allow the zero gas to flow at a rate of 1 SCFH and at atmospheric pressure for at least 3-5 minutes. Then, to reset the bridge calibration to 0.00%, proceed as follows:...
- Page 126 O2 INPUT Option (cont.) The Done option: The Done? option returns the XMO2 to the Calibrate System menu from the O2 Input? submenu. To use this option, refer to the menu map in Figure C-8 on page C-8 and press until the following prompt appears.
- Page 127 The Gas Value Exp Filter? option is used to specify the five Option parameters associated with the XMO2’s fast response algorithm for the main gas when background gas compensation is disabled. To use this option, refer to the menu map in Figure C-8 on page C-8 and...
- Page 128 September 2007 GAS VALUE EXP FILTER The Set Tau(up) option (cont.): Option (cont.) You have now completed the Gas Value Exp Filter: programming of this submenu. Set Tau(up)? You may now do one of the following: • Press as many times as necessary to select another Gas Value Exp Filter menu option.
- Page 129 September 2007 GAS VALUE EXP FILTER The Set Exp Threshold option: Option (cont.) The exponential threshold is calculated from the oxygen span of the calibration data. If the exponentially-calculated oxygen value is within the threshold value of the normally-calculated oxygen value, fast response is disabled.
- Page 130 September 2007 GAS VALUE EXP FILTER The Set Window Threshold option (cont.): Option (cont.) You have now completed the Gas Value Exp. Filter: programming of this submenu. Set Window Threshold? You may now do one of the following: • Press as many times as necessary to select another Gas Value Exp Filter menu option.
- Page 131 The Done option: Option (cont.) The Done? option returns the XMO2 to the Calibrate System menu from the Gas Value Exp Filter? submenu. To use this option, refer to the menu map in Figure C-8 on page C-8 and press until the following prompt appears.
- Page 132 The Comp mV Exp Filter? option is used to specify the five Option parameters associated with the XMO2’s fast response algorithm for the background gas when background gas compensation is enabled. To use this option, refer to the menu map in Figure C-8 on page C-8...
- Page 133 To use this option, proceed as follows: Note: If the XMO2 displays a value greater than 25% of F.S. after reaching equilibrium, change the maximum total drift value to 50% before calibrating the unit.
- Page 134 Calibrate System menu. The Done option: The Done? option returns the XMO2 to the Calibrate System menu from the DriftCal Handler? submenu. To use this option, refer to the menu map in Figure C-8 on page C-8 and press until the following prompt appears.
- Page 135 September 2007 DONE Option The Done? option returns the XMO2 to the Advanced main menu from the Calibrate System? submenu. To use this option, refer to the menu map in Figure C-7 on page C-7 and press until the following prompt appears.
- Page 136 September 2007 CALIBRATE RECORDER Continue as indicated below. Menu (cont.) ADVANCED MENU Calibrate Recorder? As the 4 mA and 20 mA calibrations interact with each other, it may be necessary to repeat the above sequence several times to achieve and accurate calibration. Accomplish this as follows: •...
- Page 137 September 2007 TERMINAL Option The Terminal submenu is used to individually enable or disable error handling for fifteen different terminal error conditions. To program this menu, see Figure C-9 on page C-9 and proceed as follows: • The DriftCal Offset Error is generated when an error occurs during an offset gas (one-gas) calibration.
- Page 138 September 2007 TERMINAL Option (cont.) • The DriftCal Span Error is generated when an error occurs during a span gas (two-gas) calibration. Press to skip this error, or ENABLE/DISABLE ERRORS press [Enter] to set it. DriftCal Span Error? Press to select the desired DriftCal Span Error response: option, then press [Enter]...
- Page 139 September 2007 TERMINAL Option (cont.) • The Bkgd Input Underrange Error is generated when the background gas compensation signal falls below the normal range. Press to skip this error, or ENABLE/DISABLE ERRORS press [Enter] to set it. Bkgd input underrange? Press to select the desired Bkgd input underrange response:...
- Page 140 September 2007 TERMINAL Option (cont.) • The Pressure Input Overrange Error is generated when the pressure mV signal exceeds 512 mV. Press to skip this error, or ENABLE/DISABLE ERRORS press [Enter] to set it. Pressure input overrange? Press to select the desired Pressure input overrange response: option, then press [Enter]...
- Page 141 September 2007 TERMINAL Option (cont.) • The mmHg Value Underrange Error is generated if the pressure reading (in the selected units) falls below the normal range. Press to skip this error, or ENABLE/DISABLE ERRORS press [Enter] to set it. mmHg value underrange? Press to select the desired mmHg value underrange response:...
- Page 142 ENABLE/DISABLE ERRORS error. %N2 value overrange? • The Done? option returns the XMO2 to the Set Error Handling menu from the Terminal? submenu. Respond as indicated below. ENABLE/DISABLE ERRORS Done? You may now do one of the following: •...
- Page 143 September 2007 mA OUTPUT Option The mA Output submenu is used to individually enable or disable error handling for fifteen different 4-20 mA analog output error conditions. In addition, the type of response to the error may be specified. To program this menu, see Figure C-9 on page C-9 and proceed as follows: •...
- Page 144 XMO2’s memory. Once deleted, this data cannot be recovered. The Erase RAM menu is used to delete all user-entered data from the XMO2’s memory. Refer to Figure C-7 on page C-7 and enter this menu from the Advanced Menu prompt as follows: Press...
- Page 145 September 2007 RESUME Menu The Resume? option is used to exit the Advanced Menu and return to normal Run mode to take live readings. At the next prompt (see the menu map in Figure C-7 on page C-7), the following two responses are available: •...
- Page 146 Chapter 8...
- Page 147 Specifications and Factory Data Performance Specifications........8-1 Functional Specifications .
- Page 148 September 2007 Performance Accuracy: Specifications 0-1% O range: ±2% of span for 80-100% O and 90-100% O ranges: ±0.2% O all other ranges: ±1% of span Linearity: ±0.5% of span Repeatability: ±0.2% of span Measurement Resolution: 0.01 mA Stability: Zero: ±1.0% of span per month (± 2% for 0-1% O range) Span: ±0.4% of span per month (±0.8% for 0-1% O range)
- Page 149 September 2007 Functional Specifications Analog Output: 4-20 mA, 800 Ω max. load, isolated, field-programmable Digital Output: RS232, 3-conductor Power Input: 24.0±4.0 VDC @1.2 A maximum Cable (Power Input and Analog Output): Standard: 10 ft (3 m), 4-conductor, shielded, P/N X4(10) Optional: lengths to 450 ft.
- Page 150 SAA AUS Ex 3139X EMC Direct. 89/336/EEC PED 97/23/EC Lloyd’s Registry approval Optional Accessories GE Sensing offers a complete line of optional accessories for use with the XMO2 transmitter. These include: • PS5R-C24: 24 VDC power supply • X4(*): 4-conductor cable for power input and analog output...
- Page 151 September 2007 Ordering Information XMO2 - Transmitter Model XMO2 thermoparamagnetic oxygen transmitter Package (requires 24 VDC power supply) 1 - weatherproof enclosure 2 - explosion-proof enclosure 3 - weatherproof with external cal switch 4 - explosion-proof with external cal switch...
- Page 152 September 2007 Calibration Specification XCAL- Calibration XCAL XMO2 thermoparamagnetic oxygen transmitter Range of Oxygen Output (when the rack-mount package is selected, option 6 [0 to 25%] must be selected here.) 1 - 0-1% oxygen 2 - 0-2% oxygen 3 - 0-5% oxygen...
- Page 153 September 2007 Calibration Sheet For reference, a sample Calibration Sheet for the XMO2 transmitter is shown in Figure 8-1 below. Figure 8-1: A Sample XMO2 Calibration Sheet Specifications and Factory Data...
- Page 154 September 2007 Default Settings During the original factory calibration, the programming options for all XMO2 transmitters are set at default values that provide the best performance in the most common applications. For reference, these default values are listed in this section.
- Page 155 September 2007 General Menu Defaults Calibrate System - DriftCal Handler (cont.) (cont.) • Perform Offset - [no default setting] • View Offset - [Press YES] • WARNING: reset DriftCal? [Yes] Calibrate System - Calibrate Recorder • mA Output 4 mA Value - [0.00] •...
- Page 156 September 2007 Advanced Menu Defaults The default settings for the options in the Advanced Menu are: Setup - Terminal • Select Gas Type - [%O2] • Display Background Gas - [No] • Select Pressure Type - [MMHG] • Set Easy Menu Entry - [Enable] Calibrate System - System Mode •...
- Page 157 September 2007 Advanced Menu Defaults Set Error Handling - Terminal (cont.) (cont.) • Bkgd Input Overrange Response - [Enable] • Pressure Input Underrange Response - [Enable] • Pressure Input Overrange Response - [Enable] • %O2 Value Underrange Response - [Enable] •...
- Page 158 September 2007 Advanced Menu Defaults Set Error Handling - mA Output (cont.) (cont.) • Pressure Input Overrange Response - [Enable] • Set mA Output Error Response - [Force High?] • %O2 Value Underrange Response - [Enable] • Set mA Output Error Response - [Force High?] •...
- Page 159 Appendix A...
- Page 160 Two Typical Applications Blanketing Gases in Hydrocarbon Liquid Storage Tanks ... . A-1 Reactor Feed Gases in Formaldehyde Production ....A-3...
- Page 161 N or CO and operating conditions of ambient temperature and atmospheric pressure. The XMO2 is mounted in a sample system similar to the one shown in Figure A-1 below (dwg. #731-559). Figure A-1: Blanketing Gas Sample System Two Typical Applications...
- Page 162 The sample gas, condensed liquids, and the inert gas are all returned to the tank, making this is a closed-loop system. The XMO2 is recalibrated periodically using the purge gas to zero the instrument and ambient air (20.93% O ) to span the instrument.
- Page 163 N or CO and operating conditions of a controlled temperature and atmospheric pressure. The XMO2 is mounted in a sample system similar to the one shown in Figure A-2 below (dwg. #731-185). Figure A-2: Formaldehyde Feed Gas Sample System...
- Page 164 Zero Gas: N (at least 99.95% pure - 0.0% O • Span Gas: air (20.93% O A typical XMO2 Calibration Sheet for this application is shown in Figure 8-1 on page 8-6. Note: Any compatible display device may be specified. Previous Systems...
- Page 165 Appendix B...
- Page 166 XMO2 Assembly ........
- Page 167 September 2007 Outline and Installation Drawings...
- Page 168 September 2007 Outline and Installation Drawings...
- Page 169 (or equal) Same As TB1 Pins 2-4 Same As TB1 Pins 2-4 Same As TB1 Pins 2-4 Same As TB1 XMO2 XMO2 XMO2 Pins 2-4 Same As TB1 MIS1/MMS3 Pins 2-4 TMO2D Connections (see User's Manual for details) XDP Connections (see User's Manual for details)
- Page 170 September 2007 Cable 704-667 Cable 704-668 DB25 Female DB9 Female Cable 704-669 Cable 704-670 DB25 Male DB9 Male Outline and Installation Drawings...
- Page 171 September 2007 Outline and Installation Drawings...
- Page 172 September 2007 Outline and Installation Drawings...
- Page 173 September 2007 Outline and Installation Drawings...
- Page 174 September 2007 Outline and Installation Drawings...
- Page 175 September 2007 Outline and Installation Drawings...
- Page 176 September 2007 Outline and Installation Drawings B-10...
- Page 177 Appendix C...
- Page 178 Menu Maps Basic - All Submenus and Options ....... . C-1 General - Cal System>System Mode, Gas Curve, Background Grid .
- Page 179 September 2007 if DriftCal is ON if DriftCal is OFF if ONE GAS selected if TWO GASES selected BASIC MENU OPTIONS 1...9 1...9 Menu Maps...
- Page 180 September 2007 GENERAL MENU OPTIONS [See Figure C-6] [See Figure C-6] [See Figure C-6] [See Figure C-6] CALIBRATE SYSTEM MENU [See Figure C-3] [See Figure C-3] [See Figure C-4] [See Figure C-5] [If n Points Entered] [If <n Points Entered] [If <n Curves Entered] [If n Curves Entered] [If Numeric Entry]...
- Page 181 September 2007 GENERAL MENU OPTIONS [See Figure C-6] [See Figure C-6] [See Figure C-6] [See Figure C-6] CALIBRATE SYSTEM MENU [See Figure C-2] [See Figure C-2] [See Figure C-2] [See Figure C-4] [See Figure C-5] [If n Points Entered] [If <n Points Entered] [If <n Curves Entered] [If n Curves Entered] [If Numeric Entry]...
- Page 182 September 2007 GENERAL MENU OPTIONS [See Figure C-6] [See Figure C-6] [See Figure C-6] [See Figure C-6] CALIBRATE SYSTEM MENU [See Figure C-2] [See Figure C-2] [See Figure C-3] [See Figure C-3] [See Figure C-2] [See Figure C-5] [If n Grids Entered] [If <n Grids Entered] [If <n Grids Entered] [If Introduce Gases]...
- Page 183 September 2007 GENERAL MENU OPTIONS [See Figure C-6] [See Figure C-6] [See Figure C-6] [See Figure C-6] CALIBRATE SYSTEM MENU [See Figure C-2] [See Figure C-2] [See Figure C-3] [See Figure C-3] [See Figure C-2] [See Figure C-4] Menu Maps...
- Page 184 September 2007 GENERAL MENU OPTIONS [See Figures C-2 to C-5] [If Units Selected] [If mA Selected] [If Disabled] [If Enabled] [If Value] [If High or Low] Menu Maps...
- Page 185 September 2007 ADVANCED MENU OPTIONS [See Figure C-8] [See Figure C-9] SETUP MENU OPTIONS Menu Maps...
- Page 186 September 2007 ADVANCED MENU OPTIONS [See Figure C-7] [See Figure C-7] [See Figure C-9] [See Figure C-7] CALIBRATE SYSTEM MENU OPTIONS [except for the units, these menus are identical] [if range 0.00-100.00%] [if range 0.000-10.000%] [programming is identical for all parameters] Menu Maps...
- Page 187 September 2007 ADVANCED MENU OPTIONS [See Figure C-7] [See Figure C-8] [See Figure C-7] [See Figure C-7] [except for units, these menus are identical] [programming is identical for all parameters] [programming is identical for all parameters] Menu Maps...
- Page 188 September 2007 Index Accessories, Optional....8-3 Advanced Menu Calibrate Recorder ....7-20 Calibrate System .
- Page 189 September 2007 Index (cont.) Circuit Board ......3-4 Comp Input Menu ....6-38, 7-11 Cables Comp mV Exp Filter Menu.
- Page 190 One-Gas Calibration ....4-5 Grounding the XMO2 ....2-5 Ordering Information .
- Page 191 September 2007 Index (cont.) Passcodes ....5-1, 6-1, 7-1 Sample Gas Perform Offset Menu ....6-26 Flow Rate.
- Page 192 Temperature Input Menu ....6-40 XMO2 Terminal Block TB1....2-7 Accessories .
- Page 193 • EN50281-1-1:1998 • II 2 GD EEx d IIC T5 ISSeP02ATEX022 ISSeP, B7340 Colfontaine, Belgium • EN 50104:1998 (XMO2 only) • EN 61326:1998, Class A, Annex A, Continuous Unmonitored Operation • EN 60529:1991+A1:2000 IP66 following the provisions of the 89/336/EEC EMC Directive and the 94/9/EC ATEX Directive.
- Page 194 • EN50281-1-1:1998 • II 2 GD EEx d IIC T5 ISSeP02ATEX022 ISSeP, B7340 Colfontaine, Belgique • EN 50104:1998 (XMO2 uniquement) • EN 61326:1998, Classe A, Annexe A, Fonctionnement continu sans surveillance • EN 60529:1991+A1:2000 IP66 conformément aux dispositions des directives 89/336/EEC (compatibilité électromagnétique) et 94/9/EC ATEX.
- Page 195 • EN50281-1-1:1998 • II 2 GD EEx d IIC T5 ISSeP02ATEX022 ISSeP, B7340 Colfontaine, Belgien • EN 50104:1998 (nur XMO2) • EN 61326:1998, Class A, Annex A, kontinuierlicher, überwachungsfreier Betrieb • EN 60529:1991+A1:2000 IP66 und dass sie die Anforderungen der EMC-Direktive 89/336/EEC und der Direktive 94/9/EC ATEX einhalten.
- Page 196 ATEX COMPLIANCE Sensing GE Infrastructure Sensing, Inc. 1100 Technology Park Drive Billerica, MA 01821-4111 U.S.A. as the manufacturer, declare under our sole responsibility that the product XMO2 Oxygen Transmitter to which this document relates, in accordance with the provisions of ATEX Directive 94/9/EC Annex II, meets the following specifications: II 2 GD EEx d IIC T6 or T5 (-40°C to +55°C)
Need help?
Do you have a question about the XMO2 and is the answer not in the manual?
Questions and answers