Sepura SC21 Series Quick Start Manual
Hand-portable radio
Hide thumbs
Also See for SC21 Series:
- User manual (133 pages) ,
- Service manual (41 pages) ,
- Quick reference manual (9 pages)

Related Manuals for Sepura SC21 Series


Summary of Contents for Sepura SC21 Series
- Page 1 T E T R A G U I D E Quick Start Guide SC21 Series Hand-portable radio Going further in critical communications...
- Page 2 Sepura plc. and the liability of Sepura plc. for any errors and omissions shall be limited to the correction of such errors and omissions. Sepura plc.
-
Page 3: Table Of Contents
CONTENTS General information Your radio at a glance Battery Charging the battery Fitting the battery Removing the battery Operational overview Keys, buttons and knobs LED indicators Home screen Status icons Antenna and radio coverage Menu SmartMenus Getting Started Power on Power off Locking and unlocking the keypad Adjusting the volume... - Page 4 Features Connector Protector User profiles Man Down Lone Worker Messages Inbox Create a text message Read a new message Reply to a message Send a message Send a status message Personalising your radio Invert the display SC21 Series – 10/2017...
- Page 5 Adjusting the backlight Day/Night mode Adjusting text and icon size Setting the display language Tips & Tricks Quick Start Guide...
- Page 6 SC21 Series – 10/2017...
-
Page 7: General Information
General information This user guide describes the default operation and features of the SC21 Series radio. Your service provider or organisation may have customised your radio to optimise its performance to suit your individual needs. There may be differences between this guide and the way your product operates. -
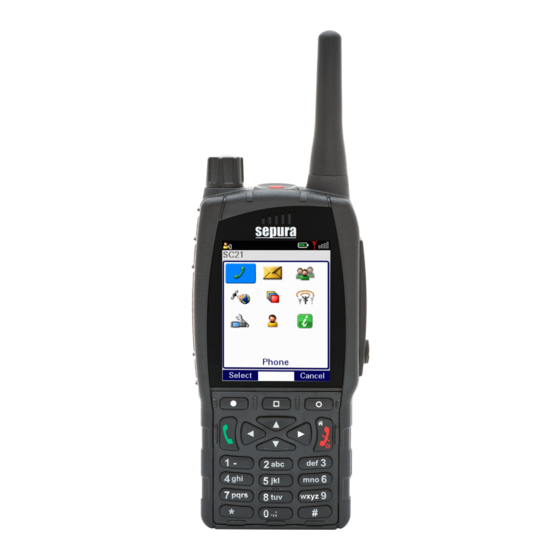
Page 8: Your Radio At A Glance
Right context key. Press to activate the feature or option that appears directly above the key. Cancel/Home key. Press and hold (2 seconds) to power on your radio. From the Home screen, press and hold (4 seconds) to power off. SC21 Series – 10/2017... - Page 9 Item Description Alphanumeric keypad with backlight and microphone behind. Navigation keys. Press to scroll through lists and move the cursor when writing text. Select/Send key. Press to initiate a phone call. Left context key. Press to activate the feature or option that appears directly above the key.
- Page 10 RFID tag for monitoring and auditing purposes. Mounting clip attachment points Loudspeaker used during Group calls when an audio acccessory is not connected and the radio is held in the hand. Radio user label area for attaching an asset label (optional). SC21 Series – 10/2017...
-
Page 11: Battery
Fit a new battery if there are any signs of damage. Warning: Risk to personal safety. Sepura TETRA radios have been tested and certified using Sepura approved batteries. The use of non-approved batteries may damage the product, will result in... -
Page 12: Fitting The Battery
Battery chargers Only use Sepura approved battery chargers. Use of non-approved chargers may not fully charge the battery or damage it. Always read the user documentation supplied with the charger for additional safety instructions and how to use it. -
Page 13: Removing The Battery
To attach the battery, insert the battery into the battery compartment as shown. Press the battery downwards until it clicks into position. Removing the battery Caution: Power off before removing the battery. If a Belt clip or Shirt/Pocket clip is attached, lift the clip before removing the battery. -
Page 14: Operational Overview
Press to end a phone call. Select/Send key Press to initiate a phone call. Press to select a menu or option. Navi-knob Rotate to adjust the volume. Navigation keys Press to scroll lists, menus, talkgroup folders and status messages. SC21 Series – 10/2017... - Page 15 Press to move through characters when writing text. Context keys Context labels appear at the bottom of the screen, directly above each context key. These labels show the action of the key when it is pressed; either activating a feature or performing a function such as clearing a call (Clear) or selecting an option (Select).
-
Page 16: Led Indicators
Radio is in a call and transmitting Intermittent flashing Attempting to connect to the network or incoming telephone SDS/Status message Incoming telephone call or SDS/Status Flashing orange message Intermittent four Transmit Inhibit mode or Fallback mode are flashes orange active SC21 Series – 10/2017... -
Page 17: Home Screen
Home screen The top level screen, known as the home screen, appears when the radio powers on and when it is idle. Tip: To quickly get back to the home Screen, press and hold (2 seconds) the Cancel/Home key. The status line, at the top of the screen, displays various icons to indicate the state of operation or when certain functions such as keypad lock have been activated. -
Page 18: Status Icons
Icon Description Security and Emergency Emergency Appears when emergency operation mode is active on your radio and an Alarm call is in progress. Air Interface Encryption disabled Calls will not be encrypted. SC21 Series – 10/2017... - Page 19 Icon Description Trunked Mode Operation (TMO) Outgoing TMO call in progress You are in a call that you initiated. Incoming TMO call in progress You are in a call that was initiated by another person or your dispatcher on the TMO network. Missed incoming TMO call You have missed an incoming TMO call.
-
Page 20: Antenna And Radio Coverage
Poor or no radio coverage is indicated by a short bar or no bar at all with the poor signal strength icon. Menu Your radio is customised by your service provider or organisation with a number of features that are accessed from the main menu. SC21 Series – 10/2017... - Page 21 To open the main menu, in the Home screen press Menu. To open a sub-menu or menu option, scroll to the option (highlight it) and press Select. To return to a higher level menu, press Back. To return to the Home screen at any time within the menu hierarchy, press and hold (2 seconds) the Cancel/Home key.
-
Page 22: Smartmenus
SmartMenu containing all your Quick Status messages, another for user profiles and another for selecting operational modes such as toggling on/off covert mode, Transmit Inhibit, loudspeaker mute and so on. SC21 Series – 10/2017... - Page 23 SmartMenus are assigned to a soft key, either a Side key or one of the keys on the keypad. To open a SmartMenu, press the Side key or press and hold (1 second) the assigned key on the keypad. Use the navigation keys to scroll the list of options on the SmartMenu. Options are labelled with a number, shown to the right of the option.
-
Page 24: Getting Started
To prevent accidental activity during operation, you can lock the keypad. This will also prevent access to the radio's functions if the radio is stolen. When the keypad is locked, the Key icon appears in the status line. SC21 Series – 10/2017... -
Page 25: Adjusting The Volume
The Navi-knob, and the PTT and Emergency buttons remain unlocked so you can still adjust the adjust the volume, make a Group or Alarm call when the keypad is locked. To lock/unlock the keypad: Press the * (star) key (or a designated soft key), then press the OK context key to lock/unlock the keypad. -
Page 26: Notifications
Unread message Inbox Missed call Call History Missed Callout Callout To close a notification: From the Home screen, press the Shortcut context key or the Up navigation key to open the Shortcut Bar, highlight the notification then SC21 Series – 10/2017... -
Page 27: Selecting Tmo And Dmo
press the Select context key. Use the feature in the usual way, for example, read an unread message or respond to a missed call. The notification automatically closes and disappears from the Shortcut Bar. Selecting TMO and DMO In Direct Mode Operation (DMO), radios communicate directly with other TETRA radios without using a network. - Page 28 DGNA, Always Attached, Background or Smart Call folder as your selected folder. You can only select a talkgroup that is editable. Selecting a folder Use one of the following methods to select the current folder: SC21 Series – 10/2017...
- Page 29 From the Home screen, press Menu then select Groups> Folders to display the current selected folder containing the selected talkgroup. From the Home screen, press Groups. Depending on the customisation of your radio, either the current selected folder opens displaying all talkgroups within the folder, or the Talkgroup Selection box opens displaying the selected talkgroup and folder.
- Page 30 1. From the Home screen, press Groups to open the current folder. The selected talkgroup within the folder is indicated by the icon. 2. Scroll to the talkgroup you want as your requested talkgroup and press Select. Selection is indicated by the icon. SC21 Series – 10/2017...
- Page 31 To select a talkgroup using the Talkgroup Selection box: 1. From the Home screen, press Groups. The selected talkgroup and folder appear in the Talkgroup Selection box. The current talkgroup appears in bold typeface. 2. Rotate the Navi-knob to scroll through the talkgroups within the currently selected folder.
-
Page 32: Emergency Operation
PTT button. The radio automatically cycles between transmit and receive communication during a programmed period of time (seconds). Live Microphone is cancelled when the time expires or by pressing the PTT button. SC21 Series – 10/2017... -
Page 33: Making An Alarm Call
Making an Alarm call You can still make an Alarm call if the keypad is locked. 1. Press and hold (2 seconds) the Emergency button; a confirmation beep sounds. 2. Release the button and speak into the microphone. During an Alarm call: the microphone is ‘live’... -
Page 34: Power On Alarm Call
If your radio is customised for PIN entry, you will need to enter your PIN before the alarm call is initiated. It may take several seconds for the radio to complete its power on process before initiating the Alarm call. SC21 Series – 10/2017... -
Page 35: Contacts
Contacts Details of regularly used contacts are stored in a phone book. The phone book has a series of folders labelled Menu, Search, All and Personal. Your radio may have additional folders containing contacts programmed into your radio during customisation. The Personal folder contains contacts you create (personal contacts). -
Page 36: Creating Contacts
Cancel context key, then the OK context key. Creating contacts To create a contact: 1. Select Menu > Phone > Contacts. 2. Navigate to the Menu card and select Create Contact. SC21 Series – 10/2017... -
Page 37: Editing Contacts
3. Enter the contact name (see Text entry on page 36) then press the Save context key. 4. Select a dial mode for this contact, either TETRA Network (default) or telephone/mobile network. To change the dial mode, press the Up navigation key to select the dial mode line then use the Left or Right navigation keys to switch dial modes. - Page 38 Left navigation key. 3. After making changes press Save. To delete a contact: 1. Select the contact and press Open. 2. Press Options. 3. Select Edit > Delete contact, then press Select. SC21 Series – 10/2017...
-
Page 39: Calls
Calls The various types of voice and data calls that are supported by your radio, and the acoustic and visual alerts that accompany a call, depend on your radio's customisation. Group calls Group (point-to-multipoint) calls are calls where you talk to other users within a nominated group of radio users (a talkgroup). -
Page 40: Individual Calls
3. To speak press the PTT button; release the PTT button to listen to the other radio users. 4. To end the call, press the Clear context key. Receiving individual calls (half-duplex) 1. Press the PTT button to answer the call or the Clear context key to reject the call. SC21 Series – 10/2017... - Page 41 Making individual phone calls (full-duplex mode) Calling a contact: 1. Select Menu > Phone > Contacts to open the contacts menu. 2. Navigate to a contacts folder (such as the All folder) and select your contact. Press the Open context key, then choose the phone number. 3.
-
Page 42: Text Entry
You can use character sets to change the style of the text, and to enter numbers and special characters. The character set can be changed as often as required when entering text. The following character sets are supported: SC21 Series – 10/2017... - Page 43 Character set Description The first letter is entered in upper-case, with all following characters in lower- case. New sentences start with a Auto-capitalisation (Abc) capital letter and end with a full stop (.), question mark (?) or exclamation mark (!) followed by one or more spaces.
- Page 44 Zhiyan Chinese characters are composed and entered in a similar way to Simplified Chinese characters, however when the keys are pressed to input the strokes that build up the character you must then press the Select/Send key to display the set of possible matching characters. SC21 Series – 10/2017...
-
Page 45: Features
Features Your radio can be customised for various advanced features and can have various soft keys assigned to frequently used features. Connector Protector When working in salt water environments or in an area with high salt- laden humidity such as sea mist or fog, enabling the Connector Protector feature will protect the Digital Accessory connector (sDAC) from potential corrosive damage when an accessory is not attached. -
Page 46: Man Down
Select a user profile which uses Man Down (see User profiles on the previous page). The sensors activated are those customised in the profile. From the Home screen, press the Shortcut context key, then select the Man Down icon. SC21 Series – 10/2017... -
Page 47: Lone Worker
A message (‘Man Down Starting’) is displayed and an alert sounds (a succession of beeps). 2. Attach your radio in a comfortable wearing position on your body. When a two second continuous tone finishes the radio’s ‘normal’ wearing position has been recorded. An icon indicates that Man Down is switched on and which sensors are active. -
Page 48: Messages
A notification appears in the Shortcut Bar, see Notifications on page 20 and the blue LED flashes. To read a new message, open your Inbox (Messages > Inbox). To open the message, select it and press the Open context key. To read a long SC21 Series – 10/2017... -
Page 49: Reply To A Message
message use the Down navigation key to continue reading, and the Up navigation key to return to the top of the message. When you have finished reading the message, you can choose to reply to the message (see Reply to a message below), delete it or save it. -
Page 50: Send A Status Message
To send a status message, from the Home screen press the Groups context key 2 times. Use the navigation keys to scroll through your status messages. To send the message, press the Send context key. See Send a message on the previous page. SC21 Series – 10/2017... -
Page 51: Personalising Your Radio
Personalising your radio You can personalise your display settings (such as text size, backlight, inverting the screen and change languages) and create a personal phone book containing your own contacts. Invert the display When you are wearing the radio on your shoulder, attached to a belt or to a body vest, you may want to flip the display upside down to make it easier to read. -
Page 52: Day/Night Mode
When a tick appears in the box, the backlight is on, and when the box is empty, the backlight is off. Backlight Level—to adjust the intensity of the backlight and the key pad illumination on a scale of 1 to 7 . SC21 Series – 10/2017... -
Page 53: Adjusting Text And Icon Size
Adjusting text and icon size Your radio uses the default size for the text and icons set during customisation, however it also supports a number of different size modes that control how text and icons are displayed, which can make them easier to see from a distance. - Page 54 To change the language: 1. Select Menu > Options > Settings > Language. 2. Scroll to the language option, and then press the Select context key. The Home screen appears and the display shows the selected language. SC21 Series – 10/2017...
-
Page 55: Tips & Tricks
Tips & Tricks Home Screen To quickly get back to the Home Screen, press and hold (2 seconds) the Cancel/Home key. Keypad lock/unlock To quickly lock/unlock the keypad, press and hold (2 seconds) the * (star) key. Change talkgroup From the Home screen, press the Groups context key. Use the navigation keys to change the folder, then rotate the Navi-knob to select the talkgroup. - Page 56 Instead of using the context keys to initiate and end a call, use the Select/Send key to make a call and the Cancel/Home key to end the call. View recent calls To view recent calls, from the Home screen press Menu > Phone > Call History. SC21 Series – 10/2017...
- Page 57 Sepura plc 9000 Cambridge Research Park Beach Drive Waterbeach Cambridge CB25 9TL United Kingdom sepura.com...
Need help?
Do you have a question about the SC21 Series and is the answer not in the manual?
Questions and answers