Sepura SC21 Series User Manual
Hand-portable radio
Hide thumbs
Also See for SC21 Series:
- Quick start manual (57 pages) ,
- Service manual (41 pages) ,
- Quick reference manual (9 pages)
Table of Contents
Advertisement
Quick Links
Advertisement
Table of Contents

Related Manuals for Sepura SC21 Series


Summary of Contents for Sepura SC21 Series
- Page 1 User Guide SC21 Series hand-portable radio...
- Page 2 Sepura Limited and the liability of Sepura Limited for any errors and omissions shall be limited to the correction of such errors and omissions. Sepura Limited welcomes any comment and feedback as a way to improve any delivered documentation.
- Page 3 General information This user guide describes the default operation and features of the SC21 Series radio. Your service provider or organisation may have customised your radio to optimise its performance to suit your individual needs. There may be differences between this guide and the way your product operates.
- Page 4 Federal Communication Commission (FCC) Regulations Sepura TETRA radios generate, use and radiate RF energy. Radios that comply with the limits for a Class A digital device, pursuant of part 15 of the FCC rules are identified by an FCC certification ID label (located under the battery).
-
Page 5: Table Of Contents
Safety Regulatory Your radio at a glance Battery Charging the battery Charging a 'flat' battery Fitting the battery Removing the battery Using Sepura approved batteries Controls & indicators Navi-knob Navigation Keys Soft keys Context keys Status icons LED indicators Emergency button... - Page 6 Changing the behaviour of the PTT during TMO group calls Text entry Cursor movement Character sets Chinese character sets Messages Message Inbox Opening messages View message details Reply to a message Saved messages SDS report request Picture messages SC21 Series hand-portable radio...
- Page 7 Paging alerts Networks Authentication Change Network Transmit Inhibit Adjusting the DMO power transmission level Fallback Mode Operating Modes DMO Mode Repeater Mode Callout alerts Responding to Callouts Callout display Group calls to Callout group Information Phase Features Privacy Screen Connector Protector User profiles Man Down Lone Worker...
- Page 8 Unlocking the radio after incorrect PIN entry End-to-End Encryption Zeroising Asset management Labelling RFID tag Customising your radio Revert radio settings to customisation settings Accessories Accessory profiles Belt Clip Shirt/Pocket clip Uniform stud Fitting an accessory SC21 Series hand-portable radio...
-
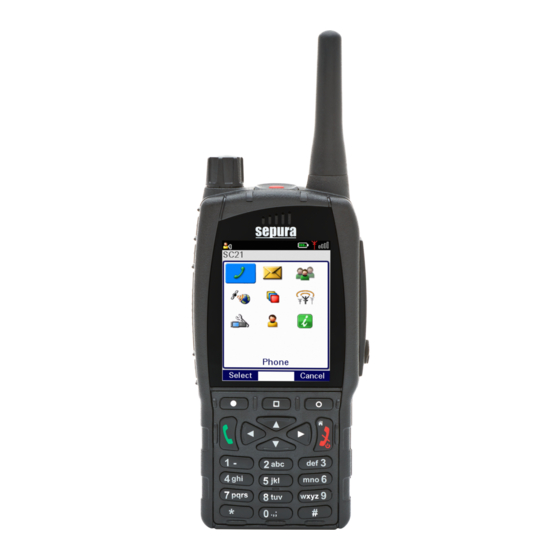
Page 9: Your Radio At A Glance
Your radio at a glance Item Description Emergency Button. Press and hold (2 seconds) to initiate an Alarm call. Antenna. Rugged Accessory Connector (sRAC). Provides connection for accessories. Centre context key (Groups, Status, Profiles). Press to activate the feature or option that appears directly above the key. - Page 10 Accessory attachment mounting points used to connect Klickfast accessories designed for securing the radio during use. Loudspeaker used during half-duplex calls when an audio accessory is not connected and the radio is held in the hand. SC21 Series hand-portable radio...
-
Page 11: Battery
Fit a new battery if there are any signs of damage. Warning! Risk to personal safety. Sepura TETRA radios have been tested and certified using Sepura approved batteries. The use of non-approved batteries may... -
Page 12: Charging The Battery
Battery chargers Only use Sepura approved battery chargers. Use of non-approved chargers may not fully charge the battery or damage it. Always read the user documentation supplied with the charger for additional safety instructions and how to use it. -
Page 13: Charging A 'Flat' Battery
Charging a 'flat' battery If the battery is completely 'flat' (without charge) during storage or after a long period of non-activity, it may fail to recharge or stop charging after 20 minutes. If this happens, disconnect and then reconnect the charger (or power off the charger, then power on) to reset the battery. NOTE: Do not charge a flat battery attached to the radio. -
Page 14: Using Sepura Approved Batteries
When the radio is powered on, it checks the authenticity of the battery. There are a number of battery management features that only work when a genuine Sepura battery is fitted to the radio, including: the remaining battery charge appears as a percentage when your radio is powered on [customisable];... - Page 15 If a non-Sepura battery is fitted, the Charge is reported as 0%, the battery is marked as Unauthenticated and the serial number is not shown. User Guide...
-
Page 16: Controls & Indicators
Open the top level menu from the Home screen. Repeated presses moves upwards through the options and menu levels until the top level menu is reached. Left/Right Moves between options on the top level menu. Moves through the text characters for selection when writing. SC21 Series hand-portable radio... -
Page 17: Soft Keys
NOTE: When the display is inverted (flipped upside down) the left and right navigation keys work in opposite directions. Soft keys Some keys on your radio may be customised to provide one-touch access to regularly used features. These programmable keys are referred to as soft keys. To activate the soft key function: assigned to a programmable soft key, press and release assigned to other keys (such as the Cancel/Home and Select/Send keys), press and hold for... -
Page 18: Status Icons
Icon Description Security and Emergency Emergency Appears when emergency operation mode is active on your radio and an Alarm call is in progress. Air Interface Encryption disabled Calls and Callouts will not be encrypted. SC21 Series hand-portable radio... - Page 19 Icon Description E2E Encryption enabled The Secure Communications icon indicates that the selected talkgroup is customised for End-to-End Encryption. In other words, calls you make by pressing the PTT button are End-to-End Encrypted. E2E Encryption disabled Indicates that the call is not encrypted. Key agreement Indicates that a cryptographic key agreement is in progress between the radio and the Key Management Centre (KMC) on the...
- Page 20 The radio turns off any visual and sound alerts, and displays this icon when covert operation mode is enabled. Group Focus Appears when Group Focus is enabled, preventing any calls from other talkgroups (other than the selected talkgroup) connecting to the radio. SC21 Series hand-portable radio...
- Page 21 Icon Description User Profile Appears when a user profile is activated. Your radio may be programmed for a number of user profiles. The number next to the icon indicates the chosen user profile. Communication Type Mismatch This icon appears when there is a mismatch in communications and is activated when: the radio is out of range of a gateway when another radio within range of the gateway is in a group call, and you...
-
Page 22: Led Indicators
If the radio is powered off, press and hold (3 seconds) to power on and initiate an Alarm Call. It may take several seconds for the radio to complete its power on process before initiating the Alarm call. SC21 Series hand-portable radio... -
Page 23: Getting Started
RSM) during operational periods. Transmitting without an antenna attached may damage the product. Your radio is designed for use with Sepura approved antennas. Always ensure that the seal between the antenna and the radio is maintained. -
Page 24: Fitting A Smartcard
Caution! Risk of damage to the radio. Do not over-extend the card holder in the open position as this can cause permanent damage. Power off the radio and remove the battery. 1. Using the handle recesses, carefully lift the card holder cover away from the radio with your thumb and forefinger. SC21 Series hand-portable radio... - Page 25 2. Slide the card holder left to unlock and then lift and pivot to open it. Insert the card. 3. Close and slide the card holder right to lock. 4. Refit the card holder cover. Apply even pressure to the cover to ensure it is firmly seated and seals the card compartment to retain the radio's IP rating.
-
Page 26: Power On
See Authentication on page 76. Transmitting in 3W RF is only available when using a Sepura 3W battery. During power on the radio checks the authenticity of the battery and whether it has the capacity for the radio to transmit 3W RF. -
Page 27: Locking And Unlocking The Keypad
Locking and unlocking the keypad To prevent accidental activity during operation, you can lock the keypad. This will also prevent access to the radio's functions if the radio is stolen. When the keypad is locked, the Key icon appears in the status line. The keypad can be locked manually or set to lock automatically after a period of inactivity. -
Page 28: Home Screen
Information area containing information that only appears on the Home screen. This is customised by your service provider or organisation. It may show date and time, your selected talkgroup, folder and network name (Mobile Network Code Alias). Context key options (available in the Home screen). SC21 Series hand-portable radio... -
Page 29: Shortcut Bar
Shortcut Bar You can easily access commonly used radio features such as your Inbox, and turn features on and off using the Shortcut Bar. The Shortcut Bar can contain up to 5 radio features and some of these can be paired with notifications to alert you to a missed call or a new message in your Inbox. To open the Shortcut Bar, in the Home screen press the Shortcut context key or the Up navigation key. -
Page 30: Menu
RF sensitive areas. Options Personalise your radio settings such as backlight, text size and language. Reset your radio to the last customisation, with options to keep personal data settings such as contacts in the phonebook. SC21 Series hand-portable radio... -
Page 31: Smartmenus
Icon Menu option User Profiles Select customised profiles designed specifically for the way you work. Help View help, such as a list of customised soft keys on your radio. SmartMenus SmartMenus are designed to provide quick access to regularly used radio features, usually with a common theme. - Page 32 Press Menu > Help. SC21 Series hand-portable radio...
-
Page 33: Emergency Operation
Emergency operation Emergency operation is available in TMO if the radio is in service. If your radio is operating in DMO when you make the emergency call, the radio switches to TMO before making the emergency call. If the radio cannot make the call in TMO, the radio automatically switches back to DMO to make the call. -
Page 34: Making An Alarm Call
TETRA Alarm call condition until the dispatcher clears the call from the system. When the Alarm call is cancelled, your radio returns to the talkgroup that was selected before the call was initiated. SC21 Series hand-portable radio... -
Page 35: Power On Alarm Call
Power on Alarm call If your radio is powered off, press and hold (3 seconds) the Emergency button to power on and initiate an Alarm call. Any customised Welcome screen is not displayed during power on. If your radio is customised for PIN entry, you will need to enter your PIN before the alarm call is initiated. It may take several seconds for the radio to complete its power on process before initiating the Alarm call. -
Page 36: Sound
If an earpiece accessory is connected, audio is routed to the accessory in both modes. When the radio is inserted in a car kit cradle, audio is routed to the car kit speaker in high audio mode and to the handset earpiece in low audio mode. SC21 Series hand-portable radio... -
Page 37: Whisper Mode
During incoming or outgoing emergency calls, audio is always routed to the radio's speaker. A full duplex call is always routed to the radio's earpiece. Whisper mode Whisper mode allows you to talk more quietly than normal but still be heard and understood by the person you are calling. - Page 38 2. Press Toggle or the Send/Select key to enable/disable it as required. 3. To return to the Display Settings menu press Back or the Cancel/Home key. To stop the radio vibrating when a voice call is received, press a Context key or the Select/Send or Cancel/Home key. SC21 Series hand-portable radio...
-
Page 39: Personalising Your Radio
Personalising your radio You can personalise your display settings (such as text size, backlight, inverting the screen and change languages) and create a personal phone book containing your own contacts. Invert the display When you are wearing the radio on your shoulder, attached to a belt or to a body vest, you may want to flip the display upside down to make it easier to read. -
Page 40: Day/Night Mode
Home screen with all other screens in Large mode. Custom displays the Home screen, menu and WAP browser in predefined text sizes set during customisation. Only the Home screen supports Very Large mode, with other screens set to either Normal or Large mode. SC21 Series hand-portable radio... -
Page 41: Setting The Display Language
NOTE: Depending on the customisation of the Home screen, if the date is shown on the Home screen it may be truncated in Very Large Mode. If the date format YYYY.MM.DD is used, then the day does not display. To change text mode: 1. - Page 42 Cancel or Cancel/Home key. List style highlight items using the Down and Up navigation keys. to open an item press Select to return to the top level screen press Cancel or the Cancel/Home key. SC21 Series hand-portable radio...
-
Page 43: Time And Date
Compatibility style (card) highlight items using the Left and Right navigation keys to open an item press Select to return to the top level screen press Cancel or Cancel/Home key. Time and Date Your radio can be customised to display the current time and date on the Home screen. The time is shown in 24 hour format. -
Page 44: Talkgroups And Folders
When your radio is powered on, if possible it re-selects either the default talkgroup or connects to your last selected talkgroup. SC21 Series hand-portable radio... -
Page 45: Special Folders
Special folders In addition to the ‘standard’ folders created to contain your talkgroups, your radio can be customised with Special folders. Special folders can only contain talkgroups (they cannot contain folders). Some Special folders are continuously scanned, and when ongoing calls are detected you can join in by pressing the PTT. -
Page 46: Talkgroup Selection Mode
UDSL folder ‘greys out’ (disables) talkgroups that are invalid for the current network. The scan list allows you to set scanning priorities on the talkgroups, so the radio can prioritise calls between the scanned talkgroups. See User Defined Scan Lists on page 42. SC21 Series hand-portable radio... -
Page 47: Typical Folder Arrangement
Typical folder arrangement The following illustration shows how the folders can be used to organise talkgroups: Selecting a talkgroup You can use one of the following methods to select a talkgroup: From the Home screen, press Groups. From the Menu navigate to the Groups menu. Use a soft key to return to your Quick Group. - Page 48 When the radio is customised to use the Left and Right navigation keys for talkgroup selection: 1. From the Home Screen, press the Left or Right navigation keys. The current selected folder and previous/next talkgroup folders appear in the talkgroup selection box. If customised you can scroll through the talkgroups continuously. SC21 Series hand-portable radio...
- Page 49 2. Use the Navi-knob to move between the folder levels (sub-folders). 3. Press the Select context key to attach to the talkgroup. Opening a folder 1. Select Menu > Groups > Folders. 2. Highlight a folder and press Open. To navigate back ‘up’ the folders list, press Back. Searching for folders and talkgroups You can search for talkgroups or folders by filtering on a text string.
- Page 50 Your radio can have a maximum of 20 UDSLs, and up to 10 talkgroups can reside within each UDSL. If you select a UDSL (in the same way as you select a talkgroup): SC21 Series hand-portable radio...
- Page 51 the talkgroups it contains are scanned, allowing your radio to receive calls from any of the talkgroups in the UDSL UDSL icon is displayed in the right hand corner of the radio display calls are made to the talkgroup designated as the 'selected talkgroup'. If there is no selected talkgroup in the UDSL, calls are made to the talkgroup with the highest priority.
-
Page 52: Folder Selection Mode
Selection box. Non-selectable folders and talkgroups, such as the Always Attached and the Background folders, do not appear for selection. The exception is the DGNA folder where a talkgroup from the folder can be selected, but the selected folder remains unchanged. SC21 Series hand-portable radio... - Page 53 All the TMO talkgroups within the selected folder that are scan-enabled and valid for the current network contribute to the scan list that the radio uses to prioritise calls. If a talkgroup is editable can change its scan state (to enable or disable scanning), change its scanning priority (see Scanning talkgroups on page 48) and select or deselect it.
- Page 54 The selected talkgroup within each folder only becomes your requested talkgroup when the folder is selected. Depending on the customisation of your radio, you will use one of the following methods to change the talkgroup. You can only select a talkgroup that is editable. SC21 Series hand-portable radio...
- Page 55 To select a talkgroup from the folder: 1. From the Home screen, press Groups to open the current folder. The selected talkgroup within the folder is indicated by the icon. 2. Scroll to the talkgroup you want as your requested talkgroup and press Select. Selection is indicated by the icon.
- Page 56 The scan priority appears on the left of the talkgroup as a series of bars (more bars indicate higher priority). If the scan state is enabled the icon appears in the right-hand corner of the scan priority icon. Symbol Priority Low priority scanned Low priority not scanned SC21 Series hand-portable radio...
- Page 57 Symbol Priority Medium priority scanned Medium priority not scanned High priority scanned High priority not scanned Background talkgroup not scanned Background talkgroup scanned To scan a talkgroup: 1. From the Home screen, press Menu then select Groups > Folders to open the current folder.
- Page 58 2. Select the folder you want to assign to a Quick Folder. Press Options, scroll to the Set Quick Folder option and press Select. 3. Scroll to the Quick Folder (Folders 1 to 5) you want to assign this folder to and press Select. SC21 Series hand-portable radio...
- Page 59 To view your Quick Folders: 1. Select Menu > Groups > Quick Folders. Select the Folder (1 to 5 depending on customisation) and press Select to view the folder assigned as this Quick Folder. Scanning ON/OFF Scanning of talkgroups (those that are always scanned or are background talkgroups) in the current selected folder and the Background folder can be enabled and disabled.
-
Page 60: Contacts
All non- matching entries are listed below the dotted line. Spaces in a search string ‘split’ it into separate strings. Search attempts to match each string in sequence. SC21 Series hand-portable radio... -
Page 61: View Contact Details
To search for contacts and numbers within the phone book: 1. Select Menu > Phone > Contacts. Navigate to the Search folder. 2. Press the Up navigation key to open the Search Bar. 3. Enter a search string (see Text entry on page 66) and press the Search context key. 4. -
Page 62: Editing Contacts
2. Make changes: to add additional digits press the number keys; to delete digits press the Left navigation key. 3. After making changes press Save. To delete a contact: 1. Select the contact and press Open. 2. Press Options. 3. Select Edit > Delete contact, then press Select. SC21 Series hand-portable radio... -
Page 63: Delete All Contacts
Delete all contacts You can delete all contacts in your Personal folder. You can also delete individual contacts or numbers associated with them, see Editing contacts on the previous page. To delete all contacts 1. Select Menu > Phone > Contacts. 2. -
Page 64: Calls
The various types of voice and data calls that are supported by your radio, and the acoustic and visual alerts that accompany a call, depend on your radio's customisation. Call types Sepura radios support the following voice- and data call types: Voice call types Voice call type... -
Page 65: Call History
Voice call type Description Smart Call A special individual call made in Smart Call mode which allows you to make group or broadcast calls to specific talkgroups without the need to notify the network about the talkgroup change. Smart Call mode is initiated from a configured soft key. Smart call priority can have a call priority value from 0 (undefined) to 15 (pre-emptive priority 4, emergency) in TMO and to a value from 0 (undefined) to 3 (Emergency pre-emptive priority call) in... -
Page 66: Group Calls
The LED changes to solid green whilst the group call is active and your radio status text changes to ‘Group Call’. 3. When you have finished your call, press the Clear context key. You can also clear the group call by pressing: Clear Call soft key (if customised) Cancel/Home key SC21 Series hand-portable radio... -
Page 67: Individual Calls
Receiving a group call When a group call is received, the LED flashes red and your radio status changes to ‘Group Call’. The name of the talkgroup, talkgroup folder and the caller’s ID are displayed. When the LED changes to solid green (after a few seconds) you can respond to the call. Individual calls Individual calls (point-to-point) are private calls between you and one other person. - Page 68 2. Press Send or press the Select/Send key to initiate the call. 3. To end the call, press Clear. If your radio has been customised with a single dial mode for TETRA, PBX and PSTN numbers, the dial mode icon cannot be changed. SC21 Series hand-portable radio...
- Page 69 Calling a contact directly: When the radio is customised with this feature, a call can be made to a contact without having to select a specific number, by pressing the Select/Send key. 1. Navigate to a contacts folder (such as the All folder) and select your contact as normal. 2.
-
Page 70: Broadcast Calls
You initiate a Smart Call by switching to Smart Call mode, then you press the PTT to transmit to a chosen talkgroup in the Smart Call Folder. Broadcast calls cannot be made from a radio which is in DMO. Attempting to make a Smart Call in DMO initiates a group call to the attached talkgroup. SC21 Series hand-portable radio... -
Page 71: Modifying Your Call Setup
Make a Smart Call 1. Open the Smart Call menu either of the following: Press a preconfigured soft key. Use the Speech Call Settings menu (see Speech call settings below. 2. Select mode Smart Call A or Smart Call B. Your radio goes into Smart Call Mode. -
Page 72: Changing The Behaviour Of The Ptt During Tmo Group Calls
To set the PTT behaviour using the menu: 1. Select Menu > Options > Settings > PTT Behaviour. 2. Select the PTT behaviour (To received group or To selected group), then press the Select context key. SC21 Series hand-portable radio... - Page 73 To change the PTT behaviour during a group call: 1. When the group call is in progress, press the PTT context key. Select the PTT behaviour and press the Select context key. Alternatively, you can change the PTT behaviour during a group call by pressing the Options context key, then selecting the PTT Behaviour option.
-
Page 74: Text Entry
Press the Right or Left navigation key. time Move to the start of a Press the Up navigation key. sentence Move to the end of a Press the Down navigation key. sentence Add a space Press the 1 key. SC21 Series hand-portable radio... -
Page 75: Character Sets
Character sets You can use character sets to change the style of the text, and to enter numbers and special characters. The character set can be changed as often as required when entering text. The following character sets are supported: Character set Description Auto-capitalisation (Abc) -
Page 76: Messages
Open the Shortcut Bar (in the Home screen press the Shortcut context key or the Up navigation key) then navigate to the Inbox shortcut and press the Select context key. Message icons Various icons are used to identify the type of message received: SC21 Series hand-portable radio... -
Page 77: Opening Messages
Icon Description Status message SDS message (unread) SDS message Broken message: there was a problem receiving the message. Its contents are lost or damaged. Saved Messages is nearly full to capacity [customisable] SDS message with Paging Alert (unread) SDS message with Paging Alert Picture message (unread) Picture message Inbox operations... -
Page 78: Reply To A Message
4. When you have finished, press Send. 5. Select a recipient: a. Send to Default—send to message sender b. Send to Group—send to your current talkgroup c. Phonebook—send to a contact in your phonebook 6. Press Send. SC21 Series hand-portable radio... -
Page 79: Saved Messages
Open a URL in a message Open the message then select Options > Open URL. A text message may contain a URL which you can open in the WAP Browser. If your radio has been customised to do so, URLs in text messages can open automatically in the WAP Browser when they are received. - Page 80 For setting default destination see Set default destination on page 70. 1. Choose one of the following methods: Select a saved text message Select a status message from the Send Status List Create a text message SC21 Series hand-portable radio...
- Page 81 2. Select Send or Options > Send. 3. Select a destination (see below): Send to default destination Select Send to Default then select Send. The message is sent and the radio returns to the message screen. Send to current talkgroup 1.
-
Page 82: Sds Report Request
Dial to enter the required number directly from the radio keypad. 4. Press Save or the Select/Send key to save the number (or press Cancel or the Cancel/Home key to cancel it and return to the previous number). SC21 Series hand-portable radio... -
Page 83: Picture Messages
Picture messages Picture messages Your radio can receive picture messages which may have accompanying text. You may also be alerted by an alarm (if specified in the message) and vibration and LED alerts (if customised). (You cannot reply to or forward a picture messages.) You can press any key to stop the audible alarm. -
Page 84: Networks
If a talkgroup is selected that does not belong to the current network, your radio will change network accordingly. After switching to a different network, make sure that your selected talkgroup is valid for that network. For details of talkgroup selection see Talkgroups and folders on page 36. SC21 Series hand-portable radio... -
Page 85: Transmit Inhibit
Your radio can be configured to display the Network Name continuously on the Radio Status Line (RSL), subject to space, when it is idle. If your radio registers on a Visited Network network the Migrated icon is displayed in the Radio Status Line (RSL). -
Page 86: Adjusting The Dmo Power Transmission Level
When your radio leaves Fallback Mode: the radio status bar returns to normal (Ready… or similar) RSSI antenna icon stops flashing the tri-colour LED stops flashing a text box pops up indicating normal operation. the radio generates a warning tone. SC21 Series hand-portable radio... -
Page 87: Operating Modes
Operating Modes Your radio supports the following operating modes: In Trunked Mode Operation (TMO Mode) your radio operates on the network infrastructure supplied by your service provider. In Direct Mode Operation (DMO Mode) your radio can transmit directly to another radio (antenna to antenna). - Page 88 DMO Mode and the Communication Mismatch icon is displayed to all members of the talkgroup to indicate that there may be members of the talkgroup who cannot take part in the call. SC21 Series hand-portable radio...
-
Page 89: Repeater Mode
DMO options You can select the following DMO options: Presence Check Specify whether Presence Checking is performed before DMO Individual calls are made. When Presence Checking is On your radio checks whether the intended receiving radio is available and in radio contact before it attempts to set up the call. - Page 90 A and B are in range of the repeater. Because of its location, the repeater can pass communications between A and B even though they cannot communicate directly. What repeaters cannot do In Repeater Mode the radio cannot: SC21 Series hand-portable radio...
- Page 91 make individual calls take part in another group call send status or SDS messages use the Quick Status feature edit text use the phonebook view the library of pre-defined Status messages Participating in repeated calls A radio in Repeater Mode may (depending on its customisation) operate either as a Standard Repeater or as a Repeater with Call Participation.
- Page 92 The repeater has detected that the DMO channel is being used. In this case repeater operation is suspended. In Call: Repeater A call is in progress through the repeater. Talk Repeater Participating in a call and transmitting SC21 Series hand-portable radio...
-
Page 93: Callout Alerts
Callout alerts Your radio can receive Callout Alerts sent over the network to inform you of incidents. When a Callout Alert arrives the radio sounds an audible alarm and a Callout message is displayed on the screen. To silence this alarm press any key. A voice call may also be initiated. Your radio may also be customised to alert you of Callouts in other ways (such as vibrator alert and/or a flashing LED alerts). - Page 94 Callout is to a group or an individual whether the Callout is incoming or outgoing whether or not the Callout is End-to-End Encrypted User Response Allows you to compose and send a free-form text message to the originator of the Callout. [customisable] SC21 Series hand-portable radio...
- Page 95 Callouts not requiring a response Some Callouts do not require a response. You can respond to or ignore then as follows: Exit Press the Exit context key to exit the Callout and exit, and return to the top level screen. No response message is sent.
- Page 96 During Protected Callout Mode you can only do the following: Read the current alerting message Acknowledge the Callout alert Make an Alarm Call Switch Transmit Inhibit on/off SC21 Series hand-portable radio...
-
Page 97: Callout Display
Make a Quick Call (if customised as a higher priority than Callout) Switch on Man Down React to the Lone Worker prompts. The Lone Worker alarm operates if you do not react. Switch the radio off using the Mode key No calls—apart from group calls allowed by some Callouts—received while your radio is in Protected Callout Mode are connected but their details are saved. - Page 98 Callout Test message, user response is required. The identity of the sender is displayed instead of the Callout group. Callout Test message, user response has been sent. The receiving radio and the Callout originator both have End-to-End Encryption active. SC21 Series hand-portable radio...
-
Page 99: Group Calls To Callout Group
Icon Description Either the Callout originator or the receiving radio has End-to-End Encryption switched off. The Callout is addressed to an individual. The Callout is addressed to a group. Left and Right navigation keys left and right arrow icons are displayed between the Context keys during Protected Callout Mode when there are more options than are shown on the Context keys. - Page 100 Callout Alert the Callout ID icons to show: whether the Callout is to a group or an individual whether the Callout is incoming or outgoing whether or not the Callout is End-to-End Encrypted SC21 Series hand-portable radio...
-
Page 101: Features
Features Your radio can be customised for various advanced features and can have various soft keys assigned to frequently used features. Privacy Screen Your radio can be customised to display a picture when the screen is inactive for a specified period of time. -
Page 102: User Profiles
The profile sets your radio so that no incoming calls are allowed except calls from the current talkgroup (Group Focus above). Covert Mode operation is active. Audible alerts are disabled. If this profile is selected you cannot select Transmit Inhibit (see Transmit Inhibit on page 77 SC21 Series hand-portable radio... -
Page 103: Man Down
Connector Protector This user profile activates the Connector Protector feature when working in salt water environments. See Connector Protector on page 93. Man Down Man Down is a licensed customisable feature which uses motion sensors to detect motion in three dimensions. When your radio is powered on it stores it's current angle of inclination (orientation). If it moves more than a customised angle from the original inclination or is stationary for more than a customised length of time, the radio sounds an alarm and displays a ‘Man Down Alarm’... -
Page 104: Lone Worker
To enable Lone Worker, scroll to a user profile which has Lone Worker enabled, then press the Select context key. See User profiles on page 94. To disable Lone Worker mode, repeat the process and choose a different user profile. SC21 Series hand-portable radio... -
Page 105: Wap
Your radio may be configured to browse WAP websites. The browser options are customised using Radio Manager. Starting the WAP browser To open activate the WAP browser: press the Up navigation key (or Shortcut) to open the Shortcut Bar, then select WAP Homepage OR select the WAP option from the Applications menu OR press a programmed soft key [customisable] OR... -
Page 106: Navigation Menu
Forward/Back Use these options to move to the next or previous page in the History (if more than one page is stored in History). Reload Reloads the current page. SC21 Series hand-portable radio... -
Page 107: Settings
Settings Selecting Settings from the Browser menu provides access to the Advanced settings. Advanced Settings Homepage Select this option to set the Home page. You can enter a new Home page URL and set it as the current and default home page. Downloads You can disable or enable the downloading of images, background sounds and objects when downloading information from a website. -
Page 108: History Menu
If more than nine pages have been viewed, the list of all pages in the History is stored and may be accessed by selecting the ‘More…’ option. Press the Left context key, or the star (*) or hash (#) key, to open the ‘More’ page(s). SC21 Series hand-portable radio... -
Page 109: Using Bookmarks
Exit history Select this option to exit History and resume browsing at the page which was selected when the History Menu was chosen. Show URL Select this option to display the currently selected URL. Delete Select this option to delete the history. Using bookmarks A bookmark consists an internet address, the book mark title, and access point (and a user name and password if required by the web page). -
Page 110: Call Handling
When an individual call is received while the browser is active, the call information box is visible on top of the browser and you can answer the call. If an Alarm Call is received the browser closes and SC21 Series hand-portable radio... - Page 111 the radio displays the Home screen, allowing you to respond to the call. You can still make a group call attached to a talkgroup but not a telephone type call whilst the browser is open. SDS messages If an incoming SDS message is received while the browser is active and the message is marked for immediate display then the browser will close and the SDS message is displayed.
-
Page 112: Location Services
Age shows how long ago the position was first displayed; to refresh the reading press Locate again. GPS/BeiDou2 shows the number of satellites used in the selected system. Note that the name of the selected GNSS is customisable. SC21 Series hand-portable radio... -
Page 113: Direction
Direction To read the direction in which your radio is travelling 1. Select Menu >GPS > Direction. The Direction screen gives information about the current direction and speed of travel. If the radio is stationary no information is displayed. However if the radio becomes stationary after a period of movement the direction information is displayed for five seconds to give you time to view it. -
Page 114: Bluetooth
A device only needs to be paired with the Sepura radio the first time it (the device) is used. The pairing is remembered until the device is deleted from the list of paired devices. -
Page 115: Audio Devices
Stop. (Press Cancel to abandon searching and delete any devices found.) Tip! If a device is not found, check that the data device is powerswitched on, is set to the discoverable (visible) state and is close enough to your Sepura radio before attempting a new search. - Page 116 Tip! If a device is not found, check that the data device is powerswitched on, is set to the discoverable (visible) state and is close enough to your Sepura radio before attempting a new search. The method of pairing the devices will depend on the Bluetooth® capability of the connecting device: Devices that do not support SSP will pair automatically if it has a passcode of 0000.
-
Page 117: Data Devices
Data devices You can pair your radio with data devices such as a laptop or PDA. When you pair to a data device it 'discovers' your radio. To pair with an incoming data device: 1. Press Menu then select Options > Bluetooth > Devices. 2. -
Page 118: Modify Connected Devices
Stop. Press Cancel to abandon searching and delete any devices found. Tip! If a device is not found, check that the data device is switched on, is set to the discoverable (visible) state and is close enough to your Sepura radio before attempting a new search. - Page 119 To edit a device name: Select Edit to rename different devices of the same type to make it easier to distinguish between them. To delete a device: Select Delete Device to delete the device from the list of paired devices. User Guide...
-
Page 120: Security
If you enter the PIN incorrectly 3 times, the radio will become locked. To unlock your radio you will need the radio's Master Reset PIN (or PUK) that consists of 8 digits. The default PIN is 00000000 but this can be changed by your Communications or Security Manager. SC21 Series hand-portable radio... -
Page 121: End-To-End Encryption
To unlock the radio: 1. Enter your 8 digit Master Reset PIN. 2. Press Confirm or the Select/Send key. If you enter the Master Rest PIN incorrectly, you need to wait at least 5 seconds before attempting to enter the PIN again. If the Master Reset PIN is successful, the radio reverts back to the last known PIN. -
Page 122: Zeroising
(zeroise) these cryptographic keys if permitted by your operational procedures. Please refer to your Security Officer for details on how to zeroise your radio as well as related operational procedures. SC21 Series hand-portable radio... -
Page 123: Asset Management
(those with an adhesive backing) are recommended as they are easy to apply and commercially available, such as 3M™ Thermal Transfer Polyester label material 7815. Your radio and Sepura battery provide an area for attaching an asset label. Placing the label here will prevent it interfering with the way the product is used. -
Page 124: Rfid Tag
A complete set of parameters for your radio is called a customisation. Radios can be customised either in bulk, by fitting them into a Sepura programming pod which can accommodate 4 or 8 radios at a time, or individually by directly connecting them to a computer running Radio Manager 2 software using a Sepura Data/Programming Cable. -
Page 125: Revert Radio Settings To Customisation Settings
To program a single radio A data/programming cable, with either an RS232 (D-type) connector or a USB connector, is available from Sepura for customising a single radio. A data/programming cable, with either an RS232 (D-type) connector or a USB connector, is available from Sepura for customising a single radio. - Page 126 3. Confirm the request to revert the radio settings to the last customisation. Press the Select key. On completion of the revert process, the radio will reboot. SC21 Series hand-portable radio...
-
Page 127: Accessories
Only use Sepura approved accessories with your radio. Sepura products have been tested to meet strict guidelines for personal safety and operational conditions. The use of non-approved accessories may damage the product, will result in the non-compliance with regulatory requirements, compromise the product safety ratings, and will invalidate the product warranty. - Page 128 If an accessory is removed and then an accessory of the same type is attached before power on, that has a different accessory profile, you must remove the accessory and then re-attach it, or press a customised soft key to open the Accessory Profile screen. You can then select a profile for the accessory. SC21 Series hand-portable radio...
-
Page 129: Belt Clip
Belt Clip The belt clip (part no. 300-01923) is used to attach the radio to your belt. The clip is fitted to the mounting clip attachment points on the back of the radio. You do not have to remove the clip before charging the battery. The radio can be inserted into any of the SC21 battery chargers with the battery and belt clip attached. -
Page 130: Shirt/Pocket Clip
1. Using a PZ1 screwdriver attach the shirt/pocket clip to the two attachment points as shown. Do not over tighten MAX 45 Ncm PZ1 x 2 Removing the shirt/pocket clip 1. Using a PZ1 screwdriver remove the shirt/pocket clip from the two attachment points. PZ1 x 2 SC21 Series hand-portable radio... -
Page 131: Uniform Stud
Uniform stud The uniform stud (part no. 300-01832) allows quick, easy docking and locking of the radio into any of the positions provided by the ratchet system. The stud is used together with the available Klickfast dock kit that provides attachments for various types of belts (clothing) and locker or car dash board mountings. -
Page 132: Fitting An Accessory
1. Connect the cable to the radio by inserting the hook on the connector into the slot as shown. 2. Secure the accessory in position by pushing down and rotating the screw clockwise 90°. Do not over tighten. SC21 Series hand-portable radio... - Page 133 @sepuraplc www.instagram.com/sepuraplc www.youtube.com/sepuraplc Contact Details Sepura Limited 9000 Cambridge Research Park Beach Drive, Waterbeach Cambridge, CB25 9TL United Kingdom www.sepura.com...
Need help?
Do you have a question about the SC21 Series and is the answer not in the manual?
Questions and answers