Table of Contents
Advertisement
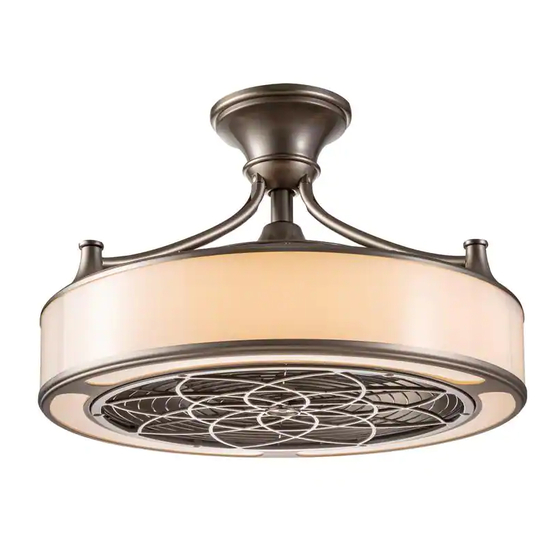
Item # 000-000
Model # SFL-550L1, SFL-550L2, SFL-550L3, SFL-550L4
USE AND CARE GUIDE
22 in. LED Indoor/Outdoor Ceiling Fan with Remote Control
120V 60Hz 0.61A
Weight of the fan with light kit: approx. 20.86lbs
Questions, problems, missing parts? Before returning to the store,
call Home Decorators Collection Customer Service
,
8 a.m. - 7 p .m. , EST, Monday - Friday, 9 a.m.- 6 p .m. , EST, Saturday
1-800-986-3460
HOMEDEPOT.COM/HOMEDECORATORS
THANK YOU
dor/Outdoor
Ceiling Fan with Remote Control . We strive to continually create quality products designed to enhance your home. Visit us online to see our
full line of products available for your home improvement needs. Thank you for choosing Home Decorators Collection!
Advertisement
Table of Contents

Related Manuals for Home Decorators Collection SFL-550L1


Summary of Contents for Home Decorators Collection SFL-550L1
- Page 1 Ceiling Fan with Remote Control . We strive to continually create quality products designed to enhance your home. Visit us online to see our full line of products available for your home improvement needs. Thank you for choosing Home Decorators Collection!
-
Page 2: Table Of Contents
Table of Contents Table of Contents ........2 Package Contends . -
Page 3: Warranty
Warranty 1-YEAR LIMITED WARRANTY WHAT IS COVERED The manufacturer warrants this product to be free from manufact uring defects in the material and workmanship under norchaser.mal use for a period of one year after the date of purchase by the original purchaser. WHAT IS NOT COVERED This warranty does not cover transit damages. -
Page 4: Package Contends
Pre-Installation (continued) PACKAGE CONTENTS Part Description Quantity Mounting bracket assembly* Pivot ball/downrod assembly Canopy* Canopy screw cover ring* Center arm support Decorative legs Motor housing cap Fan assembly Remote receiver Remote control Remote control wall mount Remote control AAA batteries Center arm support cover** *For packing purposes, the mounting bracket assembly, canopy, and caopy screw cover ring are assembled together. -
Page 5: Tools Required
Pre-Installation (continued) TOOLS NEEDED Step ladder Adjustable wrench Phillips screwdriver Wire cutters/Strippers Flat head screwdriver HARDWARE INCLUDED Part Description of Enclosed Installation Hardware Quantity Canada installation hardware bag Phillips cap screws Phillips cap screw covers HOMEDEPOT.COM/HOMEDECOR Please contact 1-800-986-3460 for further assistanc... -
Page 6: Installation
Installation INSTALLING THE CEILING FAN MOUNTING BRACKET ASSEMBLY shock, or personal injury, turn off power to room and wall switch by removing fuses or turning off circuit breakers as needed before beginning The mounting bracket assembly, canopy, and the canopy installation. - Page 7 Installation (continued) Remove any existing ceiling fan or light where you PREPARING YOUR CEILING FAN intend to install this ceiling fan. Verify the existing outlet box is marked acceptable for fan support up to FOR MOUNTING 35 lbs. and that it is securely fastened to the ceiling joists.
- Page 8 Installation (continued) Remove the screw and star washer securing the ground Thread the downrod into the motor housing until it bottoms wire terminal to the downrod. Remove the wire and set out, then back it out until the hole in the downrod aligns aside.
- Page 9 Installation (continued) Carefully feed the fan’s electrical wiring through the This step is needed only if you are installing your ceiling fan motor housing cap, then install the cap as shown. using an extended-length downrod (not provided) and have installed the center arm support from the previous step. If you are using the downrod provided in this package, or if you are using an extended-length downrod but chose not to install the center arm support, skip this step and proceed...
- Page 10 Installation (continued) Reinstall the retainer pin in the downrod. Carefully feed the fan’s electrical wiring through the pivot ball, then reinstall the pivot ball on the downrod with the flat side facing the ceiling. DOWNROD PIVOT BALL RETAINER PIN DOWNROD FLAT SIDE UP For Canada installations, refer to the Canada Installation Addendum and install the support...
- Page 11 Installation (continued) HANGING THE CEILING FAN Verify the DIP switches on the receiver and the remote control are both in the same configuration. NOTE: The switches can be adjusted as needed to avoid WARNING possible interference with other remote units in your home, Once you begin the process of hanging the ceiling but always make sure that the same configuration fan, do not leave the fan unattended until the...
- Page 12 Installation (continued) MAKING THE ELECTRICAL CONNECTIONS MOUNTING BRACKET WARNING Verify the power has been disconnected to both the BLACK room and the wall switch before making the GROUND electrical connections. Failure to do so could CONDUCTOR WHITE or death. NOTICE: BLACK GREEN/ When shipped, the electrical wires from the ceiling fan...
- Page 13 Installation (continued) Place the receiver into the top of the mounting bracket Lift the screw cover ring up over the screws and twist with the flat side facing the ceiling. Tuck the receiver counterclockwise to secure in place. antenna and all wiring up into the mounting bracket, making sure the wires don’t become pinched.
- Page 14 Installation (continued) NOTICE: Finish the assembly by screwing the finial screw on each arm The decorative arms in the next two steps are not into the threaded holes in the top lens cover. required for fan operation. You may skip these two steps if you do not wish to install the decorative arms.
-
Page 15: Operation
Operation USING THE REMOTE CONTROL To mount the remote control holder: Remove the screw cover from the remote control holder. NOTE: If you have not already done so, restore Install the remote control holder in the desired location power to the room and wall switch, then make using the two mounting screws provided. - Page 16 Operation (continued) SETTING THE AIRFLOW DIRECTION In cooler weather, choose the UP position to provide an upward direction of air travel. This will help circulate warm air off the ceiling and back down into the room. will enhance the fan’s performance and make its use DIRECTION SWITCH use the direction switch on top of the ceiling fan’s IN UP POSITION...
-
Page 17: Maintenance
Maintenance GENERAL CARE AND CLEANING RECESSED AREA Due to the natural movement of a ceiling fan, connections ON MOTOR SHAFT can become loose over time. Check all the ceiling fan’s connections (not including the electrical connections) at least twice a year. The fan has permanently lubricated sealed bearings, t herefore no further lubrication is required. - Page 18 (1) This device may not cause harmful interference, and (2) this device must accept any interference received, including interference that may cause undesired operation. The following responsible party designated in FCC §2.909 is responsible for this declaration: Model Number: SFL-550L1, SFL-550L2, SFL-550L3, SFL-550L4 Company Name: CM Development Inc.
-
Page 19: Troubleshooting
Troubleshooting WARNING Turn off power to room and wall switch by removing fuses or turning off circuit breakers as needed before attempting any repairs to the ceiling fan or the electrical connections. Failure to do so can cause serious personal injury. Problem Solution Wall switch is turned off.
Need help?
Do you have a question about the SFL-550L1 and is the answer not in the manual?
Questions and answers
The light strip flickers. Can I replace the light strip on this SFL-550L1.
Hello, I purchased 2 of the Home Decorators Collection SFL-550L1 fans and installed them somewhat close to each other. How do I change the remote control setting so that the settings don't interfere with each other?