
Related Manuals for Pudu BellaBot BL100


Summary of Contents for Pudu BellaBot BL100
- Page 1 V1.2 User manual BL100、BL110、BL101 PuduTech Copyright © 2020 Pudu Technology Inc. All Rights Reserved.
-
Page 2: Table Of Contents
Copyright © 2020 Pudu Technology Inc. All Rights Reserved. Safety Instructions Without the express written permission of Pudu Technology Inc., no unit or individual may imitate, reproduce, copy or translate the contents of this manual in part or in whole, the dissemination by any means (electronic, photocopying, recording, etc. -
Page 3: Instructions For Use
Safety Instruction Service functions Map settings Instructions for use Voice settings 1. DO NOT place any item with weight over the load of the tray: 10kg/tray(standard), Speed settings 5kg/tray(obturated) 2. Click Finish to deliver the next task immediately, please take the food before clicking LED dot-matrix setting Finish. -
Page 4: Environmental Notes
User Manual User manual User Manual User manual Environmental notes 1. The robot is suitable for use in flat environments such as floors, tiles, and thin carpets, it is not suitable for use in environments where there are steps, the slope is too large, or the environment is too tight. -
Page 5: Power And Power Requirements
User Manual User manual User Manual User manual Power and power requirements 9. There is a 35cm space between the two robots placed side by side at the standby point, and a clearance of 15cm from the rear wall and 35cm from the side wall. 1. -
Page 6: Safety Instructions
User Manual User manual User Manual User manual 14. Do not place the machine near flammable and explosive objects to charge. 10. To push or move the robot while it is moving, first tap the screen to pause it. 15. The storage and charging position of the robot should be kept dry and at normal 11. -
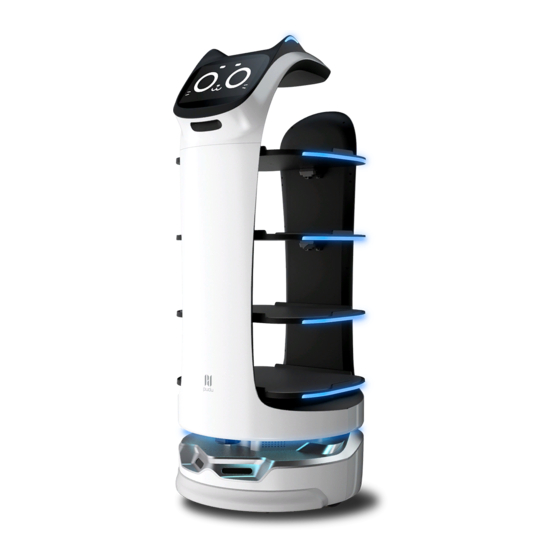
Page 7: Product Composition
Product Composition User manual User Manual User manual Performance parameters Component description Model BL100、 BL110、 BL101 Operating voltage DC 23-29.4V Power input AC 100-240V, 50/60Hz [1] Vision positioning Power output sensor 29.4V-4A [2] Screen Charging time 4.5h [3] Depth vision sensor Battery lifetime 13~24h [4] Lidar... -
Page 8: Tray Size And Height
User Manual User manual User manual User Manual User manual Tray size and height Layer height between trays: 180mm Layer height between trays: Layer height between trays: 220mm 200mm Tray size: Layer height between trays: Tray size: 220mm 410X500mm Layer height between trays: 355X453mm 200mm Layer height between trays:... -
Page 9: Product Use
Product Use User manual User Manual User manual Power ON, Power OFF, Pause, Start Charging instructions Before each power-on Charging mode: Connect the charging interface of the robot to the charging cable to Move the robot directly below the visual mark ensure that the charging port of the robot is connected to the charging cable, if the before each power-on. -
Page 10: Mode Selection
User Manual User manual User Manual User manual Mode selection Pause While the robot is running, touch the screen to In order to be applicable in different business scenarios, the modes can be selected as make the robot pause. required. The robot provides six mode selections, which are food delivery mode, cruise mode, direct delivery mode, B-day mode, special mode, and used plate collection mode. -
Page 11: Delivery Mode
User Manual User manual User manual User Manual User manual User manual Food delivery mode Direct delivery mode In this mode, the robot can perform a one-way transport operation, you can set a table The food livery mode is a common mode, and the task delivery method is used for food number, a dishwashing room or other places as the destination, after the delivery, the delivery to a designated location, the specific steps are as follows: robot will automatically exit the task and will not return to the pick-up position, then you... -
Page 12: Cruise Mode
User Manual User manual User Manual User manual 7. At the task destination, the robot will 5. When picking up the food, please stand 91 % have a voice prompt to the guests that the in front of the robot or touch the robot food has arrived, and the guest can tap the display screen, the robot stops running, Delivered... -
Page 13: Direct Delivery Mode
User Manual User manual User Manual User manual 5. The robot quickly arrives at the designat- 4. During the motion process, you can click 91 % 91 % ed location according to the established the robot screen, and the robot will stop trajectory. -
Page 14: Special Mode
User Manual User manual User Manual User manual Special mode 3. Select the background music used for the service, and choose the table number The special mode is used for food delivery services with robot in special scenario, you can for the food delivery. -
Page 15: Alarm Display
Service functions User Manual User manual Alarm display Map settings In the following cases, the robot will stop working and give an alarm tone, the tablet interface will prompt the corresponding instructions, and the machine will need your assistance. In the “Map settings” function, you can select from multiple maps. In the robot one-to-one parking mode, select the current map to configure the parking position for the robot. -
Page 16: Speed Settings
User Manual User manual User Manual User manual Version upgrade The operating steps for custom settings of cruise voice are as follows: 1. Select “Add voice” to pop up the voice With the “Version upgrade” function, you can check the current version and whether it is 91 % Set up text editing box, enter the text to be... -
Page 17: Music Function
User Manual User manual User Manual User manual Music function Parking instructions Select the “Music” switch to control the playback and start of the music. Depending on the size of the restaurant, there are three robot parking options available. 1. One-to-one parking: fixed parking locations can be set for each robot. 91 % Music Turn on/o music... -
Page 18: Instructions On Touch Interaction
Product Maintenance User Manual User manual Instructions on touch interaction Trays, drive wheel and auxiliary wheel In the non-moving state of the robot, the user can touch the robot's head or ears to achieve touch interaction with it. Keep the tray clean and clean with a clean cotton cloth,Please check for cleaning at least once a week.when the bottom wheel is entangled or stuck by debris, the robot needs to 1. -
Page 19: Troubleshooting
4. Provide valid proof of purchase, documents; Robot can't boot normally 5. Damaged spare parts replaced during the free warranty period are owned by Pudu Technology and should be returned as requested by Pudu Technology, otherwise Pudu Technology reserves the right not to grant free warranty service. -
Page 20: After-Sales Service
We have the right to reject the customer's replacement request in the following situations The product receipt date recorded by Pudu's after-sales service system is used as the 1. Cannot provide legal purchase vouchers or documents when exchanging goods, or warranty start date. - Page 21 12 months After-sales service cost standard Flash button 24 months For after-sales services not covered by the free warranty, you need to fill in the Pudu Chassis shell 6 months Technology After-Sales Record Form in accordance with the requirements. Pudu's...
Need help?
Do you have a question about the BellaBot BL100 and is the answer not in the manual?
Questions and answers