
Related Manuals for Haivision MB6

Summary of Contents for Haivision MB6
- Page 1 MB6 and MB21 Multichannel Chassis Installation Guide v2.0 HVS-ID-IG-MB6-MB21-20 Issue 01...
- Page 2 Haivision. The information in this document is subject to change without notice. Haivision assumes no responsibility for any damages arising from the use of this document, including but not limited to, lost revenue, lost data, claims by third parties, or other damages.
-
Page 3: Safety Guidelines
être accessible à tout moment. WARNING The installation of the equipment must comply with local and national electrical regulations. ATTENTION L'installation de l'équipement doit être conforme aux réglementations électriques locales et nationales en vigueur. MB6 and MB21 Multichannel Chassis Installation Guide, v2.0, Issue 01... -
Page 4: Emc Warnings
Notice with respect to Class A (FCC) Changes to equipment without the permission of Haivision may result in its failure to comply with the FCC requirements for Class A digital devices. If applicable, your rights to use the equipment may be limited By the FCC rules and you may be able to remedy, at your own expense, any interference with radio or television equipment. -
Page 5: Safety Instructions For Class A For Cispr22
WEEE, are labeled with the above symbol, and customers are encouraged to responsibly recycle their equipment at the time of disposal. Haivision also offers its customers the option of returning Haivision equipment to facilitate its environmentally sound disposal. -
Page 6: Table Of Contents
MB6 Chassis Indicators and Alarms ........ - Page 7 For More Information ............28 MB6 and MB21 Multichannel Chassis Installation Guide, v2.0, Issue 01...
-
Page 8: Introduction
For installations where rack mounting is desired, the MB6 and MB21 High Density Multichannel Chassis can contain up to 6 or 21 blades, respectively, within the single highest density platform available. MB series enclosures feature redundant power supplies, allow for in-service blade replacement, and incorporate fan-management circuitry to minimize fan noise. -
Page 9: Mb6 (6-Slot) Chassis
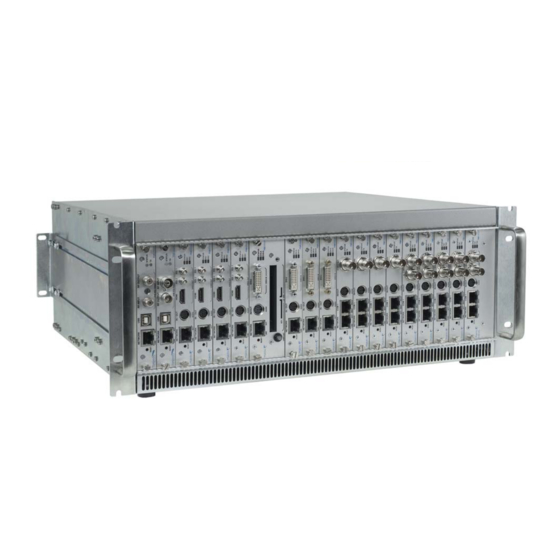
References to “MB6” can be taken to include any of the above, unless specifically stated otherwise. Figure 1: MB6 Chassis Front View MB6 Installation The MB6 may be installed in one of two ways: (1) free-standing on a desktop or rack shelf, or (2) fastened directly to a rack using support brackets (supplied). WARNING To prevent electric shock, do not remove the cover of the MB6 chassis. - Page 10 Turn one (or both) PSU Power On/Off switches to the ON (1) position. On the MB6-RAC, the PSU Status LEDs will turn green indicating that the chassis is powered up. In the front of either chassis, the Status LEDs will start blinking green, indicating that the encoders/decod- ers/gateways are booting up.
- Page 11 Wait until the Status LEDs stay solid green, indicating that the chassis is ready for operation. To begin configuring the unit, open the Web interface and log in. Please refer to the encoder, decoder, or gateway product documentation for details. MB6 and MB21 Multichannel Chassis Installation Guide, v2.0, Issue 01...
-
Page 12: Mb6 Chassis Removable Fan Tray
MB6 Chassis Removable Fan Tray MB6 Chassis Removable Fan Tray The MB6 chassis has a removable fan tray located on the right side (as shown in the figure below). The following replacement part is available for the fan tray (#F-MB6X-FAN). -
Page 13: Replacing The Mb6 Chassis Fan Tray
Verify that the Power LED is green. If the LED is not green, the fan tray is faulty. If this problem occurs, contact your customer service representative for a replacement part. Replacement fan trays are also available from Haivision. Please contact your sales representative or email Haivision at: sales@haivision.com... -
Page 14: F-Mb6X-Rac And F-Mb6X-Dc Chassis Power Components
The F-MB6X-MED power supply cannot be replaced without opening the chassis, which would void the warranty. To replace the F-MB6X-MED power supply, you must return the unit to Haivision. If field-serviceability is a requirement, we recommend that you keep a second F-MB6X-MED chassis available on the premises. -
Page 15: Replacing The F-Mb6X-Rac And F-Mb6X-Dc Chassis Power Distribution Unit
Slide the replacement PDU module into the chassis and press to click. Tighten the screws. Plug all power cords back into the chassis. Turn on all power switches on the PDU. MB6 and MB21 Multichannel Chassis Installation Guide, v2.0, Issue 01... -
Page 16: Mb21 (21 Slot) Chassis
(secured to enclosure using 5 screws) Fan Tray Alarm Mute button PSU Alarm Mute button PSU Power LED (green) AC Power Receptacles PSU Power AC On/Off Switches Figure 11: #F-MB21X-R Chassis Rear View MB6 and MB21 Multichannel Chassis Installation Guide, v2.0, Issue 01... -
Page 17: F-Mb21B-R
• The loss of one or two PSUs of the four PSUs in the F-MB21B-R chassis in any combination. The following replacement part is available for the power supply (#P-MB21B-PS). MB6 and MB21 Multichannel Chassis Installation Guide, v2.0, Issue 01... -
Page 18: Mb21 Installation
If necessary, you may remove the handles on the front of the chassis by using a Phillips #2 screw- driver to unscrew the four handle screws (see blue arrows in Figure 13 following). MB6 and MB21 Multichannel Chassis Installation Guide, v2.0, Issue 01... - Page 19 (F-MB21X-R only) If using a system interface, insert it now. The mating connector is provided but you will need to add your own wiring. Insert the cards from the front (as shown in Figure 10 on page 16). MB6 and MB21 Multichannel Chassis Installation Guide, v2.0, Issue 01...
- Page 20 The MB21 chassis has more than one power supply cord. Be sure to disconnect both (2) power supply cords before servicing to avoid electric shock. To begin configuring the unit, open the Web interface and log in. Please refer to the product documentation for details. MB6 and MB21 Multichannel Chassis Installation Guide, v2.0, Issue 01...
-
Page 21: F-Mb21X-R Chassis Removable Fan Tray
Pin 6 = PSU Fault Signal TTL Signal (Open Connector) Low Active -> Defective High -> Normal Sink AND Source Current 24mA MAX Figure 14: F-MB21X-R Removable Fan Tray Module (close-up view bottom) MB6 and MB21 Multichannel Chassis Installation Guide, v2.0, Issue 01... -
Page 22: F-Mb21X-R Fan Tray Led Indicators And Alarms
To mute the audible alarm, push the Alarm ON/OFF button. Once the button is pushed, the alarm is muted. To re-activate the alarm, push the Alarm ON/OFF button a second time. MB6 and MB21 Multichannel Chassis Installation Guide, v2.0, Issue 01... -
Page 23: Replacing The F-Mb21X-R Chassis Fan Tray
Verify that the Power LED is green. If the LED is not green, one or more fans are faulty. If this problem occurs, contact your customer service representative for a replacement part. Replacement fan trays are available from Haivision. Please contact your sales representative or email Haivision at: sales@haivision.com... -
Page 24: Mb21 Chassis Power Components
Using a Phillips #2 head screwdriver, remove the screw next to the power receptacle. Pull out the unit by the handle. Slide the new PSU back in. Tighten the screw. Plug the power cord back in. Return the AC cable retainer wire to position. Turn on the power switch. MB6 and MB21 Multichannel Chassis Installation Guide, v2.0, Issue 01... -
Page 25: Replacing The F-Mb21B-R Chassis Power Supply
Using a Phillips #2 head screwdriver, loosen the two captive panel screws (one on each side of the module). Pull out the unit by the handle. Slide the new PSU back in the chassis. Tighten both captive panel screws. Turn on the power switch. MB6 and MB21 Multichannel Chassis Installation Guide, v2.0, Issue 01... -
Page 26: Appendix A:technical Specifications
Appendix A:Technical Specifications Physical Characteristics – MB6 Dimensions 19-inch rack mountable, 1RU 43.69 mm H x 447.19 mm D x 482.60 mm W (1.72 inches H x 17.606 inches D x 19.00 inches W) Weight Empty chassis: 17.5 pounds Each blade: 0.5 pounds •... -
Page 27: Physical Characteristics - Mb21X (#F-Mb21X-R)
(F-MB21B-R) 110-240 V AC power supply unit, 300 W max, for Quad PSU version of F-MB21B-R F-MB21X-FAN (F-MB21X-R) Replacement fan and station alarm unit P-MB21X-PS (F-MB21X-R) Replacement 100-240 V; 47-63Hz AC power supply unit, 600 W MB6 and MB21 Multichannel Chassis Installation Guide, v2.0, Issue 01... -
Page 28: For More Information
For More Information Replacement Part Ordering Information For More Information Contact Haivision Technical Support via our Support Portal on our website at: http://www.haivision.com/support- portal-home Or you may use the phone numbers or email addresses listed below: North America: Toll Free: 1.877.224.5445 (option 4)
Need help?
Do you have a question about the MB6 and is the answer not in the manual?
Questions and answers