Table of Contents
Advertisement
Quick Links
Aastra Business
Communication Solution
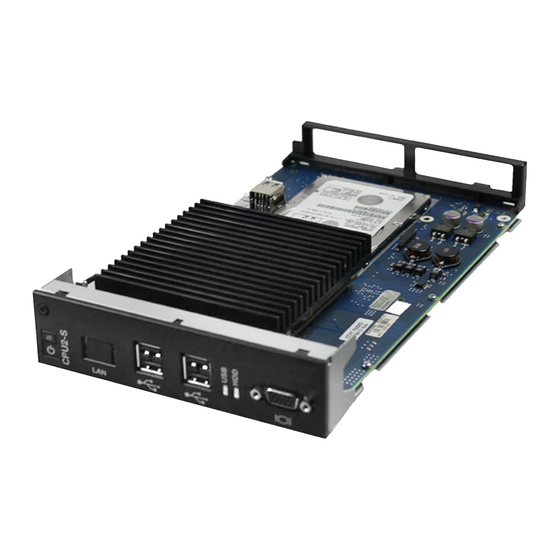
Applications card CPU2-S as of R3.0 SP1
Installation Guide
Supported platforms:
Aastra 470
These instructions take you through the installation and
initial configuration of the Aastra 470 communication
server applications card.
syd-0500_en / 1.2 – R3.0 SP1 – © 04.2014
Advertisement
Table of Contents

Summary of Contents for Aastra CPU2-S
- Page 1 Aastra Business Communication Solution Applications card CPU2-S as of R3.0 SP1 Installation Guide Supported platforms: Aastra 470 These instructions take you through the installation and initial configuration of the Aastra 470 communication server applications card. syd-0500_en / 1.2 – R3.0 SP1 – © 04.2014...
-
Page 2: Table Of Contents
About Aastra ........ -
Page 3: Welcome
The CPU2-S applications card as Aastra 400 application server The CPU2-S applications card is a PC plug-in card for the Aastra 470 communica- tion server which uses a Windows operating system and has pre-installed Aastra 400 applications. - Page 4 The Windows Embedded Standard 7 operating system is installed on the applica- tions card in addition to the following Aastra 400 applications: • Aastra 400 OIP, the Aastra 400 application server with integrated call centre, CTI and operator applications and central contact data management.
- Page 5 All parts and components of the Aastra 400 communication solution are manufac- tured in accordance with ISO 9001 quality guidelines. The relevant user information has been compiled with the utmost care. The functions of the Aastra 400 products have been tested and approved after comprehensive conformity tests. Nonethe- less errors cannot be entirely excluded.
-
Page 6: Safety Information
Hazard warnings are affixed whenever there is a risk that improper handling may put people at risk or cause damage to the Aastra 400 product. Please take note of these warnings and follow them at all times. Please also take note in particular of hazard warnings contained in the user information. -
Page 7: Limited Warranty (Australia Only)
(1) year period from the date of original purchase ("Warranty Period"). If there is a defect or malfunction, Aastra shall, at its option, and as the exclusive remedy under this limited warranty, either repair or replace the product at no charge, if returned within the warranty period. - Page 8 Aastra will not accept liability for any damages and/or long dis- tance charges, which result from unauthorized and/or unlawful use. To the extent permitted by law, Aastra shall not be liable for any incidental dam- ages, including, but not limited to, loss, damage or expense directly or indirectly arising from your use of or inability to use this product, either separately or in com- bination with other equipment.
- Page 9 Limited Warranty (Australia only) Limitation of liability To the extent permitted by law and subject to clause 1.2 below, the liability of Aastra to you for any non-compliance with a statutory guarantee or loss or damage arising out of or...
-
Page 10: About Aastra
About Aastra About Aastra Aastra Technologies Limited, (TSX: “AAH”), is a leading company at the forefront of the enterprise communication market. Headquartered in Concord, Ontario, Can- ada, Aastra develops and delivers innovative communication products and applications for businesses. Aastra’s operations are truly global with more than 50 million in- stalled lines around the world and a direct and indirect presence in more than 100 countries. -
Page 11: Installing The Applications Card
1. Switch on the communication server. Switching on the communication server also powers up the applications card. You can see this on the the LED's On/Off key which now turns steady orange. Applications card CPU2-S syd-0500/1.2 – R3.0 SP1 – 04.2014... - Page 12 3. Navigate to the card view(Configuration System Cards and modules. The applications card is now entered in slot 2 under the name CPU2-S, and the operating status is Available. 4. Click the Confirm button at the end of the slot line.
- Page 13 2. Address the network card on your PC with an IP address within the range 192.168.104. xxx 3. Open the browser and enter the applications card's standard IP address. The IP address is 192.168.104.014/cpu2. 4. You can now, for example, change the applications card IP address. Applications card CPU2-S syd-0500/1.2 – R3.0 SP1 – 04.2014...
-
Page 14: Configuring The Applications Card
This section contains a link to the OIP Toolbox, which is the OIP configuration console. Log on using the user name cpu2-emmc and the applications card password. Settings under IP Network You will find the IP network settings here. Applications card CPU2-S syd-0500/1.2 – R3.0 SP1 – 04.2014... - Page 15 Configure the mandatory applications. The hyperlinks at the bottom of the Config- uration screen take you to the OIP configuration platform. Log on using the user name cpu2-emmc and the applications card password. Applications card CPU2-S syd-0500/1.2 – R3.0 SP1 – 04.2014...
- Page 16 An email with the installation link is then opened. Send the email to the user group you want and request them to start the installation using the installation link. Applications card CPU2-S syd-0500/1.2 – R3.0 SP1 – 04.2014...
-
Page 17: Configuring The Fax Server
Enter the header here that should appear on the fax. E-mail address for error mes- Enter here the e-mail address to which the fax server should send error mes- sages sages. Applications card CPU2-S syd-0500/1.2 – R3.0 SP1 – 04.2014... - Page 18 “Download” hyperlink. • To give a cover image a name, enter the name of your choice in the input field of the second column. Use the following placeholders to represent specific information. Applications card CPU2-S syd-0500/1.2 – R3.0 SP1 – 04.2014...
- Page 19 7. Check the terminal settings of the connected Group3 fax devices to make sure Fax device setting is set to a value other than No fax device (Configuration Terminals view). Applications card CPU2-S syd-0500/1.2 – R3.0 SP1 – 04.2014...
- Page 20 Fax mailbox Fax number setting and Cover page setting). 5. Check whether an e-mail address has been entered (Configuration User view). 6. Continue with step 7 of the above instruction. Applications card CPU2-S syd-0500/1.2 – R3.0 SP1 – 04.2014...
-
Page 21: Operation And Maintenance
Proceed as follows to change the IP addressing on the communication server and applications card: 1. In WebAdmin, navigate to the Multimedia IP network view and click on Reset in- fields. Applications card CPU2-S syd-0500/1.2 – R3.0 SP1 – 04.2014... -
Page 22: Updating System Software
ZIP file and load it onto the applications card using a USB stick. Updating the system software via the Aastra download server Proceed as follows to carry out the software update via the Aastra download server and upgrade the operating system and pre-installed Aastra applications: 1. - Page 23 The view for uploading the system software appears. 5. Click the Browse button. The applications card runs through the available drives and lists all the update packages found in a list box. Applications card CPU2-S syd-0500/1.2 – R3.0 SP1 – 04.2014...
-
Page 24: Replacing An Applications Card
When resetting the applications card, all data saved on the card is lost. 1. If required create a backup of your current configuration data according to the indications in "Saving the configuration (menu Maintenance)", Seite Applications card CPU2-S syd-0500/1.2 – R3.0 SP1 – 04.2014... - Page 25 "Resetting a saved pass- word on the applications card", Seite 5. Start the batch file c:\recovery\recovery.bat. The C: drive is reformatted and the operating system and Aastra 400 applica- tions are installed again. This takes approximately 30 minutes. Applications card CPU2-S...
- Page 26 (PBX installer user name PBX installer password). 3. Make sure that the Reset CPU2 password checkbox is marked. 4. Click the Reset button. The password is reset to the default value 33aastra. Applications card CPU2-S syd-0500/1.2 – R3.0 SP1 – 04.2014...
-
Page 27: Making Enhancements With The Customer's Own Applications
• Aastra does not guarantee support in connection with applications cards that have been modified at the customer. Support is made on a best-effort basis. • As part of support services, Aastra reserves the right to have the applications card reset to the factory settings by the customer. -
Page 28: Enhancing The Applications Card At The Customer
Aastra 400 applica- tions. Please note the following: • The applications you install must be certified for CPU2-S by the Aastra Applica- tion Partner Programm A2P2. • The installation and configuration of the pre-installed Aastra 400 applications must not be changed. -
Page 29: Using The Applications Card As An Independent Application Server
WebAdmin, then an error message is dis- played). • The customer can no longer assert any guarantee or warranty claims at Aastra for the installed software. Proceed as follows to install an applications card which you want to use exclusively for the customer’s own applications:... - Page 30 33aas- tra. 7. Deinstall the pre-installed Aastra 400 applications. 8. Set up the server in accordance with the customer’s requirements. Connect the IP network to the front panel LAN socket, if you operate the applications card as in- dependent application server.
- Page 31 IP network configuration ........14 Licensing ..............15 Limited Warranty (Australia only) ......7 List view ................9 Maintenance .............. 21 OIP password ............. 15 OIP user name ............15 Operation ..............21 Operation notes ............6 Applications card CPU2-S syd-0500/1.2 – R3.0 SP1 – 04.2014...
Need help?
Do you have a question about the CPU2-S and is the answer not in the manual?
Questions and answers