Table of Contents
Advertisement
Quick Links
Advertisement
Table of Contents

Related Manuals for RainWise MK4-C


Summary of Contents for RainWise MK4-C
- Page 1 RainWise MK4-C Cellular Weather Station Instruction Manual www.rainwise.com...
- Page 3 Welcome to Rainwise When weather matters, get it right. Adapt to whatever’s on the horizon with the RainWise MK4-C, the accurate, reliable and accessible professional-grade weather station.
-
Page 4: Table Of Contents
Contents Getting to Know Your RainWise MK4-C Components & Hardware ........6–7 Introduction .............8 Getting Started with Your Weather Station Station Siting & Setup ........10–11 Unboxing ..............12 Activating Data Plan & Registering Online ..13 Set Up & Installation Assembling Weather Station ......14–16 Confirming Online Status ........ - Page 5 Product Safety ............26 Compliance ............27–28 Proposition 65 Warning ........29 Warranty..............30 Appendix 1: Tripod Mount ........31 Appendix 2: Mono Mounts ........32 Find additional product information, FAQs, technical support, instructional videos and more at https://rainwise.com/mk4-c C O N T E N T S...
-
Page 6: Getting To Know Your Rainwise Mk4-C
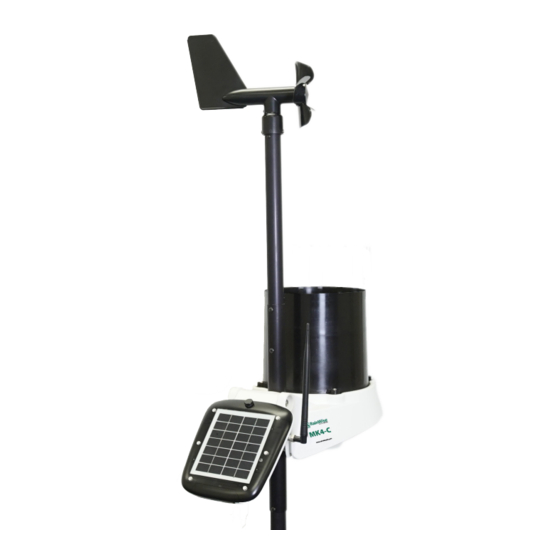
Getting to Know Your RainWise MK4-C Components & Hardware: Anemometer Mast Vane Anemometer Extension Rain Gauge PV Power Panel Station Base Assembly C O M P O N E N T S & H A R D W A R E... - Page 7 Components & Hardware (continued): Aspirated Temperature and Humidity Sensors Expansion Sensors: The MK4-C will accommodate expansion sensors and sensor upgrades* including: » An ultrasonic wind sensor upgrade with no moving parts » A solar irradiance sensor » A UV sensor »...
-
Page 8: Introduction
It is lightweight, durable, easy to set up and quick to connect. Your MK4-C station is equipped with CAT/ LTE-M and NB-IoT cellular connectivity (including one year of free data) that transports your weather data to a personal... - Page 9 Mono Mount, sold separately) for your chosen location. Unbox the station Activate your data plan Register the station account Assemble the station Mount the station View your data on rainwise.net G E T T I N G S T A R T E D...
-
Page 10: Station Siting & Setup
Station Siting and Setup Where you install your RainWise MK4-C can positively or negatively impact accuracy. Natural and artificial obstructions around the weather station, like trees or other structures, could skew the data. You can get more detailed station location and siting guidelines at https://rainwise.com/mk4-c Location Considerations: »... - Page 11 Mounting Considerations: » The rain gauge must be level to provide accurate rainfall measurements. Ensure that your chosen mounting location is sturdy and does not sway in the wind with the additional weight of the station. Excess motion or tilting will greatly reduce the accuracy of rainfall measurements.
-
Page 12: Unboxing
Unboxing What’s included: » The pre-assembled station base; including rain gauge, air temperature, RH, and barometric pressure sensors » Anemometer mast extension » Vane anemometer (wind speed and direction sensors) » Assembly tools: 5mm hex key and #2 Phillips tool (Two spare screws included) »... -
Page 13: Activating Data Plan & Registering Online
Activating Data Plan & Registering Online You must visit the RainWise registration page and enter your weather station’s MAC address and serial number to activate the station’s data plan: Go to https://rainwise.net/inview/register1.php » » Create a new account or log in to your existing account from rainwise.net in the upper right hand corner (fig A). -
Page 14: Assembling Weather Station
Assembling Your Weather Station IMPORTANT: Complete these steps before powering up your station to ensure the sensors initiate correctly. Assemble the Anemometer » Find the three screws on the anemometer mast extension. Remove and save the small Philips screw Figure C at the dimpled end. - Page 15 Station Assembly » Rotate the anemometer mast extension until the screw aligns with the slot in the station base, then slide the screw all the way into the slot and hand tighten (fig H). Figure H » Place the screw that was removed from the non-dimpled end of the mast (fig D) into the hole below the station base slot and hand-tighten it well.
- Page 16 Station Assembly Align the PV Panel » Slightly loosen the 5mm hex bolt with included wrench, adjust the PV power panel angle to match your latitude as indicated in the table below, then Figure L re-tighten the bolt (fig L). Latitude Angle from Clicks from...
-
Page 17: Confirming Online Status
» The light will flash green when the station has successfully connected. Go to rainwise.net on your mobile device to confirm your station is transmitting data from all sensors. (fig N) » Refer to the troubleshooting guide... -
Page 18: Mounting
Mounting Refer to https://rainwise.com/mk4-c » Mount the station. See appendix for Mono Mount and Tripod Mount mechanical drawings (page 31-32). Find detailed instructions and installation videos at https://rainwise.com/mk4-c. » Confirm that the rain gauge bucket is level using one of these methods:... - Page 19 » Mount the support mast securely to the support structure using the Mono Mount or Tripod (sold separately) or standard U-bolts. Do not tighten the support structure to the MK4-C unit, as directional orientation will be required. » Rotate the assembled unit until the electronics enclosure with the solar panel cover faces south if you’re in the Northern Hemisphere, or north if you’re in the...
-
Page 20: Powering Up
After mounting the station, confirm the power is ON and the station is transmitting to rainwise.net as shown in figure R. Data can take up to 15 minutes before it is shown on rainwise.net Figure R 20 | P O W E R I N G U P... -
Page 21: Troubleshooting
Troubleshooting Refer to rainwise.com/support for FAQs and additional troubleshooting information. The MK4-C cellular weather station can ONLY connect to a cellular network and cannot connect to a WiFi network. You can use provider coverage maps or third party tools such as the Open Signal app or RootMetrics app to plan an optimal location for your station. - Page 22 The MK4-C station is shipped with a fully charged battery and the station is designed to maintain normal operation in subfreezing weather. If solar charging is insufficient due to extended snow cover or installation in a shaded location, the station will change operating modes to conserve power as detailed in the station specifications operating mode table.
-
Page 23: Specifications
Specifications SENSORS Accuracy ( Resolution Range Notes +/-) Wind speed is measured continuously and stored in station memory as a series of 2 0.1 mph 1 to 100 mph 5% or 1 mph second averages. The reported wind speed 0.1 knot 1 to 86.9 knots Wind Speed between 1 to... - Page 24 Relative Humidity (typical) Figure S 24 | S P E C I F I C A T I O N S...
- Page 25 SYSTEM Operating Environment -40° to 140° F (-40° ~ 60°C) Temperature: Dimensions 11”x23”x36” (28 x 58 x 91 cm) Weight 8.9 lbs (4.04 kg) Certifications FCC, CE, IC Data Cache Capacity 365 Days Logging Rate Every 15 minutes (See sensor specification notes for details) Cellular Transmission Rate Every 15 minutes Battery Type:...
-
Page 26: Product Safety
WARNING: Read and follow these guidelines to reduce the risk of injury or death. 3 Fully read your RainWise MK4-C user manual to familiarize yourself with the product’s features before operating. 3 Failure to operate this product correctly can damage it or produce inaccurate readings. -
Page 27: Compliance
While the antenna is detachable, the MK4-C must only be used with the supplied antenna. Use of an unapproved antenna with regards to compliance and its ramifications will not be the responsibility of the manufacturer. - Page 28 Marked in accordance with the WEEE (Waste Electrical and Electronic Equipment) Directive. Please do not dispose of the RainWise batteries in your household trash. Return to RainWise, a RainWise dealer, or a designated recycling center for proper recycling and disposal.
-
Page 29: Proposition 65 Warning
More Information Many of the elements listed under Proposition 65 are commonly found in products in the electronics industry. Although RainWise’s instruments manufacturing process is “lead-free, ” it remains possible that small amounts of lead could be found in components or subassemblies. Bisphenol A (BPSA) could be found in plastic housings, lenses, labels or adhesives, and DEHP &... -
Page 30: Warranty
TWO YEARS from the date of its first consumer purchase. RainWise agrees to repair or replace any defective damage due to the product or part when notified within the warranty period without charge. -
Page 31: Appendix 1: Tripod Mount
Appendix 1: Tripod Mechanical Drawing | 31 A P P E N D I X 1 : T R I P O D M O U N T... -
Page 32: Appendix 2: Mono Mounts
Appendix 2: Mono Mounts Mechanical Drawings 32 | A P P E N D I X 2 : M O N O M O U N T S... - Page 36 Designed and Distributed by: RainWise, Inc. 18 River Field Rd, Trenton, ME 04605 (800) 762-5723 or (207) 288-5169 www.rainwise.com info@rainwise.com Designed and Assembled in the USA (US and imported components) RainWise is a Subsidiary of: Nielsen-Kellerman www.nkhome.com 319103_0_2.02.21...
Need help?
Do you have a question about the MK4-C and is the answer not in the manual?
Questions and answers