
Related Manuals for Eaton Cutler-Hammer ELC Series


Summary of Contents for Eaton Cutler-Hammer ELC Series
- Page 1 Eaton Logic Controller Basic Training (1 Hour) January 2006 Pub. No. TR05003001E For more information visit: www.EatonElectrical.com...
-
Page 2: Restricted Rights Legend
Information in this manual is subject to change without notice and does not Intro: represent a commitment on the part of Eaton Electrical Inc. Permission is granted to duplicate this material without modification only for your use or the internal use... -
Page 3: Support Services
Support Services The goal of Eaton is to ensure your greatest possible satisfaction with the operation of our products. We are dedicated to providing fast, friendly and accurate assistance. That is why we offer you so many ways to get the support you need. Whether it's by phone, fax or e-mail, you can access Eaton’s support information 24 hours a day, seven days a week. - Page 4 Go Chart This document will take you through the following steps to learn the basics of the ELC: Intro: Basics Hardware Overview Preface Support Services Software Overview Go Chart Go Chart Connecting to the ELC Basics: Hardware Hardware Overview Overview Software Overview Connecting to...
-
Page 5: Hardware Overview
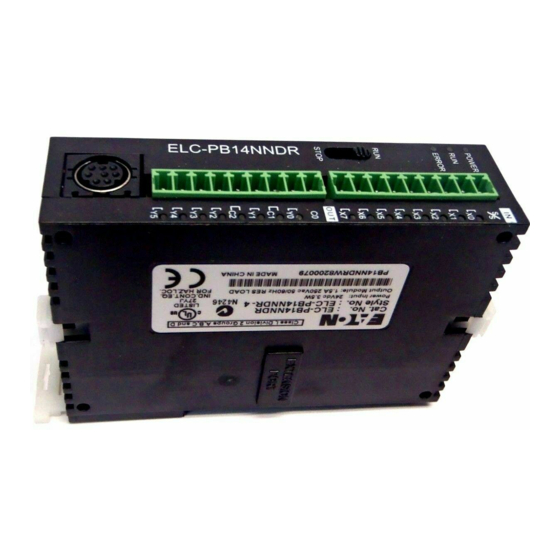
Analog I/O terminals I/O point indicators COM 1 (RS-232) (Rx) indicator COM 2 (RS-485) (Tx) indicator COM 1 (RS-232) programming port EATON nameplate Extension port Receptacle for expansion unit DIN rail slot (35mm) Expansion unit clip COM 2 (RS-485) communication port... -
Page 6: Model Number Explanation
Hardware Overview Model Number Explanation Intro: Use the following chart and tables to choose or identify your ELC components: Preface Support Services Go Chart Processors Basics: Description Inputs Outputs Catalog Listing Processor/no Clk Hardware Hardware 14 I/O PB Series ELC-PB14NNDR Overview Overview 14 I/O PB Series... - Page 7 Analog Expansion Modules Description Inputs Outputs Catalog Listing Analog In Analog Analog 4 I/O Analog In ELC-AN04ANNN Analog Out 2 I/O Analog Out ELC-AN02NANN 4 I/O Analog Out ELC-AN04NANN Analog Combination 6 I/O Analog In/Out ELC-AN06AANN Temperature 4 I/O Thermocouple ELC-TC04ANNN 4 I/O Platinum ELC-PT04ANNN...
-
Page 8: Software Overview
Serial or Windows compatible mouse Printer Printer with Windows driver Comm Port (1) RS-232, labelled COM1 - COM8 Compatible Products All Eaton ELC series Basics: Hardware Installing the software Overview Insert the provided CD-ROM into the proper drive on your PC. The install program should automatically run. - Page 9 Software Overview Software Features: To open the software, select: START>ALL PROGRAMS>ELCSOFT The following menus will be described here as a quick primer on just a few of the ELCSoft program features. Some of these features may be limited based on which ELC processor you are using.
-
Page 10: Printer Setup
Software Overview File Menu Intro: Preface Support Services Go Chart NEW: Opens the window to the right. Allows you to give the new program a name (Program Title); choose what ELC Type you will be programming (you’ll know this type as part of the ELC part number);... - Page 11 Software Overview Options Menu COMMUNICATION SETTING: Opens the window to the right. Allows you to choose the COM Port, Baud Rate and Station Address for communications to the ELC, along with Retries and Retry Delay settings. *CHANGE ELC TYPE: Opens the ELC Type Setting dialog shown on page 10.
- Page 12 Software Overview Help Menu Intro: Preface ABOUT ELCSOFT: Click here to view the version number of your ELCSoft software. Support Services INTELLIGENT FUNCTION UTILITY: A submenu is available from this menu choice that assists in the setup of advanced ELC functionality. Go Chart ELC INSTRUCTION &...
- Page 13 Connecting to the ELC To connect to a new ELC: • Open ELCSoft • Use the ELC programming cable (part number ELC-CBPCELC3) to connect a serial port on your PC to the port on the front of the ELC processor. •...
-
Page 14: Communication Menu
Connecting to the ELC The Communication menu will be described here because many of the functions selectable in this menu are only available while connected to the Intro: ELC. Preface Communication Menu Support Services Go Chart Basics: Hardware Overview TRANSFER SETUP: Opens the window to Software the right. - Page 15 Connecting to the ELC LADDER START MONITORING: While connected to an ELC, this starts monitoring the current state of the referenced bits in the ladder logic that is open in the software. This means that if the project in the ELC does not match the project currently open in the ELCSoft, it may seem that the software is not working properly.
- Page 16 Exercise 1: Ladder Logic Programming In order to teach the basics of programming with ELCSoft, Intro: we will practice with basic ladder functions. Getting Started Preface • Choose FILE>NEW and give your new project a Program Title. Choose the Type of ELC Processor you’ll use and create a File Name under which the project will be saved.
- Page 17 Exercise 1: Ladder Logic Programming The finished result of this exercise will be this ladder running in the ELC: • Click the icon that represents a normally open contact in the Ladder Diagram Toolbar (far left). The window to the right will appear with the type of contact you selected at the top.
- Page 18 Exercise 1: Ladder Logic Programming Now that the program is downloaded… Intro: • To put the ELC in RUN mode, click on the green RUN button in the toolbar or choose COMMUNICATION>RUN from the menu. Preface • To monitor the Ladder Logic, click the Ladder Start Monitoring button in the toolbar (there are popup tips that tell you what each button does when you mouse over them), or choose COMMUNICATION>LADDER START MONITORING.
- Page 19 Exercise 2: More Logic Instructions This exercise covers other basic functions like Set/Reset, MCS/MCR and Compare. Use case: An injection mold machine has an automatic refiller for the plastic pellet reservoir. At the beginning of the shift, the operator approaches the machine and presses the start button. The filling mechanism automatically keeps the level in the reservoir between 10 and 100 lbs.
- Page 20 Exercise 2: More Logic Instructions • We now need to add a (very simple) Master Control Set and Reset to allow the operator (activating bit M2) to speed up the main filler mechanism (M3) when the Intro: main filler mechanism is running. Preface •...
- Page 21 Pub. No. TR05003001E For more information visit: www.EatonElectrical.com...
Need help?
Do you have a question about the Cutler-Hammer ELC Series and is the answer not in the manual?
Questions and answers