Advertisement
Quick Links
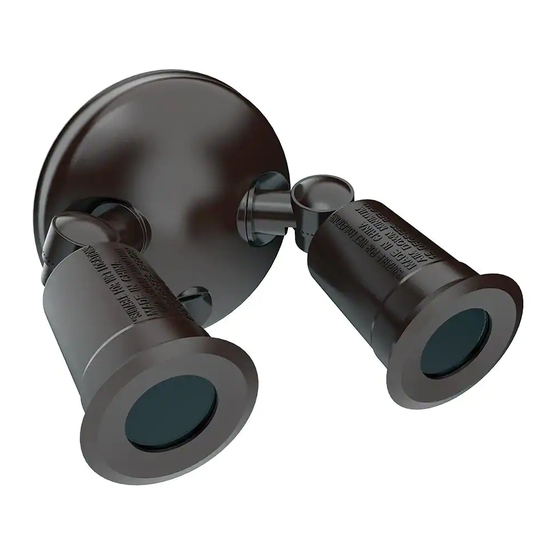
Item # 1003 953 016
1003 953 034
Model # TPAR-PC-BZ
TPAR-PC-WH
USE AND CARE GUIDE
PAR TWIN HEAD DUSK-TO-DAWN FLOOD LIGHT
Questions, problems, missing parts? Before returning to the store,
call Commercial Electric Customer Service
9 a.m. - 5 p.m., EST, Monday - Friday
1-844-548-3776
HOMEDEPOT.COM
THANK YOU
We appreciate the trust and confidence you have placed in Commercial Electric through the purchase of this PAR38
flood light. We strive to continually create quality products designed to enhance your home. Visit us online to see our
full line of products available for your home improvement needs. Thank you for choosing Commercial Electric!
Advertisement

Subscribe to Our Youtube Channel
Related Manuals for Commercial Electric TPAR-PC-BZ


Summary of Contents for Commercial Electric TPAR-PC-BZ
- Page 1 THANK YOU We appreciate the trust and confidence you have placed in Commercial Electric through the purchase of this PAR38 flood light. We strive to continually create quality products designed to enhance your home. Visit us online to see our...
-
Page 2: Table Of Contents
Table of Contents Safety Information .............2 Installation ..............5 Warranty..............2 Operation..............8 Pre-Installation ............3 Care and Cleaning .............8 Preparing for Installation ..........5 Troubleshooting ............9 Safety Information IMPORTANT WARNING: Risk of fire. Keep the light fixture at least THIS PRODUCT MUST BE INSTALLED IN ACCORDANCE 3 in. -
Page 3: Warranty
Warranty (continued) LIMITATION OF LIABILITY In no event shall the manufacturer be liable for indirect, consequential, incidental or special damages, or lost profits. The manufacturer is not liable for any claims or damage arising out of or connected with the manufacture, sale, delivery, use, maintenance and repair or modification of the manufacturer products, or supply of any replacement parts that exceed the purchase price of the manufacturer products giving rise to a claim. - Page 4 Pre-Installation (continued) HARDWARE INCLUDED NOTE: Hardware not shown to actual size. Part Description Quantity #8-32x3/4 in. Phillips mounting bracket screw Wire nut Allen key Photocell cover cap PACKAGE CONTENTS Part Description Quantity Light fixture Photocell (light sensor) Mounting plate bolt (pre-installed) Mounting plate with gasket (pre-installed) Hanger wire for hands-free installation (pre-installed) Leveling bubble...
-
Page 5: Preparing For Installation
Preparing for Installation □ Install the light 8–15 ft. above the ground. □ Do not mount the fixture close to reflective surfaces such as windows, white walls, white surfaces and water. □ When installing two fixtures on one switch, make sure the switch is rated for at least a 1A inductive load. - Page 6 Installation (continued) Removing the mounting plate NOTE: The mounting plate (D) and mounting plate bolt (C) come pre-assembled on the light fixture (A) for shipping. □ Remove the mounting plate (D) from the back of the fixture by loosening the mounting plate bolt (C) using the allen key (CC).
- Page 7 Installation (continued) Making the electrical 3/8 in. connections □ If necessary, strip 3/8 in. of insulation from the junction box or fixture (A) wires. □ Connect the fixture black wire to the supply black wire ((+) line), and fixture white wire to the supply white wire ((-) common) by twisting the exposed wires together and using the wire nuts (BB).
- Page 8 Installation (continued) Installing bulbs and adjusting the light heads □ After the fixture is securely mounted, install two PAR38 bulbs up to 150 Watts each (sold separately) into the lamp heads. □ Loosen the thumb screw (1), then use your hand to pan and tilt each individual light head on the fixture (A) to point towards the direction desired.
-
Page 9: Operation
Operation SELECTING DUSK-TO-DAWN OR SWITCH-ACTIVATED CONTROL Option 1: Dusk-to-Dawn Operation Dusk-to-dawn operation enables the light fixture to automatically turn ON when dark outside and turn OFF when the sun rises, thus saving energy costs. □ To enable dusk-to-dawn operation ensure the photocell (B) is unobstructed. -
Page 10: Care And Cleaning
Care and Cleaning □ Shut off the main power supply before cleaning the product. To prolong the original appearance, clean the light fixture with clear water and a soft, damp cloth only. □ Do not use abrasive cleaners or cleaners that contain alcohol. Do not apply paints, solvents, or any other chemicals on this light fixture. - Page 11 Questions, problems, missing parts? Before returning to the store, call Commercial Electric Customer Service 9 a.m. - 5 p.m., EST, Monday-Friday 1-844-548-3776 HOMEDEPOT.COM Retain this manual for future use.
Need help?
Do you have a question about the TPAR-PC-BZ and is the answer not in the manual?
Questions and answers