Advertisement
Quick Links
Quick Start Guide
OPTJ Power tray SC
OPTJ Power tray NTD
OPTJ Power tray NTQ
Important Safety Instructions
CLASS 1 LASER PRODUCT
Please read the supplied safety instruction
IF OPTICAL EXTENDERS
document before using the product and
ARE INSTALLED
keep it available for future reference.
The device is Class 1 laser product if the HDMI20-OPTJ-90 series extenders are installed.
Introduction
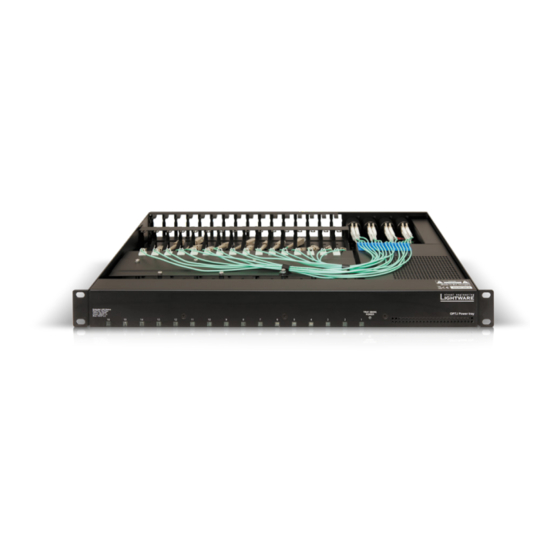
Thank you for choosing OPTJ Power tray series. The Power tray is a 1RU-size housing
accessory which can enclose up to 16 HDMI20-OPTJ-TX/RX90 units, also providing power
source for every installed device. The optical fibers are connected to the eight SC duplex or
four Neutrik opticalCON QUAD or four Neutrik opticalCON DUO connectors, each carrying
four signal fibers from four of the extenders. The HDMI tail cables of the extenders are
accessible directly at the back of the Power tray.
Model Comparison
Number of installable
Model
Optical connector
OPTJ extenders
OPTJ Power tray SC
SC duplex (8x)
up to 16
OPTJ Power tray NTQ
Neutrik NO4FDW-A (4x)
up to 16
OPTJ Power tray NTD
Neutrik NO2-4FDW-A (4x)
up to 8
Box Contents
OPTJ Power tray series
IEC power cable
M3x6mm screw and toothed
device
foot washer (16x)
Cable tie (16x)
Safety and Warranty Info,
Quick Start Guide
Front View
1
Rear View
3
4
The OPTJ Power tray NTQ model can be seen in the rear view picture but the layout of all three models is the same.
Assembly Steps of HDMI20-OPTJ-TX/RX90 Extenders
The following assembly guide is for help the correct installation of the HDMI20-OPTJ-TX/RX90
extenders to the Power tray step by step.
Step 1 - Removing of the small cover.
Remove the optical cables from the cable clamps located on the small cover. Remove the 8
pcs screws by a PH1 screwdriver from the locations highlighted with green arrows and remove
the small cover plate (grey colored).
Step 4 - Re-inserting of the small plate.
Insert the small cover plate (grey colored) back and fasten the 8 pcs screws by a PH1
screwdriver.
2
5
Step 2 - Installation of the OPTJ extenders.
Insert each HDMI20-OPTJ-TX/RX90 extender to the mounting slot. Pull the HDMI tail cable
across the rear side mounting holes of the Power tray. Fasten the extenders by the provided
M3x6 screws and the toothed foot washers (2 pcs screws and 2 pcs washers per extenders
on the top).
Step 5 - SC fiber cable connections.
Remove the protective caps and connect the SC fiber optical cables to the extenders and
insert the optical cables to the cable clamps.
Status LED
The status LED indicators give immediate feedback about
1
indicators of the
the recent status of the HDMI20-OPTJ-TX/RX90 extenders.
OPTJ extenders
Power LED
Power LED lights green when the unit is powered on.
2
AC connector
Standard IEC power connector. Accepts 100 to 240 Volts,
3
50 or 60 Hz power sources.
Fiber optical
SC model: 8x SC duplex fiber optical connectors for 16x
4
connectors
multimode SC fiber optical cables.
(variable by
NTD model: 4x Neutrik NO2-4FDW-A connectors for
models)
4x Neutrik opticalCON DUO series cables or 8x LC fiber
optical cables.
NTQ model: 4x Neutrik NO4FDW-A connectors for 4x
Neutrik opticalCON QUAD series cables.
5
Mounting slots
16x mounting slots for the HDMI20-OPTJ-TX/RX90
for the OPTJ
extenders.
extenders
Step 3 - USB cable connection.
Connect the USB-A cables of the extenders to the USB-A connectors of the Power tray (grey
colored). Fasten the USB cables with the provided cable ties.
The USB-A connectors of the Power tray are for powering purpose only. No data
transmission is processed on them.
Further Information
The Product brief of this appliance is available on www.lightware.com.
See the
Downloads
section on the dedicated product page.
Contact Us
sales@lightware.com
+36 1 255 3800
support@lightware.com
+36 1 255 3810
Lightware Visual Engineering LLC.
Peterdy 15, Budapest H-1071, Hungary
Doc. ver.: 1.1
19200130
Advertisement

Related Manuals for Lightware OPTJ Power tray Series


Summary of Contents for Lightware OPTJ Power tray Series
- Page 1 Introduction the small cover plate (grey colored). Thank you for choosing OPTJ Power tray series. The Power tray is a 1RU-size housing accessory which can enclose up to 16 HDMI20-OPTJ-TX/RX90 units, also providing power source for every installed device. The optical fibers are connected to the eight SC duplex or four Neutrik opticalCON QUAD or four Neutrik opticalCON DUO connectors, each carrying four signal fibers from four of the extenders.
- Page 2 Mounting with Rack Ears Typical Application Mechanical Drawings The rack ears allow mounting the device as a standard rack unit installation. HDMI 2.0 optical matrix assembly: by connecting the HDMI connectors outputs of the fully populated Power tray with the input and output ports of an MX2-8x8-HDMI20-Audio-L matrix a The OPTJ Power tray NTQ model can be seen in the figures but the layout of all three models HDMI 2.0 optical matrix system can be created with Full 4K UHD at 60 Hz 4:4:4 maximum resolution.
Need help?
Do you have a question about the OPTJ Power tray Series and is the answer not in the manual?
Questions and answers