
Subscribe to Our Youtube Channel
Related Manuals for Bridge City Chopstick Master


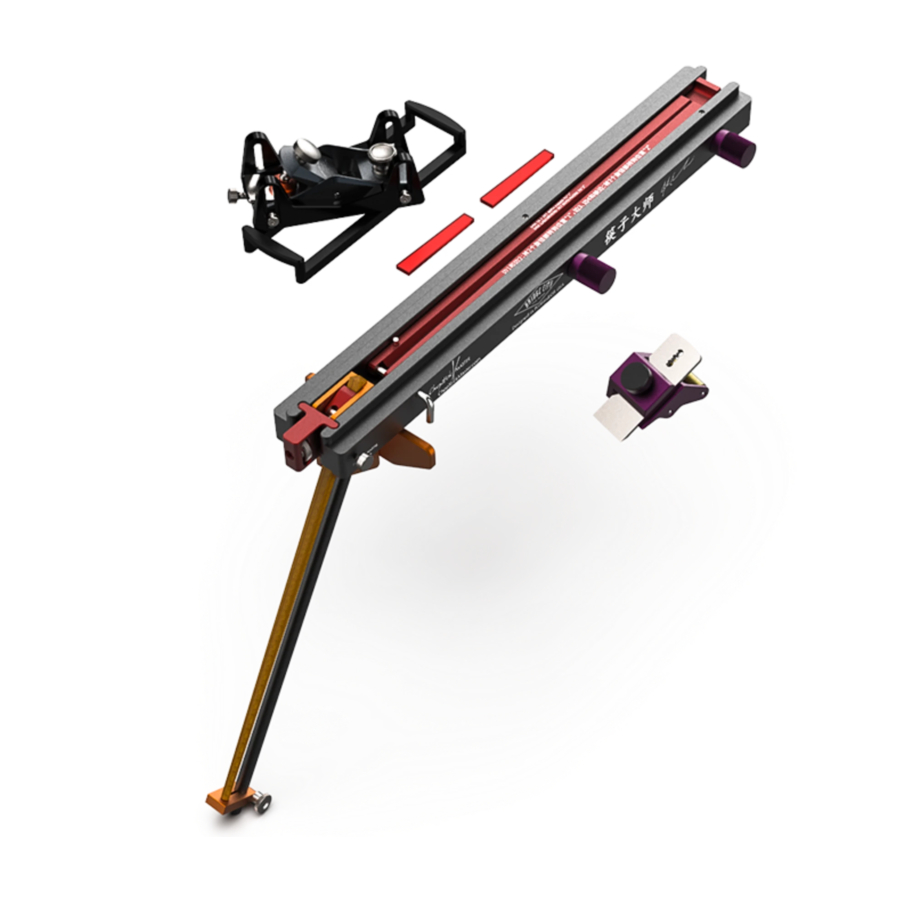
Summary of Contents for Bridge City Chopstick Master
- Page 4 For your optimal enjoyment, please read this manual completely before beginning. Congratulations on your purchase of the Chopstick Master™! The Chopstick Master™ is easy to use and allows young and old alike to make professional-grade, reusable chopsticks without woodworking experience or ability. A set of chopsticks...
- Page 5 Chopstick Master™ body. Once the skids rest on the Chopstick Master™ body, tighten all four screws with the included hex key wrench.
- Page 6 B.Setting the Cutting Depth of the Hand Plane The small block plane (Fig. 2) included with the Chopstick Master™ is a precision tool with a sharp iron; when properly set-up, it will give you silky shavings with minimal effort. The cutting blade (the “iron”) is always inserted into the plane body with the bevel up —...
- Page 7 Figure 2 4. Adjust the iron depth until the shaving is thin and easy. Once the iron depth has been set, make sure the iron cap is tight. You may find that tightening the iron cap makes the depth of cut too deep. If so, loosen the cap, slightly retract the iron, and re-tighten the cap.
- Page 8 Although the Chopstick Master™ makes very little dust, it does make lots of shavings. These are easy to clean up with a vacuum, but can also be easily picked up by placing an old newspaper on the counter prior to beginning;...
- Page 9 Blanks larger than 7 mm square will require extra work in planing. Blanks over 270 mm in length will not fit in the Chopstick Master™. Blanks less than 270 mm can cause clamping problems in the event of reverse grain.
- Page 10 Tighten the iron locking knob so the iron is firmly held in place. 4. Loosen the locking knob of the orange bench hook on the Chopstick Master™ and rotate the hook 180 degrees and re-tighten the knob (Fig.5). 5. The 1 micron abrasive strip on the underside of the...
- Page 11 Chopstick Master™ body is equivalent to an 8000 grit honing stone. Place the honing guide in the channel and stroke back and forth on the abrasive strip, using your fingers to put a light pressure on the front of the iron.
- Page 12 Master™ Chopstick blanks are positioned diagonally in the Chopstick Master™ to utilize the entire width of the plane iron. They are held in place with two tapered wedges as illustrated in Figure 7. Notice that side “1” of the chopstick...
- Page 13 4. Planing Adjacent Sides 1 and 2 of the Chopstick Blanks With the Chopstick Master™ properly positioned and side “1” of the chopstick blank facing up, you are ready to taper side “1”. With the plane skids straddling the rails of the Chopstick Master™, take full strokes pushing the plane...
- Page 14 Remove the two locking wedges, and turn the blank so that side “2” is up. Lock the blank in place with the two locking wedges. Repeat the planing process. Set this chopstick blank aside and repeat the above steps for sides “1” and “2” of your second blank. 5.
- Page 15 what direction you plane, you cannot get a smooth surface. When this occurs we recommend you discard the blank. A sharp plane blade will help to minimize these problems. If your chopstick blank is warped, you will still be able to make a chopstick, it will however, retain the warp when complete.
- Page 16 Adding a pyramidal finial (Fig. 9) adds a professional touch to your chopsticks and is very easy to accomplish with the Chopstick Master™. Figure 9 Attach the sliding table to the Chopstick Master™ body. It should slide smoothly without any slop. If it needs...
- Page 17 (Fig. 10). The three slots in the blade will fit over the shafts of the three thumbscrews, aligning the blade. Tighten the three thumbscrews. The blade should now be angled out from the Chopstick Master™ body at 22.5 degrees from the vertical. Figure 10 Place the chopstick on the sliding table as illustrated in Figure 11;...
- Page 18 Figure 11 Place your right thumb in the indent at the rear of the sliding table, and use your right index and middle fingers to firmly hold the chopstick down, while pushing the chopstick gently to the right against the stop of the sliding table.
- Page 19 For multiple-use chopsticks, you need to apply a finish. Included with your Chopstick Master™ is a small amount of food-grade mineral oil. With a paper towel, apply a small amount to each chopstick, let sit for a couple of minutes and wipe clean.
- Page 20 Other finishing options include varnish, paint, lacquer, or shellac. You can also gild with metal leaf, or explore many other decorative ideas to make your chopsticks unique!
- Page 21 Portland, Oregon USA, and our manufacturing partners in Nanjing, China, we sincerely thank you for your purchase of the Chopstick Master™. We know you had a lot of fun making your chopsticks and hope that you share this experience with your family and friends! One really fun way to enjoy your Chopstick Master™...
- Page 24 筷子大师™使用说明 为了让您拥有最佳的使用体验,请在开始操作前仔细阅读 使用说明。 恭喜您购买了一台筷子大师™!筷子大师™使用简单,可 以让没有任何木工经验的老年人和孩子制作出具有专业水准并 且可重复使用的筷子。使用筷子大师™,您可以在短短十分钟 内制作出一双筷子,绝对会让您眼前一亮! I. 筷子大师™如何工作 筷子大师™配合一把多功能短刨(HP-8,配有深度限位 装置)便可以制作筷子的四个倾斜侧面。这四个侧面都以相同 的角度顺着木纹向中心倾斜。 在开始前,请先确认您所喜欢的筷子类型。通常来说,中 国人喜欢使用筷子尖头直径为 5 毫米的中式筷子。在其他文 化中,例如日本,则更偏向于筷子尖头直径为 2mm 的筷子。 筷子大师™配备这两类筷子的模板,只需要更换不同颜色的调 节杠杆即可制作出两种不同类型的筷子:红色杠杆可以制作出 尖头直径为 5 毫米的筷子,绿色杠杆可以制作出尖头直径为 2 毫米的筷子。 II. 使用筷子大师™前的准备工作 A. 设置深度限位装置 在开始制作筷子前,正确的设置深度限位装置非常重 要。如图一所示便是正确的调节方法。一般情况下,只需 进行一次深度调节即可。除非多功能短刨摔落在地上发生 错位或深度限位装置出现移动,否则不再需要第二次的调 节。 将多功能短刨的底座放置在深度调节轨道上,使用标 配的内六角扳手拧松深度限位锁紧螺母,让深度限位装置 自动落在深度调节槽内。当两个深度限位装置都正确落在 深度调节槽上后,再使用内六角扳手拧紧所有螺母。如果 调节操作是正确的,那么多功能短刨的底面与轨道接触,...
- Page 25 而深度限位装置与深度调节槽面接触。 图一 B. 设定多功能短刨的刨削深度 多功能短刨(图二)需要与筷子大师™配合使用。多 功能短刨是一个非常精密的工具,配有锋利的刨刀。正确 的设置之后,不费吹灰之力即可刨削出丝绸般的刨花。 这是一个低角度刨,安装刨刀时,应一直保持刨刀斜 面向上。若需要调节刨刀的深度,只需要旋转多功能短刨 后侧的刨刀深度调节旋钮即可 (顺时针旋转增加刨刀深度, 逆时针旋转减少刨刀深度)。这个多功能短刨还可以调节 刨口。首先拧松喉板锁紧旋钮,其次前后滑动旋钮调节喉 板至正确位置,再重新锁紧旋钮固定喉板位置即可完成。 请根据以下步骤设置多功能短刨以达到最佳体验 1. 将刨口打开至最大处并锁紧。 2. 增大刨刀深度直至指腹轻抚刨底时能感觉到刀刃。轻轻 地锁紧刨刀压紧盖。注意此时无须用力。将刨口缩小直...
- Page 26 至您可以看见喉板与刀刃间的微弱光线。刨刀刀刃应与 喉板保持平行。如果两者间不平行,轻微旋转刨刀直至 刀刃与喉板平行。应保证喉板与刀刃间的间隙应足够使 刨花穿过。 图二 3. 适当调节刨刀深度,使刨削轻松自如,刨花薄透。一旦 刨刀深度设置好后请锁紧刨刀压紧盖。如果锁紧刨刀压 紧盖后发现刨刀深度增加,超过了预期深度,请拧松压 紧盖,稍微减少一点刨刀深度之后再次锁紧。 C. 确定筷子尖头直径:5 毫米还是 2 毫米? 红色杠杆可制作出 5mm 尖头直径的中式筷子。绿色 杠杆可制作出 2mm 尖头直径的日式筷子。更换杠杆的方 法:移除 L 型插销,插入杠杆,再装入 L 型插销。...
- Page 27 图三 D. 选择筷子大师™的操作位置 筷子大师™可以在木工桌或任何稳定的桌面上使用, 其设计的初衷是为了方便操作者可以站立使用。 虽然筷子大师™只产生极少的灰尘,但却会产生大量 的刨花。这些刨花可以用吸尘器轻易清除,但是如果使用 前即在筷子大师™底部铺垫报纸,这样使用完后,用报纸 包裹走刨花则更加快速简便。在使用者身边放置一个垃圾 篓也可以更加有效地清理刨花。 橙色的台面挡板是由铝合金整体镂铣并研磨制作完成, 因此不会对桌边造成伤害。如果仍有顾虑,则也可以在筷 子大师™与挡板之间以及桌面上铺垫报纸从而保护台面。 如果您希望移除橙色挡板并将筷子大师™主体永久固 定在工作台面或个人自制的挡板上,使用两个平头螺丝即 可永久固定。 E. 准备木料 筷 子 大 师 ™ 需 要 使 用 精 确 尺 寸 的 木 料 制 作 筷 子: 使 用 7mmX7mmX270mm 尺 寸 的 木 料。 如 果 您 选 择 自 己 制作木料,请注意如果木料边长小于...
- Page 28 筷 子 弯 曲 并 产 生 不 规 则 的 四 边 斜 面。 如 果 木 料 边 长 大 于 7mm,则需要更大量的刨削工作。木料如果长于 270mm 则无法装入筷子大师™。如果木料小于 270 毫米,当木纹 出现逆纹时又会无法夹紧。 最佳的选择是直纹理的硬木。尽管很多木材都是制作 筷子的优秀材料,但是如果有些木料已知有毒,您就需要 做一层表面处理(例如清漆或油脂)以防止在木头与食物 或皮肤接触过程中传播毒素。 F. 磨刀 多功能短刨所使用的刨刀在出厂时已经经过打磨,可 以直接使用。保持刨刀锋利可以让刨削更加简单顺滑。内 置的磨刀导向器可以帮助您简单快速地打磨刨刀。 图四 1. 拧松刨刀压紧旋钮,向上提起刨刀直至其从中摆脱,同 时向后拉出刨刀。...
- Page 29 4. 拧松筷子大师™的挡板锁紧旋钮,翻转筷子大师™并重 新锁紧旋钮。(图五) 5. 筷子大师™底部的一微米砂带等同于 8000 目磨刀石。 将磨刀导向器放置在通道内并且在砂带上前后滑动,用 您 的 手 指 在 刨 刀 前 部 施 加 一 点 压 力 即 可。 每 当 4-6 次 打磨后检查刀刃,您可以使用刨刀切一张纸来测试锋利 程度。打磨完成后将刨刀斜面向上装入短刨,调节刨刀 深 度, 现 在 您 可 以 开 始 制 作 更 多 的 筷 子 了。 如 果 需 要 更...
- Page 30 图六 3. 在筷子大师™中安装木料 将木料以对角线的姿态安装在筷子大师™中,这样便 可利用刨刃的整个宽度来进行刨削。同时,如图七所示, 木料需要两个梯形的嵌块固定。注意,此时木料的 1 号面 应该朝上,同时将两个调节旋钮设定在位置 1 处(使用红 色杠杆时)。而木料的尾部应该紧靠逆纹限位销(图三)。 之后将两个梯形嵌块向中间位置滑动并最终固定木料。 图七 4. 刨削木料相邻的 1,2 号面 将木料 1 号面朝上放置在筷子大师™上,再用嵌块固 定木料,您便可以开始刨削这个面了。将多功能短刨两侧...
- Page 31 的深度限位装置跨过筷子大师™的轨道,将短刨向下轻微 用力并向前推动。反复刨削,直至没有任何刨花出现 ---- 深度限位装置会限制刨刃刨削过多的木料。每当刨削几次 后将短刨中产生的刨花倒进垃圾篓,确保刨口没有被刨花 堵住。 当刨花厚度很薄的时候应该感觉到刨削基本不用力。 1 号面刨削结束后,移除两个梯形嵌块,将木料翻转, 使 2 号面朝上。再使用嵌块固定木料并重复以上步骤。 刨削完成 1,2 号面后取下此根木料,重新安装另一 根木料并刨削此木料的 1,2 号面。 5. 刨削木料的 3,4 号面 如果您使用红色杠杆,将两个调节旋钮旋转至位置 2。 如果您使用可选的绿色杠杆,则将调节旋钮旋转至位置 3。 在调节时可能需要提起杠杆以便调节旋钮旋转。 将 3 号面朝上,使用嵌块固定木料,同样刨削直至没 有刨花即可。移除嵌块,将 4 号面朝上并使用嵌块固定, 同样刨削至没有刨花为止。 重新安装另一根木料并且重复以上步骤刨削 3,4 号 面。 此时您将会拥有两根两端方头且四边都倾斜的筷子。 注意:有时会出现筷子表面不光滑的情况,这也不必担心, 这是由于木料木纹的方向和使用短刨的刨削方向不同而导...
- Page 32 6. 制作八边形筷子尖头 调节旋钮的设置和刨削 3,4 号面时的设置是一样的 (即红色杠杆设置在位置 2,绿色杠杆设置在位置 3)。 将筷子的一个直角边放入如图八所示的 V 型槽中。筷 子的尖头应该朝向远端并且抵住杠杆远端的限位。一手使 用短刨,另一手用拇指推动筷子抵住限位。使用短刨刨削 朝上的棱角,您只需要刨削筷子总长度的一半或三分之一 即可。当完全刨削完此棱角后,再用同样方法刨削其他三 个棱角。 图八 以上都完成后,您会获得一个完美的、尖头为八边形 的筷子 注意:八边形的准确性取决于刨刀深度。如果棱角刨削完 成后,四个角的刨削程度过小,无法形成标准的八边形时, 您可以增加刨刀深度或在杠杆下磁铁与调节旋钮之间垫放 一张纸片(后者在操作上更快)。再重新刨削四个棱角。 另外,在制作其他筷子前增加刨刀深度可以预防此类情况 再次发生。 如果棱角刨削完成后,四个角的刨削程度过大,甚至...
- Page 33 是形成一个新的正方形尖端时,则可在杠杆的磁铁和调节 旋钮间垫放一张纸片后重新刨削新生的四个棱角。另外, 在制作其他筷子前减小刨刀深度可以预防此类情况再次发 生。 7. 制作筷子尾部的方尖头 使用筷子大师™可以非常简单的制作筷子尾部的方尖 头。这会让您的筷子更加优美,也更加专业。 图九 在筷子大师™上安装滑台。滑台应该在轨道内顺滑地 滑动,并且没有任何阻碍。如果需要调节,拧松两颗透明 护罩的螺丝,然后使用配套的内六角扳手拧松或拧紧燕尾 槽顶丝。适当的调节燕尾槽顶丝,直至滑台可以顺滑的滑 动并且没有晃动和阻碍。正确调节后,再安装滑台护罩并 拧紧螺丝。 拧 松 筷 子 大 师 ™ 侧 面 的 三 颗 螺 丝 并 在 夹 缝 内 装 入 锯 片, 锯片的窄端朝向橙色挡板处并且锯齿向上安装 (图十) 。 锯片上的三个凹槽会嵌入三个螺杆,并校准锯片。拧紧三...
- Page 34 如图十一所示,将筷子放置在滑台上,筷子的尖头应 靠住操作者的右侧限位。 图十一 使用右手拇指按住滑台后侧的凹槽,并且右手食指和 中指向下压住筷子,轻轻的将筷子向右侧滑动且将筷子尖 头抵住滑台限位。 注意:在前后滑动滑台的时候必须要压紧筷子。您只有在 准备锯切接下来的侧面时才可以放松手指。 不能将筷子与滑台推出锯片外!只需推过锯片长度的 90% 即可,并且在筷子脱离锯片前即可拉回滑台与筷子。 如果将筷子推出锯片,那么则需要将筷子从滑台上取下再 将滑台拉回。如果失误多次可能会导致锯片损坏。当滑台 拉回后则可以旋转筷子并装入滑台进行下一次锯切。 稳定顺滑的推动滑台进行第一次锯切并拉回。记住, 在推动和拉回滑台的过程中都要保持筷子在滑台中保持稳 定。第一次操作结束拉回后,以 90 度旋转筷子,再次确 保筷子尖头紧靠限位并进行第二次锯切。以此类推,锯切 第 3,4 面。只要一直压紧筷子,便可制作出完美的方尖 头筷子。...
- Page 35 注 意: 在 据 切 完 筷 子 的 方 尖 头 后 请 务 必 取 下 锯 片。 注 意 千万不可在安装好锯片的情况下使用短刨。 如果成品并不完美,可拧松限位调节螺丝并且将其向 滑台移动一点距离。 重新拧紧限位并且重新锯切两根筷子, 这样便可以保证两根筷子的长度相同,只是筷子长度会相 对剪短。 8. 打磨筷子 以上步骤结束之后, 您手里便呈现出一双成型的筷子。 如果您觉得有些棱角略微尖锐,则可使用 400 目的砂纸 轻微打磨。当然,您并不需要将全部筷子都打磨一遍,您 只需要打磨一些较为锋利或者粗糙的地方。 为了筷子的重复使用,也为了延长筷子大师™的使用 寿命,您可在筷子表面涂抹一层食用级矿物油。只需要用 一张纸巾在每一根筷子表面涂抹少量的油,放置几分钟后 擦除多余的油即可。每一次使用完筷子后擦除干净即可等...
- Page 37 恭喜您 现在您是一位筷子大师了! 谨代表在俄勒冈州 -- 波特兰的 Bridge City 工具公司- 筷子大师™设计团队与我们在中国 -- 南京的生产合作伙伴, 感谢您购买了筷子大师™。我们知道您因此获得了制作筷子的 乐趣并且希望您可以将之与您的家人和朋友分享!筷子大师™ 还有个很有趣的使用方法,那就是举办一个派对的时候,邀请 您的客人自己制作一双筷子(否则就饿着肚子回家吧)! 筷子大师™是给家人和朋友礼物的不二之选。我们想不出 其他任何可以在 10 分钟内完成的木质作品,更何况是能带来 无与伦比的快乐和满足感的作品!如有需求,您可以登陆网站 www.ChopstickMaster.com 获得更多有关筷子大师™套件、 木料、袋子、修补件等资讯。...
- Page 40 For warranty service, please visit ChopstickMaster.com for contact information. ©2015 Fine Tools, LLC (DBA “Bridge City Tool Works”) 拥 有 所 有 版 权, 并且正在申请专利。Chopstick Master™, 筷子大师™ 和 Bridge City Tool Works™ 是 Fine Tools, LLC 所持有的商标。Fine Tools, LLC 商标未经允许...
Need help?
Do you have a question about the Chopstick Master and is the answer not in the manual?
Questions and answers