Bartscher KV1 Comfort Manual
Hide thumbs
Also See for KV1 Comfort:
- Manual (44 pages) ,
- Cleaning instructions manual (8 pages) ,
- Original instruction manual (5 pages)
Table of Contents
Advertisement
Advertisement
Table of Contents

Related Manuals for Bartscher KV1 Comfort


Summary of Contents for Bartscher KV1 Comfort
- Page 1 KV1 Comfort 190031...
- Page 2 Bartscher GmbH Phone: +49 5258 971-0 Franz-Kleine-Str. 28 Fax: +49 5258 971-120 Technical Support Hotline: +49 5258 971-197 D-33154 Salzkotten Germany www.bartscher.com Version: 2.0 Date of preparation: 2020-05-14...
-
Page 3: Table Of Contents
Original instruction manual Safety ......................2 Explanation of Signal Words ..............2 Safety instructions..................3 Intended Use ................... 6 Unintended Use ..................6 General information ..................6 Liability and Warranty ................6 Copyright Protection ................7 Declaration of Conformity ................ 7 Transport, Packaging and Storage .............. -
Page 4: Safety
Safety Diese Bedi enungsanlei tung besc hrei bt di e Installation, Bedi enung und Wartung des Geräts und gilt als wic htige Infor mationsquelle und N achschl agewer k. Di e Kenntnis aller enthaltenen Sic herheits hi nweis e und H andlungs anweisungen schafft die Vorauss etz ung für das sichere und s ac hger echte Ar beiten mit dem Gerät. D arüber hi naus müs sen die für den Ei ns atz ber eic h des Geräts geltenden ör tlichen Unfall verhütungs vorsc hriften und allgemeinen Sicherheits besti mmungen eing ehalten wer den. Dies e Bedi enungs anleitung is t Bes tandteil des Produkts und muss i n unmi ttelbarer N ähe des Ger äts für das In¬s tall ations-, Bedi enungs-, Wartungs- und R einigungspers onal jederzeit z ugänglich auf¬bewahrt werden. Wenn das Ger ät an eine dritte Pers on weiterg egeben wird, muss die Bedi enungsanlei tung mit ausgehändigt wer den. -
Page 5: Safety Instructions
Safety WARNING! The signal word WARNING warns against hazards that may lead to moderate or severe injuries or death if the hazards are not avoided. CAUTION! The signal word CAUTION warns against hazards that may lead to light or moderate injuries if the hazards are not avoided. , di e IMPORTANT! The signal word IMPORTANT indicates possible property damages,... - Page 6 Safety • Always completely unwind the power cord. • Never place the appliance or other objects on the power cord. • Always take hold of the plug to disconnect the appliance from the power supply. Flammable Materials • Never subject the appliance to contact with high temperature sources, e.g.: oven, furnace, open flame, heat generating devices, etc.
- Page 7 Safety Health hazard due to germs! • The water tank must be regularly emptied and disinfected to eliminate the possibility of accumulation of harmful and dangerous germs. Supervised Usage only • Only supervised appliance may be used. • Always remain in an immediate vicinity of the appliance. Operating Personnel •...
-
Page 8: Intended Use
General information Intended Use As described below, every use of the appliance for a purpose differing and/or diverging from its intended standard use, is prohibited and considered to be an unintended use. The following is an intended use: – Preparation of various types of coffee beverages, for example: coffee, cappuccino, espresso, etc. -
Page 9: Copyright Protection
General information Our coffee makers are constructed with components that are subject to wear and tear. As a rule, with correct maintenance of coffee makers, the following components that are subject to wear and tear sustain dispensing of the following amounts of beverages: –... -
Page 10: Transport, Packaging And Storage
Transport, Packaging and Storage Transport, Packaging and Storage Delivery Check Immediately upon reception, check the delivery for completeness and possible shipping damage. In the case of visible transport damage refuse to accept the appliance or accept it conditionally. Mark and note the scope of damage in shipping documents/consignment list of the shipping company and lodge a complaint. -
Page 11: Technical Data
Technical Data Technical Data Technical Specifications Automatic coffee machine KV1 Name: Comfort 190031 Item No.: Material: Plastic Grinder material: Steel Number of brewing unit groups: Water tank volume, in l: Coffee container volume, in g: 1.000 Programs with the possibility of individual settings: Pump pressure, in bar: Outlet, height regulation, from–to, in... - Page 12 Technical Data Version / Characteristics • Fully automatic • Control: touch • Settable parameters: grinding coarseness with 5-level scale, coffee dosing, amount of water, water temperature, amount of milk, video display • Programs: – 23, pre-set, individual write-over possible – Programming: password protected •...
-
Page 13: Functions Of The Appliance
Technical Data – Fixed water connection ½" – Water supply from external water tank • Milk supply: external via a milk hose • Other features: – Cup counter (per program and total) – Cleaning cycles memory – Milk temperature settable in individual programs –... -
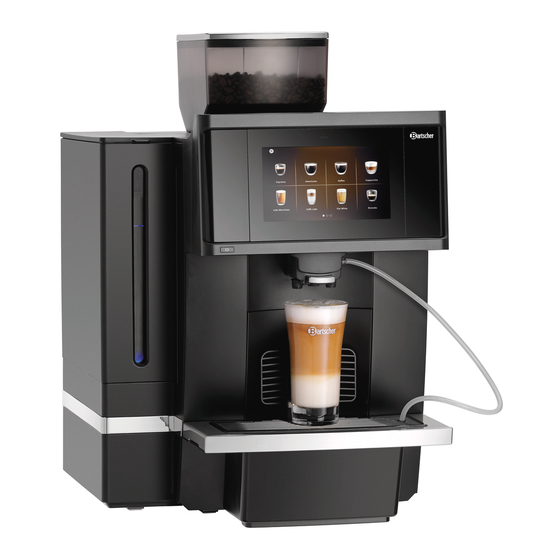
Page 14: List Of Components Of The Appliance
Technical Data List of Components of the Appliance 12 / 44 190031... -
Page 15: Installation And Operation
Installation and operation List of Components 1. Coffee container 2. Coffee container cover 3. Grinder with selector wheel 4. Control panel 5. Brewing unit 6. Hot water outlet 7. Coffee outlet 8. Milk hose 9. Grate for placing small cups 10. - Page 16 Installation and operation – sufficiently large, and thus enabling usage of the appliance with no problems; – easily accessible; – well ventilated. • Maintain sufficient clearance from table edges. The appliance might turn over and fall down. • Mind the sufficient clearance from the walls and other flammable objects or objects that are prone to discolouration.
- Page 17 Installation and operation To supply the appliance from water mains system, perform the following steps: Step 1: Water supply hose connection 1. Connect one end of the delivered water supply hose (with 1/4" thread) to the water connection stub at the back face of the appliance, and the second end (with 1/2"...
-
Page 18: Operation
Installation and operation 3. Select the 'Tap water supply' option. Step 3: Open the water mains system tap Operation Important indications • Fill the water tank solely with fresh potable water. • Never fill the water tank with warm/hot water, milk nor any other liquid. •... - Page 19 Installation and operation 2. To safely start up the appliance, read the following indications carefully. 3. Fill the water tank with fresh drinking water. 4. Mind the filling level. It may not exceed the MAX marking. 5. Fill the coffee container with coffee beans. Appliance Start-up 1.
- Page 20 Installation and operation Control Panel 1. Beverage selection icons 2. Setting button 3. Time button 4. Beverage short-cut access button Press the setting button and hold for 3 seconds to go to the short-cut access menu and introduce the necessary settings immediately. By swiping the short-cut access button left or right, you may go to the next beverage selection.
- Page 21 Installation and operation Preferred Settings 1. In menu, select 'Machine setting', and then 'Language setting' option. 2. For 'Language setting' option, select the language. 3. To end with, press the 'Back' button, to continue with the preferred settings. 4. For 'Water supply mode' select one of the connection methods: –...
- Page 22 Installation and operation 6. For 'Maintenance mode', introduce water hardness level in local water mains system. 7. To end with, press 'Back' button. 8. For 'Security&privacy', select an option: password protection or no protection 9. To end with, press 'Back' button.
- Page 23 Installation and operation 13. Set the required time for automatic switching ON/OFF. 14. Press 'OK' button, to confirm. 15. To introduce subsequent settings, press 'Back' button. 16. For 'AD-Standby' option, execute the required settings. 17. To end with, press 'Back' button.
- Page 24 Installation and operation , beverage s etti ngs, applianc e s etti ngs, etc., sel ect from amongst various s etti ng opti ons by pres sing the ' ∧' and '∨' setti ng buttons. Grinding coarseness setting 1. The coarseness of the ground coffee must be adapted to the selected coffee beans.
- Page 25 Installation and operation Preparing beverages with Milk 1. Connect firmly the milk hose with the milk frother and the milk container. 2. Place a cup under the coffee outlet and press, for example, 'CAPPUCCINO' icon to prepare the selected beverage. When the 'Please enjoy' message is displayed, it means that cappuccino is ready.
- Page 26 Installation and operation Message Settings 1. In 'Machine setting' menu, select 'Advertisement setting' option. 2. Then, select 'AD-Standby' option. The appliance switches into Standby mode, when no settings have been introduced for a minute. The video may be played in Standby mode.
- Page 27 Installation and operation 4. Select video and press 'OK' (only MP4 format is supported). Setting 'Welcome' Message 1. In 'Advertisement setting' menu, select 'AD- Welcome' option. 190031 25 / 44...
- Page 28 Installation and operation 2. Then, select one of the options for storing video. 3. Select video and press 'OK' (only MP4 format is supported). 26 / 44 190031...
- Page 29 Installation and operation Setting 'AD-Making beverage' Message 1. In 'Advertisement setting' menu, select 'AD-Making beverage' option. Setting 'AD-Complete' Message 1. In 'Advertisement setting' menu, select 'AD-Complete' option. 2. Search for an image. The image must be JPEG or PNG format. 190031 27 / 44...
-
Page 30: Cleaning And Descaling
Cleaning and Descaling Cleaning and Descaling Safety Instructions for Cleaning • Before cleaning, disconnect the appliance from the power supply. • Leave the appliance to cool down completely. • Make sure water does not enter the appliance. Do not immerse the appliance in water or other liquids during cleaning. - Page 31 Cleaning and Descaling 4. Remove the drip tray and the dregs container, empty them and reinstall it in the appliance. 5. Open the grinder cover. 6. Place a cleaning tablet in the pit. 7. Reinstall the cover and press 'OK' button to confirm.
- Page 32 Cleaning and Descaling When the cleaning process is complete, the appliance switches to the settings menu. Cleaning the Milk System 1. Clean the milk system daily. 2. In a separate container, prepare a solution of water and commercially available cleaning agent for coffee machines milk systems. 3.
- Page 33 Cleaning and Descaling 5. Remove the milk hose from the milk container or from the milk hose opening in the drip grate. 6. Introduce the milk hose into the container with milk system cleaning agent solution. 7. Clean the container with the cleaning agent.
- Page 34 Cleaning and Descaling Cleaning the milk frother 1. The milk frother should be cleaned 3. Remove the milk hose from the milk daily. frother. 2. Press it simultaneously at both sides and carefully remove from the appliance. 4. Disassemble the milk frother as 5.
- Page 35 Cleaning and Descaling 6. Wash the milk hose carefully under running water, allowing water to run also through the milk hose. 7. Reassemble the milk frother and reinstall it in the appliance. 8. Secure the milk hose on the milk frother.
- Page 36 Cleaning and Descaling 2. Clean the metal filter manually, using a soft cloth or a soft brush and inserting it carefully through the front opening. 3. When the filter is clean, reinsert the drip tray and the dregs container into the appliance.
- Page 37 Cleaning and Descaling Cleaning the water tank 1. Remove the water tank. 2. Wash the water tank thoroughly each time it is filled with water. 3. Then, fill the water tank with fresh potable water and reinstall it in the appliance.
-
Page 38: Descaling
Cleaning and Descaling Descaling In the course of daily use of the appliance, depending on the local water hardness, limescale may build up inside the appliance components. In order to maintain the appliance in top condition, and in order to be certain that every brewing process yields the best results, the appliance should be descaled from time to time. - Page 39 Cleaning and Descaling 5. Remove the drip tray and the dregs container, empty them and reinstall it in the appliance. 6. Place the milk hose in the drip grate opening. 7. Prepare a solution of commercially available cleaning agent for coffee machines milk systems and fresh potable water.
- Page 40 Cleaning and Descaling 11. Remove and empty the water tank. 12. Clean the water tank thoroughly. 13. Then, fill the water tank with fresh potable water and reinstall it in the appliance. 14. When the descaling process is complete, remove the drip tray and the dregs container.
- Page 41 Cleaning and Descaling Trans port des Gerätes • Keep the pac kaging of the c offee mac hine for s ubseq uent trans portati on. Transporting the Appliance • Keep the packaging of the coffee machine for subsequent transportation. • Make sure the water is removed from the appliance before transporting it to prevent damage to the appliance.
- Page 42 Cleaning and Descaling 3. In settings menu, select 'Machine setting', and then 'Factory reset' option. 4. Confirm the selection with 'OK' button. 5. Then, select 'Empty the waterway' option. 6. Press 'OK', to start emptying the water system. After the water system is emptied, the appliance switches off automatically. 7.
-
Page 43: Possible Malfunctions
Possible Malfunctions Possible Malfunctions Mögliche The table below contains descriptions of possible causes and solutions to malfunctions or errors during operation of the appliance. When malfunction cannot be removed, contact the technical service. Display Message Cause Solution Empty the drip tray The drip tray is full, and the Remove the drip tray, empty beverage preparation... -
Page 44: Disposal
Disposal Display Message Cause Solution Error codes 1–7 Errors cannot be defined Switch the appliance off and switch it back on If the problem persists, pull the plug out and contact the service company High pressure The used coffee beans are Set the coarser grinding too dark or the coffee is level of 4–5 or use a...
Need help?
Do you have a question about the KV1 Comfort and is the answer not in the manual?
Questions and answers