Free The Tone FUTURE FACTORY FF-1Y Firmware Update Procedures
Rf phase modulation delay
Hide thumbs
Also See for FUTURE FACTORY FF-1Y:
- Quick start manual (2 pages) ,
- Owner's manual (12 pages)
Advertisement
Quick Links
Advertisement

Related Manuals for Free The Tone FUTURE FACTORY FF-1Y


Summary of Contents for Free The Tone FUTURE FACTORY FF-1Y
- Page 1 FUTURE FACTORY RF PHASE MODULATION DELAY Firmware Update Procedures...
-
Page 2: Firmware Update Procedures
Overview of Update Steps 1. Prepare a PC (Windows) or Mac (Macintosh) computer and setup your MIDI interface for data transmission. 2. Download MIDI software (for Mac: SysEx Librarian, for Windows: SendSx) from the specified website and install it on your computer. 3. Download the latest firmware from the Free The Toneʼs website. 4. Connect the FUTURE FACTORY to the MIDI interface and send the firmware to the FUTURE FACTORY by using the installed MIDI software. 5. When the FUTURE FACTORY Display counts from “0” up to “100” and stops, push the 【SAVE】 switch, and the unit will automatically reboot itself and the firmware update will be completed. Since the user preset contents are not erased by this process, users can safely do the update. Firmware Update Procedures 1. Confirmation of Firmware Version 1) Turn on the power to the FUTURE FACTORY. 2) Look at the display on the top panel and note the version information shown just after powering up. 3) Turn off the power to the FUTURE FACTORY. You will see a number such as “1.0”, etc. If the version number of the firmware to be downloaded from the Free The Tone website is larger than the one you saw on your FUTURE FACTORYʼs display, please proceed to the update steps described below. If the version numbers are the same, then the latest firmware has been installed in your unit before shipment from our factory and you do not have to perform firmware update. 2. Preparation of Computer and MDI Interface 1) Prepare a PC (Windows) or Mac (Macintosh) computer and a MIDI interface. 2) Connect the computer and the MIDI interface. 3) Download the MIDI interface driver and make data transmission ready. At this phase the FUTURE FACTORY and the MIDI interface are not connected. Regarding setup procedures for your MIDI interface, please refer to its operation manual. (* We recommend YAMAHA USB-MIDI INTERFACE UX16 because we use this model for operation tests.) 3. Download of the Latest Firmware for FUTURE FACTORY From the Free The Toneʼs website (http://www.freethetone.com/support/download.html), download the latest firmware file for the FUTURE FACTORY and unzip it. Be sure to write down the name (ex: FIRMWARE) for the download destination folder in which you save the file. NOTE: When downloading the file, you may sometimes encounter a message which says that downloading FF-1Y̲FIRMWARE̲V**.ZIP can damage your computer. In such a case, ignore the message and continue the download. Note that**= firmware version number. - Page 3 For Mac Computer 1. Preparation of MIDI Software 1) Download the freeware “SysEx Librarian” from http://snoize.com/SysExLibrarian/ and save it in any folder. 2) Unzip the downloaded ZIP file and install it. 3) Start SysEx Librarian. The following screen will appear: 2. Configuration of SysEx Librarian Select the MIDI interface to be used from the main windowʼs pull-down menu. Select “Port1” for the YAMAHA UX16. The list of interfaces will not be shown if the MIDI interface is not connected or the MIDI interface driver is not installed correctly. In such a case, please check if the MIDI interface is connected correctly and the driver has been installed.
- Page 4 When you select the interface to be used, the screen changes to the following one: 3. Selection of Update File 1) Click the “+” (or “Add...” on some versions) button located near the left bottom corner of the main window. 2) Select the latest FUTURE FACTORY firmware file youʼve downloaded. After selecting the file, the following message appears. Click the “OK” button.
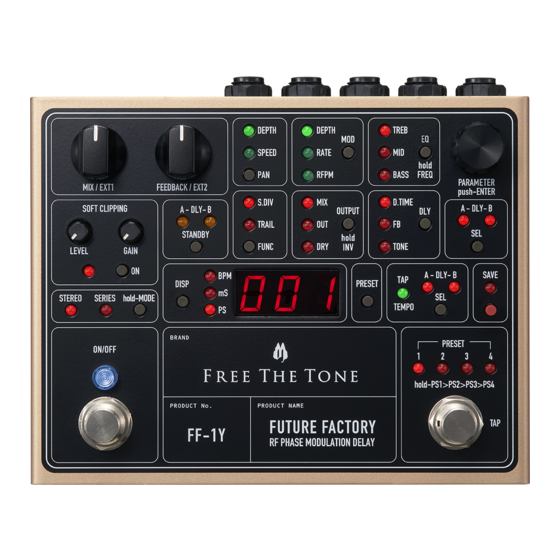
- Page 5 When the file is successfully read, its file name is listed as shown in the figure below. Click the file name to highlight. Now the file data in your Mac is ready to send. 4. Connecting FUTURE FACTORY and MIDI Interface 1) Connect the MIDI interface's MIDI OUT terminal to FUTURE FACTORYʼs MIDI terminal, and switch the MIDI IN OUT switch to "IN". 2) While holding down both the 【A-DLY-B SEL】 and 【SAVE】 switches on the FUTURE FACTORY , turn on the power to it. The display indicates “00”. Now the FUTURE FACTORY is ready to receive the data. 927A001 SIDE FRONT REAR INPUT LEVEL LINE INST MIDI ( MONO ) ( SERIES MODE )
- Page 6 5. Data Transmission Click the “Play” button near the left top corner of the SysEx Librarianʼs main screen. Data transmission starts as shown in the figure below. The FUTURE FACTORY ʼs display starts counting up from “00”. Data transmission will complete in about 60 seconds. CAUTION! NEVER TURN OFF THE POWER TO THE FUTURE FACTORY DURING DATA TRANSMISSION. When the FUTURE FACTORY ʼs display counts up to “100” and stops, press the 【 SAVE】 switch, then the unit will automatically initialize itself and the firmware update will be completed.
- Page 7 For Windows Computer 1. Preparation of MIDI Software 1) Download the shareware “SendSx” from http://www.bome.com/products/sendsx and save it in any folder. You can use it free for a trial period. 2) Unzip the downloaded ZIP file and install it to your computer. 3) Start SendSx. The following screen will appear: 2. Configuration of SendSx Select the MIDI interface to be used from the “MIDI Out” menu. Select “Yamaha UX-16-1” for the YAMAHA UX16. The list of interfaces will not be shown if the MIDI interface is not connected or the MIDI interface driver is not installed correctly. In such a case, please check if the MIDI interface is connected correctly and the driver has been installed.
- Page 8 When you select the interface to be used, its name is shown in the lower half of the screen: 3. Selection of Update File 1) Select “Open” from the “File” menu.
- Page 9 2) In the file selection window, select the firmware file youʼve downloaded. When the file is read successfully, a screen that looks like the following will appear. Now your computer is ready for data transmission.
- Page 10 4. Connecting FUTURE FACTORY and MIDI Interface 1) Connect the MIDI interface's MIDI OUT terminal to FUTURE FACTORYʼs MIDI terminal, and switch the MIDI IN OUT switch to "IN". 2) While holding down both the 【A-DLY-B SEL】 and 【SAVE】 switches on the FUTURE FACTORY , turn on the power to it. The display indicates “00”. Now the FUTURE FACTORY is ready to receive the data. 927A001 SIDE FRONT REAR INPUT LEVEL LINE INST MIDI ( MONO ) ( SERIES MODE ) 5. Data Transmission Click the “Send(F4)” but ton near the left top corner of the SysEx Librarianʼs main screen. Data transmission starts as shown in the figure below. The FUTURE FACTORY ʼs display starts counting up from “00”. Data transmission will complete in about 60 seconds. CAUTION! NEVER TURN OFF THE POWER TO THE FUTURE FACTORY DURING DATA TRANSMISSION. When the FUTURE FACTORY ʼs display counts up to “100” and stops, press the 【 SAVE】 switch, then the unit will automatically initialize itself and the firmware update will be completed. ...
Need help?
Do you have a question about the FUTURE FACTORY FF-1Y and is the answer not in the manual?
Questions and answers