Table of Contents
Advertisement
Quick Links
AN5472
How to work with LPWAN cellular connectivity on STEVAL-STWINKT1 for cloud
condition-based monitoring applications
Introduction
Cellular low power wide area network (LPWAN) technologies are highly applicable in Industrial Internet of Things (IIoT)
scenarios, especially those involving battery-powered sensor nodes that require wireless, low power and long-range
connectivity. Condition monitoring and predictive maintenance applications can take advantage of LPWAN protocols such as
NB-IoT and LTE-M to deliver affordable cloud monitoring solutions for industrial equipment when wired connectivity is not viable.
Narrow band Internet of Things (NB-IoT) is a standards-based, LPWAN technology that offers a wide range of services
associated with connected objects. It can significantly reduce power consumption in user devices and still provide the necessary
coverage for application control and data transmission services, including security and privacy support for user identity
confidentiality, entity authentication, confidentiality, data integrity, and mobile equipment identification.
Long-term evolution machine type communication (LTE-M) offers better performance and can therefore complement NB-IoT
when high data transmission speeds and terminal mobility are required, while the superior radioelectric coverage, lower costs
and longer battery life offered by NB-IoT should be preferred when these services are not necessary.
The
STSW-STWINCELL
software package lets you test and develop a smart industrial condition monitoring sensor node
connected to a cloud application based on Amazon Web Services (AWS) over innovative LPWAN cellular technologies such as
NB-IoT and LTE-M. The firmware runs on the SensorTile Wireless Industrial Node (STEVAL-STWINKT1) along with the STMod
+ cellular expansion board with BG96 modem from Quectel (included in the
P-L496G-CELL02
Discovery pack).
Figure 1.
ST Predictive Maintenance scenario using cellular networks
This cellular connectivity allows the
STSW-STWINCELL
firmware to publish smart, prepocessed data from
STEVAL-STWINKT1
sensor nodes on the ST Predictive Maintenance Dashboard (DSH-PREDMNT) cloud application based on Amazon Web
Services (AWS), from which you can gather, monitor and analyze critical vibration, ultrasound and environmental data on
specific industrial equipment.
RELATED LINKS
Use Google Chrome to run the Predictive Maintenance Dashboard with your myST login credentials
AN5472 - Rev 1 - March 2020
www.st.com
For further information contact your local STMicroelectronics sales office.
Advertisement
Table of Contents

Related Manuals for ST STEVAL-STWINKT1


Summary of Contents for ST STEVAL-STWINKT1
-
Page 1: Figure 1. St Predictive Maintenance Scenario Using Cellular Networks
Amazon Web Services (AWS) over innovative LPWAN cellular technologies such as NB-IoT and LTE-M. The firmware runs on the SensorTile Wireless Industrial Node (STEVAL-STWINKT1) along with the STMod + cellular expansion board with BG96 modem from Quectel (included in the P-L496G-CELL02 Discovery pack). -
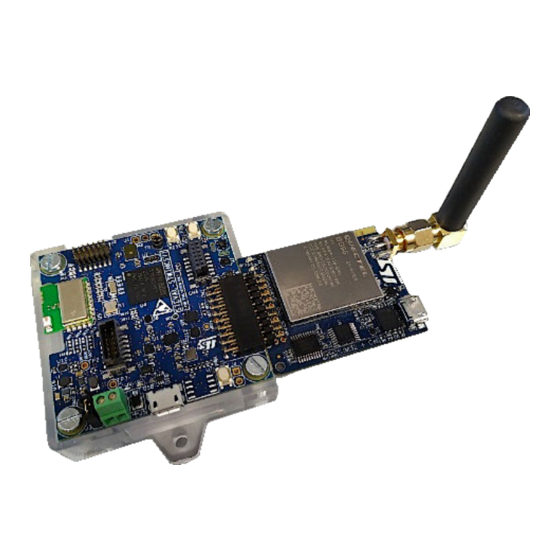
Page 2: Hardware And Software Requirements
AN5472 Hardware and software requirements Hardware and software requirements Figure 2. STEVAL-STWINKT1 with STMOD+ cellular add-on board Hardware requirements STEVAL-STWINKT1 STWIN SensorTile Wireless Industrial Node development kit – Core system board with industrial-grade sensors and ultra-low-power MCU – Li-Po battery 480 mAh –... - Page 3 AN5472 Software requirements X-CUBE-CELLULAR cellular connectivity software expansion for STM32Cube. Note: This software is optional and can be used to optimize the scanning and connection times of the BG96 modem on the cellular expansion board. Quectel LTE&5G Windows USB Driver. This software is optional and offers an alternative way to optimize the BG96 module scanning and connection times.
-
Page 4: Firmware
STM32L4R9ZI EGPRS Module LPS22HH MP23ABS1 STMod+ cellular expansion board Development STEVAL-STWINKT1 (BG96) boards • Board Support Package (BSP): set of APIs related to the hardware components on the boards. • Hardware abstraction layer (HAL): low-level drivers and the hardware interfacing methods to interact with the upper layers. -
Page 5: Folder Structure
AN5472 Folder structure Folder structure STSW-STWINCELL This software package is developed using the standard STM32Cube framework structure shown below: \STSW-STWINCELL ├───_htmresc ├───Documentation ├───Drivers ├───Middlewares ├───Projects └───Utilities _htmresc This folder contains the html resources. Documentation This folder contains the documentation. Drivers This folder contains the following main groups: ├───Drivers │... - Page 6 Vendor-independent hardware abstraction layer for ARM Cortex-M series, including DSP Libraries used for all projects. STM32L4xx_HAL_Driver Microcontroller HAL libraries. Middlewares This folder contains libraries oriented to provide, at high application level, specific APIs: ├───Middlewares │ ├───ST │ │ ├───STM32_Cellular │ │ ├───STM32_Connect_Library │...
-
Page 7: Application Behavior
AN5472 Application behavior parson Provides a lightweight json library written in C. Projects This folder contains the user level files of the application software: ├───Projects │ ├───Demonstrations │ │ └───C2C │ │ └───AWS │ │ ├───Binary │ │ │ ├───STSW-STWINCELL_BG96_Vx.y.z.bin │... -
Page 8: Ide Configuration Selection
• USE_INE_FDM_FEAT • USE_ACO_FEAT RELATED LINKS 5 How to activate the ST Predictive Maintenance Dashboard on page 19 6 Demonstration application on page 24 IDE configuration selection Each project comes with a separate configuration for each modem to be used. Figure 4. -
Page 9: Figure 5. Keil Configuration Selection
AN5472 IDE configuration selection Figure 5. Keil configuration selection Figure 6. STM32CubeIDE configuration selection AN5472 - Rev 1 page 9/48... -
Page 10: Hardware Setup
AN5472 Hardware setup Hardware setup Set up and power supply Step 1. Connect the battery to the STEVAL-STWINKT1. Figure 7. STEVAL-STWINKT1 battery connection AN5472 - Rev 1 page 10/48... -
Page 11: Figure 8. Steval-Stwinkt1 Stmod+ Power Supply Selection
Step 2. Route the external unregulated supply pin of the battery charger to the power supply pin of the STMOD + connector (short pins 2-3 of J3). Figure 8. STEVAL-STWINKT1 STMOD+ power supply selection Step 3. Mount the STEVAL-STWINKT1 with the battery in the plastic box. -
Page 12: Figure 10. Steval-Stwinkt1 Start In Battery Mode
AN5472 Set up and power supply Step 6. Power on the kit. – If powered via battery, press the PWR button on the STEVAL-STWINKT1 for more than 2 seconds. Figure 10. STEVAL-STWINKT1 start in battery mode – If powered through USB, just connect a micro USB cable between the micro USB socket of the STEVAL-STWINKT1 and a USB port with at least 1 A of current capability. -
Page 13: Figure 11. Steval-Stwinkt1 Start In Usb Mode
AN5472 Set up and power supply Figure 11. STEVAL-STWINKT1 start in USB mode Step 7. Connect the STEVAL-STWINKT1 and the STLINK-V3MINI debugger with the 14-pin programming cable plugged on J2. AN5472 - Rev 1 page 13/48... -
Page 14: Status Leds
Connect the STLINK-V3MINI debugger to a USB port on your PC via a micro USB cable. Figure 12. STEVAL-STWINKT1 connected to STLINK-V3MINI Step 9. Turn off the board. – If the board is only powered by the Li-Po battery, hold down the PWR button for more than 3 seconds (SW feature). -
Page 15: Note On Battery Operation
This does not create any issues when the same cellular expansion board is plugged into an STEVAL-STWINKT1 powered via USB, but when the STEVAL-STWINKT1 is only powered by a lithium battery, the input voltage provided to the STMod+ cellular expansion board is nominally 3.7 V, which is below the voltage the LDO was designed to output. -
Page 16: Firmware Setup
RELATED LINKS 3.1 Set up and power supply on page 10 How to upload the firmware to the microcontroller Follow the procedure below to load the demonstration firmware onto STEVAL-STWINKT1 and the STMOD+ cellular expansion board. Step 1. Download and unpack the STSW-STWINCELL firmware. -
Page 17: Figure 15. Stm32Cubeprogrammer Connected Mask
AN5472 How to upload the firmware to the microcontroller Step 4. Click [Erasing & Programming] Figure 15. STM32CubeProgrammer connected mask Step 5. Choose the appropriate (cellular module name) pre-built binary located in the STSW-STWINCELL \Projects\Demonstrations\C2C\AWS\Binary\ folder. Step 6. Check the [Verify programming], [Run after programming] and [Download file] boxes Step 7. -
Page 18: Figure 17. Stm32Cubeprogrammer Erasing & Programming Completed
AN5472 How to upload the firmware to the microcontroller Step 9. Click [Disconnect] Figure 17. STM32CubeProgrammer Erasing & Programming completed AN5472 - Rev 1 page 18/48... -
Page 19: How To Activate The St Predictive Maintenance Dashboard
STEVAL-STWINKT1 with cellular connectivity on ST Predictive Maintenance Dashboard based on AWS IoT (Amazon Web Services internet of things) platform. You can configure the firmware to publish any or all of the following data: Vibration signal preprocessing in the time domain... -
Page 20: Figure 19. Dsh-Predmnt Home Page
How to activate the ST Predictive Maintenance Dashboard Step 2. Log in to the ST Predictive Maintenance Dashboard with your myST credentials Once you log in, you can create new devices and manage any previous devices you have already created. -
Page 21: Figure 21. Dsh-Predmnt Add Device
AN5472 How to activate the ST Predictive Maintenance Dashboard Step 4. Click on [Add Device] and fill in the information on the pop-up window. Figure 21. DSH-PREDMNT add device Step 5. Then click [Register] A new pop-up window confirms the device creation and provides a link to download the files for connecting the device with the cloud and the IoT Endpoint. -
Page 22: Figure 23. Dsh-Predmnt Set Streaming Time
AN5472 How to activate the ST Predictive Maintenance Dashboard Step 9. Change the streaming time as shown in the figure below. It also possible to set the thresholds to be monitored. Figure 23. DSH-PREDMNT set streaming time Step 10. Add the new device to the dashboard by selecting the corresponding tab. -
Page 23: Figure 25. Dsh-Predmnt Dashboard Waiting For First Connection
AN5472 How to activate the ST Predictive Maintenance Dashboard Step 11. The dashboard is now standing by for connection with the STEVAL-STWINKT1 sensor node. Figure 25. DSH-PREDMNT dashboard waiting for first connection RELATED LINKS The DSH-PREDMNT web folder has several resources, including a user manual and a quick Getting Started guide. -
Page 24: Demonstration Application
AN5472 Demonstration application Demonstration application Before you use the demonstration application, you must set up the hardware and load the configured firmware onto the microcontroller. RELATED LINKS 3.1 Set up and power supply on page 10 4 Firmware setup on page 16 How to set up and use the demo application Step 1. -
Page 25: Figure 26. Tera Term Terminal Setup
AN5472 How to set up and use the demo application Step 2. Select the appropriate COM port and set the parameters as shown: Figure 26. Tera Term Terminal setup – [New line] ◦ [Receive]: AUTO ◦ [Transmit]: LF Figure 27. Tera Term Serial setup –... - Page 26 - Network Interface connected: - IP address : 10.18.44.41. Enter server address: (example: xxx.iot.region.amazonaws.com) Step 6. Enter the IoT Endpoint information. This information is shown during device creation phase on ST Predictive Maintenance Dashboard. AN5472 - Rev 1 page 26/48...
- Page 27 AN5472 How to set up and use the demo application Step 7. Enter the name of the device. Enter server address: (example: xxx.iot.region.amazonaws.com) a31pjrd6x4v4ba-ats.iot.eu-west-1.amazonaws.com read: ---> a31pjrd6x4v4ba-ats.iot.eu-west-1.amazonaws.com <--- Enter device name: (example: mything1) STWIN_BG96 read: ---> STWIN_BG96 <--- Updating TLS security credentials. Enter the x509 certificates or keys as per the following format: -----BEGIN CERTIFICATE----- YMPGn8u67GB9t+aEMr5P+1gmIgNb1LTV+/Xjli5wwOQuvfwu7uJBVcA0Ln0kcmnL...
-
Page 28: Figure 28. Tera Term File Menu
How to set up and use the demo application Step 8. In Tera Term, select [File]>[Send file...] to load the certificates for the AWS IoT device. This information is available in the zip file you download during the device creation phase on ST Predictive Maintenance Dashboard. Figure 28. - Page 29 AN5472 How to set up and use the demo application Step 9. Load the root CA. Enter your root CA: -----BEGIN CERTIFICATE----- MKKDQTCCAimgAwKBAgKTBmyfz5m/jAo54vB4ikPmljZbyjANBgkphkiG9w0BAQsF ADA5MQswCQYDVQQGEwWVUzEPMA0GA1UEChMGQW1hem9uMRkwFwYDVQQDExBBbWF6 b24gUm9vbCBDQSAxMB4XDTE1MDUyNjAwMDAwMFoXDTM4MDExNzAwMDAwMFowOTEL MAkGA1UEBhMCVVMxDzANBgNVBAoTBkFtYXpvbjEZMBcGA1UEAxMQQW1hem9uKFWv b3QgQ0EgMTCCASKwDQYWKoZKhvcNAQEBBQADggEPADCCAQoCggEBALW4gHHKeNXj ca9HgFB0fW7Y14h29Wlo91ghYPl0hAEvrAKthtOgQ3pOspTQNroBvo3bSMgHFzZM 9O6KK8c+6zf1tRn4SWiw3te5bjgbYZ6k/oK2peVKVuRF4fn9tBb6bNpcmzU5L/pw KFAGbHrQgLKm+a/sRxmPUDgH3KKHOVj4utWp+UhnMWbulHheb4mjUcAwhmahRWa6 VOujw5H5SNz/0egwLX0tbHA114gk957EWW67c4cX8jWGKLhD+rcbpsp08p8kDi1L 93FcXmn/6pUCyziKrlA4b9v7LWKbxcceVOF34GfKD5yHK9Y/QCB/KKDEgEw+OyQm jgSubWrKpg0CAwEAAaNCMEAwDwYDVR0TAQH/BAUwAwEB/zAOBgNVHQ8BAf8EBAMC AYYwHQYDVR0OBBYEFKQYzKU07LwMlWQuCFmcx7KQTgoKMA0GCSpGSKb3DQEBCwUA A4KBAQCY8jbaQZChGsV2USggNiMOruYou6r4lK5KpDB/G/wkjUu0yKGX9rbxenDK U5PMCCjjmCXPK6T53iHTfKUWrU6abTrCC2pWeHZERxhlbK1Bjjt/msv0tabQ1wUs N+gDS63pYaACbvXy8MWy7Vu33PpUXHeeE6V/Up2V8viTO96LXFvKWlWbYK8U90vv o/ufQWVtMVT8QtPHRh8jrbkPSHCa2XV4cbFyQzR1blbZwgWcWmApzyMZFo6KQ6XU 5MsK+yMRQ+hDKXWioalbXgjUkK642M4UwtBV8ob2xWNDb2ZhwLnoQbeXeGADbkpy rpXRfboQnoZsG4p5WTP468SQvvG5 -----END CERTIFICATE----- read: --->...
- Page 30 AN5472 How to set up and use the demo application Step 10. Load the device certificate Enter your device certificate: -----BEGIN CERTIFICATE----- MKKDWjCCAkKgAwKBAgKVAKPWpBtX6wziOY4z0pX19T7aU5owMA0GCSpGSKb3DQEB CwUAME0xSzBWBgNVBAsMQkFtYXpvbiBXZWKgU2VybmljZXMgTz1BbWF6b24uY29t KEluYy4gTD1TZWF0bGxlKFNUPVbhc2hpbmb0b24gQz1VUzAeFw0yMDAxMDgxNTU5 NDZaFw00OTEyMzEyMzU5NTlaMB4xHDAaBgNVBAMME0FXUyBWb1QgQ2VybGlmaWNh bGUwggEiMA0GCSpGSKb3DQEBAQUAA4KBDwAwggEKAoKBAQClM1MNC651mpVE58v0 NL4E1Bj3U/uyEbPPNoOWxKNpbilBwGWODPUAuxobCEGosngjSEb9HUNnWYrmmb8C n+WD0Xbfb9TWpLlmYEvwKwmvKuwU044LLtf/SDep6r9AabRHFfcB2p/HpMlYXYSM 263pm31Ykwlg6bM+vMAOLN8Op4EWWL2mV0WSr/vVmorVYUSiR8cmCwy83i6+KSrp lD5Tm2PWmAcQXWvt+SFo1PMG39KfQUmMo4/mHZK8wu1yDPS6Qj504FKy0R9vpS9R L0+pSuekXZ2Yo8vfF/TbfhiGxtsyVEA6GGnpyT5Y0jvu6AcTh+EbmnSREc/cOfZW 6nTRAgMBAAGjYDBeMB8GA1UbKwQYMBaAFKGrT790Mr50PFEctviicGkaTTsSMB0G A1UbDgQWBBSKe3XF7KUTlz8ScmsgVR1Kftz2YTAMBgNVHRMBAf8EAjAAMA4GA1Ub DwEB/wQEAwKHgDANBgkphkiG9w0BAQsFAAOCAQEAs/jWLhZrMpCyHG+lQWnrf7gK 1TRG6G+1DFfxzK6xCj+RFoNb9z617ncR7mFkpofKEY4XjVLpVDppEUmip/cBE7Cb 5crHSApEoO9vmpL/Sse/zRzkj5ui7C6Ycr609QLRAZRpb6/4MaeefzTLw1XCgLYz Z0K4zL2rrp6FUv6WrX8h8b8+Zulm+V5KBGnNlP18gR1Z28f69htKoXne/mSr5NXY XH9F0kPA/AUmD4mGZaUcsDRot0FOn5HMLTo2vf7tyciwTZxnYYPSiBi6AF5rCAeB jPagM+lmhmNKeFcoen1m/HU5lLkKwK6/WMf24HPkK5avDpMo036U6NpY43YwCQ== -----END CERTIFICATE----- read: --->...
- Page 31 AN5472 How to set up and use the demo application Step 11. Load the device key. Enter your device key: -----BEGIN RSA PRIVATE KEY----- MKKEowKBAAKCAQEApTNTDQuubZpVROfL9DS+BNQY91P7shGzzzaDicSDaW4pQcBl jgz1ALsaGwhBpLW4K0hHfR1DZyWK5pnfAp/lg9F233fUyaS5ZmBL8CMWryLsFNOO Cy7X/0g3pup/QGnURxX3Abpvx6TWWF2EjNut6Zt9WWMWYOnTPrzADizfDpuBCVi9 plbFkp/71ZpK1WFEokfHWgsMvN4uvikp6ZQ+U5tjyZgHEFyb7fkhaNTzBt/Sn0FW jKOP5h2SvMLtcgz0ukK+bOBSstEfb6kvUS9PpkrnpF2bmKPL3xf0234YhsbbMlRA Ohhp6sk+WNK77ugHE4fhHZp0kRHP3Dn2Sep00QKDAQABAoKBAHOMwrpNQSnhRic8 OtxFR+P4tr3KcHTNDQgTCU6Dtac49oKXKHGLfpNUS5482DA3WPEKzXglz8+F4vKW DoO3c8KP8SW9m4ivPz7sfDErUMp/koG+t8v6p/pXeRiDueWEK8bVBkC1xb3O1UaW ov0jazHLKWGjxxuScb+gWnXDzQFktHKVKyrXAPlVWf5c8VQrLQ6bS/rL3rcjHnfW Qbpp1BGToPt7C7V9MhAchcQNCwnemDWacQ94G5BFW4eyN9bON9SSpjPnLzWfVbZ9 9kpiyQSWNxGXTy8o0f97Dr5Hhu7lr8FK2p54nLUyoAE9eNhRBBs2WBNHbOkozhAj 5H+bWkECgYEA2QFjmiKslvosNwcCbKNmsbkWb97atzAjNObmKt/wpWcYtfil5LN9 /zeOtyjGX5n602KcB8sVU7hpfgmR5Q0y6MEWeAnwwe0T354LDHCWQeLjitrnrXVa M6mbg0GhlBPpHsKDTz/raXmH2yMyD/ygOrK3pt/Z3Y6ol2b+Fb+rew8CgYEAwuLS ZHoOvM0b66fGjXobcuvN43i8kTi6K/SG2zQEiiM93KSPFuwk5EzlbE1a47bcuFuC 3Oi7HmBzlyx1NnNLFmmFKWTbiGQVSeKghafExXM8fyUO0aHEt+KgkDKKZ+inaoye TMgHltZ/Xs89YP2SyVz3SThN8oFDHYKpiHiKkh8CgYEAp+kRPrRuuCu/hpyf48yD p92EKyB/L/vWYie/tTEuMKYbcsKA6pOQPKipf0LHrDWjBWkGs2kKiYtW5UWWZ1t9 WugxEWTwe72MAR1zAx8Ytahv1KNpfKgvMYZu4W8p/UAiw7BSlkGpUCW/X2puU/xv...
- Page 32 AN5472 How to set up and use the demo application Step 12. As the AWS IoT section should already be configured, the sensors are automatically enabled and the MQTT connection runs. Setting the RTC from the network time. Connecting to www.gandi.net at ipaddress: 151.101.193.103 20001410 =>...
- Page 33 AN5472 How to set up and use the demo application Step 14. The data is now ready to begin uploading to the ST Predictive Maintenance Dashboard: – Sound analysis in the frequency domain Published to topic pm/STWIN_BG96/sense/acoustic: {"Aco_FFT":[-72.86,-72.4,-74.61,-75.94,-73.730000000000009,-72.53,-73.92,-76.33,- 79.17,-78.39,-76.7,-77.540000000000009,-81.15,-83.790000000000009,-83.069999999999991 ,-81.340000000000009,-80.680000000000009,-81.61,-83.659999999999991,-84.65,- 82.519999999999991,-79.94,-80.86,-84.02,-86.13,-84.57,-82.090000000000009,-81.87,-...
- Page 34 AN5472 How to set up and use the demo application – Vibration analysis in the frequency domain Published to topic pm/STWIN_BG96/sense/inertial_fdm: {"Ine_FFT": [[0.00,0.00,0.00,0.00],[25.96,0.00,0.00,0.01],[51.91,0.01,0.00,0.01], [77.87,0.01,0.00,0.01], [103.83,0.01,0.01,0.01],[129.79,0.01,0.01,0.01],[155.74,0.01,0.01,0.01], [181.70,0.01,0.01,0.01], [207.66,0.01,0.01,0.01],[233.61,0.01,0.01,0.01],[259.57,0.01,0.01,0.01], [285.53,0.01,0.01,0.01], [311.48,0.01,0.01,0.01],[337.44,0.01,0.01,0.01],[363.40,0.01,0.01,0.01], [389.36,0.01,0.01,0.01], [415.31,0.01,0.01,0.01],[441.27,0.01,0.01,0.01],[467.23,0.01,0.01,0.01], [493.18,0.01,0.01,0.01], [519.14,0.01,0.01,0.01],[545.10,0.01,0.01,0.01],[571.05,0.01,0.01,0.01], [597.01,0.01,0.01,0.01], [622.97,0.01,0.01,0.01],[648.93,0.01,0.01,0.01],[674.88,0.01,0.01,0.01], [700.84,0.01,0.01,0.01], [726.80,0.01,0.01,0.01],[752.75,0.01,0.01,0.01],[778.71,0.01,0.01,0.01], [804.67,0.01,0.01,0.01], [830.63,0.01,0.01,0.01],[856.58,0.01,0.01,0.01],[882.54,0.01,0.01,0.01], [908.50,0.01,0.01,0.01], [934.45,0.01,0.01,0.01],[960.41,0.01,0.01,0.01],[986.37,0.01,0.01,0.01], [1012.32,0.01,0.01,0.01], [1038.28,0.01,0.01,0.01],[1064.24,0.01,0.01,0.01],[1090.20,0.01,0.01,0.01],...
- Page 35 Published to topic pm/STWIN_BG96/sense/environmental: {"Humidity": 34.37, "Pressure": 1028.54, "Temperature": 30.28} Step 15. Confirm that the data has been uploaded onto the ST Predictive Maintenance Dashboard. When all the features are enabled, the dashboard should display the following information: – Environmental parameters ◦...
-
Page 36: Sims Used In Testing
DSH-PREDMNT data for sensor node subject to 1 kHz vibration and 5.5 kHz acoustic waves RELATED LINKS 5 How to activate the ST Predictive Maintenance Dashboard on page 19 7 Optimizing modem scanning and connection times on page 37 SIMs used in testing The APN information that you load through the terminal window during the application setup relates to the cellular network operator and the protocol used by the SIM. -
Page 37: Optimizing Modem Scanning And Connection Times
AN5472 Optimizing modem scanning and connection times Optimizing modem scanning and connection times As the BG96 modem can scan all possible bands available to the modem, it may be useful to restrict modem scanning to bands that are compatible with the device location and radio environment. When no M1 or NB1 network is available, the 2G fallback connection can take several minutes. -
Page 38: Figure 31. Load Firmware Onto P-L496G-Cell02
AN5472 Program the BG96 modem using X-CUBE-CELLULAR software Step 4. Run Tera Term, select the appropriate COM port, and set the parameters shown below: Terminal – [New line] ◦ [Receive]: CR ◦ [Transmit]: CR – [Local Echo] selected Serial – [Baud rate]: 115200 –... -
Page 39: Program Bg96 Sending At Commands
P-L496G-CELL02 Discovery board and detach the cellular expansion board with BG96 modem. Step 11. Connect the cellular expansion board onto the STEVAL-STWINKT1 sensor node and run the STSW-STWINCELL demo software. RELATED LINKS The X-CUBE-CELLULAR web folder has several resources, including a user manual. -
Page 40: Figure 32. Steval-Stwinkt1 With Bg96 Cellular Expansion Board Connected To Pc
Program BG96 sending AT commands Step 4. Connect another USB cable from your PC to the micro USB socket on the BG96 cellular expansion board Figure 32. STEVAL-STWINKT1 with BG96 cellular expansion board connected to PC AN5472 - Rev 1 page 40/48... -
Page 41: Figure 33. Prepare Quectel Bg96 To Expose Usb At Port
AN5472 Program BG96 sending AT commands Step 5. Run the demonstration application until you are prompted for the IoT Endpoint Figure 33. Prepare Quectel BG96 to expose USB AT Port Step 6. Start a new instance of Tera Term, select the appropriate COM port and set the parameters shown below: Terminal –... - Page 42 AN5472 Program BG96 sending AT commands Step 7. Use the following Network Searching AT commands to configure the modem to scan for NB-IoT only. You can modify the code to limit scanning to other networks and bands according the document "BG96 Network Searching Scheme Introduction".
-
Page 43: Acronyms And Abbreviations
Amazon Web Services Board Support Package Certificate Authority CMSIS Cortex Microcontroller Software Interface Standard DSH-PREDMNT ST Predictive Maintenance Dashboard EDGE Enhanced Data rates for GSM Evolution also known as EGPRS EGPRS Enhanced General Packet Radio Service eMTC Enhanced Machine Type Communication... -
Page 44: Revision History
AN5472 Revision history Table 2. Document revision history Date Version Changes 23-Mar-2020 Initial release. AN5472 - Rev 1 page 44/48... -
Page 45: Table Of Contents
How to upload the firmware to the microcontroller ........16 How to activate the ST Predictive Maintenance Dashboard ......19 Demonstration application . - Page 46 ST Predictive Maintenance scenario using cellular networks........
- Page 47 AN5472 List of tables List of tables Table 1. List of acronyms ..............43 Table 2.
- Page 48 ST’s terms and conditions of sale in place at the time of order acknowledgement. Purchasers are solely responsible for the choice, selection, and use of ST products and ST assumes no liability for application assistance or the design of Purchasers’...
Need help?
Do you have a question about the STEVAL-STWINKT1 and is the answer not in the manual?
Questions and answers