Table of Contents
Advertisement
Available languages
Available languages
Quick Links
Immer. Sicher. Dicht.
Immer. Sicher. Dicht.
Montageanweisung MIS 60D / 6 - 34, 3 x 10 bzw. 4 x 5-7 -
für Wandstärken 200 - 900 mm und 900 - 1200 mm
Assembly instruction MIS 60D / 6 - 34, 3 x 10 and 4 x 5-7 -
for wall thicknesses of 200 - 900 mm and 900 - 1200 mm
Instructions d' installation MIS 60D / 6 - 34, 3 x 10 et 4 x 5-7 -
pour des épaisseurs de paroi de 200-900 mm et 900-1 200 mm
Einsatz
4 x Ø 5-7
Einsatz
Einsatz
3 x Ø 10
Ø 6-12
Vor Beginn der Montage Anweisung lesen und gut aufbewahren!
Read the instructions prior to installation and keep them in a safe place!
Lire les instructions avant le montage et bien les conserver!
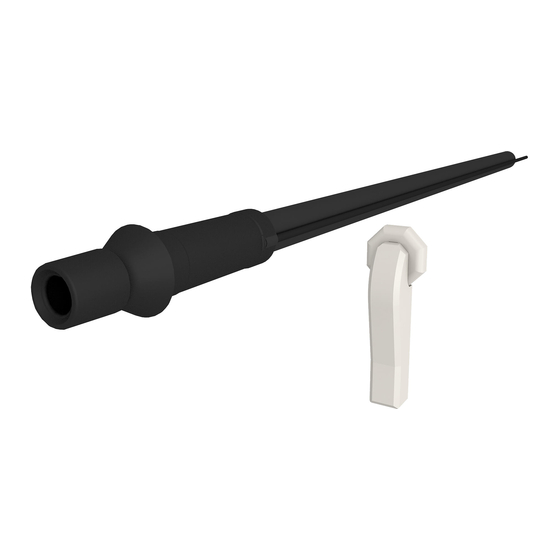
Abb.: MIS 60 D 30-34
Einsatz
Einsatz
Ø 12-18
Ø 18-24
Wandab-
schlussrosette
WAR 60
DE
EN
FR
Einsatz
Ø 24-30
Aufnahme -
Rasterbogen
(optional)
www.hauff-technik.de
Advertisement
Chapters
Table of Contents

Related Manuals for Hauff-Technik MIS 60D


Summary of Contents for Hauff-Technik MIS 60D
- Page 1 200 - 900 mm and 900 - 1200 mm Instructions d‘ installation MIS 60D / 6 - 34, 3 x 10 et 4 x 5-7 - pour des épaisseurs de paroi de 200-900 mm et 900-1 200 mm Abb.: MIS 60 D 30-34...
-
Page 2: Table Of Contents
Benötigtes Werkzeug und Hilfsmittel ............ 8 10 Vor der Montage der Mauerdurchführung sind folgende Hinweise zu beachten: ..................... 9 11 Montage vorbereiten ................11 12 MIS 60D montieren ................12 13 Rasterbogen (Zubehör) montieren ............16 Art. Nr.: 5090032019 Rev.: 00/2018-07-31... -
Page 3: Impressum
MIS 60D Impressum Copyright © 2018 by Hauff-Technik GmbH & Co. KG Abteilung: Technische Redaktion Robert-Bosch-Straße 9 89568 Hermaringen, GERMANY Tel. +49 7322 1333-0 +49 7322 1333-999 E-Mail office@hauff-technik.de Internet www.hauff-technik.de Die Vervielfältigung der Montageanleitung - auch auszugsweise - als Nachdruck, Fotoko- pie, auf elektronischem Datenträger oder irgendein anderers Verfahren bedarf unserer... -
Page 4: Allgemeines Und Verwendungszweck
Verwendung unserer Produkte, sowie deren Kombination mit Fremd- produkten für eventuell auftretende Folgeschäden, keinerlei Gewährleistung übernommen wird. MIS 60D ist für bestehende Gebäude mit Keller zur zuverlässigen Abdichtung von Micropipes/Glas- faserkabeln, Telekommunikationsleitungen oder Stromkabeln geeignet. Eine Aufnahme von bis zu 4 Kabeln mit Außendurchmesser 5 -7 mm bzw. -
Page 5: Symbolerklärung
MIS 60D • Bei Unfall oder Unwohlsein sofort Arzt hinzuziehen (wenn möglich das Etikett der Harzkartusche vorzeigen) • Verarbeitungstemperatur: +5°C bis +30°C; optimal: +15°C bis +25°C 4.1 Symbolerklärung Arbeitsschritte ► Folge/Resultat eines Arbeitsschrittes Bezugsnummerierung in Zeichnungen 4.2 Warnhinweise Warnhinweise sind in dieser Montageanweisung durch Symbole gekennzeichnet. Die Hinweise werden durch Signalworte eingeleitet, die das Ausmaß... -
Page 6: Personalanforderungen
MIS 60D Personalanforderungen 5.1 Qualifi kationen WARNUNG! Verletzungsgefahr bei unzureichender Qualifi kation! Unsachgemäßer Umgang kann zu erheblichen Personen- und Sachschäden führen. • Montage darf nur von qualifi zierten und geschulten Personen durchgeführt werden, welche diese Montageanweisung gelesen und verstanden haben. 5.2 Fachpersonal Fachpersonal ist aufgrund seiner fachlichen Ausbildung, Kenntnisse und Erfahrung sowie Kenntnis der einschlägigen Bestimmungen, Normen und Vorschriften in der Lage, die ihm übertragenen Arbeiten... -
Page 7: Lieferumfang
MIS 60D 6.3 Lieferumfang Zum Lieferumfang der MIS 60D (VPE = 10 Stück) für Wandstärken von 200 - 900 mm und 900 - 1200 mm gehören: 10 Stück MIS 60D 10 Stück Dichteinsatz 6 - 12, 12 - 18, 18 - 24, 24 - 30 oder 3 x 10 bzw.4 x 5 - 7 (vormontiert) 10 Stück Wandabschlussrosetten WAR 60... -
Page 8: Beschreibung Mis 60D
Harzeinfüllschlauch Mauerdurchführungsrohr Wandabschlussrosette WAR 60 Benötigtes Werkzeug und Hilfsmittel Für die ordnungsgemäße Installation der MIS 60D benötigen Sie neben dem üblichen Standard- werkzeug die folgenden Werkzeuge und Hilfsmittel: 1 Bohrgerät für Bohrung Ø 62 - 65 mm 1 Kartuschenpistole 1 Schnellspannvorrichtung MIS 60-SVS, wiederverwendbar, 1 Stück zu jeder VPE (= 10 Stück) enthalten... -
Page 9: Vor Der Montage Der Mauerdurchführung Sind Folgende Hinweise Zu Beachten
Gebäudeaußenseite enstehen, die durch Auffüttern mit Mörtel so egalisiert und verputzt werden müssen, bis wieder ein Durchmesser der Bohrung von 62 -65 mm erreicht ist. • Vor dem Einbau der MIS 60D müssen vorhandene Ausbrüche ( > 95 mm) der Wandoberfl äche bzw. im Anstrich, nach DIN 18533 wieder ordnungsgemäß hergestellt werden. - Page 10 MIS 60D Abb.: Einbausituation MIS 60D Legende zu Abb.: Einbausituation MIS 60D Max. Durchmesser der Ausbrüche Ø 95 mm (ggf. eine zweite Harzkartusche verwenden) Wandstärke 200 - 1200 mm (unterschiedliche Baulängen der MIS beachten!) Durchmesser Bohrung Ø 62-65 mm Gebäudeinnenseite Art.
-
Page 11: Montage Vorbereiten
MIS 60D 11 Montage vorbereiten HINWEIS! Keine Abdichtung durch unsachgemäße Mon- tage! Unsachgemäße Montage kann zu Sachschäden führen. • Für gemauerte Keller stehen Diamant-Bohrkronen für Trockenanwendungen (z.B. Fa. Hilti) zur Ver- fügung. Eine handgeführte Ausführung der Bohrung ist möglich. • Bei porösem oder brüchigem Mauermaterial können Ausbrüche oder Abplatzungen auf der... -
Page 12: Mis 60D Montieren
MIS 60D 12 MIS 60D montieren Danach Mauerdurchführung (MIS) von der Gebäudeau- ßenseite in Kernbohrung einführen. Dabei Harzeinfüllschlauch oben anordnen (siehe Abb.: Legende zu Abb.: 4 Harzinjektionsschlauch Abb.: 4 Schutzfolie vom Butylband des Gummiflansches abziehen und MIS bis an Außenwand schieben und leicht andrü- cken (siehe Abb.: 5). - Page 13 MIS 60D HINWEIS! Keine Abdichtung durch unsachgemäße Mon- tage! Unsachgemäße Montage kann zu Sachschäden führen. • Beim Anziehen der Schnellspannvorrichtung tritt auf der Gebäudeaußenseite das Butylband seitlich aus und dichtet zuverlässig ab! Abb.: 8 Den Harzeinfüllschlauch mit einem Seitenschneider auf Abb.: 9...
- Page 14 MIS 60D Kartusche in die Mischdüse einschrauben (siehe Abb.: 12). Abb.: 12 Bodendeckel der Harzkartusche entfernen (siehe Abb.: 13). Abb.: 13 Harzkartusche in Kartuschenpistole einlegen (siehe Abb.: 14). Mit gleichmäßigen Bewegungen an der Kartuschen- pistole das Harz komplett aus der Kartusche in die Mauerdurchführung injizieren.
- Page 15 MIS 60D Nach Ablauf der Aushärtezeit die Kartusche sowie die wiederverwendbare Schnellspannvorrichtung von der MIS entfernen (siehe Abb.: 16). Legende zu Abb.: 16 Entleerte Harzkartusche Schnellspannvorrichtung MIS 60-SVS Abb.: 16 Danach wird der Harzeinfüllschlauch mit Hilfe eines Sei- tenschneiders wandbündig abgetrennt (siehe Abb.: 17).
-
Page 16: Rasterbogen (Zubehör) Montieren
MIS 60D HINWEIS! Keine Abdichtung durch unsachgemäße Mon- tage! Unsachgemäße Montage kann zu Sachschäden führen. • Die einzuführenden Micropipes/Kabel müssen an den Dichtfl ächen unbeschädigt und sauber sein, da ansonsten die Dichtheit nicht gewährleistet werden kann! Um ein besseres Gleiten der Micropipes/Kabel zu gewährleisten, wird empfohlen, die Öffnungen des aus- gewählten Dichteinsatzes auf der Gebäudeaußenseite... - Page 17 MIS 60D Anschließend Rasterbogen in die Aufnahme bis Anschlag schieben (siehe Abb.: 22). HINWEIS! Keine Abdichtung durch unsachgemäße Mon- tage! Unsachgemäße Montage kann zu Sachschäden führen. Abb.: 22 • Die Mindestbiegeradien der Glasfaserkabel und Micropipes müssen beachtet werden! Micropipe/Kabel durch gestreckten Rasterbogen führen (siehe Abb.: 23).
- Page 18 10 The following instructions are to be observed prior to installation of the wall entry: ................... 25 11 Preparing for installation ............... 27 12 Mount MIS 60D ..................28 13 Installing the tubular guide elbow (auxiliary equipment) ....32 Art. Nr.: 5090032019...
-
Page 19: Publishing Notes
MIS 60D Publishing notes Copyright © 2018 by Hauff-Technik GmbH & Co. KG Dept.: Technical Editing Robert-Bosch-Straße 9 89568 Hermaringen, GERMANY Tel. +49 7322 1333-0 +49 7322 1333-999 E-mail office@hauff-technik.de Internet www.hauff-technik.de Reproduction of these assembly instruction – even in extracts – in the form of reprint, photocopy, on electronic data media or using any other method requires our written consent. -
Page 20: General Information And Intended Use
If there is a failure to observe the instructions and safety information set out here, this may result in significant hazards. When installing the MIS 60D it is imperative to observe the relevant professional association rules, the VDE provisions, the relevant national safety and accident prevention regulations and your com- pany’s guidelines (work and procedure instructions). -
Page 21: Explanation Of Symbols
MIS 60D 4.1 Explanation of symbols Work stages ► Effect/result of a work step Reference numerals in drawings 4.2 Warnings Warnings are indicated in these assembly instruction by means of symbols. The warnings are preceded by signal words which show the extent of the hazard. It is imperative to observe the warnings and act with care so as to avoid accidents, bodily harm and damage. -
Page 22: Personnel Requirements
MIS 60D Personnel requirements 5.1 Qualifi cations WARNING! Risk of injury in case of inadequate qualifi cation! Improper handling can result in signifi cant bodily harm and damage to property. • Installation may only be carried out by qualifi ed and trained individuals who have read and understood these instructions. 5.2 Skilled experts Based on their specialist training, skills, experience and familiarity with the relevant provisions, standards and regulations, skilled exper ts are able to carry out the worked assigned, independently identifying and avoiding potential hazards. -
Page 23: Scope Of Delivery
MIS 60D 6.3 Scope of delivery Zum Lieferumfang der MIS 60D (VPE = 10 Stück) für Wandstärken von 200 - 900 mm und 900 - 1200 mm gehören: 10 pieces MIS 60D 10 pieces Dichteinsatz 6 - 12, 12 - 18, 18 - 24, 24 - 30 oder 3 x 10 bzw.4 x 5 - 7 (vormon-... -
Page 24: Description Mis 60D
Wall rosette WAR 60 Required tool and auxiliaries For the correct installation of the MIS 60D, the following tools and aids are required in addition to the usual standard tools: 1 Drill for drill hole Ø 62 - 65 mm... -
Page 25: The Following Instructions Are To Be Observed Prior To Installation Of The Wall Entry
Risk of injury in the event of improper installation! Improper installation can result in signifi cant bodily harm and property damage. • MIS 60D installation must comply with the relevant professional association regulations, VDE provisions, national safety and accident prevention regulations as well as company regulations (work and procedural instructions). - Page 26 62 - 65 mm again. • Before installing the MIS 60D, any existing voids or spalling (> 95 mm) in the wall surface or paint must be properly restored according to DIN 18533.
-
Page 27: Preparing For Installation
MIS 60D 11 Preparing for installation NOTE! Failure to seal due to incorrect installation! Improper installation can result in damage. • Diamond core bits for dry cutting are available (e.g. from Hilti) for basements with masonry walls. Handheld drills can be used. -
Page 28: Mount Mis 60D
MIS 60D 12 Mount MIS 60D Then insert the wall entry (MIS) into the drilled hole from the outside of the building. Make sure that the resin filler hose is at the top (see fig.: Legend for fig.: 4 Resin filler hose Fig.: 4 Pull off the protective foil from the butyl tape of the rubber flange. Push the MIS up to the surface of the outside wall and lightly press onto the wall (see fig.: 5). - Page 29 MIS 60D NOTE! Failure to seal due to incorrect installation! Improper installation can result in damage. • As the quick tensioning device is tightened, the butyl tape on the outside of the building is squeezed and emerges around the edge to create a reliable seal! Fig.: 8...
- Page 30 MIS 60D Screw the cartridge into the mixing nozzle (see fi g.: 12). Fig.: 12 Remove the bottom cover of the resin cartridge (see fi g.: 13). Fig.: 13 Insert the resin cartridge into the cartridge gun (see fi g.: 14). Fully inject the resin out of the cartridge into the MIS using even movements on the cartridge gun. Legend for fi g.: 14 Resin cartridge Fig.: 14...
- Page 31 MIS 60D After the curing time the resin cartridge and the reusa- ble quick tensioning system must be removed (see fig.: 16). Legend for fig.: 16 Empty resin cartridge Quick tensioning device MIS 60-SVS Fig.: 16 Cut resin filling hose to length with a side cutter (see fig.: 17). Fig.: 17 The protruding part of the wall entry pipe must be cut off using a saw, so that it is flush with the wall (see fig.: 18).
-
Page 32: Installing The Tubular Guide Elbow (Auxiliary Equipment)
MIS 60D NOTE! Failure to seal due to incorrect installation! Improper installation can result in damage. • The micropipes/cables to be inserted must be clean and undamaged at the point where they pass through the seals; otherwise correct sealing cannot be guaranteed! - Page 33 MIS 60D Then push the tubular guide elbow into the adapter as far as it will go (see fi g.: 22). NOTE! Failure to seal due to incorrect installation! Improper installation can result in damage. • The minimum bending radiuses of the glass fi bre Fig.: 22 cables and micropipes must be observed! Keeping the tubular guide elbow straight, feed the micro- pipe/cable through it (see fi g.: 23).
- Page 34 10 Respecter les instructions suivantes avant le montage de la traversée de paroi : ................41 11 Préparer le montage................43 12 Monter le MIS 60D ................. 44 13 Monter le coude de guidage (accessoire) ..........48 Art. Nr.: 5090032019 Rev.: 00/2018-07-31...
-
Page 35: Mentions Légales
MIS 60D Mentions légales Copyright © 2018 de Hauff-Technik GmbH & Co. KG Département : Rédaction technique Robert-Bosch-Straße 9 89568 Hermaringen, ALLEMAGNE Tél. +49 7322 1333-0 +49 7322 1333-999 e-mail office@hauff-technik.de Site web www.hauff-technik.de La reproduction de ces instructions de montage - même des d'extraits - sous forme d'impres- sion papier, de photocopie, de fichier électronique ou tout autre support nécessite notre accord... -
Page 36: Informations Générales Et Utilisation Prévue
En cas de non-respect des consignes de manipulation et de sécurité fournies dans ces instructions, l'utilisateur s'expose à de graves dangers. Lors du montage du MIS 60D, respecter impérativement les réglementations de la fédération alle- mande des associations professionnelles, les directives de l'association professionnelle des électri- ciens allemands (VDE), les règles nationales en vigueur relatives à la sécurité et à la prévention des... -
Page 37: Signification Des Symboles
MIS 60D • Porter des gants de protection appropriés • En cas d’accident ou de malaise, consulter immédiatement un médecin (si possible, lui mon- trer l’étiquette de la cartouche de résine) • Température de traitement : de +5°C à +30°C ; de préférence : entre +15°C et +25°C 4.1 Signifi cation des symboles Étapes de travail ►... -
Page 38: Conseils Et Recommandations
MIS 60D 4.3 Conseils et recommandations ... fournissent des conseils et recommandations utiles, ainsi que des informations pour un montage réussi. Personnel requis 5.1 Qualifi cations AVERTISSEMENT ! Risque de blessure en cas de qualifi cation insuffi sante ! Une utilisation inappropriée peut entraîner des dommages corporels et matériels considérables. -
Page 39: Inspection Après Transport
• Les demandes de dédommagement peuvent être uniquement soumises dans les délais de réclamation applicables. 6.3 Contenu de la livraison La livraison du MIS 60D (unité d’emballage = 10 unités) pour des épaisseurs de mur de 200- 900 mm et 900-1 200 mm comprend : 10 unités MIS 60D 10 unités insert d’étanchement 6 - 12, 12 - 18, 18 - 24, 24 - 30 ou 3 x 10 et 4 x 5 - 7 (pré-... -
Page 40: Élimination Des Déchets
• Le matériel d'emballage doit être éliminé dans le respect des normes environnementales en vigueur. Description MIS 60D ill.: MIS 60D 30-34 Légende de l'illustration : MIS 60D 30-34 Passage 30 - 34 mm Bride extérieure Tuyau à membrane Ruban butyle Contre-palier Flexible de remplissage de résine... -
Page 41: Outils Et Auxiliaires Requis
MIS 60D Outils et auxiliaires requis Pour monter correctement le MIS 60D, outre des outils classiques, vous avez besoin des outils suivants : 1 p erceuse pour un perçage de Ø 62-65 mm 1 pistolet à cartouche 1 dispositif de serrage rapide MIS 60-SVS, réutilisable, 1 unité fournie par unité d’emballage (= 10 unités) - Page 42 • B ien compacter le sol et le bâti tubulaire avant de poser tuyaux ou câbles afi n d’empêcher toute chute de ces derniers. • Aucun produit à base de solvant ne doit être utilisé pour le nettoyage le MIS 60D. Nous recommandons le produit nettoyant pour câble KR M.T.X. • D‘autres accessoires et informations sont disponibles sous www.hauff-technik.
-
Page 43: Préparer Le Montage
MIS 60D 11 Préparer le montage REMARQUE ! Un montage non conforme ne garantit aucune étanchéité ! Un montage non conforme peut entraîner des dom- mages matériels. • Pour les caves maçonnées, des couronnes de forage diamantées destinées à des applications à sec (p. ex. de la société Hilti) sont disponibles. Une version pour un perçage guidé à la main est possible. • En cas de matériau mural poreux ou friable, des percées ou des fêlures peuvent apparaître sur... -
Page 44: Monter Le Mis 60D
être aspirée directement au niveau du trou de perçage. 12 Monter le MIS 60D Insérer le passage mural (MIS) depuis le côté extérieur du bâtiment dans le carottage. Placer le fl exible de remplissage de résine sur le dessus (voir ill.: 4). - Page 45 MIS 60D En serrant les deux vis horizontales jusqu’à la butée, le MIS est tendu contre la paroi extérieure (voir ill.: 7). REMARQUE ! Un montage non conforme ne garantit aucu- ne étanchéité ! Un montage non conforme peut entraîner des dom- mages matériels. • Lorsque l’on resserre le dispositif de serrage ra- pide, le ruban butyle ressort latéralement sur le...
- Page 46 MIS 60D Visser la cartouche dans la buse mélangeuse (voir ill.: 12). ill.: 12 Retirer le couvercle du fond de la cartouche de résine (voir ill.: 13). ill.: 13 Placer la cartouche de résine dans le pistolet à cartouche (voir ill.: 14). Injecter la totalité de la résine dans le passage mural en effectuant des mouvements uniformes avec le pistolet.
- Page 47 MIS 60D Une fois le temps de durcissement écoulé, retirer du MIS la cartouche ainsi que le dispositif de serrage rapide réutilisable (voir ill.: 16). Légende de l'illustration : 16 Cartouche de résine vidée Dispositif de serrage rapide MIS 60-SVS ill.: 16...
-
Page 48: Monter Le Coude De Guidage (Accessoire)
MIS 60D REMARQUE ! Un montage non conforme ne garantit aucu- ne étanchéité ! Un montage non conforme peut entraîner des dom- mages matériels. • Les microconduits/câbles doivent être intacts et propres au niveau des surfaces étanches, faute de quoi l’étanchéité ne peut pas être garantie ! Afi n de mieux faire coulisser les câbles et microconduits, il est recommandé de lubrifi er les ouvertures de l’insert... - Page 49 MIS 60D Enfoncer l’adaptateur du coude de guidage à fl eur de paroi dans le passage mural (voir ill.: 21). ill.: 21 Ensuite, glisser le coude de guidage dans l’adaptateur jusqu’à la butée (voir ill.: 22). REMARQUE ! Un montage non conforme ne garantit aucu- ne étanchéité ! Un montage non conforme peut entraîner des dom- ill.: 22...
- Page 50 Notizen / Notes / Remarques Art. Nr.: 5090032019 Rev.: 00/2018-07-31...
- Page 51 Notizen / Notes / Remarques Art. Nr.: 5090032019 Rev.: 00/2018-07-31...
- Page 52 Notizen / Notes / Remarques Art. Nr.: 5090032019 Rev.: 00/2018-07-31...
- Page 53 Notizen / Notes / Remarques Art. Nr.: 5090032019 Rev.: 00/2018-07-31...
- Page 54 Notizen / Notes / Remarques Art. Nr.: 5090032019 Rev.: 00/2018-07-31...
- Page 55 Notizen / Notes / Remarques Art. Nr.: 5090032019 Rev.: 00/2018-07-31...
- Page 56 Notizen / Notes / Remarques Art. Nr.: 5090032019 Rev.: 00/2018-07-31...
- Page 57 Notizen / Notes / Remarques Art. Nr.: 5090032019 Rev.: 00/2018-07-31...
- Page 58 Notizen / Notes / Remarques Art. Nr.: 5090032019 Rev.: 00/2018-07-31...
- Page 59 Notizen / Notes / Remarques Art. Nr.: 5090032019 Rev.: 00/2018-07-31...
- Page 60 Notizen / Notes / Remarques Art. Nr.: 5090032019 Rev.: 00/2018-07-31...
- Page 61 Notizen / Notes / Remarques Art. Nr.: 5090032019 Rev.: 00/2018-07-31...
- Page 62 Notizen / Notes / Remarques Art. Nr.: 5090032019 Rev.: 00/2018-07-31...
- Page 63 Notizen / Notes / Remarques Art. Nr.: 5090032019 Rev.: 00/2018-07-31...
- Page 64 Hauff-Technik GmbH & Co. KG Robert-Bosch-Straße 9 89568 Hermaringen, GERMANY Tel. +49 7322 1333-0 Fax +49 7322 1333-999 office @ hauff-technik.de www.hauff-technik.de...
Need help?
Do you have a question about the MIS 60D and is the answer not in the manual?
Questions and answers