Renishaw LP2 Installation And User Manual
Probe system
Hide thumbs
Also See for LP2:
- Installation and user manual (44 pages) ,
- Installation manual (41 pages)

Related Manuals for Renishaw LP2


Summary of Contents for Renishaw LP2
- Page 1 Installation and user’s guide H-2000-5021-06-A LP2 probe system English Français Deutsch Italiano...
- Page 3 Installation and user’s guide LP2 – LP2H – LP2DD – LP2H DD probes Hard-wired transmission English Manuel d’installation et d’utilisation Palpeurs LP2 – LP2H – LP2DD – LP2H DD à transmission inductive ou câblée Français Installations- und Benutzerhandbuch LP2 Messtaster mit induktiver oder Kabelübertragung...
- Page 4 This page is intentionally left blank...
- Page 5 English Installation and user’s guide LP2 – LP2H – LP2DD – LP2HDD probes...
- Page 6 © 2000-2015 Renishaw plc. All rights reserved. This document may not be copied or reproduced RENISHAW and the probe symbol used in the in whole or in part, or transferred to any other RENISHAW logo are registered trade marks of...
-
Page 7: Table Of Contents
Lathes (hard-wired transmission) .... 1-22 Introduction ............1-6 Stylus spring pressure adjustment – gauging force ..........1-23 LP2 probe types ..........1-7 Stylus on-centre adjustment with probe LP2 modular system ........1-8 holders and sockets ........1-24 LP2 probe moves ..........1-9 Stylus on-centre adjustment with shank Specification .......... -
Page 8: Preliminary Information
Unless otherwise specifically agreed in writing between you and Renishaw, if you purchased CNC machine the equipment from a Renishaw company, the warranty provisions contained in Renishaw’s CNC machine tools must always be operated by CONDITIONS OF SALE apply. - Page 9 CMMs, eye protection is recommended. Refer to the machine supplier’s operating instructions. The use of this symbol on Renishaw products The LP2 system must be installed by a competent person, observing relevant safety and/or accompanying documentation indicates precautions. Before starting work, ensure that the...
-
Page 10: Introduction
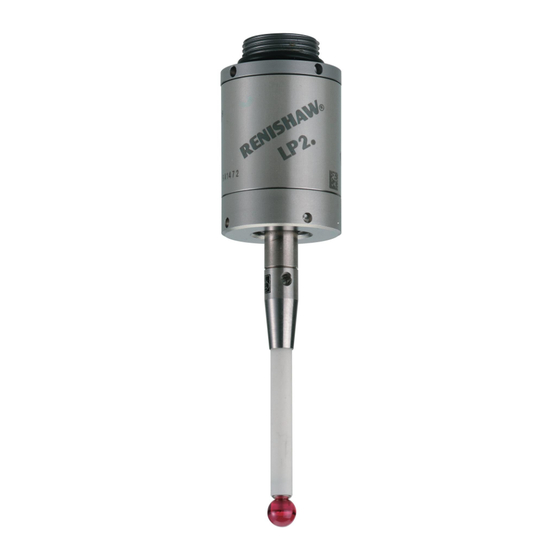
• Optical or radio – for lathes and machining centres. Easy installation, particularly in The LP2 is a compact and versatile probe for retrofit applications because there is no applications on CNC lathes and machining need for the prepared passageways required centres. -
Page 11: Lp2 Probe Types
Stylus spring pressure adjustment LP2DD probes are available as original equipment, Swarf deflector – essential for LP2DD or existing LP2 probes may be converted to the DD and LP2HDD when continually exposed standard using a conversion kit. to hot chips. -
Page 12: Lp2 Modular System
LP2 modular system M4 styli Hard-wired transmission MA2 probe Shank adaptor holder Stylus weak link Swarf deflector Shank Square holder LP2H LP2DD LP2HDD LPE extension bar MA 4 adapter Radio or optical receiver Transmission module... -
Page 13: Lp2 Probe Moves
LP2 probe moves Probe trigger A probe trigger signal is generated when the probe’s stylus is driven against a surface. The machine control records the contact position and instructs the machine motion to stop. Although high probing speeds are desirable, it is... - Page 14 1-10 LP2 probe moves (continued) System delays System delays are repeatable to less than 2 µs, and are constant in each direction in which measurement is taken. Delays are automatically compensated for, provided a calibration move is made in the same direction and at the same velocity as each measurement move.
-
Page 15: Specification
Specification 1-11 Variants LP2 / LP2DD LP2H / LP2HDD Principal application Workpiece inspection and job set-up on all sizes of lathes, machining centres and CNC grinders. Transmission type Hard-wired, or in conjunction with optical or radio transceiver modules Compatible Hard-wired... - Page 16 Note 3 These are the factory settings, manual adjustment of the LP2/LP2DD is possible, but the LP2H/LP2HDD is NOT adjustable. NOTE: For stylus recommendations, please refer to the Styli and accessories technical specification...
-
Page 17: Dimensions
Dimensions 1-13 LP2 – LP2H 20 (0.79) 7.5 (0.30) 12.5° 12.5° M4 stylus 6.5 (0.26) 40.8 (1.61) LP2DD – LP2HDD 20 (0.79) 4.5 (0.18) 15° 15° M4 stylus 6.5 (0.26) 40.8 (1.61) Dimensions given in mm (in) -
Page 18: Recommended Connection Diagram For Lp2 With Hsi Interface
1-14 Recommended connection diagram for LP2 with HSI interface HSI interface Standard connector (3 way) NOTES: Inner spring pin When connecting the Probe input + Outer spring pin LP2 probe to the HSI Probe input - interface, please use Screen... -
Page 19: Recommended Connection Diagram For Lp2 With Mi 8-4 Interface
Recommended connection diagram for LP2 with MI 8-4 interface 1-15 CNC controller MI 8-4 interface +Vdc from I/O supply A10 output + supply Skip input (G31) A11 probe status output (totem pole) A12 output - supply -Vdc from I/O supply... -
Page 20: Typical Lp2 Probe Systems
1-16 Typical LP2 probe systems Machining centres (radio transmission) CNC machine spindle Mounting bracket RMI-Q receiver Typical radio module machine control LP2 probe Cable Stylus Workpiece... -
Page 21: Machining Centres (Optical Transmission)
Typical LP2 probe systems 1-17 Machining centres (optical transmission) CNC machine spindle Mounting bracket Typical optical module OMI-2/ OMI-2T/OMI-2 H LP2 probe OMM-2 OSI interface unit Stylus CNC machine CNC machine Workpiece control control... -
Page 22: Machining Centres (Hard-Wired Transmission)
1-18 Typical LP2 probe systems Machining centres (hard-wired transmission) WARNING: The probe CNC machine should not be rotated spindle (spun) by the machine when the curly cable is connected. If this is allowed to occur, Shank adaptor then persons may be... -
Page 23: Machining Centres (Hard-Wired Transmission, Tool Setting)
Typical LP2 probe systems 1-19 Machining centres (hard-wired transmission, tool setting) machine control Square tip HSI or MI 8-4 stylus interface unit Cable Workpiece probe Cable... -
Page 24: Lathes (Radio Transmission)
1-20 Typical LP2 probe systems Lathes (radio transmission) machine RMI-Q receiver control Cable Typical radio module Workpiece Stylus probe... -
Page 25: Lathes (Optical Transmission)
Typical LP2 probe systems 1-21 Lathes (optical transmission) OSI interface machine unit control Mounting bracket OMM-2 Cable Cable OMI-2/OMI-2T/OMI-2H Typical optical module probe Workpiece Stylus... -
Page 26: Lathes (Hard-Wired Transmission)
1-22 Typical LP2 probe systems Lathes (hard-wired transmission) machine control HSI or MI 8-4 interface unit Cable Workpiece Cable Stylus probe... -
Page 27: Stylus Spring Pressure Adjustment - Gauging Force
Stylus trigger force is determined by the internal type, may cause probe repeatability to differ from spring pressure set by Renishaw. The user the calibration certificate results. should only adjust the spring pressure in special... -
Page 28: Stylus On-Centre Adjustment With Probe Holders And Sockets
1-24 Stylus on-centre adjustment with probe holders and sockets Stylus on-centre adjustment Stylus position is established using a setting gauge or dial test indicator. Lathes – inspection The stylus is set to the same height as the 4° spindle centre line to avoid errors when 4°... -
Page 29: Stylus On-Centre Adjustment With Shank Adaptor Or Shank
Stylus on-centre adjustment with shank adaptor or shank 1-25 Shank adaptor only – fit shank adaptor onto shank and tighten the shank screws. 2.0 mm Attach the MA2 to the shank or shank A/F ×4 adaptor. Tighten the two MA2 holding screws, then unscrew half a turn. -
Page 30: Screw Torque Values
Normal 10 Nm–12 Nm ■ (7.4 lbf. ft–8.9 lbf. ft) FS1 socket ▲ Maximum 20 Nm (14.8 lbf.ft) ❃ FS2 socket ● ❃ ● LP2 probe ● ■ ❃ ● ❃ ❃ ■ Extension ▲ ▲ Square holder ❃ ■... -
Page 31: Software Requirements
Does the software automatically adjust the NOTE: Probe cycles and features are machine program co-ordinate system to the relevant software dependent. For software for probing set-up feature on the component, for job routines is available from Renishaw. set-up purposes? -
Page 32: Service And Maintenance
Equipment requiring repair, overhaul or attention kits are available.) under warranty should be returned to your LP2 – LP2H – LP2DD – LP2HDD supplier. Once a month, remove the stylus front cap (the C spanner is provided for easy cap removal) then... - Page 33 Service and maintenance (continued) 1-29 LP2DD – LP2HDD LP2 – LP2H Weak link screw Stylus Stylus C spanner Cap (4 Nm [3.0 lbf.ft] approx) Swarf deflector Metal eyelid Cap (finger tight) Spring Wash clean Front O-ring Outer diaphragm Inner diaphragm...
-
Page 34: Fault-Finding
1-30 Fault-finding Symptom Cause Action Complete failure. Transmission modules not Align correctly. correctly aligned. Transmission modules Return to supplier for repair. damaged. For information on transmission, refer to the relevant installation guide. Swarf blocking inductive Clean out. transmission air gap. Loose mounting. - Page 35 Fault-finding (continued) 1-31 Symptom Cause Action Poor repeatability. Transmission modules not Align correctly. correctly aligned. Loose mounting. Check all bolts and screwed connections for tightness. Loose stylus. Tighten. Poor electrical connections. Check connectors. Excessive machine vibration. Tighten spring pressure. Spurious reading. Cable screen broken.
- Page 36 1-32 Parts list Type Part number Description A-2063-6098 LP2 probe complete with two C spanners and TK1 tool kit. LP2H A-2064-0002 LP2H probe complete with two C spanners and TK1 tool kit. MA2 holder A-2063-7868 MA2 probe holder, complete with holding screws.
- Page 37 HSI interface A-5500-1000 HSI probe system interface with DIN rail mounting and three terminal blocks, quick-start guide and packaging. Publications. These can be downloaded from our website at www.renishaw.com. H-2000-5021 Installation and user’s guide: LP2 probe system. MI 8-4 H-2000-5008 Installation and user’s guide: MI 8-4 interface.
- Page 39 Renishaw plc +44 (0)1453 524524 +44 (0)1453 524901 New Mills, Wotton-under-Edge, uk@renishaw.com Gloucestershire, GL12 8JR United Kingdom www.renishaw.com For worldwide contact details, visit www.renishaw.com/contact *H-2000-5021-06*...
Need help?
Do you have a question about the LP2 and is the answer not in the manual?
Questions and answers